Universal jack for headphones and microphone. Connecting a laptop microphone
IN lately Laptop manufacturers are increasingly following the fashion set by the smartphone market: instead of two separate audio jacks - for headphones and a microphone - they are installing a combined one. In some ways, this is logical: there are now a huge number of headsets on the market that users will willingly use for conversations on Skype or other services. And watching videos or listening to music in them is just as convenient.
However, this twist does cause some compatibility issues. It's not always possible to easily connect your headset to your computer, especially if it was made several years ago and has separate plugs for the microphone and headphones. But buying a new one is not always an option, especially if your headset is not a budget one.
How to connect headphones with a microphone to a computer so that they work?
Let's look at all possible combinations of computer connectors and headphone plugs.
1 plug, 1 connector

The situation is when you want to connect a headset from a smartphone to a laptop with one output. The simplest one: inserted it and it worked. Manufacturers specially make a combined output so that you can work with it so simply.
1 plug, 2 connectors

The smartphone headset must be connected to the computer, where the audio output is divided in the old fashioned way. In general, you have three options:
- Connect a headset to the headphone output and use the built-in microphone of your laptop or webcam. Of course, if you have another microphone.
- Connect a headset to the microphone input and use third-party headphones or speakers. Again, if you have them. In addition, these two options require setting up Skype or other conversation programs: you must separately select the sound source and microphone input.
- Use an adapter. Sometimes such adapters are included with headsets, especially expensive ones. They have two plugs and one input connector: sometimes they can be connected by wire, and sometimes they can be soldered into one housing (like an airplane adapter).
Before connecting headphones with a microphone to your laptop, check the functionality of the headset. Try using it for a conversation, for example, on a smartphone or tablet via Skype.
Two plugs, one connector

Again, you have two options for connecting headphones with a microphone to your computer even like this:
- Use the headset in only one capacity - headphones or microphone. The wiring of the standard headset allows you to work with it in both versions. And the second device will have to be connected separately or use the built-in one (webcam microphone or laptop speakers).
- Use a splitter adapter. As a rule, they cost about two or three dollars (especially if bought in foreign online stores). The splitter usually has two outputs with markings indicating which one to connect the microphone plug to and which one to connect the headphone plug to.
Two plugs, two connectors

Everything here is extremely simple, the main thing is to remember that the plug and headphone jack are usually colored green, and the microphone - pink.
Tips for all occasions
- After connecting, be sure to check for sound and input signal from the microphone. This can be done through the system Windows mixer(speaker icon in the lower right corner, in the tray). Right-click on the icon, select “Playback Devices” to check the headphones or “Recording Devices” to check the microphone. Opposite the device you need, a flashing green volume indicator is shown during operation. Make this device your default choice.
- Listen to your own voice in headphones and adjust (in the mixer) a comfortable microphone volume level.
- You can buy an external one for ridiculous money sound card and connect it via USB. Sound quality inexpensive cards it will be approximately the same as on the built-in one, but there are always separate microphone inputs and headphone outputs. Special drivers for such cards in Windows 7 or later are not needed.
And let's hope that laptop manufacturers will not follow the bad example of Apple and abandon wired connections in principle.
It is not always the case that a new headset connected to a computer starts working automatically after connecting the plug to the correct connector. Often, different OS require additional manipulations to activate the device. Let's look at how to set up a microphone on headphones and then check its functionality via Skype or another program.
Variety of plugs or correcting incorrect connections
Before buying headphones, check how many audio and microphone connectors are in your system unit. Modern computers and laptops have a combined jack, which transmits both signals through one input.

On old system units There are separate connectors for microphone and headphones. In such a situation, you need to purchase a headset with two plugs. They will be in different colors:
- pink or red – microphone;
- green – headphones.
Recommendations: How to set up headphones for high-quality sound reproduction  , How to properly set the equalizer (for headphones)
  How to make a microphone from headphones
They must be connected to the computer by color into the corresponding sockets. If you bought a headset with one wire, but the system unit needs a model with two, you can buy a special adapter. On one side it will have an input for a combination jack, on the other - two outputs with plugs of different colors. The cost of such a cord varies between 300 - 500 rubles.
Connection sequence and settings
When the headset is connected, you need to check if the sound and microphone are working. With the first option everything is simple, just turn on the music. The second one is a little more difficult. To check the functionality of the microphone, you can use:
1. A classic voice recorder that can be installed on any OS. Typically, in Windows, the program can be opened through: Start - Accessories - Voice Recorder. Start recording and find out if the sound works.
2. You can go to installed program Skype, find the sound test (Echo/Sound Test Service) and run it. However, in this case, the settings of Skype itself may be configured incorrectly.
3. Immediately go to the computer settings and check that the microphone is turned on.

Each OS has its own path to sound settings, but even users with basic PC knowledge should not encounter any difficulties.
How to enable microphone on headphones on Windows XP, 8, 8.1
The microphone activation procedure takes no more than 5 minutes. To do this, after turning on and checking the headset, if it does not work, do the following:
1. Find the sound image in the lower right corner, right-click on it and select “Playback Devices”.

2. The “Playback” subsection will open. Find “Speakers”, right-click and set “Set as default”. There, look for “Speaker Settings” and set “Stereo” in the configurations.
3. Returning to the subsection, find the “Record” column at the top. And do the same with “Microphone”, only instead of settings, select “Properties” and “Levels”, where you set the indicator to the maximum.

4. After such manipulations, check the operation of the headset in a way convenient for you.
If the accessory does not work, double-check that it is connected correctly. As well as the functionality of the device on another computer or mobile phone(if model with a combination plug). So, you can determine the serviceability of the headphone and microphone jacks themselves in the system unit.
Important! Setting the default settings and volume level are the same everywhere, only the search paths for the window to make changes are different.
Configuration via control panel for all Windows, including 10
The control panel is a window where shortcuts for settings of all the main functions of the computer are displayed, including sound and recording. To open it in Windows XP, 7 or 8, just click on the “Start” button and find the corresponding entry. Then, select “Sounds” and carry out the manipulations listed above.

Headphone wiring 
Structured differently Windows interface 10, where there is no usual “start”. To get to the settings, do:
- press Win+S to open the menu;
- find the image of the “house”;
- select Control Panel (desktop app);
- in the window that opens: Equipment and sound – sound.
This will take you to the necessary columns for configuration.
"Microphone not detected" error
Sometimes, in order to understand how to set up a microphone on headphones, you first need to “force” the computer to see it. To do this:
- go to the control panel and find “Device Manager”;
- look for the column “sound, gaming and video devices”;
- Find the microphone you need, right-click and select “Enable”.
After this, carry out all the manipulations described above and use the microphone in your headphones, if it is working.
Video material on the topic
To make it easier for you to understand the sequence of actions, watch the video about microphone settings on Windows 7.
Hello.
Quite a lot of questions always arise with the sound: sometimes it’s not there, sometimes it’s hard to hear, sometimes the connectors are not right to connect the plug, or something else...
In this article I would like to dwell on the issue of connection and configuration computer headphones with a microphone (approximately the same as in Fig. 1). After all, it’s quite difficult to imagine without them normal work on a PC: you won’t talk to friends and relatives on the Internet, you won’t listen to music or watch a movie in the evening (so as not to disturb anyone), etc.
- if you have too much quiet sound and you want to strengthen it:
- if you have no sound on your computer -

Fig.1. Headphones with microphone // as an example (not advertising!)
Types of connectors and plugs / adapters
The most common classic computer headphones with a microphone have two plugs: green and pink (see Fig. 2). Green is for transmitting a signal to the headphones, and pink is for the microphone.

Rice. 2. 2 plugs on classic computer headphones (they are also called mini-jack)
Actually, if you look at the back wall of the computer system unit, you will see 3 connectors (Fig. 3). Their colors are usually always standard: pink (for a microphone), blue (line-in for connecting audio devices), and green (line-out for headphones, speakers, etc.).
By the way, such connectors (as in Fig. 3) may not exist if you do not have an audio card installed on your PC. You can find out its model and determine whether it is installed from this article:

Rice. 3. Outputs on the back of the computer
Actually, if everything is so, you just need not to confuse the colors and connect the plugs to the right connectors. It's simple...
As for laptops, their connector is not always marked with a color: often the headphone or microphone icon is simply drawn. By the way, please note that on newer laptops - it occurs headset jack(see Fig. 4). Those. If there are 2 classic audio outputs, then when you are dealing with the headset jack, there is 1 (it has a characteristic icon, see the difference in Fig. 4)!
If you have classic computer headphones, and your laptop has just such a headset jack installed, you have several outputs:
- buy a special adapter (see Fig. 6). It is not expensive and is sold in many computer stores;
- buy a small audio card that connects to a USB port (there are also cheap options);
- you can buy new headset headphones (or swap with someone ☻);
- if you don't need a microphone, you can try connecting the green plug from the headphones to the headset jack. In most cases, headphones will work for you (although this is not recommended!).

By the way, please note that the plug on headset headphones has 4 pins (the plug on classic headphones has 3 pins). Even by this sign you can easily determine what kind of headphones you are buying...
Rice. 6. Adapter for connecting classic computer headphones to the headset jack (by the way, there are also reverse adapters to connect headset headphones to classic audio outputs)
Another article to help you!
One input for headphones and microphone in a laptop - how to connect them -
One more moment!
Expensive (most often studio) headphones have a Jack plug (on classic headphones Mini Jack). If you don’t have a Jack connector on your computer/laptop, you can buy a small adapter from Jack to Mini Jack (see Fig. 7) and easily use these “ears”...

Rice. 7. Plugs (Jack and Mini-Jack). Adapter
If you have one line output for headphones and speakers
Sometimes people ask me what to do if you need to connect both headphones and speakers to the computer, but it has only one line output (i.e. one audio jack) on the back wall of the system unit. I'll try to give a couple of recommendations on this matter.
1. Use audio output on speakers
Many speakers have special audio jacks for connecting headphones. When you connect headphones to them, the sound from the speakers will disappear. It may not be very convenient if the plug accidentally comes out of the socket (especially if it happens in the evening when everyone is sleeping ☻). Therefore, see the second option.
2. Buy a splitter (special adapter)
You can connect speakers and headphones in parallel to the audio connector (splitter, see screenshot below). Using a splitter, in my opinion, has its advantages:
- the sound goes to both speakers and headphones at the same time;
- if you don't need speakers, just turn them off (this way, even if the headphone plug falls out of the socket, there will be no noise from the speakers!);
- the price of the issue is a pittance...

3. Use the front panel on the system unit
On some system units, on the front panel, there are additional multimedia connectors (if there is no such panel, you can also get one; many service centers easily connect it). Actually, you can easily connect both headphones and a microphone to such a socket (and many other useful things ☻).
Checking drivers for an audio card
We will assume that we have dealt with the plugs and connectors directly, the “wires” are now connected ☻. The next step is to check and configure the drivers. And I must say that drivers sometimes cause quite a lot of problems with sound. Most often, there are simply no drivers, or they are not installed. current version, causing conflicts.
To see if the system has a driver for your audio card, open device Manager (to do this, press the WIN+R button combination and enter the command devmgmt.msc).

Rice. 8. How to open the device manager // WIN+R (Run window).

Rice. 9. Sound, gaming and video devices
If the yellow light is on next to your device exclamation mark- this means there is no driver in the system. By the way, usually those devices for which there are no drivers are located in the "Other devices" .

Rice. 10. There is no driver for the audio device! Needs to be updated!
How to install the driver for sound. Search for audio drivers (using Realtek as an example) -
Driver update programs -
How to install drivers on a computer, laptop -
Setting up Windows and audio driver. No sound in headphones
If the headphone plug is connected correctly (to the right connector), the drivers are installed, you should already have sound (even if it’s not of very high quality yet). If you have no sound at all, I also recommend that you read this article:
First thing to do- this is to check the volume control on the headphones themselves. Such a regulator is found on most computer ears (see Fig. 11).

Rice. 11. Turn the microphone on/off; increase/decrease volume
Then pay attention to the volume level: click on the sound icon in the tray. Often such a banal thing is the reason for the lack of sound ☻...

After this, I recommend that you also check the volume mixer (it is quite possible that you have the volume turned down in specific application). To open it, just right-click on the sound icon in the tray, select from the menu that appears "Volume Mixer", as in Fig. 13.

In the screenshot of the volume mixer in Fig. 14, for example, decreased system sounds(more precisely, even disabled). For initial testing and setup, I recommend moving all the sliders higher.

After that, open the control panel Windows partition "Equipment and Sound"(valid for Windows 7/8/10). In this section, open the “Sound” tab, see fig. 15.

In it, be sure to check that in front of your playback device there is green tick- i.e. it was selected by default!
Note: The default device for sound playback can be selected by Windows, which is generally disabled! And then there will be no sound! If you don’t know which device to set as the default for sound playback, try each one in turn, after turning on some song/movie...
To check the sound quality - select required device: Right-click on it and select "Check" from the menu. A short melody should sound first from one speaker, then from the second.

And one more thing!
Don't forget to check and set the sound settings in your audio drivers. You can open their settings using the tray icon (next to the clock, if there is an icon there), or in the control panel in the section "Equipment and Sound", as in Fig. 17.

Actually, the driver setup itself will depend on the specific manufacturer. It is quite difficult to give any specific recommendations here...
An example of such fine tuning of headphones is shown in Fig. 18: you can turn down the volume of the left or right ear, set the volume of headphones and microphone, check the operation of audio connectors, set the desired sound effect and much more...

Microphone check
Your interlocutor hears you poorly (or does not hear you at all), there is extraneous noise, hissing, etc. “charms” - and other problems may be due to the fact that fine tuning microphone in Windows and the conversation application you use (Skype, Viber, etc.).
In Windows, you can configure the microphone in the "Sound" tab (you can open it in the Control Panel, in the "Hardware and Sound" section). To set basic parameters, open the microphone properties, see fig. 19.

In general, I recently had an article on my blog about checking and setting up a microphone in Windows, so I won’t repeat it here (link to the article below).
How to check the microphone on headphones (it’s hard to hear me...) -
PS: additions in the comments are welcome...
Well, that’s all, quick and successful setup everyone.
Play games, listen to music, talk on Skype without disturbing others - all this is possible using headphones with a microphone. The gadget makes life much easier for the user of a PC or laptop.
Jacks and types of connecting headphones with a microphone
At the beginning of the article, I would like to clarify a little the situation with the connectors and sockets of headphones and a computer.
So, if you bought modern headphones with a built-in microphone, then most likely they will have a combination jack that will look like this:
Please note that this jack has three dark contact strips, two of them for headphones, right and left channels, and one for the microphone. This means that if your computer or laptop has a special combo jack, then you just need to connect the headset and everything will work. But, unfortunately, in cases with desktop computers, this is not always the case. In most cases, a computer has 2 jacks, one for headphones only (usually green) and the other only for a microphone (usually pink color).
This is what a regular headphone jack looks like without a microphone (only two contact strips): 
How to connect headphones with a combo jack to a desktop computer that does not have a combo jack? You will need a special adapter cord: 
In the case of a laptop, you will most likely have better luck, in modern models built-in combined sockets(note the icon - headphones with microphone), which look something like this: 
U desktop computers It’s convenient to connect the headset to the front panel; in my case it looks like this: 
It is difficult to make a mistake when connecting; all sockets have a corresponding icon. If your computer doesn’t have such sockets on the front panel, it doesn’t matter, there are definitely some on the back. If, of course, your computer has a sound card.
We connect and configure headphones to a PC running Windows XP, 7, 8, 8.1
There shouldn't be any difficulties when connecting. Everything is extremely simple - the “procedure” will take no more than 2 minutes.
The headphones have two connectors: one for the “ears” themselves (usually green), the other for the microphone (usually pink). Of course, there are models without a microphone (there is one connector), but basically all modern headphones come with a microphone. After all, voice communication via the Internet is becoming more popular than telephone communication.
You can connect the device using the front or rear panel, depending on where there are free inputs.
- Connect the ear connector. It is usually either green or has a headphone icon next to it;
- Connect the microphone jack. It is usually pink or has a microphone icon next to it;
- If you have a combination jack on your headphones and a corresponding jack on your computer, just connect and don’t need to do anything else;
- Turn on your favorite song or movie and check the sound. If there is sound, everything is fine. If not, then right-click on the speaker icon in the lower right corner of the monitor. Then select "Playback Devices":

- There will be several (or one) devices in the list, make sure that the “Speakers” device is selected and there is a green checkmark next to it:

- If not, select this device, right-click on it and select the "set as default" menu:

- Now select the speakers, and click on the “set up” button, which is located just below, then select the “stereo” sound channels, you can click on the “test” button, you should hear the sound from the channel that is displayed on the screen, and click “next” ":

- Check the box in the settings " full range speakers" in the "left and right front" position and click "next", and then "done":

- The speakers on the right have a scale, turn on the music, if when playing music the scale does not fill and there is no sound, then something is not working correctly:

- If the scale fills up but there is no sound, check the volume level. You can do this by left-clicking on the speaker icon in the lower right corner of the monitor:

If the volume is set, the scale is filling, but there is no sound, it means that either you inserted headphones into the wrong socket, or your headphones are faulty, check them on another device that definitely works;
We connect and configure a microphone to a PC running Windows XP, 7, 8, 8.1
- To check the microphone, connect it, click on the speaker icon, which is located in the lower right corner, right-click and select “recording devices” there:

- Select your microphone and make it your default device. Most likely, it will already be one, but it doesn’t hurt to check:

- A menu will appear where your microphone should be displayed. Check if you clap your hands next to it to see if the gauge is filling:

- If not, then right-click on the device and select “properties”:

- Then go to the “levels” tab, set the value to 80, check again:

If after this the scale does not fill, then you most likely connected the microphone to the wrong connector, or your microphone is not working. If it is full, then select this device “use as default” and use it.
The headphones work properly and make the owner happy. For the most effective use and configuration of the device and all sound in general, use the programs that come with your sound card, these are usually Realtek applications, but not always, so be careful.
Main features of the Realtek application:
- volume control;
- adjusting sound quality, microphone;
- Configuring front and rear panel connectors.
And many other nice additions.
We connect headphones to a laptop on Windows XP, 7, 8, 8.1
Laptops have only one connector for connecting headphones and, most likely, it will be a combined one. If not, no problem, because... Almost all laptops come with a built-in microphone.
The algorithm for connecting headphones to a laptop is exactly the same as to a computer; follow the instructions given just above:
- Connect the device;
- Checking the sound;
- You are using it.
Drivers for headphones and microphones are usually not needed.
The headphones and microphone are connected, all that remains is to configure the headphones to suit your needs.
- Adjust the microphone volume. Right-click on the speaker icon, select "recording devices", then right-click on the microphone, select "properties", then go to the "levels" tab. There is no need to set all values to maximum. You don’t want your interlocutor to hear only wheezing? Photos of the process are presented just above;
- Adjust the volume level in your ears to a comfortable level so that you can clearly hear the music or your interlocutor. However, keep in mind that it is best to adjust the volume based on the sound of the music on your computer. Quite often it happens that the interlocutor has incorrectly adjusted the microphone sensitivity level, and it will sound either quiet or loud, then, if circumstances permit, you need to tell your interlocutor about this. He must set the microphone correctly, because... if you adjust to it, you may forget that you changed the volume level, and then, when you turn on music or a movie, you may get very scared loud sound, or worry that the sound is very difficult to hear.
Connected. Set up. Now enjoy crystal clear sound.
Hello.
Lately, people sometimes ask me how to connect headphones with a microphone to a laptop that does not have a separate jack (input) for connecting a microphone...
As a rule, in this case the user is faced with a headset jack (combined). Thanks to this connector, manufacturers save space on laptop panels (and the number of wires). It differs from standard themes that the plug for connecting to it must have four contacts (and not three, as when connecting a microphone to a PC).
Let's consider this issue in more detail...
The laptop only has one headphone and microphone jack.
Take a close look at the laptop panel (usually on the left and right, on the side) - sometimes you come across laptops with a microphone output on the right side and a headphone output on the left...
By the way, if you pay attention to the icon next to the connector, you can clearly identify it. On the new combo jacks, the icon is "headphones with microphone (and is usually just black, not marked with any colors)."
Regular connectors for connecting headphones and a microphone (pink - microphone, green - headphones).
Headset jack for connecting headphones with microphone
The connection plug itself looks like this (see picture below). It has four contacts (not three, like on regular headphones, which everyone is already used to...).
Plug for connecting headset headphones with microphone.
It's important to note that some older headsets (eg Nokia, released before 2012) had a slightly different standard and therefore may not work in new laptops (released after 2012)!
How to connect regular headphones with a microphone to the combo jack
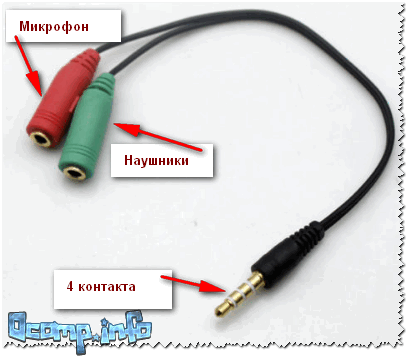
1) Option 1 - adapter
The best and most cheap option- This is to buy an adapter to connect ordinary computer headphones with a microphone to the headset jack. It costs between 150-300 rubles (as of the day this article was written).
Its advantages are obvious: it takes up little space, does not create confusion with wires, and is a very cheap option.
Adapter for connecting regular headphones to the headset jack.
Important: when purchasing such an adapter, pay attention to one thing - it must have one connector for connecting a microphone, the other for headphones (pink + green). The fact is that there are very similar splitters designed to connect two pairs of headphones to a PC.
2) Option 2 - external sound card
This option is suitable for those who also have problems with their sound card (or are not satisfied with the quality of the reproduced sound). A modern external sound card provides very, very decent sound in an extremely small size.
It is a device whose dimensions are sometimes no larger than a flash drive! But you can connect headphones and a microphone to it.
Advantages: sound quality, quick connection/disconnection, will help in case of problems with the laptop sound card.
Cons: the cost is 3-7 times higher than when buying a regular adapter; there will be an extra “flash drive” in the USB port.
3) Option 3 - connect directly
In most cases, if you plug a plug from regular headphones into the combo jack, they will work (it is important to note that the headphones will work, but the microphone will not!). True, I don’t recommend doing this; it’s better to buy an adapter.
Which headphones are suitable for the headset jack?
When purchasing, you only need to pay attention to one thing - the plug for connecting them to your laptop (computer). As mentioned in the article above, there are several types of plugs: with three and four contacts.
For a combined connector, you need to take headphones with a plug with four contacts (see screenshot below).
Plugs and connectors
Headphones with microphone (note: the plug has 4 pins!)
How to connect headphones with a combo plug to a regular computer/laptop
For such a task, there are also separate adapters (the cost is around the same 150-300 rubles). By the way, pay attention that the plugs of such a connector have a designation indicating which plug is for headphones and which is for a microphone. I once came across such Chinese adapters, where there was no such designation and I had to literally re-connect the headphones to the PC “by trial and error”...
That's all, good sound everyone!