Where is Vold fstab located? We get a list of available storage devices
The capabilities of the device can be seriously expanded if you replace internal memory Android to memory card. This will allow you to install on a tablet or other gadget much more more apps, but the main requirement to perform this update is to have root rights on the device. Let's look at ways to use an SD card as system memory device, as well as related conditions.
Risks and conditions for replacing the gadget’s internal memory with an SD card
Before repeating the steps below, the user should consider several important points:
- The lifespan of the SD card will be greatly reduced due to frequent read/write cycles when running applications.
- The speed of the gadget may drop noticeably if you use a low-end MicroSD card.
- If you make a mistake when editing a system file, the phone may not boot next time - you will have to reflash it.
In general, the procedure (especially for inexperienced users) is quite risky, so it makes sense to carry it out exclusively for old gadgets with a small amount of their own memory.
Using the Root Browser utility and editing the vold.fstab file
To swap memory, from Google Play You will need to install Root Browser.
Let us repeat that you can only fully work with it on rooted devices. After running the above application:

IN Android sdcard stands for internal memory and extsd stands for external memory, i.e. SD card. By replacing these lines, we actually swapped these types of memory. On some systems these pieces of code may look different, for example like this:
They need to be replaced as follows:
After completing the described procedure, reboot the gadget. Before doing this, be sure to check that there are no errors in the modified code, so that in the future there will be no need to reflash it.
The second way to increase memory using Link2SD

The application is available in Play Market and only works on devices with root rights. This file manager does not physically replace the internal memory of the device external storage, but it is capable of transferring any utilities to an SD card, significantly saving the gadget’s resources.
The peculiarity of the application in question is that the MicroSD itself will have to be split and properly formatted. Therefore, copy everything valuable from your card to your computer and start dividing the drive into sections.
Dividing the device card into sections if there is a custom Recovery
Every Android device has a recovery mode, but the method described below is only suitable for devices with . If you've never heard of CWM, move on to the second drive partitioning option. Next, we’ll tell you how to solve the problem if your device recovery mode has the Partition SD Card item:

Partitioning a MicroSD card via a computer
Connect the card to your laptop or PC. To do this, you can use a card reader or other equipment, the main thing is that it must be defined as a drive and not an MTP media device. Next:

Continuing the topic of flashing firmware for devices based on the Rockchip 2926 chipset, let's talk about the abuse of the tablet made by Prestigio, namely about the multireader with the designation 5274 B. This device appearance And technical specifications not much different from the previous hero of the day, Enot E102, so detailed description you won't find it here. As always with Prestigio, the frankly Chinese origin of the device is masterfully enhanced by well-thought-out firmware - there is nothing superfluous in it and everything you need for the first time works out of the box. That is, ICQKontakte clients, readers and video players exist and do not require thoughtful configuration after the first turn on. Tablets based on the 2926 chipset will become widespread in the coming months, replacing outdated components such as the Allwinner A13 in the niche of budget Android devices. The limitations of the cheap device remain the same as the others - 4 GB of memory, barbarically divided into two halves, and a memory card that works as a media content warehouse, not used for application cache. When will firmware developers remember that memory cards are now very, very cheap and early aspirations to ensure the tablet can work without a card in these conditions look, at the very least, anachronistic. Why not equip devices with at least two-gigabit cards, leaving them in the firmware like sdcard, and not a crooked external_sd, without forcing users to look for ways to correct the injustice by unconventional means?
However, the topic of loyalty to users and turning your face to them rather than your seat is vast and does not have a place here. We are starting execution work on the reader, making it more convenient in everyday life. Let's start with getting Root. To make this case extremely successful, download the archive ( https://www.dropbox.com/s/rhsvca9epfv53ld/ROOT_icood70pro.zip), unpack it to drive C, without Russian characters in the path (this way we avoid mistakes). In the tablet, put a tick “ unknown sources", "USB debugging" and connect it to the computer. In the unpacked folder we find Root.bat and run it. We are waiting for the tablet to reboot with the appearance of supersu among the installed variety. We need to launch this application, agree to update the binaries and reboot the tablet again. That's it, administrator rights are available - now you can edit system files, remove unnecessary things, add stuff. If your device does not want to get Root, there is method 2. Uncheck USB debugging in the device settings. Install PdaNet ( http://pdanet.co/a/), choosing to install other drivers. Install UnlockRoot ( http://yadi.sk/d/awamSlwP2mpgQ). Return the check mark to its place. Launch UnlockRoot and click Root. After it finishes working, restart the tablet and update SuperSu.

If you have a memory card and you are not satisfied with the position of the firmware developers, you need to edit vold.fstab. Install Root Explorer versions 2.21 or higher (the previous ones work crookedly with 4.1.1). Quickly agree to the request to allow him access anywhere. Now download the modified vold.fstab ( http://yadi.sk/d/P-SKlRTG4t2Vu), replacing the card and partition of the internal memory, transfer it to the memory card. Rename it by removing the 1 from the name. Through Root Explorer find this file, long tap on it (press if anyone doesn’t like anglicisms) and click copy. Now find the etc directory. Above the directory you will find a mount RW button. Click on it. At the bottom of the program window, click “paste”. The tablet will ask whether to replace the file with your custom one. Agree. Long press on the replaced file to bring up a submenu where you select “permissions”. You see in front of you a square with three windows in a row. Check the boxes exactly as in the screenshot and apply the selection. All that remains is to exit the program, restart the tablet and leave it to boot. Depending on the type and quality of the memory card (class 10 from a normal one is best, not a name from the manufacturer), the tablet will boot from 5 minutes to half an hour. If everything went well, then you will find an updated “memory” section, where the card is finally seen like an Sdcard and applications for transferring cache and programs to microSD see it.
Installation recovery CWM is associated with a high risk of killing the bootloader - try not to do it unless you have a strong desire to experiment or need to install custom firmware based on 4.2.2. At the time of writing this text was not found, so in at the moment CWM installation on Prestigio MultiReader 5274 has only theoretical benefit. So, download CWM(). Its installation can be done in several ways. The most correct and almost safe way is to rename the archive to update.zip and respond positively to the tablet’s request to reboot. Now you can enter recovery simply and elegantly by holding down the volume up and power button. When the green robot appears, release the buttons, hold down the sound + and press the power button once. The CWM recovery menu, known to almost everyone, will appear, where everything is available - from mounting partitions to backups and flashing Zen. It is convenient to reboot into recovery and through the Goo Manager application from the market. Other ways to implement CWM at the moment too often ruin the device and I won’t talk about them. Suffice it to say that the installation takes place via adb shell, which will help you look for approximate instructions on how to do this and blame someone else for a non-working device.
And the last thing for today. If this happened and as a result of some unforeseen circumstances (for example, installing CWM recovery) or the incorrect location of the stars in the sky, the tablet refused to work, then we will try to return it to the world of the living by flashing it. Due to the complete identity of the flashing instructions with the previous patient, Enot E102, read about it. I see no reason to repeat it, since the only difference is in the file that you will implement. The firmware image is on the official website ( http://www.prestigio.com/catalogue/MultiReaders/MultiReader_5274/PER5274B#/product-support/firmware ). There is also the program itself.
Remember, by carrying out all sorts of flashing experiments, you can completely lose your warranty and be left without a working device on Android. Therefore, attentiveness, attentiveness and the same word again. On this note full of optimism, let me take my leave. Soon we will meet again, discussing, scolding and re-programming something else.
Almost every application on Android is installed in the internal memory of the device. But it’s not rubber, so it tends to fill up. So any user can face this situation. On help will come SD card, the volume of which can reach tens or even hundreds of GB. Now we will tell you in detail how to transfer the application and cache to an SD card.
It is also worth noting that not every the card will do for the procedure for replacing internal memory with external memory. It's all about the speed classes of SD cards, which vary from slow (C2 and C4) to fast (C10 and C16). If the procedures discussed below are performed on slow SD, then the data transfer will affect the overall performance of the device, therefore it is recommended to use only fast flash drives.
There are not so many ways to replace internal memory with external memory, so we will focus only on the most effective ones, and they will be described sequentially: from simple to more complex.
Cache transfer for Android versions 4.0+
It is worth noting that this method does not require ROOT rights, but is not suitable for all applications. So, if the application description does not the necessary buttons, you shouldn’t be upset, because it was the most easy way. For even greater ease, you can use a utility or similar, where all applications are conveniently structured, which speeds up the search for the ones you need.
ATTENTION! The methods presented below can only be used on devices with RUT rights. All further operations are done at your own peril and risk; no one gives a 100% guarantee that in case of failure you will not receive a brick. We also do not accept any responsibility for the loss of personal data.
Transfer using third-party programs
If the application does not support standard data transfer, then you can do it forcibly using third party utilities, such as:
The principle of operation of these programs is very similar, so let’s consider the method using Link2SD as an example. 
This method, unlike the next one, does not require special knowledge from the user, except for basic concepts about Root rights.
Complete transfer of Android applications to SD memory card
An attentive user was able to notice that Link2SD and other similar utilities have interesting feature"Exile." With its help, not individual parts of the program are transferred, as in the previous paragraphs, but absolutely all data. In this case, the program will consider that it is working in the internal memory of the device, which for some of them is an important condition normal performance.
To implement this method, the SD card must be “split” into two sections, after which all data will be deleted from it, so be careful and do backup copy important information.
Partitions on a memory card can be made like on a computer, using programs such as Paragon Hard Disk Manager 12 Server or MiniTool Partition Wizard Home Edition. But this is a rather labor-intensive process, and therefore we will do everything right on the smartphone, using.
- Download and install the utility.
- In the device settings we find the “Memory” section, where we click “Eject SD”.

- We go directly to AParted and in the first tab Create, click ADD twice.

- In Part 1 we leave Fat32, and in Part 2 we select ext2 or any other format, if you know what they are needed for.
- Make sure that the Format field is checked and select the required memory size for each partition. In this case, Part 1 will remain our standard “flash drive”, but Part 2 will be referenced by applications.
- Click APPLY and confirm the action.

- We patiently wait for the process to complete.

Now applications and games can be safely linked to the second section of the memory card using the corresponding Link2SD function or its equivalent.
Transferring cache to a flash drive
This method is useful for users who like games with a large cache. Now many major projects(for example, a series of games) occupy several gigabytes. The same goes for navigation maps. Not all devices can boast this amount of built-in memory, so FolderMount comes to the rescue. It allows you to create virtual folders so that the system still thinks that the application data is in the internal memory, although in fact all the files are located on the flash drive.
- We install.
- Launch and grant Superuser rights.
- Open the pull-out menu on the left side of the screen.

- Go to “Application Analyzer”, look for the game you want and click on it.

- In the window that opens, we see the volume that is occupied separately by the application data and its cache.
- Click the “Create pair” button next to the cache size.

- Answer the question “Yes” and click the checkmark at the top of the screen, after which you must answer “Yes” again.

- You will be able to see the process of file transfer in the notification bar.
- As soon as the transfer is complete (reaches 100%), open the pull-out menu again and select “List of pairs.”
- All that remains is to press the switch next to the name of the game you transferred.

Replacing internal memory with external memory
This method allows you to deceive the system, i.e. Android will consider the SD card to be the device’s memory. One of the main advantages is the fact that all applications will be automatically installed on the flash drive. Ideal for devices with very little internal memory. To implement this you will need a file manager, it is best to use Total Commander. The point of the method is to swap the paths to the device memory and the flash drive.
- Install
- Click on the file, then “Edit”.

- The file contains many lines that begin with # (the hash character). But we need a line that starts with the words “dev_mount” and without (!!!) a hash at the beginning.
There should be 2 such lines: the first indicates internal memory, the second - external.For example, if your lines are:
dev_mount sdcard/mnt/sdcard
dev_mount extsd/mnt/extsdThen they should become:
dev_mount sdcard/mnt/extsd
dev_mount extsd/mnt/sdcardThat is, the most important thing is to swap the words after /mnt/.

- You don’t need to change anything else, click the “Save” button (floppy disk icon).
- Reboot the device.
Let me make a reservation right away that we are not talking about programs like link2sd. The principle is similar, but we will link not program directories, but the data directories of these programs, for example /sdcard2/Navigon -> /sdcard/Navigon or /mnt/extSdCard/Books -> /sdcard/Books, etc.
In addition, we need root (where would we be without it). By the way, after I found out about this program, this is another argument for me for root.
Many owners of Android smartphones or tablets with small built-in memory have probably encountered the following problem: a large SD card is inserted (for example, 16, 32 or even 64 GB), but after installing several heavyweight programs, our device or another program boldly declares that there is no memory on the card. enough space. Sometimes the program itself is small, but after installation it goes online and pulls gigabytes of data onto your smartphone.
Once again, having received the message “No space” and looking at the card, we see that it is almost empty, but the internal memory of the device is filled to capacity.
This is because internal memory is often used as the default directory for many programs. The fact is that it is mounted as /sdcard, which historically has always been an external SD card (it used to be the case on all smartphones). The external SD card is mounted in this case as /sdcard2, /mnt/sdcard2, /mnt/extSdCard or even /sdcard/.externalSD. As I understand it, this is done by the manufacturers so that the device works out of the box, i.e. no SD card at all.
Many “unscrupulous” programs always want to read/write data from/to the /sdcard/NameInsert directory. Rarely can this be changed in the program settings.
As a result, we have what we have, and several opportunities to improve the current situation:
The last two methods are also not a panacea, because... require certain skills from the user, in addition, they are not “clean” enough, for example, problems are known when connecting a smartphone to a computer via USB (cannot be unmounted), etc.
The DirectoryBind program will help correct the situation, which good man slig from xda wrote for himself and posted it on the forum for public use.
QR code
Although the audience here is technically savvy, a couple of explanations need to be made for inexperienced readers of the habr. As he himself wrote ( program not idiot-proof), i.e. unlikely to pass the fool test.
After installation, run the program (the first time, of course, we permanently allow Root rights), click the menu then “Preferences” and set the default paths to external memory“Default data path” for example /sdcard/external_sd/ and internal memory “Default target path” /sdcard/. We exit the menu.
Click menu, then “Add new entry” 
Now let's create new connection directories, for example, move the CamScanner folder to an external card. Long pressing on the folder path opens a small built-in file manager where you can create and/or select a folder. The folder on the external card should be created (and empty). 
By checking the “Transfer files from target to data” checkbox, files and folders will be transferred from the /sdcard/CamScanner/ directory to the /sdcard/external_sd/CamScanner directory. 
It should be noted that connections are not automatically activated after creation (gray floppy disk icon, as in the screenshot below for gameloft). To complete linking folders, select the checkboxes necessary connections and click menu -> “Bind checked”. The active (linked) folder icons should turn green. 
By the way, if you want to attach the entire external card, I fully recommend doing it not with /sdcard/externalSD/, but with a dot in front /sdcard/.externalSD/. This will save you from such troubles as double thumbnails in galleries, etc. True, it will not help for all galleries and players, because... some also search for media in hidden directories.
After suffering, I decided for myself to link only individual directories.
UPD. By the way, an external SD card is much slower than the internal memory, so transferring program data to an external SD naturally slows down the operation of this program. This should be especially remembered by those who decide to completely change the mount points of internal and external memory, because... Chances are your entire device will run slower than before.
I hope this program will complement your piggy bank. useful utilities for android devices.
If you decide to swap internal and external memory, i.e. reassign the external sd card to /sdcard and there is no such option in the device settings - if you have root, this can be easily done by performing the following operation:
In Root-Explorer we mount "/etc" as R/W (if R/O), find the file "/etc/vold.fstab", save a copy and open (long click) it in the Text Editor.
In the next two lines we change the names of the mount points: dev_mount sdcard /mnt/sdcard emmc@fat /devices/platform/goldfish_mmc.0 ... dev_mount sdcard /mnt/external_sd auto /devices/platform/goldfish_mmc.1 ... to dev_mount sdcard /mnt/external_sd emmc@fat /devices/platform/goldfish_mmc.0 ... dev_mount sdcard /mnt/sdcard auto /devices/platform/goldfish_mmc.1 ...
You can read more. They also suggest, as an alternative, to use another interesting program Root External 2 Internal SD.
I will add that in both cases, before switching, you need to copy the entire contents of the /sdcard folder to an external SD card.
Remember that after the switch, your entire system may work better than before.
Be careful- you need to understand that everything you do as root is done at your own peril and risk, and for example, saving the wrong “vold.fstab” can lead to the inability to boot the device and for treatment you will need to boot into recovery and edit “vold.fstab” already there.
This method can be used in conjunction with DirectoryBind, only now it’s the other way around: “Default target path” (/sdcard) and all connections created in DirectoryBind will point to an external card.
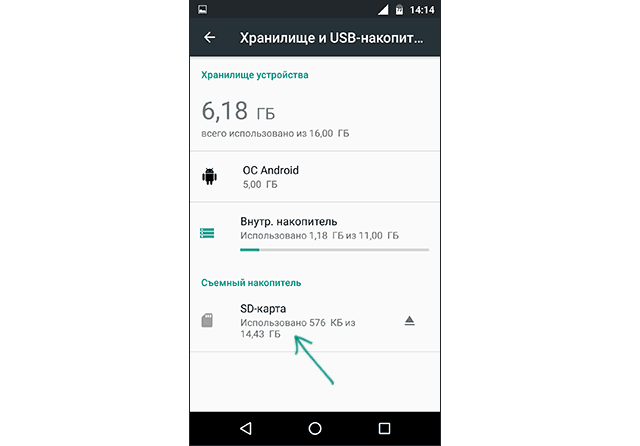
If your device does not have enough internal memory, can use SD card as internal storage for your Android phone. This function, called Adoptable Storage, allows Android OS to format external media data as permanent internal storage. The information on the installed SD card is encrypted and cannot be subsequently used on another device.
SD Card is very convenient option for storing photos, songs and videos. Even if you have a large amount of internal memory on your Android smartphone, you may always need a large chunk of memory to store long videos. filmed by camera high resolution your phone.
Important to know
There is one drawback, the SD chip can lag when recording high-definition video.
Android by default in the internal memory and only occasionally uploads data to the SD card. Thus, you are deprived of installing any additional applications if there is a noticeable lack of volume on your phone internal storage, for example, in the case budget devices on Android One.
What is storage storage?
Storage storage is the main memory of your smartphone, but if necessary, it can be expanded using an SD card. This on Android it is called Adoptable Storage. This will allow you to use a removable microSD card installed on Android phone,as the main storage. This way, you can easily solve the problem of how to make an SD card the main memory on Android and overcome the lack of space if the phone has a small internal volume.
Features of using the card as the main storage
There are a number of important features that should be taken into account during this procedure.
Will be useful
When using a storage device, be it an SD flash drive or a USB drive, it is important to remember what format the device is in and whether it supports it operating system Android, and the main ones file formats There are four types: FAT32 or exFAT, ext4 or f2fs.
How to change phone memory to android memory card? The question is not entirely correct, it is impossible to completely replace it, you can only “increase” additional volume.
Using your SD card as your main storage can be a great solution for music lovers and those who like to watch TV shows on the way to work or on a long trip. But, as often happens, memory expansion always depends on the cost of the required device, after all, they differ both in speed and in volume, as well as in the adaptable information storage function. Here are some nuances that you can consider with different sides– both negatively and positively:
How to use SD card as internal memory on Android?
How to replace the phone's internal memory with an external SD card on Android? Configuring your SD card to act as internal storage on Android is essentially a fairly simple process. There is nothing complicated about this and you will see for yourself later.
It is possible that the Adoptable Storage feature is not supported by your device, even if the smartphone is running Android control 6.0 and higher (this also happens, it all depends on the model and brand of the smartphone). The device manufacturer may have disabled this function. However, there are methods to use command line, which allow you to force the use of a flash drive to store data.
Below are the basic formatting steps.
On the next screen you have one last chance to decide for yourself if you want to change your mind

Important to know
Don't forget to back up your data; after formatting, the information will disappear without a trace!

Once the formatting process is complete, you can use the removable SD card as a “temporary” or “removable” permanent location. But keep in mind that hot swapping and ejecting will no longer be available as you may have previously done. That's why Do not remove the flash drive without using the Eject parameter. In addition, you can practically delete the place accepted by the operating system, which, accordingly, is not recommended, since this can cause certain errors in the operation of the device. Now you know how to make a memory card the main memory on Android.