Burning discs from ISO images. How to burn an iso image to disk in windows without using programs
In the era high-speed Internet need for installation disks for programs faded into the background. However, there are many situations where an installation DVD can be useful. For example, you can burn an ISO image the desired program or your favorite game, and store it in a safe place. If you need to reinstall the system, you don’t need to download anything. Windows installation- another striking example. And in order to create installation media, you need to know how or disk.
General information
If you've ever done bootable flash drives, then you should know that it’s easy to throw necessary files not enough for the media. Need help special programs(or mark sectors manually if you are good at console commands).
In the case of disks, the situation is similar. You can't just insert it into the drive, open the directory in Explorer, and burn the image to disk. You need to use special programs for “burning” (this is what is called recording a disk image onto a blank DVD).
Windows Standard Tools
In the operating room Windows system The developers have created a special built-in utility with which you can easily burn ISO. You just need to double-click on the image file in Explorer. 
After this, a small window will open called “Windows Disc Image Burner”. The file in it has already been selected, all that remains is to specify the drive. Insert the DVD and select its location in the drop-down list. Click “Burn” to start burning. 
You can also check the box next to “Check after recording”. In this case, upon completion of the process, the application will compare the recorded file with the original one. If any problems arise, the utility will notify you about them.
Pay attention! With this method, you can only burn images to discs. With flash drives this utility doesn't know how to work.
ImgBurn
A very popular utility for working with disks. ImgBurn allows you to create ISO files by reading information from ready-made CDs and DVDs, as well as burn them to new media.
The application is distributed absolutely free of charge. You can download it from the official website of the developer without fear of getting a virus:

Ashampoo Burning Studio
Ashampoo is a fairly large company that develops software. One of the developer utilities is Burning Studio– has a simple free version, quite convenient to use.
Tell an aged beginner how to burn iso image to disk, I read your article about ESET NOD32 today, you interested me very much, it turns out you can check your operating system for viruses for free with good antivirus programs. I downloaded the disk image from the official ESET website, it is in iso format, according to your article, it needs to be burned to disk using the free Ashampoo Burning Studio program, but something doesn’t work for me. I asked my question on the first forum I came across on the Internet, they answered me like this, it’s a shame to say, what then to do with mutual assistance and so on, maybe you have instructions somewhere on the website, tell me?
How to burn an iso image to disk
Many advanced users believe that installing the Windows operating system is very simple, and even easier to install different programs, search for viruses, and so on. But for some reason it doesn’t occur to them that there are people next to us ordinary people, who are sometimes simply afraid to approach the computer, and our inconsistent attitude towards them further aggravates the situation. It is very easy to offend a person, but it is very difficult to return his favor, so let's help each other and be more tolerant.
Burn the iso image to disk, as well as copy discs yourself, you can very simply excellent free programs, I personally have the impression that the Ashampoo Burning Studio program, as well as ImgBurn, is very easy to do and is just right for a beginner. Step by step burn the iso image to disk using a tool built into the Windows 7 operating system, which many beginners do not know about, as well as the Ashampoo Burning Studio and ImgBurn programs.
We right-click on the downloaded image, located for example on our desktop and select from the menu that opens Burn disk image,
insert a blank disc into the drive and click Burn, it happens burning an image to disk, that's all, now let's move on to third-party programs.

https://www.ashampoo.com/en/usd/fdl

The installer is only 16 MB, downloads in seconds wherever we specify, for example, directly to the desktop.

If you wish, you can select the Russian language on the site, that’s all. We launch the program installer, then as usual.

We accept the agreement. And in this place, as our attentive user Alexander correctly noted, to prefer custom installation and uncheck all the boxes, since the toolbar and search from MyAshampoo are certainly not needed by everyone.

Finish.

Launch the program, select Create/burn disk image->Burn CD/DVD/Bly-ray disc from disk image.

In this window, click Browse.


Insert a blank disc into the drive.

Click Burn CD, one minute and our image downloaded from the Internet is burned onto a CD or DVD.

How to burn an iso image to disk using ImgBurn
http://www.imgburn.com/
Here, too, everything is very simple, go to the official website of the program, click Download.

Go to the downloads page and select the very first version of the utility, then download it,

Click on the green arrow


Have you downloaded it? We start the installation of the program

By the way, on the same page, just below you can download the crack for the ImgBurn program.

Installation is very simple, although it is done on English,


Next, we’ll insert the localization into the program and we’ll be able to work in the Russian interface. How to Russify, screenshots at the end of the article. But even in English you can burn our image without any problems with one click of the mouse. We insert a blank CD into the drive, depending on the image - CD or DVD. Launch ImgBurn,

Before us is the main program window, select Write image file to disc in it.
For many users computer systems very often problematic situations arise when knowledge of working with images is required. In particular, such knowledge is most in demand in the field of installation of any software product(when you need to insert disks into the drive one by one) or restoring the operating system after a complete crash. Let's try to briefly consider the question of how to burn an ISO image to disk using the simplest methods and for different needs.
What is an ISO image
Without going into technical aspects, for ease of understanding, we can say that an ISO image is a single file containing information located on optical media in the form of CD/DVD discs (types R or RW). In other words, almost all the data present on the disk is written to one file when creating an image.
However, it should be noted that when generating an image, not all information goes there, since the disks themselves may contain some service data regarding, say, copy protection, etc. However, the image itself is universal from the point of view that it you can mount, for example, virtual drive, write data to another optical disk or restore the operating system from the same disk or USB drive. Now we will talk about how to burn an ISO image to disk.
General principles of burning an image to disk
Let's start with the fact that there are several basic recording methods. The standard option for the usual transfer of information to optical media in Windows OS involves executing the “Write data to disk” command, which appears in the menu after inserting a blank “blank”. If this command was not executed, you can use regular Explorer with the command context menu“Send...”, after which you will be asked to record the image using standard means.
However, if you understand the question “how to burn an ISO image to disk” deeper, it is worth noting that the best option will be the use of specialized utilities and applications.
The most famous programs
In modern computer world Today, a huge number of programs have been developed for processing images of this type. Among the most famous applications that allow you to understand how to burn an ISO image to a disc are the following: Alcohol 120%, Nero Burning ROM, UltraISO, Daemon Tools and many others.
The recording process is practically the same in all applications. The difference can only be found in the names of the menus and corresponding commands.
So, for example, in the UltraISO application, the question “how to burn an ISO image to disk” is solved by simply adding files and folders (or dragging them into the main work field of the program), after which the “Burn CD image” function is selected and the burner drive is selected.

IN Daemon program Tools this process is practically no different. Solving the problem that arises (how to burn an ISO image to disk) can be completely elementary. Again, the file is dragged into the program window or opened from the corresponding menu, after which the “Start Recording” button is selected. That's all.

In general, the recording processes are similar in all programs. Can also be used universal solution. As a rule, when installing any program of this type, it sets the file association and integrates its own commands into the menu of Explorer or other file manager, so you can use a regular double-click on the file, after which it will open automatically.
If there are several such programs in the system, use the “Open with...” drop-down menu after right-clicking and select the desired application.
Burning a bootable disc
To restore the system, you can use so-called boot disks. How to burn a bootable disc from an ISO image? It couldn't be simpler. First, of course, it is necessary to create an image boot disk. To do this, you can use the original CD/DVD with the installation distribution.

Now the whole procedure comes down to deciding how to write Windows ISO image to disk. The process is the same. You just need to pay attention to the most essential details. For example, in UltraISO program When recording, you need to use the “Bootboot” function for the disc. Otherwise, autoloading from the disk will not occur.
In principle, in some cases, you can first create an image of the system at a certain operating point, images of all drivers, etc. But as practice shows, it is better to work with a distribution kit or recovery console, which is available on any disk.
Conclusion
In conclusion, it remains to be said that there is nothing complicated in writing images to disk using completely different programs No. Almost all processes are automated. The user can only specify the path to the source file or use the methods described above to activate the recording, and then click the appropriate buttons. I think even an untrained entry-level user can figure this out.
Using special programs. Creating a virtual image is very important point, when you do not have a CD/DVD recording disc, with the help of such images, in order to play some game you do not need to have a disc, we will create emulation using a program, then mount it into the drive.
Today there are a huge number of programs for ISO creation-image, many of them are both good and bad, but we will, of course, analyze the workable and popular programs. Some of them come free and may be as good as paid versions, let's now see what programs we are talking about.
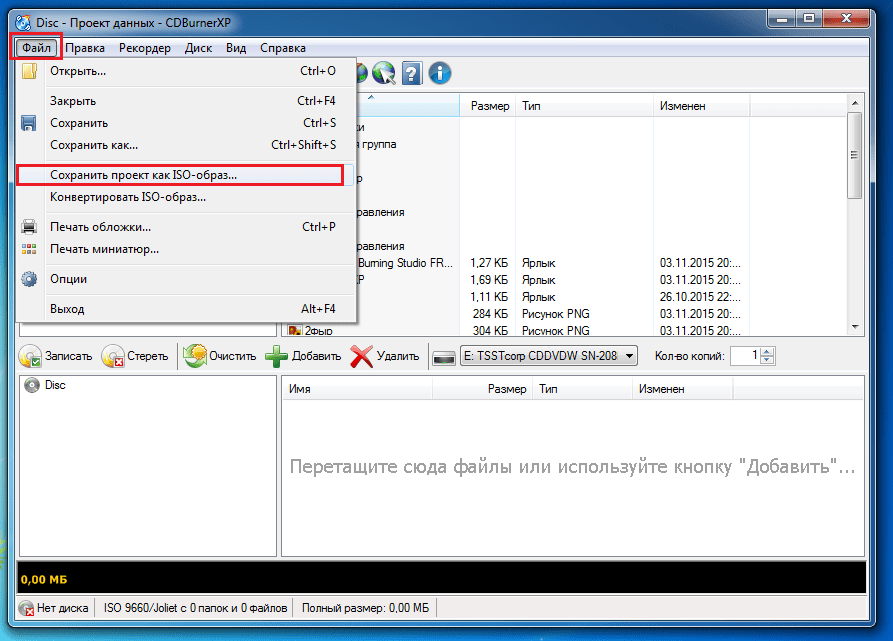
ISO Disk Image Creator – CDBurnerXP
The CDBurnerXP utility is very powerful and works with almost any image. Using it, you can both write and overwrite data, as well as erase it. The product is free, so there are no restrictions. CDBurnerXP will easily create a virtual disk with an ISO extension. Works on all Windows operating systems. What do you need to create a disk image?
- Download CDBurnerXP here this link. The site is official, there is no need to be afraid of viruses. When installing, pay close attention to all buttons. One of them "More options", there you can disable the installation of additional software, such as Amigo, or Yandex Browser. It's better to choose the portable version.
- Now that you have installed the program, launch it. In the window that opens, you will see many options. To create an ISO you need to select the item “Creating ISO images, burning data discs...”. If you need to create an image from a disk, then select “Copy disk”.
- So, a window will open in which you select any files to create the image.
- Having selected the files, you need to save our virtual image. To do this, click on the “File” button and select "Save project as ISO image".
Creating an ISO Disc Image Using ImgBurn
The next program on our list is ImgBurn. Its interface is very clear, so you can figure out what and how without my help, but I’ll write everything down just in case. To begin with I want to say that installation file also carries with it the installation of unwanted software, therefore, when installing, keep an eye on all the checkboxes and items. Here is the official website from where you can download this program.

So, the ImgBurn utility is, of course, functional and has a simple interface. When you first install and launch the program, you will see the interface in English, but you can change it to Russian in the settings. True, to do this you need to first download the crack from the official website, and then put the file in the Language folder.
You don't need much to create a virtual image. You just need to click on one of the provided icons in the main program window, add necessary files and save the image.
ISO image creation program – UltraISO
I don’t want such a wonderful program as UltraISO to be in last place. Yes, it's paid, but it's powerful, it works with all types of images, a large number files, can create virtual disks and write data to real optical discs.

The demo version of the program allows you to record an image of 300 MB. Not very much. You can download it from this site. If needed full version, for recording large files, then you will have to either purchase or find “Activation” on the Internet. It's a dishonest way, but you can try.
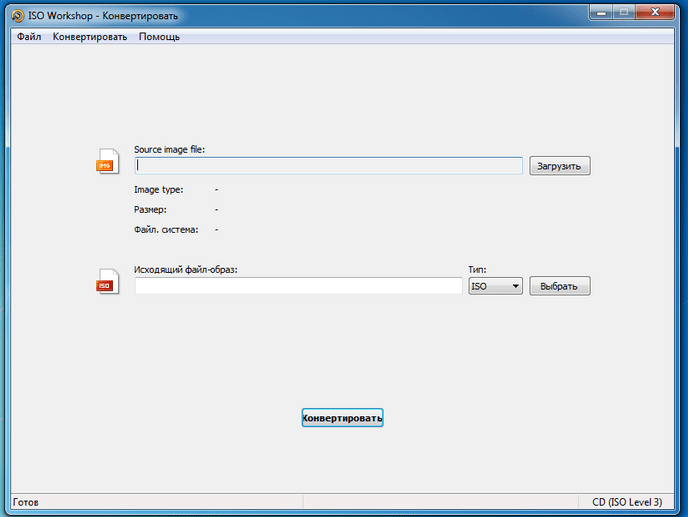
Creating an ISO Image Using ISO Workshop
Here is another program for creating virtual images - ISO Workshop. The interface is very simple, nothing superfluous. In addition to the ISO format, the program can also work with .CUE. This is a format that works with album images.

The program can record images and extract them, as well as check disks for errors. Here is the official website of the program, download and use it.
Ashampoo Burning Studio
And the last program on our list is Ashampoo Burning Studio. The program is free and has a nice interface. In addition to the ISO format, it supports many others. Works with almost any disc. If you decide to use this utility, then you can use it to write data to various disks, rewrite several times, copy discs. You can download the program from the official website. Have you noticed that I mostly give only official sources? Some unscrupulous people try to push their products or provide viral sources to steal your data. Before downloading from dubious sites, it is better to study it in more detail.
Once you have installed and launched the utility, you will see a nice window in front of you:
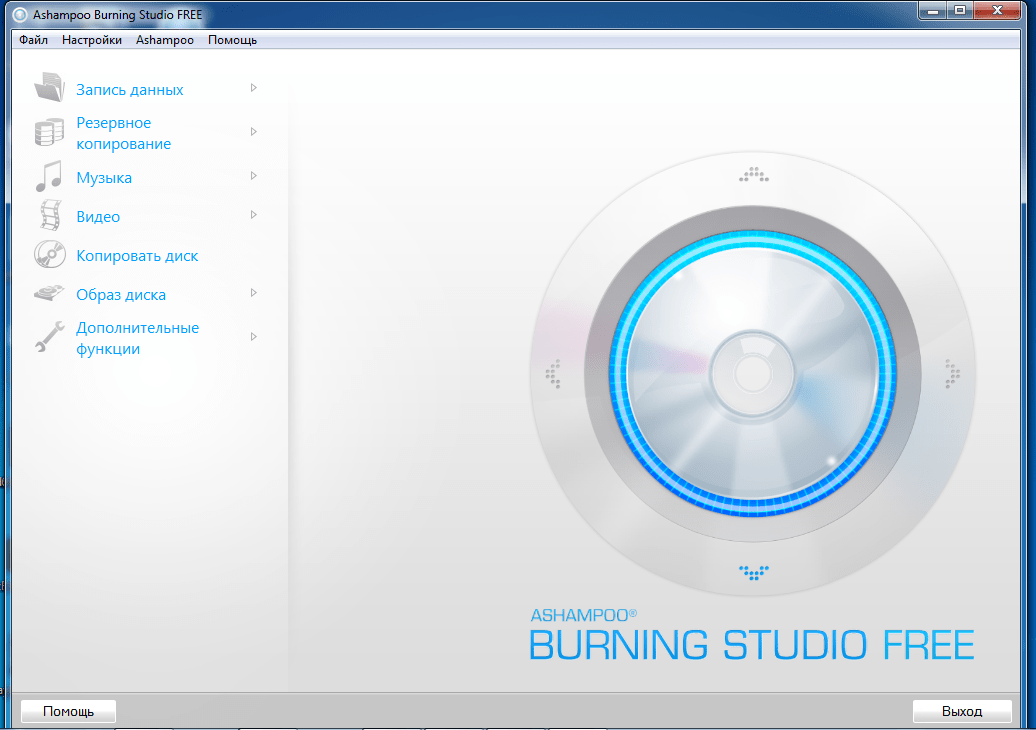
The program is in Russian, so everything is clear. To create a disk image you need to hover your mouse over the tab "Image Creation". A menu of 3 items will appear. First option - "Burn image" allows you to write data to a file already prepared for this task optical disk. Second point "Create an image" allows you to create an image from a disc already inserted into the drive.

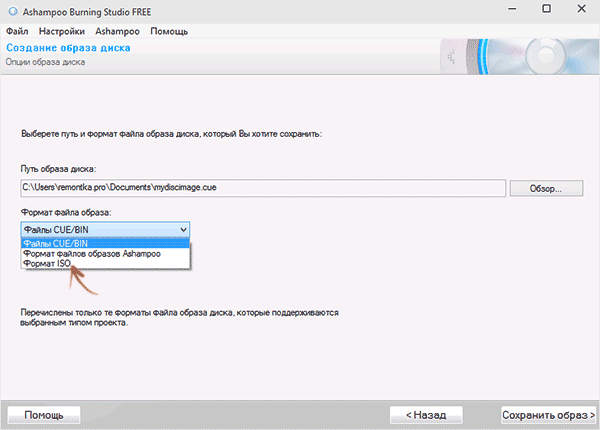
To create an ISO image from files, we need a third option - “Create an image from files”. This way we can create our own ISO images.
Let's say you have already selected this item. A window will appear before our eyes in which we need to select the ISO format. In addition to this format, there is also the native format of the program itself and the CUE/BIN format.
That's all, these are not all programs, there are a lot of them on the Internet, both well-known and those that have just appeared. Each has many advantages and disadvantages, but with the help of the programs we have discussed, you can easily create a virtual image and, if necessary, write the necessary files to a finished disk.
File with ISO extension– this is an exact (possibly bootable) copy of the CD/DVD disc. And so, if you come across a file with the ISO extension, then know that this image file contains: data, as well as information about file system, directory structure, file attributes and boot information.
Disc images are specially distributed in a format where every bit of the CD is copied according to the original media. At simple copying files from CD or DVD to hard drive, information about tracks, disc titles, and boot information will be lost.
If you have created a disk image, you can later easily restore the original version of the copied CD. ISO format- perhaps the most common disk image format. Also, the ISO-like .MDF format is very common.
Accordingly, in order to burn an image file with an ISO extension, you need a CD/DVD burning program that has the “Burn images” option. In almost all famous programs disc recording, there is a similar option, but for beginners, understanding the settings can be quite difficult.
I suggest you use a small program called ISO Burner, which does not require installation and is specifically designed for burning an image file with the ISO extension.

1. Download and run the file ISO-Burner.exe.
2. Press the button review and specify the path to the ISO file.
3. Insert the disc into the CD/DVD drive and press the button “RECORD ISO”.
4. When the burning is complete, a window will appear indicating that it has been successfully completed: “Burning ISO Image to CD/DVD has been completed successfully!”
Recording will start immediately, you can monitor the process using the status bar. If you are using rewritable RW discs, to erase, click the link “ Settings” and check the box “ Clean all RW disks”.

P.S. For recording in the operating room Windows system 7 right-click on iso file, then select “Open with” – “Image Burner Windows drives”, and the “Record” button.
If you receive, then simply change the disc blank (media type) to CD or DVD.