How should the hard drive be installed? How to install Windows directly from your hard drive using different methods
Hello, dear friends! Today, we will learn how to install it correctly hard drive to the computer. Most often, the need to install extra hard disk storage may occur when there is no longer enough space on the old disk and an increase in volume is required disk space.
Of course, in this case, you can simply purchase an external hard drive. But generally, installing an internal disk is the best option than using an external one, since often external drive It works much slower and can be easily lost or damaged. Moreover, the installation process internal storage is not some very complicated and incomprehensible matter. As a rule, the whole process consists of installing the HDD into a computer, connecting a pair of cables to it and preparing it for use, that is, formatting. However, in order to install a hard drive as quickly and smoothly as possible, you need to know some things, which we will talk about next.
Main types of disk drives.
To begin with, let's briefly look at the main types of HDD for a computer and what features they have.

Location of the HDD in the system unit.
An internal hard drive, as a rule, is installed in a special place in the system unit designated for this purpose - in a drive cage or a special compartment. Depending on the specific case, the placement and orientation of the disk cage may vary. The most common location for the cage is at the bottom front of the case, near the front fans, away from other computer components. Most often, the disk basket is located perpendicular to the bottom of the case, while disk drives, installed in it, as a rule, are installed in parallel.

Installing a disk into a computer.
First we need to disconnect all the wires from the back of the computer system unit and unscrew the side covers on both sides. We remove both covers, since we will need access to the basket from both sides if it is not removable.
Physically installing the hard drive into your computer is probably the most difficult part of the installation process. The hard drive is usually secured to the cage using four screws. Special holes for these screws can be located both on the sides and at the bottom of the disk.

Also, in some cases, the so-called system is used quick installation and removing discs (sled). At the same time, the hard drive is mounted not on screws, but on special latches. This mounting method is more convenient for computers in which frequent installation and removing discs.

Hard drives last longer and perform better if they are well cooled. Therefore, when installing an additional disk or several disks, make sure that the distance between them is as wide as possible. This will allow cold air flows to cool the hard drives as well as possible, both from above and from below.
Connecting a hard drive.
After the hard drive is installed, all that remains is to connect it. This is done easily and quickly. Almost all modern internal hard drives, sold today, use the SATA interface. They connect with motherboard using a SATA cable, which is specially designed so that it cannot be connected incorrectly.

The cable has identical connectors on both sides. Connect one end to hard drive, and the second to any of SATA connectors located on the motherboard.


SATA cables are usually sold complete with the motherboard or with a new hard drive. Cable connectors can be either straight or angled. At the same time, the shape of the connector does not affect the performance of the hard drive in any way.
After you are done with SATA connection cable, all that remains is to plug the power cable into the disk. It is plugged in “by key”, so there is absolutely no risk that you will not plug it in correctly or somehow damage the disk.

We’ll probably end the conversation about how to connect a SATA drive here. On connection SSD drive We won’t stop there, since its connection is similar to SATA. But about IDE disk let's say a few words. There are some minor subtleties here.
The cable for connecting an IDE drive is fundamentally different from SATA. You can see what it looks like and where it is connected to on the motherboard below.


Connection fineness IDE hard disk is that first, on the main disk, you need to rearrange special jumpers in the “Master” mode, and on the second, which is installed as an additional one, the jumpers must be in the “Slave” mode. The jumper layout can be found on the disks themselves.

The power cable for the IDE drive is also different. It looks something like this:

With this, I think the topic of connecting a hard drive can be considered fully covered. Now let's move on to the last, final step.
The final step.
When the hard drive is installed and connected, you need to connect all the wires to the system unit back and turn on the computer. At the power-up stage, we will need to go into the BIOS. On various models Motherboards do this differently. Typically, you can enter the BIOS by pressing the DEL keys immediately after turning on the computer, when “Press DEL to enter setup” appears on the screen. In the BIOS you will need to see if our new disk has been detected (Main Tab or Standard CMOS Features), and, if necessary, select the boot order hard drives on the BOOT tab.


If all is well, restart the computer and enter Windows. The last step, in order for the operating system to use your new disk, is to format the hard disk and create partitions on it. But this is a topic for another article.
Co desktop computer the situation is much easier than with a laptop, so let's start with it. So, you already know what characteristics to rely on when purchasing, so we’ll leave this topic outside the scope of today’s article.
- First of all, even before purchasing, you should have figured out what free drive connectors are available on your system board- old IDE or one of the varieties of SATA (I, II or III).
- And secondly, what free power connectors are available on the .
Modern hard drives, motherboards and power supplies work with connectors SATA type. However, if they are all already occupied on the power supply, then also take care of purchasing a Molex-SATA adapter to connect your second drive to Molex-type power.
If you want to use a second old hard drive with a connection to an “IDE” type motherboard, and your latter is new and no longer has such an input, then we buy an adapter from IDE to SATA.
Another option to connect a hard drive to a computer that does not have a corresponding connector for it is to use a special IDE-SATA PCI controller. The advantage of it is that with it you can connect an old IDE drive to new board, and a new SATA drive to the old motherboard. It looks like an expansion card that is inserted into PCI slot on the motherboard and adds support for working with IDE devices. Let me remind you that you can connect two disks or drives to a standard cable at once.

Let's say you have already found out all your nuances, purchased second hard disk and, if necessary, adapters, and now you need to install it in the case and connect it to the motherboard and power supply. First, we fix the hard drive in a special basket in the case, or insert it along the guides and secure it with special fasteners or ordinary screws, depending on the type.

After that, connect the “small” SATA to the corresponding connectors on the back of the drive and on the motherboard, and into the SATA socket larger size(for power supply) we insert either an adapter connected to the cable from the power supply, or directly the power supply cable with a SATA plug. We do this carefully so as not to break the socket on the hard drive, since there is no limiter at the bottom and you can easily break off a piece of the board with the contacts of this connector.
In the screenshot below, green arrows indicate wide SATA arrows that connect the second hard drive to the power supply, and red arrows indicate narrow ones that go to the motherboard.

Yes, do not forget that all connections must be made with the power supply disconnected from the outlet, or with the power switch turned off, if there is one on it. As you can see, there is nothing complicated.
How to install a second hard drive in a laptop?
Is this really possible? Yes, today you can also increase the amount of space not only on a desktop PC, but also on a laptop. And for this it is not at all necessary to replace the standard hard drive that is already in the laptop, and therefore you will not have to face all the associated problems, such as transferring files and reinstalling Windows and all programs on the new hard drive.
The second hard drive in the laptop (remember, 2.5 inches in size) is connected using a special adapter, which is installed instead of the laptop one DVD drive And - you must admit, now almost no one uses this device. And if you need to view discs, you can always use an external one connected via USB.
This is what this adapter, invented (or copied?) by the Chinese, looks like:

In online stores it can be found under the name “2nd SSD HDD HD Hard Disk Driver Caddy SATA for 12.7mm CD / DVD-ROM Optical Bay". Inside and outside of this adapter there is a connector for connecting a disk and for connecting the adapter itself to the laptop board.
So, we insert the hard drive into the adapter. You may also have to screw the mount yourself to the back of the adapter, through which it will be screwed to the laptop body.


And in its place we insert the adapter and secure it with the same screw. After this, a new hard drive will appear in the “Computer” menu, which after formatting can be fully used.
How to install a small hard drive in a computer?
Talking about connecting hard drive, we cannot but touch upon the problem that users sometimes encounter when there is a need to install a hard drive or 2.5″ SSD into a computer whose case only has fasteners for standard wheels 3.5″ in size. For this case, there are also special adapters in which such a hard drive can be secured and inserted into a regular place under disks of larger diameter.

BIOS does not recognize the second hard drive
Another common problem that you may encounter when installing 2 hard drives- the computer simply does not see one of them. First of all, if you are using an adapter, then this may be the problem. Use known-good adapters.
If you haven’t used it or your adapter is working, then the whole point is BIOS settings, namely, the operating mode of the hard drive controller is incorrectly set.
We reboot the computer, go into the BIOS and look for the “SATA Controller” item (or SATA ATA/IDE/Raid Config, Mass Storage Controll or something else like that to set the mode HDD operation). If you connected a drive from to the motherboard SATA cable and at the same time a modern operating system is installed on the computer ( Windows Vista, 7, 8 and above), then the AHCI, IDE, Native or Enchansed position can be activated in this item. At the same time
only in AHCI mode will be achieved maximum speed transferring data from disk.
If more old Windows, or if the hard drive was connected, then only IDE, Native or Enchansed.
The disk controllers themselves must also be enabled. Here are a couple of screenshots from different BIOSes with these settings:

If your computer has 2 hard drives (or a disk + DVD drive) and both of them are connected via IDE cables, then the problem may be that they are not configured correctly. If you have just such a connection and in the BIOS you see the following picture:
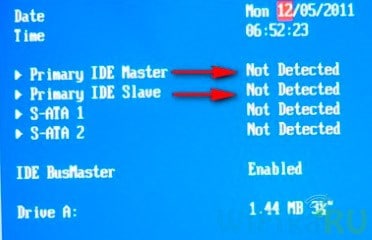
then this is your case. In this configuration (when both are connected via IDE), one disk should be Master, that is, the main one, the one on which Windows is located, and the other Slave, that is, secondary.
This priority is configured using a special jumper installed on the contacts on the back of the case.

All possible positions of this jumper and their modes are usually described on a sticker on the disk body. U different manufacturers they may differ.

From our table we see that if Windows is installed on the disk and it will be the main one (Master), or if it is used alone, then we put a jumper on the first 2 vertical contacts. If it is secondary (Slave), then remove the jumper altogether.
We do this with our hard drives and go into the BIOS again. Now they will be automatically detected by the motherboard and the following picture should be drawn:

Installation new hard disk Simply screwing screws and plugging in wires is not enough. You'll have to tinker a bit here. The hard drive is one of the few exceptions where installation requires some time investment.
The hard drive is installed in a special compartment located just below the CD-ROM. It is usually inserted there from the inside, but it can also be inserted from the outside by removing the plug on the body. Connect the hard drive using special cable(IDE or SATA).
After installing a new hard drive (I hope everything was done correctly, for example, the IDE cable should be connected with the red wire closer to the power connector). Now we need to make sure that our BIOS has detected the new device. To do this we need to enter the BIOS.
Turn on the computer and at the first moment of startup press the “Del” (“F2”) key several times. After logging in, look in the menu STANDARD SMOC SETUP (on some BIOS versions it may be called differently, but in any case we are looking for something similar). Check whether the computer has correctly detected the capacity, as well as the type of connection (Master or Slave). If your computer has only one hard drive, then it should be defined as PRIMARY MASTER. To ensure that everything goes as expected, you can go to IDE HDD AUTODETECTION , press "Enter" to have the computer check again for new devices.
If everything is OK, exit the BIOS and save the settings.
Partitioning the disk. What partitions are and how to partition a disk during system installation was described in the article.
If you are installing a second hard drive as an addition to the main one on which the system is already installed, then partitioning can be done using the built-in utilities.
To launch the Disk Management utility, go to the menu Start
> Control Panel
> Administration
> Computer management
and in the window that opens, on the left side, select Disk management
. On the right side of the window you will see the entire list of disks installed on your computer. New disc will be marked as "not allocated". This means that your drive has no partitions created and the drive is not formatted.
The disk partitioning procedure should be taken responsibly. Of course, as long as it is empty, you are in no danger, but if there is any data on it, we risk losing it. For this entire disk partitioning procedure, there is a special Partition program Magic.
So, to partition the disk, right-click on the unallocated space of our new disk and the dropped context menu select " Create a section " Next, we need to figure out how much disk space we will divide the disk into. I advise you to allocate at least 30 GB for the first partition. Click Next – here we will need to assign a letter to the logical drive, but here you don’t have to touch anything, the system will do everything itself. And finally, the last window, here we need to choose which file system we will format our logical drive under. There are two options - FAT32 and NTFS. It is advisable to choose the latter, because it is reliable and advanced.
That's it, the section is ready. The program will need a few more minutes to format and the procedure can be considered complete. The rest of the remaining disk space is divided similarly into one or more logical drives.
It is advisable to divide the disk into at least two logical drive, well, if the volume allows, it’s possible for three, but not for one. It is not advisable to keep necessary files on the same partition with the installed operating system, because If the system breaks down, there is a risk of losing all data.
—————————-
Do you know what our future is? Perhaps the movie "Terminator" will become real reality? — http://roboting.ru/ — AI nanotechnology has reached that level, robots these days are no longer science fiction, all that remains is to add these robots artificial intelligence and that's it, no one can predict their actions and it can begin new era evolution...
We discuss the issues of choosing hard drives. The main differences between hard drives, their operating parameters were discussed, and recommendations were given for choosing hard drives for certain tasks. In today's article we would like to dwell on the issues of putting a hard drive into operation.
Previous analysis modern market hard drives showed that there were practically no players left on it. The key players remain Seagate and Western Digital, Toshiba, which received the business after purchasing the bankrupt Fujitsu division, is playing the role of a catching up independent manufacturer. A comparison of various hard drives showed that competing models may differ in operating noise, performance, but this difference so low that it can be neglected. When choosing a universal hard drive, we recommend paying attention to the release date, which is indicated on the label, as well as its cost. How newer hard disk - so much the better, since there is less chance that you will end up with a Thai drowned man or a disk with outdated problematic firmware. There are already too many firmwares in the computer and often, not many people can take the time to update the firmware of the hard drives. At the same time, it is often hard drives that cause various lags and freezes. operating system, which must be taken into account by all computer users, especially laptops.
Some may disagree and begin to argue that hard drives are reliable. Unfortunately, using last generation hard drives under different brands, we cannot confirm this - problems occur in all manufacturers, with approximately equal frequency. This is understandable, a hard drive is a mechanical nanotechnological device in which small parts are in constant motion - this leads to the impossibility of eliminating the risk of defective products entering the market. For such users, we recommend purchasing a hard drive from the manufacturer that is closest to the “soul” and instills confidence.
For other rational users, we recommend taking a closer look not at the brand, but at the store where you purchase it. Hard drive manufacturers in our country have virtually no dealer warranties. service centers, so if the device fails, you will have to go to the store where you purchased it. Often, regional "sharashkin's offices" strike a pose. Such offices can be immediately identified by the terms of the warranty for the product sold. If instead of a two, three, five year warranty on a hard drive they offer you 6 months or one year, then you will not get any warranty from them. Fortunately, there are fewer and fewer such offices, since such network giants as Yulmart, Citylink, CSN are opening their representative offices in almost all regions, which reduces the cost of products while simultaneously increasing quality warranty service. Often the faulty hard drive is replaced with a new one or the money paid is returned.
The picture is clickable --
Few users know how to handle a newly purchased hard drive. The most experienced in this regard should be considered users who began their acquaintance with the computer from the operating room. MS-DOS systems, when each operation was “felt” through command line. Today everything has been simplified to the point of disgrace. It is worth inserting a CD with the operating system into the drive Windows system 7, as soon as it detects new hard drives, it will offer to create partitions on it and will format it itself, creating the most popular file system- NTFS. But many users consider this not sufficient, since it does not allow at least a preliminary assessment of the quality and reliability of the purchased hard drive. Therefore, the following specific advice is given.
Firstly, the purchased hard drive must be carefully inspected in the delivery department for any dents, scratches, as well as signs of previous mounting in the system unit. In the latter case, as a rule, the paint flies off the screw holes. Often hard drives are shipped in anti-static sealed bags, if the package is labeled as the hard drive and it is sealed - you are still responsible for any defects on the hard drive itself, so don't be lazy - print it out and inspect the device. This is due to the fact that modern hard drives are quite sensitive to mechanical influences and there are frequent cases of the spindle becoming jammed or the head block being displaced due to falls or impacts, which can happen in any store - people work everywhere.

The picture is clickable --
As soon as you bring the hard drive home, install it in the system unit in accordance with all the rules. It should not be cramped; it is advisable that there should be one free slot at the top and bottom, and that it is secured to the body with all four screws or latches. The rubber gaskets used to reduce the level of transmitted vibration should not interfere with reliable fixation of the device. In this case, it does not matter how you install the hard drive - upside down or with the controller unit - the hard drive will still work, the main thing is that it is securely fixed. Next, connect all the cables and make sure that the voltage along the 5 volt line of your power supply is not too high or low. An underestimation will lead to constant “stop starts” of the hard drive, and an overestimation will lead to operation at elevated temperatures.

The picture is clickable --
Well, the third key point - are you going to additionally check the reliability of the selected hard drive? If not, then you can start working, but periodically doing backups contents of your new device - this will protect you from catastrophic loss of information. Many users want to immediately determine the endurance of their hard drive, even before they upload their valuable data onto it. Typically, these device runs take a long time and can only be recommended for users who actually have one.
To begin with, it is recommended to enable the S.M.A.R.T check. devices at the BIOS level. Then independently evaluate the values of the new device through special programs. It makes sense to take a screenshot of the S.M.A.R.T values. before testing begins, so that comparison can be made after it.

The picture is clickable --
The next step is to start testing linear speed read the entire disk. Typically this is a package from Everest Ultimate, AIDA or HD Tune. Having assessed the data obtained, compare them with the data from other hard drives in this class. If +/- 10%, then this is quite normal. A higher difference should make you think, and if there is a difference of more than 50%, you should study in more detail the reason for the poor performance of the new device and check its performance on another computer. In case of problems, replace it under warranty. Similarly, estimate the access time to data on magnetic disks.
Then the surface of the magnetic disks is tested. As a rule, the MHDD or Victoria program is chosen for these purposes. The first program and the second up to version 3.5 work exclusively within the operating system DOS systems, which becomes unacceptable for many users. Victoria program 4.3 works in Windows environment 7, but requires running as a computer administrator. After starting the program in random search mode, leave it for a day. The hard drive begins to crackle and crackle all day and all night. Then it is recommended to repeat the test for a similar period, but in Butterfly mode.
Almost the last test is to launch the IOMeter program. After setting small block sizes, setting up random search, read-write ratios, you start the process. It is also recommended to test for about 24 hours. Compare the data obtained with others hard drives doesn’t make sense, so just evaluate the performance of the disk and look at the S.M.A.R.T table. If everything is fine, then your disk is reliable and will fail in the next 24 hours - no one can guarantee you more, but peace of mind is still worth a lot.
After purchasing a computer, as a rule, free space There's enough on the disk for everyone. However, sooner or later the space runs out and the question arises of how to install the hard drive. Installation is a simple process that anyone can handle.
In this article I will try to describe in as much detail as possible the installation of a hard drive with a SATA interface. All modern hard drives are equipped with just such a connection interface. Therefore we will consider.
Let us remind you that before performing any actions with the system unit, you must completely disconnect it from the power supply.
Let's start installing the hard drive
The first thing you need to do is open the side cover of the system unit. To do this you will need to unscrew several screws.
Now that the system unit is open, you can begin installing the hard drive. Carefully install your hard drive into one of the 2.5 inch bays. Your video card or other components connected to the PCI slots may be interfering with your problem. Therefore, you need to be very careful not to scratch the boards acute angle hard drive. The disk must be installed with the iron cover facing up (stickers facing up). After the hard drive is inserted, secure it with two bolts.

Compartment for installing hard disk
If the disk is inserted and secured, you can begin connecting the cable and power cable.

SATA cable and SATA connectors on the motherboard

SATA drive power cable
Since the power connector of the SATA drive will be closer to the motherboard and it will be more difficult to reach it, it is better to start connecting with it. After the power cable (from ) is connected, you can connect the cable from motherboard(red oblong cable). Connect the cable to the connector on and to the hard drive.

Connected SATA drive
That's it, after the hard drive is installed and connected, you can close the cover of the system unit and connect the power. After installing a new hard drive, you may have to select