Apply update from ADB - what is it? ADB for Android, basic adb Android commands
Majority Android users don't know anything about A.D.B.. Full name - Android Debug Bridge, stands for Android Debug Bridge. ADB is part of the Android SDK . With ADB you can perform various actions on your Android tablet or a smartphone, such as: flashing, copying files from a computer to Android and vice versa, system recovery and others.
ADB for Android - what is it?
You probably know that the Android operating system is based on a modified Linux kernel. Therefore, there is a need to use the command line with it. It is the program adb helps establish communication between computer and Android. She is part of the environment Android development SDK, so to install Android Debug Bridge, you need to download Android SDK from the official website. There are versions for all popular operating systems: Windows, Mac OS and Linux. That is, to put it simply, adb allows control your phone or tablet using a computer.
I also recommend the following instructions:
Basic adb commands Android
Connect your device to your PC via USB. Make sure all drivers are installed and USB debugging is enabled.
Work with Android Debug Bridge best through command Windows string. To do this, in Windows XP, click “Start” and in the “Search programs and files” input field, enter “cmd”, then press “Enter”. If you have Windows 7 or higher, click "Start" and in the "Run" box type "cmd" and press "Enter" again.
adb devices
The most common adb command. Using it, you can determine whether your PC sees the connected device. If you did everything correctly, the following line will appear: “List of devices attached.” After it you will see serial number your smartphone or tablet and its status: “online” or “offline”.
If it says “offline”, this means that the device is in sleep mode, if “online”, then the device is ready to execute your commands.

Thanks to this command you can install applications on your smartphone or tablet. To do this, you need to specify the path where the APK file is located:
adb intsall D:\papka_s_faylom\nazvanie_prilogeniya.apk
To avoid writing long paths, copy the file to the android-tools directory. Then the path will be like this:
adb intsall nazvanie_prilogeniya.apk
adb uninstall
You need to enter it in the same way as the previous command. This will remove the application.
This team has an interesting feature. If you add the key -k, then when you delete a game or program, its data and cache will not be deleted, but will remain on the Android device.

Thanks to this command, you can transfer files from your computer to Android. To do this, you need to know the full path where the file is stored and where to move it.
adb push D:\papka_s_faylom\nazvanie_fayla/sdcard/Android
To avoid writing long paths, copy the file to the android-tools directory. Then you need to enter:
adb push nazvanie_fayla/sdcard/Android

This command copies files from Android to computer. You need to know the path where the file is located on your smartphone or tablet and indicate the location where you want to save the file. If you do not specify the latter, the file will be saved in the android-tools directory.
adb pull /sdcard/nazvanie_fayla\D:\papka_gde_sohranity

This command will reboot your Android phone or tablet.

With this command you can directly boot into bootloader mode.
adb reboot recovery
Not all devices support this command. Using it you can get into recovery mode.
adb connect
Using this command you can connect your device to a Wi-Fi network. To do this, you need to know the IP address and port of the device.
adb connect ip:port
With this command you get full access to all files on your device.

Second way using adb shell is the execution of a single Android commands shell using this construct:
adb shell<команда>
If you put your Android phone or tablet into bootloader mode, then the commands adb will not work anymore. Here you need to use fastboot commands.

To check if the PC and Android friend friend, use the command:
After entering it, the serial number of your device should appear.
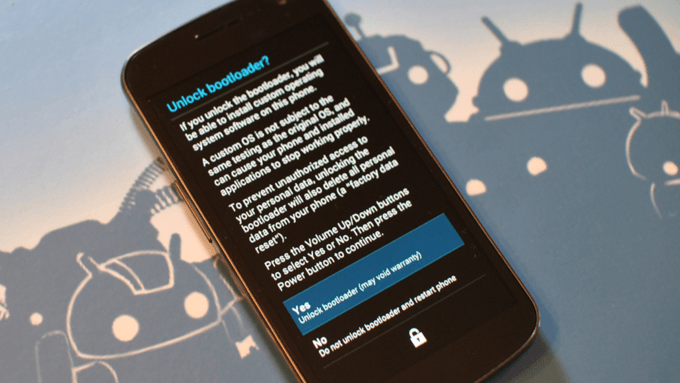
By entering this command, you can unlock the bootloader of Asus and HTC phones and tablets. When your device is in bootloader mode, enter:
Also all yours installed programs and personal data will be lost.

Using this command you can display the contents of a log file: changes, errors, etc. The data will scroll too quickly, so the right solution would be to save it in one TXT file. To do this, enter:
adb logcat > filename.txt
adb sideload
The command will be useful for owners of Google Nexus devices. Using it you can update the firmware of the device. Download it to your computer, connect your Nexus to it, go to Recovery mode, select " Apply update from ADB" and then enter the command.
Many of us are already familiar with ADB (Android Debug Bridge) because, being Android owner devices, quite often you have to perform such simple steps, How adb push And pull, or adb reboot etc. But for many novice users, just one view command line already frightening, and seems beyond possible. Although in reality everything is quite simple, experienced users They won’t let me lie, and the biggest difficulty is to remember all these commands, although this is also not necessary, since the Internet is always at hand and finding the right command is not difficult.
Android Debug Bridge, which is part of Android emulator SDK allows you to communicate between your computer and an Android device connected to it. By the way, if you need some software, you can download the programs for your laptop for free here. What can I do with ADB? Its capabilities are quite wide, for example, the most popular actions: copy files from an Android device to a computer, upload files from a computer to Android, execute many Linux commands, receive error reports, etc.
So if you're new to this and want to learn a little more about ADB than just what it is, then I suggest you check out my little basic guide to learning ADB.
What you will need
1. Android Debug Bridge (ADB) for Windows 32bit - download
2. Android Debug Bridge (ADB) for Windows 64bit - download
3. Computer with installed Windows OS.
Now let's move on to the active phase:
1. Download the required one zip archive and extract it wherever you want, for example, drive C.
2. Now go to the directory C:/adb/sdk/platform-tools. Here you will find a set of files as shown in the image below.
3. Hold down the Shift button + right-click and launch the Windows command line from the current directory.
4. Enter the command adb start-server.
5. To make sure that your device is connected correctly and has been recognized by the computer, enter the command: adb devices. If all is well, you will see something similar to this:

Now that your device is connected and everything is working, let's play with it a little.
Reading LOGCAT via ADB
The easiest way is to run the command: adb logcat. As a result, the entire contents of the device log file will appear on the screen. To get logcat to separate file do: adb logcat > logcat.txt.
BUGREPORT
You can run the command: adb bugreport, but you will receive a notification that the generated report will not be readable, so it is better to use: adb bugreport >result.txt.

ADB together with ROOT access rights
To work from under ADB with full rights access, you need to root the device. If the device is already manual, then run the command: adb root and we see what is shown in the picture below (reboot ADB with root rights).

Installing applications via ADB
To install the application, make sure that there are no spaces in the apk file name and you need to know exactly the correct path to it. Well, then we run the command: adb install+ name of the installation file. In my example, I installed the papertoss game, so if everything goes well, you will get this picture on the screen:

If you have a smartphone with operating Android system and you often experiment with it, configure something or reflash something, then most likely you are already familiar with the ADB tool or (Android Debug Bridge). This is a program for controlling a smartphone via a computer via USB, which contains many useful commands.
You can view logs, install and uninstall apps, manage your device, and perform many other useful commands. In this article you will learn how to use ADB on Linux, we will look at useful commands ADB for Android users and we will analyze this utility in detail. But first, let's look at how to install the tool itself on your computer.
The ADB program is included in the standard set of Android SDK utilities. You can install this environment and get the required utility. But you don’t always want to drag an entire execution environment onto your computer. Sometimes you only need one program. It can be very easily installed separately. On Ubuntu, you can do this by running the command:
sudo apt install android-tools-adb
For Red Hat, CentOS the command will be slightly different:
sudo yum install android-tools-adb
If you need to install ADB on Windows, you will have to download the Platform Tools SDK from the official website.
Preparing your smartphone
In order for you to be able to use adb with your smartphone, you need to enable USB debugging mode. This opportunity is hidden in all Android versions starting from 4.2. To become a developer, first go to "Settings" -> "About the phone" and click seven times on the item "Build number":

Then an item will appear in the main settings menu "For developers":

Here you need to check the box next to the section "Allow USB Debugging":


Now your phone is ready to work with adb. Connect it via USB to your computer and let's get started.
Useful ADB Commands
Before we can control the device, there is one more thing we need to do. The adb command requires a special service to communicate with Android and needs to be started. To do this, use the following command:
adb start-server

After completion of work, you can disable the service so that it does not consume unnecessary resources:
Now you can run adb commands for android.
Device list
First of all, let's look at the list of devices connected to our computer. To do this, use the devices command:

If several smartphones are connected to the system, then by default the actions will be applied to the first one. But you can specify the desired device name using the -s option. For example:
adb -s 0123456789ABCDEF logcat
You can also specify the name of the device to which you want to apply adb program commands using the ANDROID_SERIAL variable:
export ANDROID_SERIAL=0123456789ABCDEF
Then all adb commands will be applied to the device specified in this variable.
Device status
With the get-state command you can find out the state of the device:

The command will return one of the following values: device - running, bootloader - loading, offline - disabled. You can use the status-window command to constantly monitor status:
adb status-window

View logs
The most common action that developers and testers have to do mobile applications in searching for errors - this is viewing system and application logs. To do this, use the logcat command:

The utility displays the contents of Android logs in real time, so you will immediately see all error messages. You can also write everything to a file:
adb logcat -d > ~/android.log
Using the -c option, you can clear all logs on the device:
It is not always necessary to look at the full system log; sometimes it will be enough to just see the messages the desired program.. To do this, simply specify the package name:
adb logcat com android.settings
Using the --log-level option, you can set the message detail level, the following options are available: V, D, I, W, E, F, S. To select the output detail, specify the desired letter separated by a colon after the application name:
adb logcat com android.settings:E
Or we will display only errors for the entire system:

Transferring files to your device
If you need to quickly send a file to a device, you can use the push command to do this. Here is its syntax:
$ adb push /address/local/file/address/remote/file
For example, let's download a file from the home folder to the device:
adb push ~/file /sdcard/file

The file will be instantly transferred to the device and you can verify it. Additionally, you can use the -p option to display progress, as well as the -a option to preserve the original timestamp.
In the same way, you can download a file from your device. Pull command syntax:
$ adb push /address/remote/file/address/local/file
For example, let's copy the sent file back:
adb pull /sdcard/file ~/file1

Installing applications
WITH using adb You can directly install applications. This feature can be very convenient for developers. The install command only needs to pass the address of the apk file:
adb install ~/Momentum_apkpure.com.apk

After this, the application is installed and ready to work on your device. If you need to update the application to more new version, then use the -r option. This is very important. Otherwise you will get an error:
adb -r install~/Momentum_apkpure.com.apk
Options -s - for installation on a USB flash drive and -d - for downgrading the program version are also available.
Uninstalling apps
Uninstalling the app is also very easy. To do this, just pass the name of its package to the uninstall command. For example, let's remove the Firefox browser:
adb uninstall org.mozilla.firefox
Backup
You can create a backup copy of your firmware and all system files Android in order to restore it later very simply and quickly. To do this, use the backup command. Let's look at its syntax first:
$ adb backup options packages
Options indicate what data should be copied. Each option can have the prefix no, which means that this data does not need to be copied. Let's look at the main options:
- -apk- save apk files for programs, disabled by default;
- -obb- save installed extensions apk extensions files in obb format. Disabled by default;
- -shared- save application data from SD card or phone memory, disabled;
- -all- save all installed applications;
- -system- save system applications, these applications are already included in the all list.
The last parameter allows you to specify which applications should be saved. If the all option is specified, then naturally this parameter is not needed. So the command for backup the system will look like this:
adb backup -apk -obb -shared -all -f backup.ab
 Using the -f option we specify the name of the archive file; it will be saved in the current folder. If you do not set it, the default name will be backup.ab. You will need to confirm the creation of a copy on your phone; you can enter a password for encryption:

To restore from backup copy use the restore command. All she needs to do is pass the file address:
adb restore android.ab
The adb utility even has commands to reboot the device. You can simply reboot your smartphone using the reboot command:
You can boot into recovery mode:
adb reboot recovery
Or to bootloader setup mode:
adb reboot bootloader
Android Console
Using the shell command, you can log into the Android console and perform the necessary actions there. Most of the Linux commands we are familiar with are available here. We examined in detail all the available commands in the article. Now let's talk about the shell command itself and give some examples. To enter the console, type:

adb shell ls /system

For example, with this command you can take a screenshot:
adb shell screencap -p /sdcard/screenshot.png
And this is how you can record your smartphone screen on video:
adb shell screenrecord /sdcard/video.mp4
Conclusions
In this article we looked at how to use the adb utility to manage Android smartphone, as well as the basic adb program commands that you can use. adb shell commands are the same commands you can run in Android terminal, so there is no point in disassembling them again. I hope you found the information in this article helpful.
About the author
Founder and administrator of the site, I am fond of open software and operating room Linux system. I currently use Ubuntu as my main OS. In addition to Linux, I am interested in everything related to information technology and modern science.
There are many tools available to work with a USB cable or Wi-Fi smartphone. Particularly advanced tools allow you to move files, install and uninstall software, view contacts, take screenshots and even send SMS, but no graphical tool can compare with the power that the Android console can provide. In this article we will talk about ADB (Android Debug Bridge) - a standard tool for debugging and working with the Android console from a computer.
The commands described in the article can be executed directly on the device by downloading a terminal emulator from the market, but it is more convenient to do this, of course, from a computer via adb.
ADB Basics
To start working with ADB, you should activate it on your device and install the adb utility and drivers on your computer. The first task is performed by enabling “USB Debugging” in the “For Developers” settings item (if this item is hidden, click seven times on the build number in the “About Phone” menu).
To install ADB on your computer, download Adb Kit and unpack it into any folder (I recommend using folder names without Russian characters). We also download and install ADB drivers.
You need to work with adb from the command line. Press Win + R and enter cmd, then go to the folder in which adb is located. For my folder the command would be:
Cd\android
In order not to do all these manipulations every time, you can add the desired folder to the Path variable. To do this, go to “Control Panel -> System -> Additional options systems -> Environment Variables", find the Path variable and add to the end of the line, separated by a semicolon, the path to the folder with adb. Now, after starting the console, you can immediately enter the necessary commands.
Let's check our connection to the phone using the following command (it should display a list of connected devices):
adb devices
You can work with ADB via Wi-Fi. For this we need root rights and WiFi ADB app. We launch the application, press the switch and connect to the smartphone using the connect command and the IP address shown by the application:
INFO
You can copy the console output after selecting it with the mouse, as well as paste the copied command or file name into the console with the right mouse button. Enabled in the console properties.Installing programs
ADB can be used to install applications without having to copy them to your smartphone. All you need to do is run the following command:
Adb install d:/downloads/filename.apk
You can also add additional keys to the command. Will be useful -e- reinstall the application while saving the data and -d- install a version less than the current one.
Programs can be removed, but to do this you need to know the name of the package (I’ll tell you how to find out a little later). Using the game Angry Birds Seasons as an example, the command would look like this:
Adb uninstall com.rovio.angrybirdsseasons
Application backup
Android has built-in backup functions that can also be launched using the command line. To do this, use the adb backup command and a set of options:
Adb backup [options]<приложения>
- -f indicates the name created file and its location on the computer. If the key is missing, the backup.ab file will be created in the current directory;
- -apk|-noapk indicates whether to include only the application data or the apk itself in the backup (does not include it by default);
- -obb|-noobb specifies whether to include .obb extensions for applications in the backup (not included by default);
- -shared|-noshared specifies whether to include the contents of the application on the SD card in the backup (not included by default);
- -all indicates the need to backup all installed applications;
- -system|-nosystem specifies whether to include system applications in the backup (includes by default);
- - list of packages for backup.
If we want to create a backup of all non-system programs, including .apk, to a specific location, then the command will look like this:
Adb backup -f c:\android\backup.ab -apk -all -nosystem
After entering, you must confirm the start of the backup on the device itself. To restore the resulting backup, you need to run the appropriate command:
Adb restore c:\android\backup.ab 
Console within a console
Along with the mentioned console, which is a DOS console for Windows, Android also has its own. It is called via adb shell and is essentially a standard Linux console, but with an incomplete set of commands, which can be expanded by installing BusyBox from the market. There are two ways to use this console. In interactive mode it is launched with the command
adb shell
The $ sign appears in the console (hereinafter in the text this sign will mean the need to enter the preliminary adb shell command), and after that you can enter a series of commands, receiving a response after each. The second method is if you need to enter only one command, you can write it in a row using the adb shell.
The shell uses standard commands for copying, moving and deleting files: cp, mv And rm. You can change directories ( CD) and view their contents ( ls). In addition to standard Linux commands, which you can learn about from any reference book, Android has several of its own specialized tools, but to use some of them, you will have to get root rights on your smartphone, and after starting the console, run the su command:
adb shell su
This needs to be done if, in response to any command, you see a line similar to “ access denied" or "are you root?" If successful, the $ sign will change to #.


Taking a screenshot
Done in one line:
Adb shell screencap /sdcard/screen.png
After this, the picture needs to be pulled out of the device with the command adb pull:
Adb pull /sdcard/screen.png
In recovery, you can take a screenshot with the following command:
Adb pull /dev/graphics/fb0
Then you need to convert the fb0 file into a normal image using FFmpeg, which you need to download and put in the adb folder. The extension must be installed on your device:
Ffmpeg -f rawvideo -pix_fmt rgb32 -s 1080x1920 -i fb0 fb0.png
Record video happening on the device screen
adb shell screenrecord --size 1280x720 --bit-rate 6000000 --time-limit 20 --verbose /sdcard/video.mp4This command will start recording video with a resolution of 1280 x 720 (if not specified, the native screen resolution of the device will be used), with a bitrate of 6 Mbit/s, length 20 s (if not specified, then the maximum value 180 s), with logs shown in the console. The recorded video will be located in /sdcard (video.mp4 file).
INFO
All launched from the console and in adb shell Processes that take some time to complete can be interrupted using combinations Ctrl+ C. Exit the shell and return to executing regular adb commands - Ctrl + D.Application management
Two commands are used to manage applications: pm(package manager) - package manager and am(activity manager) - activity manager. These teams have many keys, which can be viewed on the developers portal. Let's look at a few.
To begin with, we will get a list of applications installed on the device in the form of package names that will be useful later:
Continuation is available only to subscribers
Option 1. Subscribe to Hacker to read all materials on the site
Subscription will allow you to read ALL paid materials on the site within the specified period. We accept payment bank cards, electronic money and transfers from mobile operator accounts.
In this article you will learn what ADB is, why users need it, and how to manage it using commands in the Android terminal. Well, let's start learning adb commands for android...
Getting to know ADB
ADB (android debug bridge) is a debugging tool, identifying errors in applications, unlocking devices on Android OS and much more. Official documentation for English you can read on this site.
Download ADB
You can download ADB from the official .
You can use a special Adb Run program, making it easier to interact with ADB.
You can also use Android program Terminal
Make sure that drivers are installed on your PC and USB debugging is enabled on Android.
Adb commands for Android and Linux
Adb commands can be divided into 3 types, directly for Adb command, FastBoot() and Linux command (Android).
Details about each Adb command
1. Availability check connected Android or does the computer see your smartphone or tablet?
To make sure that everything works fine and the computer recognizes Android, you need to enter the adb command:
Example how to use:
This screenshot shows that Android is connectedIf you have didn't appear If there is a similar message, then you may need to check the availability of drivers on the PC, the integrity of the cable, and the functionality of the USB port. 
2. Android connection via WI-FI
To connect Android via WI-FI networks you need to get the IP address and port of the device, the ADB Wireless application will help you with this (Root required), which can be downloaded from Google Play: after that enter the adb command:
adb connect ip:port
Example how to use:
adb connect 192.168.0.14:5555
More details on how to connect Android via WI-FI - USB debugging over Wi-FI.
3. Installing applications on Android
In order to install any application from a computer to Android, you need to enter the command:
Example how to use:
In order to use the Adb command, you need to install the application. Write:
adb intsall C:\papka_gde_hranitsya_proga.apk
That is, write the command adb install application path and application name.
4. Send any file to Android
To send from your computer to Android any file there is the following command:
adb push
Example how to use:
In order to send a file from PC to Android using the Adb command, you need to write the adb command:
adb push C:\papka_gde_hranitsya_file\imja_file /sdcard
That is, write adb command path to file, file name and location where to save this file.
5. Accept a file from Android to PC
In order to accept absolutely any file with Android devices There is a command on the computer:
adb pull
Example how to use:
In order to use the Adb command to accept a file from Android device on your PC you need to write:
adb pull /sdcard/xxx/Sex_s_Pameloy_Anderson.avi C:\papka_gde_budet_hranitsya_file
That is, write the adb command the path to the file located on Android, the name of the file and the place where to save this file on the PC.
In order to reboot Android after any operations performed, or reboot into a special mode, there is a command:
adb reboot
Example how to use:
The commands will reboot Android to normal mode (normal reboot):
adb reboot or adb reboot normal
Bootloader:
adb reboot bootloader
The command will reboot Android into Recovery mode:
adb reboot recovery
7. Go to Android control , after which you can use linux Android OS commands
The full potential of Android is revealed when you go into Android management where many Linux commands are available. There is a command for this:
adb shell
Commands in the Android terminal (Linux commands)
Superuser or Root. Allows you to perform absolutely all actions, from creating, modifying, changing, to deleting specific system files: To do this, enter the command: su
Before entering the command: su the user is a Guest in the system (many actions are blocked) and is indicated at the beginning of the terminal by a dollar sign: $ after entering the command: su becomes an Administrator and in the terminal is indicated as an American number: #  Example how to use:

2. Command go to folder(in the future it will be more correct to call a directory instead of a folder)
In order to navigate between partitions and directories in Android, there is a special command:
Example how to use:
To move from the /sdcard section to the /sdcard/xxx/porno/hot_girl section
cd /sdcard/xxx/porno/hot_girl
To return from a partition to the directory above, or back to /sdcard:
if we are in the /sdcard/xxx/porno/hot_girl directory - hot_girl
we will find ourselves in the directory:
/sdcard/xxx/porno/
if you need to go to /sdcard then:
cd ../ ../(as many times as necessary)
Attention in Android and others Unix systems Primer and primer or PrimER files are completely different files
3. Move / Rename file or directory
Moving and renaming a file or directory is carried out with only one command:
Example Rename file:
mv /sdcard/xxx/hot_porno/Alenka.avi /sdcard/xxx/hot_porno/kruto.avi
Example Rename folder:
mv -r /sdcard/xxx/hot_porno /sdcard/xxx/super
Example how Movefile:
mv /sdcard/xxx/hot_porno/Alenka.avi /sdcard/xxx/Alenka.avi
Example how Movefolder:
mv -r /sdcard/xxx/hot_porno /sdcard/hot_porno
4. View what is inside the catalog
In order to find out what directories and files are contained from the location where you are, use the following Linux command:
Example how to use:
ls /sdcard/xxx/hot_porno/
you will receive the following message in the window:
Alenka.avi
Pamela.avi
Anderson.avi
Example how to use:
ls -a /sdcard/xxx/hot_porno/
will display the following message:
.Skruty_file_Hot.avi
Pamela Anderson.avi
Skrutiy_File.avi
5. Copy a file or folder (directory)
In order to copy a file or folder and move it somewhere:
Example Copy file:
cp /sdcard/xxx/hot_porno/Alenka.avi /sdcard/xxx/Alenka.avi
Example Copyfolder:
cp -r /sdcard/xxx/hot_porno /sdcard/hot_porno
6. Connect the partition (mount) and disconnect
In order to find out what partitions exist in Android, connect or disconnect:
mount(connect section) and umont(detach partition)
Find out which partitions are mounted in at the moment, enter:
To attach a section:
mount /dev/block/mmcc121
or mount/systcode
To detach a partition:
umount /dev/block/mmcc121
or umount/systcode
7. Create a directory (folder)
To create a folder somewhere, use the command:
Example how to use:
mkdir /sdcrad/android_papka
8. Delete directory (folder) or file
If you need to delete any file or folder linux command:
Example how to delete a file:
rm /sdcard/xxx/hot_porno/Alenka.avi
Example how to delete a folder:
rm - r /sdcard/xxx/hot_porno
9. Display the contents of the file on the screen (read)
If you are faced with the task of displaying content on the screen text file:
Example how to use:
cat /sdcard/books/Tolstoy_book_war_and_peace.txt
and we get:
Eh bien, mon prince. Genes et Lucques ne sont plus que des apanages, des estates, de la famille Buonaparte. Non, je vous previens, que si vous ne me dites pas, que nous avons la guerre, si vous vous permettez encore de pallier toutes les infamies, toutes les atrocodes de cet Antichrist (ma parole, j`y crois) - je ne vous connais plus, vous n`etes plus mon ami, vous n`etes plus my faithful slave, comme vous dites.
10. Display the contents of the file on the screen (read in reverse order)
If you are faced with the task of displaying the contents of a text file, but from the end to the beginning:
11. Show full path
In order to understand which section and directory you are in:
Example how to use:
If we are in any directory and need to find out the full path (for example, we are in system partition, app directory):
will display the message:
/system/app/
12. Create empty file
To create a text file:
Example how to use:
Let's create a file 666.txt in the /sdcard directory:
touch /sdcard/666.txt
13.Creating a backup copy from a partition and restoring
Example how to use:
Creating a Backup to SD Card
dd if=dev/block/mmcblk0p1 of=sdcard/efs.img
Example how to use:
Restoring a partition from a backup copy from an SD card
dd if=/sdcard/efs.img of=/dev/block/mmcblk0p1
14. View occupied space
To understand how long something takes:
Example how to use:
Setting permissions for files and directories
To find out what rights files and directories have, you need to write the following command
Permission
And so we know that there are users and groups. Now let's talk about access rights. Why is this necessary? For example, you have a directory containing personal files. So that you owner , for example, they could edit, view files, group , only see data, files, and rest users who are not members of any of the groups and are not owners could not do anything at all, which is why access rights are needed.
File permissions can be indicated by numbers and letters:
The values of rights in numbers are summarized:
- full rights (rwx) 7 = 4 + 2 +1
- read and write (rw-) 6 = 4 + 2 + 0
- read and execute (r-x) 5 = 4 + 0 + 1
- read only 4 (r—) = 4 + 0 + 0
- recording only 2 (-w-) = 0 + 2 + 0
- no rights (—) 0 = 0 + 0 + 0

For each file and directory, rights are assigned separately for the owner, group and other users.
| Owner | Group | Rest | ||
| u | g | o | ||
| permissions letters | access rights numbers | |||
| rwxrwxrwx | 777 | read, write, do everything | ||
| rwxr-xr-x | 755 | reads, writes, executes | read and run | |
| rw-r—r— | 644 | read and write | evens only | |
| r——— | 400 | Only the owner reads it | — | — |
You can change access rights to a file or directory using the chmod command using either numbers or letters.
Assigning access rights in numbers
To change the permissions of a file or directory using the chmod command using numbers, enter the command:
Sudo chmod 755 text.txt
For directories, you need to add the -R switch after chmod.
Assigning access rights by letters
For beginners, changing access rights with letters will be a little more difficult, but this knowledge will be useful.
As you know that there is an owner, a group, and other users, they are designated as follows:
| u | user | Owner |
| g | group |
Users included in the group |
| o | others |