Photo full screen android. All methods and detailed instructions on how to put a photo on a contact on Android
A full-screen photo of a contact is not only beautiful, but also informative. But, unfortunately, on many Android smartphones, the photo of a contact during a call takes up a very small window, which is very inconvenient. I'll tell you how you can take a photo of the caller on the phone's full screen.
What should happen:
Before making a picture on the entire screen, let's figure out how to set a photo to a contact.
It's not difficult at all. Keep a couple of ways how this can be done:
Via the Contacts application
Open phone book and select desired contact.

- Click on the edit contact icon.
- In the editing window, click on the image of the man (indicated by an arrow in the photo below)
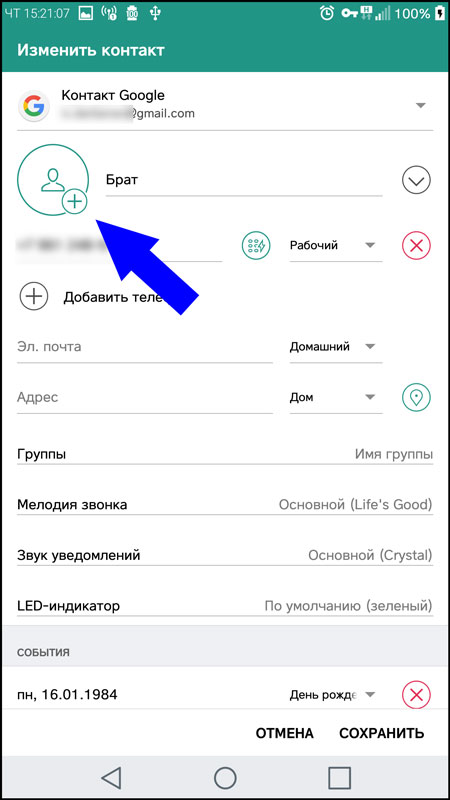
The system will prompt you to select a photo from the gallery or take new photo smartphone camera.
Set a photo to a contact via the standard gallery
Open the Gallery app on your phone and select the image you want.

- Click on the button additional options, V in this case those are the three dots in the top right corner.

- We are interested in the option " Est. image as“, click on it. We are asked to choose what this picture will be like.

- Click the button " Contact photo” and select the area in the picture that should be displayed when calling and confirm “OK”.

Now during a call the selected picture will be displayed.
#2 How to make a photo full screen
And so, we have installed a photo on the contact, now let's figure out how to make it full screen during a call.
On some devices, the photo displayed on the entire screen by default when making a call. But what if your smartphone doesn't support this feature? In this case they will help us special utilities, we will consider one of them below.

The application is one of the best of its kind, has a friendly interface and large number settings. Let's take a closer look at the settings.
Screenshots


Main features:
- Caller photo in full screen in HD quality
- Incoming SMS in full screen
- Full screen notification of missed calls
- Black list of calls
- Manage calls using gestures
- And other settings
The free version of the program supports:
- Full screen photo when calling
- Call blocking
- Gesture control
Program settings:
The application has a lot of settings. You can change almost everything - the call window, a large number of gesture parameters, notifications, etc. Even the most experienced user will like it.
When you launch the application for the first time, a setup wizard will open, which will help you set the optimal values step by step.

Now, through the built-in contact manager, you need to assign pictures for subscribers. After this, the caller's photo will be displayed in full screen.
Thanks to the fact that modern smartphones have the option of assigning a photo to a contact, the user does not need to read the text when incoming call. But not all users know how to do this correctly. This material will allow you to learn how to put a photo on a contact on Android and what difficulties may arise when performing this task.
How can I add a photo so that when I make a call it will appear on the display in full screen? Below we will look at several methods for free in Russian that will allow you to set a photo of the caller.
Using the Contacts menu
How to make the subscriber's photo appear on the screen through the contacts menu:
- First you need to remove the lock and open the main menu, from where you should go to the contacts menu. Then select the phone number of the person you want to assign the photo to and click on it. This will open a window with full description this user number and all attached information, including address email, physical address if available, etc. In this menu you can see the areas within which the silhouette is located - dark or light. A photo will be displayed at this place, click on it.
- After clicking, the operating system will ask the user where to get the image to install on the contact. You can take a photo right away or take a finished image from the gallery. If you want to take a photo now, click on the appropriate item.
- When selecting a photo from the gallery, click on the button and select the desired image. As a result, this will lead to the appearance of a preview; here you need to select the image size. If necessary, the preview is enlarged or reduced; after selecting the size, click on the checkbox.
There are versions operating system Android, which do not allow you to assign an image to a contact using view mode. If this is the case, then you will need to go into editing the photo by clicking on the corresponding button in the menu. As a result, this will lead to the opening of all data about the subscriber and the appearance of a silhouette for setting a photo. Now you need to repeat the steps described above.
From gallery
You can set an image to a contact on your phone without opening the address book. To do this, go to the phone memory by going to the gallery section, and then selecting desired image, click on the “Install as” button. Another window will appear where you need to select assigning an image to a contact. The contacts menu will open, where you select the required subscriber and click the checkmark. This will allow you to link a photo to a contact.
Guide to setting caller photo to full screen for incoming call
To large image displayed on the screen, you can use additional applications, which must be downloaded from the official store:
- Ultimate CallerID Screen HD. The application is designed to install a subscriber's photo and display it in full screen mode during a call. The utility allows you to display incoming SMS messages about missed calls also in full screen mode. In fact, the application is used as an image manager for contacts; the program allows you to sort the entire list of contacts by photos. If necessary, you can configure blocking of incoming calls and add subscriber numbers to black lists. There is an option to hang up, assigning this action to shaking the mobile device.
- The next app is Full Screen Caller ID. This program has less extensive settings and functionality. The program allows you to open the subscriber's image on full screen for an incoming call, others additional functions No. You can download the application from the official Play Market (the video was filmed and published by the AppsGames channel - all about modern technologies).
Possible difficulties and ways to eliminate them
The user may have difficulty completing this task.
If you have completed all the steps, but no image appears on the display during a call, there may be several reasons:
- The image is not associated with the subscriber. This could happen if the user forgot to click on the checkbox when installing a photo, or a glitch occurred in the Android operating system. It is necessary to check the subscriber's profile in the contact list. If you see that in the image area there is standard image in the form of a silhouette instead of an image, then try assigning the photo again.
- The problem may occur because the contact number is stored in the phone's SIM card memory. The image will be displayed on the screen during a call if the contact number is stored in memory mobile device, not SIM cards. To transfer contacts, go to your address book and open functions. A window will appear in which you need to select the option to copy contacts and select where you want to copy them from - from a cell card. Then you need to choose where exactly you will save your contacts. These actions should solve the problem.
- The reason may be a malfunction mobile platform. Problems of this kind can be solved by rebooting mobile gadget and re-checking the option. If rebooting does not help, then the reason is more serious; you can try to solve it by flashing the operating system. If this does not help, we recommend contacting technical support.
Each iPhone or iPad user, in the form of a contact directory, has the opportunity to save complete contact information and additional information (address, email, birthday, position, etc.) in one place. The contact directory also allows you to set a photo or other image for each contact. Once installed, it is used not only in address book, but also when making calls, communicating in FaceTime, iMessage and using simple SMS messages.
Setting images for contacts is not at all difficult, and there are two ways to do this.
Installing an image via contacts on iPhone
First, open the “phone” application, which has a separate “contacts” tab, then open the contact we need and in the right top corner Click the “edit” button to proceed to editing the photo. In the upper left corner we see a gray circle that replaces a photo, we need to click on it, then the phone will offer to take a new photo or select a photo from existing images. After you decide on the photo, you can select the desired area that will be attached to the contact. Afterwards, you need to click the “finish” button to complete the photo installation process.


Installing an image via iCloud
You first need to sync your contacts to iCloud. To do this, go to “settings” → “iCloud” in the device menu and turn on contact synchronization by moving the “contacts” lever to the right.
To set a photo using cloud storage, you need to go to the website https://www.icloud.com/, here you need to enter your account information Apple records ID.
Select the desired contact and click “edit”.


If you have completed all the necessary steps and the photo has been successfully attached to the contact, click the “done” button in the lower right corner. 
Sometimes there is a problem with displaying a contact photo when there is an incoming call, not in full screen. If the contact photo is not full screen, you most likely have iOS version 8 or lower. If, for example, on an iPhone with iOS 9 or later installed, and the caller’s photo is not displayed on the entire screen during a call, then most likely the photo you used is too low quality, you need to delete it and add a larger photo.
Also, the photo may be small if you synchronize contacts with your account Google entry, because this service resizes the photo by default. You can fix this by refusing synchronization.
Also, the photo will be in a small format, if you imported the contact into your phone from third-party applications (Viber, Whatsup, etc.), then you need to change the photo yourself through the contact settings.
A few years ago, there were complaints online from users who were dissatisfied with the fact that on their smartphones that had received an update to Android 5.0 Lollipop, an incoming call was no longer displayed on the entire screen, but only as a pop-up notification at the top of the screen. For some, this only happened while viewing a photo or video on a smartphone, and the device returned to a full-screen call if you called it in a locked state. In the unlocked state, the devices continued to indicate an incoming call with a pop-up thin strip, and users frankly did not like this. It turned out that there was no problem, it was all about the smartphone settings and new feature"polite call" received along with the update. A similar situation now exists among owners of Xiaomi devices that received MIUI 8. If you consider the indication incoming call inconvenient pop-up window, follow these steps:
1. Go to your smartphone settings.

2. Open the menu subsection " Applications" and go to the " tab System".


4. Uncheck the " Pop-up notifications".
All. You have disabled the " Polite call", and now you will see incoming calls in full screen, regardless of the phone's operating mode.
If, on the contrary, you want to receive information about the call in a pop-up window, and not on the entire screen, but your version of Android OS does not support this function, then you should think about installing the module