Instructions: Calibrating the laptop screen - adjusting color rendition. Atrise lutcurve. Monitor calibration
Monitor calibration at home is a rather difficult task, but it can be partly managed. Hardware monitor calibration For novice photographers, microstockers are an almost impossible task, because the hardware calibration device is quite expensive.
Why is it needed at all? monitor calibration?
Let's imagine this situation:
After a successful photo shoot, you have a lot of photos that need to be processed. You adjusted the white balance, tweaked saturation, contrast, colors and other settings, and you were pleased with the result. You sent your photos to a microstock / photo bank (or forwarded them to a friend, or maybe just posted them on the Internet for everyone to see). This is where it all begins.
The fact is that there are thousands of monitors and each has its own design features... and they display colors differently. A color that is white on one monitor may turn yellow on another, and appear blue on a third.
Therefore, when sending photos to microstocks (photostocks), you need to be sure that your monitor displays colors as correctly as possible (without hardware monitor calibration It is impossible to achieve an ideal result, but you need to strive for it).
Is it worth thinking about monitor color settings at all? Watch the following video and draw your own conclusions
The human eye adapts very quickly to changes in light. Monitor color adjustment programs will not replace a hardware calibrator, but will help you get one step closer to the “natural” color.
It’s quite a difficult task, but special programs will come to our aid.
Monitor calibration. Five of the most popular programs for calibrating your monitor at home.
Probably the most famous program For monitor calibration
It was previously included with Adobe Photoshop. Time passes, everything changes... now they have stopped doing this. The reason for this is simple - it is designed to calibrate a CRT monitor (a cathode ray tube monitor, you probably remember those old large monitors, they are no longer produced), it is of little use for LCDs (TFT / LCD - modern liquid crystal monitors), in general, it is somewhat outdated. You can download Adobe Gamma for free.
Appearance Adobe Gamma 3.0 (Russian version) you can see in the picture:
Adobe Gamma – software calibration of CRT monitors
Monitor calibration at home in Adobe Gamma 3.0 (Russian version) is described in the article “”
Next program for monitor calibration– Atrise lutcurve. I’ll say right away that the program is paid, the author asks for 5-10 $ for it. The functionality is significantly higher than that of Adobe Gamma. It’s also nice that the Atrise lutcurve interface has been translated into Russian. Monitor calibration at all steps is accompanied by explanations from the author of the program. Atrise lutcurve is suitable for color adjustment of LCD and CRT monitors. The program comes with instructions (albeit English). You can download Atrise lutcurve by following the link.
You can see the appearance of the program in the figure:

Atrise lutcurve for software monitor calibration
Monitor calibration at home in the Atrise lutcurve 1.5.2 program (Russian version) is described in the article “ ”
The following program for color adjustment of the monitor is Cltest. The program is free (interface in English), you can calibrate both LCD and CRT monitors, and has wide functionality. The appearance of the program is shown in the figure:

Program for monitor calibration at home Cltest
You can download the Cltest program.
Another program for calibrating a monitor at home is Quickgamma. The program interface is in English, designed for color adjustment of both CRT and LCD monitors. Appearance:

Software monitor calibration – Quickgamma
And another program for monitor calibration is Natural Color Pro. The interface is in English, you can calibrate CRT and LCD monitors.
The appearance of the Natural Color Pro interface can be seen in the pictures below

Natural Color Pro monitor calibration program

Monitor calibration program – Natural Color Pro
You can download Natural Color Pro by going to.
Monitor calibration at home V Samsung program Natural Color Pro is described in the article “ ”
Let's summarize.
Monitor calibration. Five most popular programs for calibrating your monitor at home
- Quick gamma
Make money from your photography by selling your images on . Register in the most profitable microstocks,
Understanding monitor calibration principles is critical for any photographer who wants to achieve accurate and predictable photo prints. If your monitor doesn't reproduce shadows and colors correctly, then all the time spent editing and post-processing the image may actually be wasted time. This chapter covers the basics of calibration for the average photographer, in addition to using calibration and profiling devices for highly accurate results. Further, it is assumed that throwing away the old monitor and buying a new one is not the solution.
Adjusting brightness and contrast
The simplest (but least accurate) way to calibrate your monitor is to adjust its brightness and contrast. This method does not require a color profile for your monitor, making it ideal for everyday use or when you need to make quick adjustments on someone else's computer.
The images below are designed to help you select the optimal brightness and contrast settings. A well-calibrated monitor should be able to pass both tests, but if it fails them, you'll have to decide which of the two is more important. In any case, make sure to allow the monitor to warm up for at least 10-15 minutes first.
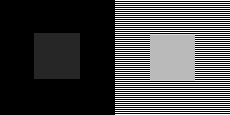
1) Halftones. Well-calibrated halftones are often the highest priority task. The monitor should show the central square as identical in brightness to the surrounding background - when viewed with defocused vision or from a distance. The left and right squares should appear darker and brighter than solid gray, respectively.

© 2004-2011 Sean McHugh
Note: The above test assumes the monitor is set to 2.2 gamma.
If the center square is brighter or darker gray background Your monitor is likely displaying images that are brighter or darker than intended. This will also have a noticeable impact on your printed output, so it's something to deal with.
If you are using an LCD monitor, first set it to standard contrast (most likely either 100% or 50%), then adjust the brightness until the central square blends into the background. If you are using a CRT (the big "old fashioned" type), set it to maximum contrast. In any case, make sure your monitor is set to 2.2 gamma if it has such a setting (for most modern monitors this is the default setting).
Note: Increasing the brightness of your monitor too much may shorten its life. You probably won't need your display at maximum brightness unless the room is too bright, the monitor doesn't have backlighting (like a window in the background), or it's not too old.
2) Details in light and shadows. If you calibrated in the previous step, the midtones on your monitor will currently display approximately the desired brightness level. However, this can also mean that shadows and highlights are too bright or dark, and vice versa. In each of the following two images, 8 steps should be visible:
The two extreme levels of shadows and light should be only slightly distinguishable. Otherwise, you've likely reached the limit of your brightness and contrast adjustments. Otherwise, if the maximum detail in the shadows and highlights is more important than the illumination of the midtones, you can ignore the midtone test. In this case, use brightness first to achieve the desired shadow detail, then use contrast to adjust the highlight detail (in that order). If the brightness is too high, all-black will appear grey, but if there isn't enough shadow detail, several of the given 8 shadow levels will appear the same.
However, the examples shown above provide only a coarse adjustment that covers only a small portion of the tonal range and does not correct color at all. There are several more precise methods visual calibration, but ultimately obtaining truly accurate results requires systematic and objective measurements using calibration instruments.
Overview: Calibration and Profiling
The colors and shadows a monitor produces vary depending on the monitor type, manufacturer, settings, and even age. Unfortunately, unlike digital world, the same numbers do not produce the same results when it comes to monitors. As a result, green, for example, may turn out to be darker, lighter, or a different saturation than it was specified in the numbers:
| Digital value green |
Monitor "X" |
Standard color |
||
|---|---|---|---|---|
| 200 | → | |||
| 150 | → | |||
| 100 | → | |||
| 50 | → | |||
| ← Color is different → | ||||
note: in terms this example"standard color" is just
an example of a desired state that can be clearly defined in terms
universal parameters such as gamma, white point and brightness.
Ideally, your monitor would simply translate the numbers from the file into a standard set of colors. However, this is not always possible, so in reality the process of calibrating a monitor consists of two steps: 1) calibration and 2) profiling.
1) Calibration is the process of bringing the monitor to a desired and clearly defined state. This usually involves changing various physical parameters of the monitor, such as the aforementioned brightness, as well as creating a so-called Look-Up Table (LUT).
The LUT takes an input value such as green=50 from the above example and then says "I know that monitor X shows green=50 darker than standard and if I convert 50 to 78 before sending it to the monitor the resulting the color will be what it should have been green=50. In this way, the LUT translates the digital values from the file into new values that effectively compensate for the characteristics of the selected monitor:
| Digital value green |
LUT | Compensated digital values |
Monitor "X" |
Standard color |
||
|---|---|---|---|---|---|---|
| 200 | → | 200 | → | |||
| 150 | → | 122 | → | |||
| 100 | → | 113 | → | |||
| 50 | → | 78 | → | |||
| ← colors match → | ||||||
2) Profiling is the process of characterizing the calibrated state of your monitor using a color profile. These characteristics include the range of colors that your monitor is capable of displaying ("chroma space"), in addition to the location of intermediate brightnesses within that range ("gamma"). Other properties may be included in the profile.
Profiling is important because various devices not always able to reproduce an identical range of color and shadow (“gamma difference”). A perfect conversion from the color of one device to the color of another is therefore not always possible. Color profiles allow programs that support color management to make reasonable compromises in the process of imperfect conversions:
Monitor calibration devices

using a calibrator
The monitor calibration device solves both calibration and profiling problems. It usually looks similar to a computer mouse and is attached to the monitor screen. A special program then controls the monitor so that it shows a wide range of colors and shadows under the calibration device, which are consistently measured and recorded.
Common calibration devices include the X-Rite Eye-One Display, ColorVision Spyder, ColorEyes Display, and ColorMunki Photo, among others.
Before starting calibration, give your monitor at least 10-15 minutes to warm up. This will ensure stability and reproducibility of brightness and color balance.
Immediately before starting the process, the program will ask you to set several parameters by which the calibration will be carried out (“target setting”). These parameters can include white point, gamma, and brightness (we'll look at these in the next section). During the calibration process, you will also be asked to change various screen settings, including brightness and contrast (and RGB values if you're using a CRT).
The result is a matrix of color values and their corresponding dimensions. Complex software algorithms will then attempt to create a LUT that will reproduce, firstly, neutral, accurate and appropriately graduated shades of gray, and secondly, an exact match of hue and color saturation across the entire gamut. If they can't be perfectly accurate (and they never can), the program tries to prioritize the inaccuracies to those differences in colors and shades that our eyes are difficult to distinguish.
Calibration Settings
White point. This setting controls the relative warmth or coolness of the lightest tone on the screen according to "color temperature." Higher color temperatures will produce cooler tones, while low temperatures will seem warmer (yes, at first glance this is not intuitively clear).
Even though the above samples appear slightly colder and warmer, this happens
because they are located nearby. If you place any of them separately so that they are
the brightest spot on the screen, the eye adapts, and you call each of them “white”
You will find materials on this topic in the chapter on white balance.
For CRT monitors, the standard recommendation is a display color temperature of about 6500K (called D65), which is slightly cooler than daylight. However, for LCD monitors everything is somewhat more complicated. Despite the fact that many LCDs have a color temperature setting, their backlight always has its own color temperature. Any deviation from it leads to a narrowing of the gamut of your display. For this reason, it is generally recommended that LCD monitors be left at their default color temperature unless you have a compelling reason to change it. Your eye adapts to color temperature, and neither the warmth nor the coolness of a tone will be noticeable until they are directly compared.
Gamma. This parameter controls the speed at which the brightness of shadows increases from black to white (for each of the digital values). This causes the image to appear lighter at higher and darker at lower gamma values, respectively, but the black and white points remain unchanged. Gamma also greatly affects the apparent contrast of an image:
Note: The images above assume your screen is set to 2.2 gamma.
Old Mac computers We used gamma value 1.8 for some time,
but nowadays they also use 2.2 gamma.
A gamma factor of 2.2 has become the standard for image editing and viewing, so this value is generally recommended. Moreover, it in the best possible way correlates with how we perceive variations in brightness and is closest to standard setting your display.
Brightness. This setting controls the amount of light emitted from your screen.
Unlike white point and gamma, the optimal brightness setting depends heavily on the brightness of your work environment. Most set the brightness to around 100-150 cd/m2, but bright workspaces usually require higher values. The maximum brightness achievable will depend on the type and age of your monitor, and may therefore severely limit the brightness of your work environment.
However, higher brightness settings will shorten the life of your monitor, so it's always best to dim your monitor brightness somewhat if you can afford it. Use the lowest possible brightness range of 100-150 cd/m2, in which you can still see all 8 shadows in the sample above.
Calibration: display table
The Look-Up Table (LUT) is either managed by your graphics card or the monitor itself, so it will be used regardless of whether your program is running a color-managed program - as opposed to a chroma profile. The LUT is usually loaded immediately after loading operating system and is used regardless of what is displayed on the monitor.
Whenever the red, green and blue numbers are equal, an accurate monitor should show it as neutral grey. However, you'd be surprised how often this isn't the case (see below). The LUT*'s job is to maintain neutral gray tones within the correct range.
*Note: This is an example for a simple linear 8-bit LUT,
which is most often used with CRT monitors.
| Input R,G,B values |
Monitor "X" |
Neutral grey |
||
|---|---|---|---|---|
| 200,200,200 | → | |||
| 159,159,159 | → | |||
| 100,100,100 | → | |||
| 50,50,50 | → | |||
| ← difference → | ||||
An example LUT that corrects the "X" monitor display is shown below. It essentially applies independent tone curves to each of the monitor's color channels:
Note: The above table is linear and 8-bit; exist
more complex 3D LUTs that do not process each color independently.
However, the basic concept remains the same.
Without the LUT above, your video card sends the input color value 159 (from a digital file) directly to the monitor (it doesn't matter what color it is). Using a LUT, the video card substitutes the red, green, and blue values using tone curves. The input value R,G,B=159,159,159 is sent to the monitor as 145,155,162 (which is now perceived as neutral gray). Note also that deeper color correction corresponds to a greater deviation of the tonal curve from a straight diagonal.
There are often multiple LUTs in the display chain - not just in the video card. Another LUT that best matches your monitor's calibration is its built-in LUT (as discussed below). If your monitor supports the ability to change the built-in LUT (some models do), this will usually result in a more precise calibration than using the video card's LUT. However, unless the calibration program was designed specifically for your monitor, it will most likely use the LUT of the video card.
Profiling: Chroma Profile
The color profile sets calibration-based output parameters such as gamma, white point, and brightness, in addition to calibration measurements such as the maximum intensities of red, green, and blue that your display is capable of emitting. These properties together define the color space of your monitor. The profile also includes a copy of the LUT, but it is not directly used since it is already implemented in the monitor or video card.
A color profile is used to transform images so they can be displayed correctly based on the unique characteristics of your monitor. Unlike LUTs, to use a chroma profile when viewing images you will need a program that supports color management. This won't be a problem if you're using the latest PC or Mac operating systems, as they all support color management. Otherwise, use Photoshop or any other common image editing or RAW file conversion program.
Whenever a digital image is opened that contains an embedded color profile, your program can compare that profile to that of your monitor. If your monitor has a tonal range similar to that indicated in the digital image, the values from the file will be directly converted by the LUT to values that are correct for your monitor. However, if the color spaces are different (as they usually are), your program will perform a more complex conversion. This process is called chromaticity space transformation.
Monitor calibration test
Don't assume that just because you've done color calibration that your monitor will reproduce color accurately without any difficulty. It is also important to check the quality of this calibration. If you find that your calibration device was unable to eliminate some inaccuracies, you can at least take this into account when processing images with methods that affect color.
The simplest and most quick way To evaluate the quality of color calibration is to look at a large black-and-white gradient in a program that supports color management. Suboptimal monitor calibration may render this gradient with subtle vertical streaks of color or sudden discrete jumps in tone. Hover over the following sample to see what a low-quality monitor calibration can look like:
An example of a smooth neutral gradient for diagnosing the quality of monitor calibration.
This gradient is best suited for diagnosis when viewed on full screen and when turning the color profile on and off. Photoshop allows you to achieve this by setting "Proof Colors" to "Monitor RGB"; CTRL+Y enables or disables the application of a monitor profile. If "Monitor RGB" is enabled, it means the monitor's color profile is Not used.
If there are visible streaks of color in the gradient, this may indicate that your monitor needs a new calibration. It's usually recommended to do this monthly or so, depending on how important color accuracy is to your work.
Otherwise, your monitor's color rendering may be so far from optimal that the color profile will require extreme correction. This may be due to the monitor calibration you are using, or it may be due to its age. In the latter case, the color profile will still be a big plus compared to its absence - but the color rendition will not be perfect.
Monitor calibration limitations
Unfortunately, there are limits to the accuracy of calibration. For a digital monitor, the more you need to change your monitor's settings from its default settings, the more you'll lose in the amount of color and shadow it can show. Fortunately, the bit depth of your monitor's built-in LUT can affect how well it is calibrated, since a monitor with a larger LUT bit depth can use a wider gamut of colors:
Note: increasing the bit depth of the built-in LUT does not mean that the monitor can show more shades of color simultaneously, since the number of input values remains unchanged. This is why increasing the bit depth of a video card's LUT alone will not allow for more accurate calibration.
In the low-bit example, the brightest (4) and darkest (1) shades are forced into white (5) and black (0), respectively, because the LUT rounds to the nearest available output value. On the other hand, a multi-bit LUT can use additional intermediate values. This greatly reduces the likelihood of color banding and image posterization - even if the monitor is quite old and has significantly deviated from the original color.
If you have a new precision monitor with an 8-bit LUT, you'll probably get a good calibration; The role of LUT bit depth begins to increase as the monitor ages. Most displays use an 8-bit LUT, although some have 6-bit LUTs and others have 10-bit or more. Avoid using LCD monitors designed for gaming, as they often sacrifice the bit depth of their LUTs (or other aspects) fast speed update, which makes no difference when viewing still images.
Monitor calibration in Windows 10 (and other versions of the operating system) is very important point at work. Monitor calibration is especially important for photo processing. No software is needed to calibrate the monitor. Windows has a built-in color calibration tool that can help. The built-in tool will display pictures to calibrate your monitor.
Reasons to calibrate your monitor:
- Desaturated colors
- All colors are gray
- Colors are too light, etc.
We do not recommend calibrating your monitor online, since the built-in functionality copes with this task quite well. But on the Internet you can find photographs for monitor calibration if the system ones seemed insufficient for you.
Software calibration of monitors does not make sense, since there is a special tool in Windows. Home monitor calibration is carried out with a standard tool, which is located along the way (for Windows 10):
- "Start"
- "Options"
- "System"
- "Screen"
- "Advanced screen options"
- "Color Calibration"
The monitor calibration test in Windows 7 is launched using a different path:
- "Control Panel"
- "Screen"
- "Color Calibration"

The monitor calibration setup program will open, click “Next” to begin calibration.

Color calibration in Windows 10 opens along the path: “Start” - “Settings” - “System” - “Display” - “Advanced display settings” - “Color calibration”. For Windows 7: “Control Panel” - “Display” - “Color Calibration”.
Once opened, you will be prompted to set your monitor settings to default. We are talking about settings that are set directly in the monitor itself, using buttons.

The next screen shows us an example of correctly setting the gamma; by clicking the “Next” button, you will go directly to setting the gamma.

By scrolling the slider on the side, you need to achieve an effect where there are no light or dark spots inside the circles. The circles should be uniformly gray.

Having achieved the desired result, click the “Next” button. The next screen prompts you to open the brightness and contrast controls on the monitor itself and click Next.
If you are satisfied with the brightness and contrast of your monitor, feel free to click the “Skip settings” button. If you want to adjust these settings, click “Next” and follow the instructions:
- When adjusting the contrast, it is necessary that at the maximum permissible settings, the folds and buttons on the shirt are clearly visible in the image proposed by the system
- In the brightness setting, you need to calibrate the brightness so that the colors in the proposed image do not merge and are not too light
The following screen shows an incorrect color setting.

Click “Next” and check the display of gray bars on your monitor. If they are not gray shades, but colored ones, twist the lower sliders to achieve the maximum good result(all stripes must have gray tones).


If, before clicking the “Finish” button, you do not uncheck the “Run ClearType Configuration Tool...” item, you will be taken to the font display settings window.
You need to choose from the presented options the one that, in your opinion, displays the fonts with the best style. Example:

After passing all tests, monitor color calibration will be completed.
Still have questions? Ask in the comments.
There is a setting in the calibration tool that allows you to adjust the contrast. The monitor's contrast setting determines the level and brightness of light tones. Adjusting monitor contrast:

Adjusting the monitor contrast will finish when you click Next.
To ensure that the colors on your monitor are displayed according to how the developers of websites, interfaces, flash screens, etc. want them to be shown, then calibrating the monitor is a good activity to kill time. The most primitive (and free) method of calibration using - Adobe Gamma(a software tool for calibrating CRT monitors or LCD monitors (aka LCD or TFT) with IPS, PVA or MVA matrices) comes with the latest Adobe products. You can also download Adobe Gamma separately for free.
However, to the newest Photoshop versions This CS3 program is not included, probably due to the predominance of LCD monitors, for which the Adobe Gamma program is not intended. In general, for LCD monitors and especially those based on TNT + film matrices, it is better to use hardware. It is not recommended to use several screen calibration programs at the same time (Adobe Gamma and Colorific).
Calibration affects the entire color range of a particular monitor as many settings changes can be saved in ICC profile.
First, you need to make your desktop background gray. Since the process will be performed “by eye,” nothing should interfere or distract. Adobe Gamma can be easily found here:
Start-Control Panel-Adobe Gamma
All the pictures below are from the program included with Photoshop CS2 (9.0)
You need to choose whether we will calibrate step by step or on one general panel. In the first Step By Step mode you will get more hints.


Click the Load button to load the original ICC profile for your monitor. Save profiles with names that are easy to find later.
Indicators Brightness and Contrast will help you adjust the brightness and contrast correctly. The light squares should be distinguishable between the dark ones, and the white stripe at the bottom should remain bright. In the next Phosphors calibration window, specify the type of phosphor used in the monitor. If you don’t want to rummage through the accompanying documentation that comes with the monitor, select the value Trinitron. For LCD monitor, leave the value Custom.
To ensure proper color matching, move the sliders until the centered squares are barely visible. It will be easier if you squint your eyes a little while doing this. If you set the View Single Gamma Only icon, there will be only one square; we also adjust the brightness with the slider. You can adjust it either by three colored squares or by one (View Single Gamma Only), in most cases the second option is simpler and more convenient. In the Desired option, define the gamma value. For Web and print preparation 1.8 is better, only for Web 2.2
The White Point function determines the white point value for the monitor being calibrated. Measure will display a dialog to configure this (optional). If you primarily work with Web images or the value 5000*K for color temperature and 1.8 for gamma are not suitable for the monitor, set 6500*K and 2.2 respectively. The program will display the appropriate settings by default, and if you want to pass the choice to it, then put Same As Hardware.
Atrise lutcurve is a program designed to calibrate the color, brightness and contrast of a monitor at home.
Users do not always understand why monitor calibration is needed. First of all, for those who work with photographs or other graphics, it is important that colors and details look the same on all monitors. This is very difficult to achieve, since monitors from different manufacturers and even different models The same manufacturer has different default settings.
For those who are engaged in photography at a commercial level, it is important that their photographs are bought, and due to the fact that the customer’s colors will not look the same as yours, the work may not be accepted. Atrise lutcurve program supported Windows versions 2000, XP (x86 and x64), Vista SP1 (x86 and x64), Windows 7 (x86 and x64) and Windows 10 (x86 and x64).
Monitor calibration process in Atrise lutcurve program.
The instructions are based on the program version Atrise lutcurve 1.5.2.
Preparing to calibrate your monitor.
Before starting calibration, you should let it run for about 20 minutes. This will allow the monitor to warm up and display the image as stable as possible. Your eyes should not be tired, so while the monitor is warming up, you should give your eyes a rest.
There are also special requirements for workplace lighting.
- Windows should not create glare on the monitor.
- Before starting setup, it is advisable to wipe the display from dust and other contaminants.
- It is advisable to set the desktop picture to gray. Bright themes will also have to be abandoned. A classic gray theme is best.
- Select RGB as the color profile in the monitor settings.
- All third-party monitor color adjustment programs should be disabled or settings reset to default values.
- When working with CRT monitors, select the gamma G=2.2, for LCD displays G=1.8
The calibration process has five steps.
After each step, you can go back and make adjustments.
- The black point setting step allows you to adjust the brightness of the monitor or the black level if you have a specialized monitor with advanced settings.
- Setting the white point allows you to adjust the contrast of the monitor.
- Gamma allows you to adjust the gamma.
- Color correction allows you to select the color temperature of your monitor.
- Curve adjustment allows for final brightness adjustment.
Let's look at each step in order.
Launch the Atrise lutcurve program

The bottom panel contains a series of tabs that provide transitions between calibration steps. In order to finally evaluate all the adjustments made, all the regulators are located on the penultimate tab. Finally, you can check the quality of the adjustment using a reference image. The program supports working with multiple monitors. In the drop-down tab, you can select which monitor you want to work with at the moment.
Setting the black point.

The black point adjustment step is divided into two steps:
- Hardware setting in the parameters of the monitor itself.
- Software setup.
First of all, we need to make the squares (1,1,1), (2,2,2) and (3,3,3) distinguishable. In this case, the square (1,1,1) should remain at the limit of visibility, and the background should be tried to be kept as black as possible. To configure, use the monitor menu and brightness control. If this is not enough to obtain a satisfactory result, we use the software controller in Atrise lutcurve.
All squares should not contain any color admixture. If foreign colors appear, they should be removed using regulators R, G, B.
Setting the white point

Now we need to adjust the contrast. We use the contrast parameter in the monitor settings. The squares (252,252,252), (253,253,253), (254,254,254) should be distinguishable. All of them should not contain any admixture of foreign colors.
Adjusting gamma (gamma)

In this step, you need to adjust the gamma so that the three columns are as little distinguishable as possible. To configure, use the first parameter Gamma. The top and bottom of the columns can remain lightly colored, but the middle should blend into the background as much as possible. If you can’t make the middle gray, then adjust the color parameters R, G, B.
Adjusting color balance (color correction)

At this stage, you need to try to rid the light and dark gray squares of impurities of other colors. If you made adjustments to this step, they have changed in the previous ones, so you need to go back and achieve a balance between all the configuration steps.
Curve adjustment

In this step, you can adjust the brightness curve of each color. Ideally, you want to achieve a complete absence of flowers. In practice, this is difficult to achieve and is not available on any monitor. It is necessary to try to get the best of possible results. To adjust, you need to move the point along the curve. In this case, the brightness of the image will change from dark to light. Try to adjust the colors so that the transitions between points are as smooth as possible.
All regulators
All parameters are collected here. We can evaluate what settings we have made and adjust them if necessary.
Reference image
Here we can view a snapshot that contains the most common color combinations and various details. All gradient transitions should be smooth; gray, white and black colors should not contain admixtures of other colors.

If the result is satisfactory, click “Ok”. All changes made are saved and the monitor continues to work taking into account the settings made.
The eye easily adapts to various combinations colors and brightness, so what may be the norm for one may cause mixed feelings for another, so hardware calibration devices cannot be replaced with programs that allow adjustments by eye, but this will at least bring the displayed image closer to the standard.
Probably every user wants to work on a monitor that displays well. The monitor must accurately convey all the shades and details of the image both in the shadows and in bright light. To set up your monitor well, you need to use a special software and metric gauges.
It is recommended to use them when carrying out professional work with color shades.
Monitor calibration program from Samsung and other manufacturers
Professional calibrators are not cheap at all. Only specialized computer services can afford to use them. It is better for ordinary users to use special programs that allow you to configure the monitor with only one natural indicator at hand, namely the eye. The operating principle of the monitor calibration program is to use certain test images with which you can check all functions and parameters graphics adapter. The operator only needs to monitor the correctness and accuracy of the adjustment.
Typically, the adjustable functions include contrast, brightness, and gamma. The gamma parameter is responsible for the screen's response to the set values for intensity and color. The gamma coefficient value taken as standard in the Windows operating system is 2.2.
Start calibrating your PC or laptop monitor
Before you start setting up the display, you need to properly set up workplace. External lighting should be directional and constant. The light should not shine into the operator’s eyes or create glare on the screen. Much attention is paid to the color of lighting. Many experts recommend using fluorescent or conventional lamps. Even such a small thing as the background behind the screen should be decorated in soothing colors. This will ensure uniform illumination and also ensure color neutrality.
It is necessary to calibrate a laptop monitor on a well-warmed device. This makes it possible to stabilize the backlight parameters. According to research data, the device must be kept turned on for 0.5-1.5 hours before calibration. Various modifiers that are responsible for contrast and brightness, as well as image quality enhancers, must be turned off.
Experts advise users to pay attention to displays that support the TN+Film matrix. On these screens, the picture quality depends on the angle of inclination. When calibrating such a monitor, you cannot change the angle of the display. Otherwise, all your attempts to adjust the monitor will be in vain. Even a small change in the tilt angle has a strong effect on the display of the test image.
Setup process
At home, monitor calibration is carried out using special programs. The principle of their operation is based on changing the image settings in accordance with the capabilities software equipment and monitor capabilities. The result of the changes is simultaneously monitored using test pictures. The patterns usually have a lattice or mesh appearance. By making changes to the contrast, brightness and gamma settings, the user tries to achieve complete merging of image areas with the general background.
Keep in mind that the calibration process for human vision is quite labor intensive. To properly set up your monitor, you will need to spend a lot of time in front of the display. During this time, the eyes may get a “defocus” effect. During the calibration process, experts recommend giving your eyes a rest. Human vision can only give a subjective assessment of the settings. Accordingly, setting up at home can be very subjective.
Practical studies have shown that ignorant and thoughtless actions during system setup when using calibration programs personal computer and laptop monitor may result in poor display quality. Therefore, to make the settings, you must have a full understanding of why and how you need to make changes to the display parameters. If the user is not well versed in setting, it is better to leave the factory settings unchanged. This is especially true for those displays that have a decent operating history. Next we will look at the most popular programs and applications that allow you to carry out high-quality work on changing monitor settings.
1. Atrise Software LUTCurve
According to many experts, this program is the best for monitor calibration. It has a fairly wide range of functions for customizing the screen. In order to make the most of all the capabilities of this software product, it is necessary to study in detail the instructions supplied with the software product. Owners of monitors and laptops with TN matrices are strongly recommended to maintain a certain viewing angle on the monitor.
On home page The utility describes in detail all the parameters for arranging a workplace, and also provides rules for setting colors and system profiles. The utility supports the sRGB color space. Gamma and color temperature are maintained at 6500 K. The program can also work in a multi-monitor configuration. This makes it possible to perform fine tuning any devices.
In its work, the Atrise Software LUTCurve monitor calibration program relies on the maximum sensitivity of the human eye to a gray person. Almost all test pictures are made in neutral color scheme. The program also has a rather significant drawback: the lack of a hardware sensor. The program settings are based on the factory brightness settings set by the manufacturer in the display settings settings. This method quite often gives a negative result.
This is especially true for old monitors whose factory settings have long been lost. The advantage of this utility is the ability to adjust the gamma at all 256 points across three elements. Thus, only a very patient user who has a lot of time to spare can configure the monitor’s operating parameters. This method is also characterized by subjective perception.
2. Eberhard Werle Quick Gamma
Given software product designed to calibrate monitor colors and adjust the gamma of systems with an indicator of 2.2. The program has minimum set functions. To obtain information about setting up the program, you must use the “Help” section. There are also links to applications necessary for the program to work. The text image is made in the form of horizontal columns. Calibration uses the principle of determining the degree to which these columns merge with background. It is especially hard on the eyes when the picture acquires a color component from RGB substrates.
3. TFT Test 1.52
This application is equipped with a set of 12 pictures designed to compare and adjust displays. The utility contains sample data designed to test geometry, accuracy and screen resolution. Thanks to gray and color, circular and linear smooth saturation gradients, the program allows you to compare the quality of brightness calibration, as well as the quality of halftone display. To monitor the performance of LCD screens, TFT Test 1.52 has two built-in tests that allow you to determine the response speed of display elements.
4. PassMark Software Monitor Test
This calibration utility contains 13 test images. All of them are designed to configure both LCD and simple displays. Such test pictures give a professional the opportunity, using standard monitor tools, to adjust the gamma parameters so that the displayed picture details have the correct appearance over a fairly wide range of brightness. Main disadvantage this application lies in the lack of tools for setting up LUT maps.
All changes are made only through the standard monitor menu.
Testing LCD screen components for performance involves displaying a number of contrasting objects that move simultaneously at different speeds. According to experts, the frequency of movement of these objects is insufficient for testing.
Conclusion
Today there are many programs for setting up monitors. Each of them requires the user to have certain skills and abilities. As was already said at the beginning of the review, if a person does not know how to correctly use the tools of calibration utilities, then it is better to leave the factory settings. If you still need to perform color correction on old monitors, but you do not know how to do this, then it is better to seek help from specialized service. Our experts can help you calibrate your display safely. All of the monitor calibration programs described above are suitable for working at a professional level. A beginner is unlikely to be able to configure the display using these software products.
Monitor calibration is a necessary preparatory stage in the pre-print preparation of photographs and images, without which all efforts to select the most suitable and effective colors will be in vain. Incorrect color reproduction will lead to printed photographs being too dark or, on the contrary, overexposed, and people's faces will take on an unnatural shade.
Monitor calibration can be done using special calibrators designed for this, but not every photographer has such a device. In the first part of this article, we will look at methods that will allow you to calibrate your monitor without the use of additional equipment.
Preliminary stage of monitor preparation
When choosing a monitor, avoid modern LCD devices designed for playing games, since most often their manufacturers often reduce the LUT bit depth in order to increase the image update speed. The optimal solution would be to purchase an accurate monitor with an 8-bit LUT, the role of which will be especially noticeable as the device ages.
Before you start calibrating your monitor, make sure that you really need it. If you are not a computer artist, but simple user, and your main task is typing, calibrating the monitor can only lead to the fact that you will overstrain your eyes as a result of high brightness, and the monitor itself will last much faster.
Make sure your monitor is clean and not covered in dust. In order to wipe the screen, it is better to use special products or, in extreme cases, alcohol.
Try to provide constant dim lighting in your room. You can turn it down during the day sun rays using blinds, at night you should use a fluorescent night lamp white. A regular incandescent lamp will not work for you, as its spectrum is narrower. For overhead light, it is recommended to use lamps that provide diffused light.
Adjusting brightness and contrast
Adjusting brightness and contrast is the simplest, but at the same time the least accurate way to calibrate a monitor. The advantages of the method include the fact that it does not require a color profile, so it is perfect not only for everyday use on your PC, but also in cases where you need to make adjustments on someone else's computer.
The tests below are designed to help you choose optimal settings contrast and brightness. A quality monitor should be able to pass both tests. If this does not work out, decide which one will be more important for you. Before testing, make sure that the monitor has already warmed up sufficiently, which may take 10-15 minutes.
Adjusting Halftones
Halftone calibration is usually the most important task in pre-press monitor setup. In the figure below, the color of the square in the center should be similar to the background color, the left square should be darker, and the right should be lighter. If the center square appears brighter or darker than the background, your monitor is displaying images that are brighter or darker, which will affect print quality.
To set up your LCD monitor, you need to set it to standard contrast (usually 50% or 100%), and then adjust the brightness until the central square blends into the background. CRT monitors should be set to maximum contrast. Be sure to make sure your monitor is set to 2.2 gamma.
Increasing the brightness of the monitor may cause its service life to expire faster. Therefore, before making changes to the brightness settings, make sure that the brightness settings are not affected by excessive room lighting or a light source behind the monitor, such as a window.
Details in light and shadows
After you complete previous setting, all halftones on your monitor will have the required brightness level. Please take a look at the images below to confirm that your settings are correct.


Details in the light
In each image, 8 steps should be visible, and the outer ones should be barely visible. Before making adjustments, decide what is more important for you - the illumination of halftones or the maximum of details. Too high a brightness will cause the black to turn into grey. The above settings allow you to correct part of the tonal range and practically do not affect color. More accurate calibration can only be achieved using special instruments.
The simplest ways to calibrate a monitor
The more colors your monitor displays, the more delicate work with images you can do. Therefore, set your video card to maximum color depth and set contrast to maximum. After this, adjust the brightness of the display so that the boundaries between the transitions in the figure below are clearly visible, but the transition between 0 and 5 is barely noticeable.
Look at the picture below, there are several squares there. No pixel on the screen should be blacker than one of them. The black border around the screen should be exactly the same black as this square. Look at white square. Its color should be truly white, without blue or pink tints.

Move one step away from the monitor: one of the squares in the picture below should be shaded in the same way as the background around it. The number in its center represents the gamma of your screen.

Another calibration test is developed using Adobe Gamma technology. The black square in the picture below should be barely distinguishable from its surrounding background. The background of the gray square is as bright as the shading surrounding it.
Calibration and profiling
The difficulty of pre-printing images is that the same color can be reproduced completely differently on monitors that differ from each other in settings, manufacturer and even duration of operation.
Monitor calibration is intended to eliminate the difference between the digital color value and its visible display, and includes changing the physical parameters of the monitor (brightness, contrast, color), as well as creating the so-called Look-Up Table.
The LUT takes the original color value from the image file and then determines that the monitor is showing it darker or brighter than it should be and makes adjustments to the display accordingly. Thus, the task of the Look-Up Table is to convert the digital color value into a new one that will correct all the existing shortcomings of the monitor.

Due to the fact that different devices usually unable to reproduce the same range of color and shadows, great value To configure the monitor, profiling is performed, which is carried out using special programs. Supporting color management software uses color profiles to achieve minimal differences between the original and converted images.

Monitor calibration devices allow for both calibration and profiling. Most calibrators look like a computer mouse and are attached to the display. Complete with the device goes a program that displays on a monitor a sequential set of colors and tones that are measured and recorded by a device.
The most common calibrators are:
- Color Eyes Display,
- ColorVision Spyder,
- Rite Eye-One Display,
- ColorMunki Photo.
Calibration should begin 10-15 minutes after turning on the monitor to allow it to warm up. This will ensure stability of brightness and color balance. Next, you will need to set the monitor parameters by which calibration will be carried out. These parameters include white point, gamma and brightness. During setup, you will need to change some monitor settings, including brightness, contrast, and RGB values if you are using a CRT.

As a result, you should have a matrix of color values and their corresponding parameters. The device will create a Look-Up Table that will reproduce neutral and accurate shades of gray, as well as matching hue and color saturation.
Calibration Settings
There are several parameters whose values must be determined to calibrate the monitor.
The white point is needed to determine the warmth or coolness of the lightest tone of the display. Increasing the color temperature produces cooler tones, while decreasing it produces warmer tones.

The standard recommended temperature for a CRT monitor is 6500K (or D65). It's a little cooler than normal daylight. Setting up LCD monitors is more complex due to the fact that their backlight always has its own color temperature, which cannot but affect the image. Because of this, it is generally recommended to leave the color temperature of LCD monitors unchanged unless you clearly need to change it.
Gamma controls the rate at which shadows fade in brightness as they transition from black to white. Has a significant effect on the contrast of the image and also makes it appear lighter or darker.

The current standard for image editing and viewing is a gamma of 2.2, which is closest to monitor settings as well as human perception of brightness variations.
Brightness determines the amount of light coming from the monitor. Settings this parameter depends entirely on the level of illumination in your environment, including daylight or electric light in the room, as well as additional sources. The most common value for this setting is 100-150 cd/m2, however, if you work in a bright room, you will need to change the monitor brightness.
How the Look-Up Table works
The LUT is controlled by the graphics card or the monitor itself, so its use is independent of whether the software supports color management. Loading of the LUT begins immediately when the operating system starts, and its use is carried out regardless of what is on the display.
To better understand how a LUT works, let's take a look at how different it can look gray, which should be displayed on the monitor when the values of red, blue and green are equal. The LUT's job is to keep the gray tones within the correct range.

In some cases, several LUTs are involved in creating the image on the monitor, not just the one located in the video card. Particularly precise calibration can be achieved by adjusting the LUT built into the monitor, but not all models allow this.
Why is a color profile needed?
A color profile is necessary to convert images so that they are displayed as correctly as possible, taking into account the characteristics of the monitor. Unlike a LUT, which starts working immediately after system startup, in order to use a color profile you need appropriate programs that support color management. For this purpose you can use Adobe PhotoShop or another program for editing images or working with RAW format.
Every time the program opens an image containing a chroma profile, the program compares it with the monitor profile and, if there are differences between the chroma spaces, converts them.
How to check the quality of calibration
It is not always possible for a device to perform its task efficiently, therefore, every time after calibrating the monitor, it is necessary to check how it was carried out. And even if you find that your monitor can't be adjusted better than this calibration device did, you can take that shortcoming into account when editing your images.
The easiest way to evaluate the quality of the calibration is to open a large black-and-white gradient in a program that supports color management. If the transitions between tones are uneven, then most likely the monitor was not calibrated well.
Compare the two pictures below to understand what poor calibration looks like.
Setting up printing equipment
General monitor calibration will help to avoid color distortion when printing on most printing equipment, however, in some cases, in order for the image obtained when printing to correspond to the image on the monitor, it is necessary to find the correct one for your printer. special file to adjust ICM.
Usually they are located on the manufacturer's official website. This color profile can be opened in any professional image program - Photoshop, CorelDRAW, Microsoft RAW, etc.

The color profile is set directly in the editor program itself. For example, in PhotoShop, to do this, go to the “Editing” menu section and select “Adjust Colors”. By clicking on the “Download” button, you can install a new profile in the program.