Optimizing Windows Vista. Tweaking Windows Vista
Vista Smoker Pro 1.2
Developer: WareSoft Software
Distribution size: 4 MB
Spreading: shareware
Vista Smoker Pro is a product of WareSoft Software, which is also the author of the XP Smoker Pro optimizer, designed for the previous version of the OS from Microsoft. Like the XP tweaker, the Vista optimizer is distributed as shareware, but there are some positive changes. To test XP Smoker, the user was given only three launches, after which the program completely refused to work. In Vista Smoker Pro, the number of test runs has been increased to fifty, but they can only be used for seven days.
XP Smoker is available in two versions - standard and professional. The only difference between them is that the first has fewer optimization parameters.
We advise you to start working with the program from the very last, but most important section – Restore Points. True, the first time you start Vista Smoker it will prompt you to create a restore point, but if you accidentally refuse, you can always return to this important operation. You can create several control points and, if necessary, return to any of them.
In the Passwords section you can create and change a password to access the program. By default, Vista Smoker works without a password.
The Tweaks section contains hundreds of checkboxes for fine-tuning the system. Its first category - Auto Tuner - is for the laziest. If you are too lazy to delve into the parameters and figure out what each checkbox is responsible for, just run the automatic system setup and sit back. The program will analyze the current state of the system and make all the necessary changes, from its point of view, to ensure the best performance. This may take up to 15 minutes. However, the developers honestly warn that when using the Auto Tuner tool, not all modules of the program are used - for example, the hard drive is not cleaned, the Internet connection is not optimized, so it still won’t be completely automatic.
The parameters responsible for system performance are divided into two categories, since, apparently, they simply did not fit in one window. They are called Performance I and Performance II. In the first, you can enable optimization of CD/DVD drives, select what will be a priority for the processor when executing tasks - applications or background tasks. You can also enable optimization of graphical effects, input/output pages, hard drives, enable timeout for services and applications, enable paging file clearing on reboot.
In the Performance II category, you can run the hard drive defragmenter from the command line and check whether the processor supports advanced management capabilities Windows memory Vista. Here you can also optimize the system for games. Just click the Activate Game Boost button, and Vista Smoker will turn off many system services, which will have a positive effect on the number RAM. There is also a button to disable game mode.

The Startup Manager category allows you to manage the applications that are loaded when Vista starts. Directly in the Vista Smoker window, you can view the registry branches in which information about program launches can be stored, and delete the corresponding entries. You can also add additional applications that should start with the system.
The next category contains tools for fine-tuning the system that the developers could not classify in any other section - optimizing the refresh rate of the mouse cursor, turning off tooltips, removing arrows in shortcut icons, disabling Windows Messenger and the recycle bin, optimizing the cache size for icons and menu response speed. The presence of a Recommended Settings button eliminates the need to think about which checkboxes are best to check and which to uncheck. Here you can also clear the icon cache, and also enter information about the computer owner and the name of the organization.
The More Tweaks category offers several automatic optimization tools. With the press of one button, you can clear your hard drive of unused temporary files and optimize your system for faster loading and launching of applications. It also displays information about the available amount of RAM and virtual memory, the number of free resources, and the size of the paging file.

The Shell Tweaks category will allow you to perform four actions: restore the original appearance of toolbars in Internet Explorer, clear the search history on your computer, and disable system performance counters. You can also manage the services that are required for Windows updates. For example, if you do not intend to update the system, all these services can be disabled with one click. Then they can be started again just as easily.
For more detailed management of services, the Services category is intended. All Windows services are displayed here, and each one can be stopped, started, disabled, or selected manually. In order to see all running services, you need to click the Query Running Services button, and for Vista Smoker to display a list of all stopped services, click the Query Stopped Services button. To avoid accidentally disabling something unnecessary, you can use one of the preset options for operating services, for example, Safe.
The Internet Explorer category, as you might guess, contains tools for fine-tuning the browser built into Windows. Basically, they relate to limiting its capabilities. So, you can disable access to the browser settings, prohibit closing it, creating or opening a new file, changing the download folder, disable search, hide the Help menu and favorites, prohibit printing web pages and viewing the source code of web pages. In addition, you can block access to each of the tabs in the browser settings window and disable remembering passwords. There are also buttons to quickly clear the DNS cache and temporary files that remain after visiting web pages.
Of particular interest is the category of settings associated with managing the User Account Control option. Using Vista Smoker, you can disable the prompt to install new applications and launch the UAC window in protected desktop mode, and define the settings for this option separately for administrators and users. There is also a checkbox for complete shutdown User Account Control.
Maintenance
The Maintenance section contains all program tools intended for system maintenance. For example, the Disk Usage tool will list all the directories on your hard drive and their sizes, and thereby help you determine which folder is taking up the most space. The Disk Cleaner tool will detect unused junk files on the system and, if the user wishes, delete them. Using the Shared DLL's tool, you can detect incorrect library files and remove them from the system.
Shell Browser is user-friendly interface to access system resources that are often difficult to find in confusing menus, especially if you don't know exactly where they are. Additionally, many of the folders that can be accessed from the Shell Browser are hidden by default, making them even more difficult to find. All Shell Browser components are divided into groups - administration tools, tools for setting up printers and networks, for managing favorites and Cookies etc.

Standard tools for system management are collected in the Control Center category. Using the available links, you can launch the DirectX diagnostic tool, the built-in Windows disk cleaner, the driver verification manager, the event viewer, the task manager, the Internet settings window, etc. Of course, you can access all these functions without the help of Vista Smoker, but it is much more convenient when they are collected in one place, it is much more convenient.
For detailed hardware and system information, refer to the System Info category. At the user's request, the program will display information about the modem, monitor, cooler, audio card, Plug and Play devices, as well as about the operating system, installed updates, Start menu items, and supported monitor resolutions. If you click the View Report in Browser button, then all collected by the program The information will open in an Internet Explorer window and you can easily save it.
Toolbox is one of the categories of Vista Smoker that is only available to users of the professional version. Using the tools available here, you can remove previously installed updates (hotfixes), add commands to the Explorer context menu to launch the command line and copy/move files, and also disable the Hibernation service, which makes it possible to reset the contents of RAM to the hard drive when you turn off the computer to load this file into memory the next time you turn it on.

Two more features implemented in the Toolbox category are enabling super fast system shutdown and repairing services. The latter means that Vista Smoker will review the parameters of all services and for those for which the Auto startup parameter is set, and the service itself is stopped, change the startup type to Manual.
Security
The Security section contains settings that are related to security. Using the settings of the first category of this section, you can clear the Start menu from items such as recently opened documents, folders “My Documents”, “My Pictures”, “My Music” “Network Neighborhood”, “Control Panel”, “Games” . In addition, you can hide the clock from the taskbar and hide the display of program icons in the tray. You can immediately return the Start menu to the classic look.
The System category contains some restrictions on the use of Vista features. Thus, it is possible to disable the disk burning option, ensure secure access to floppy disks and CD/DVD devices, and limit access restrictions to event logs. The built-in functions are immediately disabled. Windows tools recovery recovery, and sets how Vista should behave in the event of a crash (whether it should reboot or not).

Restrictions on using desktop and Explorer features can be found in the following category. It is possible to disable the desktop context menu, hide all its elements, hide some tabs in its settings window, make it impossible to call the properties of “My Computer” from the context menu, prohibit changing the screensaver or wallpaper, disable the ability to use HTML wallpaper on the active desktop, limit adding or removing new components to it, or disabling Active Desktop altogether. Explorer has the ability to pin toolbars in their original state and restricts the ability to change file types.
The next category of settings is dedicated to the control panel. You can hide administrative tools, tools for changing access to applications, restrict changes to animation settings, prevent adding and removing printers, and preventing the installation and removal of applications.
The Login category contains various options related to logging in, accounts, and saving passwords. Here you can disable saving passwords in Internet Explorer, set the requirement to press the key combination CTRL+ALT+DEL before logging in, disable the ability to turn off the computer from the window for entering the user's login and password, and so on.
The Defender category contains tools for managing Windows Defender, including disabling it and settings for downloading updates. Also here you can find restrictions that apply to some standard applications. You can disable Windows Calendar, the audio recording utility, Windows Movie Maker, and the sidebar.
Using the Drive Freeze window on your computer, you disable the ability to read and write data to floppy disks, USB drives, CD/DVDs and other devices designed to transfer data from one computer to another. This function will be useful, first of all, in the offices of those companies that are concerned about data leakage.

Vista Smoker Pro is a pretty good optimizer, although it doesn’t live up to its price of $40, since most of the proposed settings can be found in free tweakers. In addition, the organization of the program interface is not fully thought out, and finding some settings can take a lot of time. True, this program also has advantages. For example, password protection of program settings will be very useful for system administrators, and those users who do not like to delve into settings for a long time will certainly appreciate the numerous tools for quick optimization with one click.
Vispa 0.1
Developer: Jan T. Sott
Distribution size: 69 KB
Spreading: free
Vispa is a simple, free optimizer that is a successful successor to the traditions of the xpy utility for Windows XP. The program is made in an unusual way - its interface is very similar to the installation wizard that developers usually provide their programs with. Vispa itself does not require installation. Having launched the program, you need to select one of the presets according to which the system will be optimized: bringing the system appearance to the classic one, applying all settings without exception, or the mode for selecting optimization parameters by the user.
Then all that remains is to expand all the parameter categories and check or uncheck the desired boxes. There are several such categories: general settings, services, Internet Explorer, Windows Media Player, ease of use and file deletion. Almost everything available programs are aimed at disabling something, that is, making Windows Vista “lighter”.
In the general settings category, the following are of interest: the ability to disable the User Account Control option, speed up computer shutdown, and disable folder compression. In the services section, you can disable error reporting, automatic system updates, synchronization of system time with the Internet, Windows Defender, the use of a firewall and the remote registry.
Internet Explorer includes the ability to opt out of automatic updates, block the use of ActiveX, Javascript and SSL 2.0 controls, remove the anti-phishing filter, disable search components such as MASN Search and Windows Live Search. You can also disable the request to set Internet Explorer as the default browser, set temporary Internet files to be cleared every time the program is closed, and ensure that pop-up advertising windows open in new tabs.
The restrictions that apply to the built-in player in Windows Vista relate to obtaining information from the Internet about the license, DRM protection, and file metadata. In addition, you can disable automatic adding of files to the media library, prohibit automatic downloading of codecs, and prohibit the sending of the player ID to audio and video content providers. You can also use Vispa to enable music import as MP3 files and disable DRM protection for imported files.

The Usability category contains parameters that relate to ease of use. Here you can find a number of settings that help change the Windows Vista interface and bring it to the classic look, namely, change the appearance of the Start menu and the appearance of the login screen, and install the classic theme. Using the settings in this category, you can also perform operations such as integrating Notepad into the shell, disabling autorun, displaying hidden files and folders, showing the full path to a file in the title bar, displaying files of all types, disabling icon caching. In addition, it is possible to disable the Desktop Cleanup Wizard and the shortage warning. free space on disk.
The Delete Files category settings help you remove files from your system that most people never use. These include: examples of images, sounds, videos, playlists, and bookmarks in Internet Explorer. In addition, you can remove shortcuts from standard applications from the system, such as Windows Mail, Photo Gallery, Movie Maker, DVD Maker, Internet Explorer.
Vispa remembers latest changes entered into the registry with its help, so when you restart the program you will see a window in which it will prompt you to rollback.

Vista Tweaker 0.2
Developer: ajua Software
Distribution size: 78 KB
Spreading: free
Vista Tweaker is another free program for optimizing the new operating system. The program is at the very beginning of its development, as evidenced by its serial number, but everything suggests that the author plans to actively develop it in the future.
Vista Tweaker is tiny in size and has a very nice interface. At first glance at the program window, I somehow can’t believe that the author was able to fit all this into just 80 KB.

As usual, all parameters are divided into tabs. To make it more convenient to manage the settings, there are buttons with which you can quickly select or clear all the boxes in the program or on the current tab. For all parameters, a description is displayed, which can be seen in a special Description field when you hover the mouse cursor over the parameter name.
The System tab contains quite important settings that can make life easier for system administrators and simply experienced users who are annoyed by Vista's limitations. So, here you can enable the ability to use unsigned drivers, disable installation testing at startup, disable the secure desktop, remove warnings from the Security Center, partially or completely disable the UAC option, and refuse automatic system reboot. If only one user works at the computer, then the function will be very useful automatic login into the system.
What often complicates working with files in Windows Vista is that in order to gain permission to perform various actions, you must become the owner of them. Vista Tweaker allows you to add commands to the Explorer context menu to quickly take ownership of selected files. In addition, Vista Tweaker can supplement the context menu with such useful commands as “open in Notepad”, “move/copy to folder”, “display directory list”.
Windows UI
This category includes settings that affect how files are displayed in Explorer, Start menu items, and the desktop. Thus, it is possible to display the Control Panel in the Start menu as submenu items, speed up the search, hide the list of documents that were last opened, and change the speed at which submenus appear.

Among the settings that affect Explorer, one can note the display of hidden and system files, prohibiting requests for unknown file extensions on the Internet, disabling the display of tooltips and autocomplete in dialog windows. On the desktop there is an option to hide the display of arrows on shortcut icons, as well as remove the word “Shortcut” from captions.
Internet Explorer
The settings of the browser built into Windows Vista are divided into several groups: some relate to tabs, others to work with RSS, there are also options for setting up printing.

The largest group of parameters is entitled “Basic”. You can turn it off here automatic change image size, the function of automatically filling out forms, constantly checking whether the browser is installed as the default one on the system, and also getting rid of all installed extensions for IE with one click. It is also possible to save the session when closing the browser, pin the toolbar, and enable smooth scrolling.
Printing preferences include the ability to display background images when printing, and disabling printing of headers and footers.
To make working with tabs more comfortable, you can enable the opening of new tabs in the background, disable loading the main page on new tabs, and also get rid of the warning that appears when you try to close several tabs.
In addition, you can get rid of all the annoying messages in the information area and turn off the Internet Connection Setup Wizard. If you're annoyed by the sound that Internet Explorer makes when it detects a new RSS feed, you can also turn it off.
Other tabs
The remaining tabs of the program contain very few settings. Do not forget that this is just a beta version and the second open release of the program, so most likely additional funds for optimization will be added in future versions.
On the Software tab, you can find several options that relate to Notepad and Windows Media Player. For the first one, you can set the window size to be saved when closing, the status bar to be turned on, and the header and footer to be disabled when printing. For the player built into Vista, you can disable automatic checking for updates and the collection of statistics about program usage.
There are currently only two options available on the Network tab - disabling the Roaming Cache option and allowing more connections to the server.
The Performance tab contains several parameters that are responsible for system performance. So, here you can change the maximum waiting time for an application or service, and also disable checking for free space on hard drives.
On the last Miscellaneous tab, you can change information about the owner of the computer and the organization to which it belongs, as well as enter information for automatic login.
Despite the fact that Vista Tweaker is still in beta testing, the program has quite interesting options that are not available in other optimizers. In particular, it should be noted the ability to use unsigned drivers, as well as a convenient tool for adding commands to the Explorer context menu to quickly obtain ownership of selected files.
Vista Manager 1.2.0
Developer: Yamicsoft
Distribution size: 5.2 MB
Spreading: shareware
Similar to the TweakVI program discussed in the previous part of the review, Vista Manager contains a whole set of applications for comprehensive system optimization. However, if in TweakVI additional utilities for improving performance are provided only to registered users, in Vista Manager you can try out all the features of the program in trial mode for 15 days.
Information
The first section, although called Information, contains, in addition to a module that provides information about the system and PC components, a process manager, an optimization wizard, and a utility for removing outdated files and registry keys.

The System Information module provides a lot of information about the hardware and the system. Here a list of all installed updates for Vista is displayed, paths to all are displayed system folders, and also displays information about all users of the system. You can view the basic parameters of each account, in particular, the ability to change the password, the time until which the password is valid, etc. On the System Information tab you can see the main information about the operating system: version, current user, system drive and folders, installed service packs (although the latter is not relevant yet).

The process manager lists all running processes, shows their total number, as well as how much space each process takes up in RAM. A graph of processor load in real time is displayed here. The names of the processes are highlighted in color - green means they are safe, and red means they pose a potential security threat. To make it easier for the user to understand why exactly a particular process can be dangerous, there is a Query Internet button at the top of the process manager. When you click it, a browser window opens, showing Google search results for a query with the name of the process.

From the process manager window, you can stop the selected or all unknown processes. It is also possible to change the priority of allocated processes.
The Optimization Wizard helps you explore Vista Manager's capabilities and focus on the most important optimization features. The wizard contains several steps. Each displays a detailed description of a particular optimization tool, and the user is asked to run it or skip it. This is a process manager, automatic Windows update, setting the monitor refresh rate (relevant only for those who have not yet changed their monitor to an LCD one), uninstalling unnecessary applications, viewing programs that start with Windows, optimizing services, deleting temporary files, cleaning and defragmentation registry In addition, the optimization wizard suggests disabling automatic detection of hard IDE drives When the system boots, enable automatic reboot of the shell, automatic closing of applications that do not respond, and unloading of unnecessary DLLs from memory.

Another automatic tool found in the Information section is 1-Click Cleaner. Its special feature is that it allows you to get rid of temporary, unused and outdated files, as well as obsolete registry entries with one click. As a rule, different modules are used to clean the registry and hard drive, but here, to speed up the process, the developers have combined them into one.
Optimizer
The Optimizer section combines modules for optimization, including the service manager, running applications, tools for managing multimedia and troubleshooting system problems.
The System Speed category contains tools that can help speed up the system. Some of them have already been mentioned above, since they are included in the automatic optimization wizard. Other settings that speed up the system when enabled include stopping automatic file indexing, disabling compressed folders, prohibiting the creation of thumbnails, and prohibiting the creation of a “last known good configuration.” You can speed up system booting by disabling disk scanning, the startup sound, and the Prefetcher function. To shut down your computer faster, you can reduce the maximum timeout for hung applications, processes, and programs with errors.

The next tool in the Optimizer section lists all available services. With its help, you can stop or start the service and change the startup mode (automatic, manual). As in a process manager, you can always ask for clarification about a particular service on the Internet. A button for a Google query is located at the top of the program window. If you want to improve system performance by disabling some services, but are not confident in your knowledge, use the Optimize Services tool. It will tell you which services are recommended to be disabled and which are safe to disable.

From the Services Manager, you can also open a window listing all the system drivers that are available in Windows. Drivers can be managed in the same way as services - stop them, change how they start, etc.
The next tool, Vista Manager, a manager for applications that run with Windows, is interesting because it allows you to configure programs for each user separately. Some programs can be included in the All Users list, and then they will be launched for everyone, and some - only in the list of the current user. Each application that is added to the startup list can be launched constantly or loaded only once, at the user’s request.
Since recently malicious programs have become widespread, which, after infecting the computer, are placed in startup, Vista developers Manager is advised to disable the ability to autorun applications that refer to some frequently used registry branches. To do this, click the Security button and mark the corresponding registry branches.

The Mutimedia category settings allow you to make it impossible to burn discs using built-in tools, as well as prohibit the launch Windows programs Movie Maker, Sound Recorder, Image Viewer Applications. You can also disable automatic startup for all disks. The settings for Windows Media Player are standard - disable downloading updates and codecs. In addition, you can add playback of new file formats and the ability to work with DVDs to the program, improve MP3 encoding and specify the folder that the program will use by default to open files.
Tools in the System Repair category help fix errors that often arise during operation. So, you can check whether all system files are in order, enable the display of hidden files if it was disabled as a result virus attack, perform repairs, repair all system components with one click, fix problems with font display.
The Cleaner section contains a number of useful tools for working with files. For example, the Disk Analyzer module analyzes hard drive usage and displays its structure in a chart that clearly shows which folders are taking up the most space.

Smart Uninstaller shows a list installed applications and allows you to view detailed information about each of them (manufacturer’s website, version, etc.) and remove programs from the system. For convenience, new programs can be marked in red.
Next up is Junk File Cleaner, a tool for removing junk files from your system. It differs from the 1-Click Optimizer module discussed above in that it allows you to define scanning settings, and also gives you the opportunity to view all found files and make your own decision about deleting them. The user can specify the types of files that can be considered unnecessary, exclude some folders from scanning, and define deletion options (to the trash or permanently). After scanning is completed, the list of found files displays the size of each file, type, path and date of last access.
The Duplicate Files Finder tool is another tool for freeing up disk space. This module helps to find identical files. In its settings, you can select what type of files you want to view, set folders in which searches will not be performed, determine whether system files and files with a read-only attribute should be displayed in search results, and also specify file deletion options.
The last two tools in the Cleaner section are designed to work with the registry. Registry Cleaner makes it possible to search for incorrect values, including those left after installing applications, drivers, and fonts. Before starting the scan, you can specify those registry keys that you do not need to scan. Registry Defrag is a simple utility that analyzes the registry and reduces its size by defragmenting it.
Customization
This section contains a variety of tools for configuring external Windows view Vista, as well as general system parameters.
The Customize System category is the most numerous. Here you can change the owner of the copy of the operating system, the name of the organization and the company that was involved in installing Vista on this computer. In addition, it is possible to change the width of the window border, the sensitivity of the mouse wheel, and also hide links to favorites in dialog windows.
In the group of settings related to the desktop, you can disable the sidebar, set the display of the operating system version number on the desktop, prohibit changing wallpapers, block access to changing desktop settings, disable the desktop element cleaner, and also create separate processes for the desktop and Conductor.
Among the settings that affect the Start menu, we can note the ability to quickly delete any group in the menu, from the list of all programs to the Control Panel. You can also bring the menu to a classic look, set it to display small icons, disable the use of drag-and-drop technology, remove the list of frequently used programs, and change the speed at which submenus appear.
In Vista Manager, of course, there are parameters to change appearance notification area and quick launch bar. For example, you can hide the display of the clock, the volume control icon, the network icon, and the battery charge notification. In addition, it is possible to disable resizing the Quick Launch panel, disable context menus, and remove the ability to customize the panel.
If you want to change the commands available from the Explorer context menu, you can do so by accessing the Context Menu category. Here you can view all menu items, remove unnecessary ones, and add new ones. For example, you can supplement the menu with commands for opening in Notepad and placing the file in the trash. It is also possible to restore standard context menu elements.
For those for whom the appearance of the desktop matters, Vista Manager provides a special Wallpaper Changer module. With its help, you can select pictures that will be displayed on the desktop, as well as set the frequency and order of their changes, as well as parameters for their location on the screen. The Wallpaper Changer window is very clear - all graphic files are displayed as thumbnails, making them easy to identify.
With the Run Shortcut Creator module, you can greatly simplify access to many frequently used applications, files, and web pages. It allows you to set commands to quickly call them from the Run window. For example, the word home can be set to open the home page in the browser. When setting up a new command, you can even set how you want the application window to open—maximized, minimized, normal, or hidden. Also in the Run Shortcut Creator window you can edit or change the commands that are used by default in Windows.
The last module of the Customization section allows you to manage icons. The possibilities are almost endless: you can hide the display of standard elements on the desktop, change icons for the Recycle Bin, My Computer, Internet Explorer, Start menu items, and even for hard and removable drives. In addition, you can change the icon for any of the file types that are used in the system, and also change the size of the icon cache.

Security
Security is a required section for any optimizer. In Vista Manager, its main categories are system, disk and application security, control panel, and privacy.
System security settings include tools for disabling access to important components such as the control panel, registry editor, and administration tools. You can also remove the ability to change files, prohibit running files from reg extension, disable the command line.
A separate group of settings is dedicated to the User Account Control option. You can disable the transition to a secure desktop when UAC messages appear, disable warning windows when installing applications, or disable this option altogether.
Also useful will be tools for disabling automatic updates for Windows, Internet Explorer and ICQ, and options for prohibiting sending error reports for different applications.
In the category dedicated to working with disks and applications, you can disable the display of each disk, limit access to them, prohibit the connection of USB drives to the computer, as well as the use of CD/DVD drives and floppy drives. Finally, it is possible to create a list of applications that are prohibited from running on your computer, or another list of applications that are allowed to run. If you use the second function, you will be able to work on your PC only with programs from the list, and in addition, you can launch Vista Manager to change or remove this list.
File and folder security tools include modules for file encryption and secure deletion, where data is repeatedly overwritten many times and therefore cannot be recovered. It is also possible to change the paths to system folders such as Application Data, History, etc.
The Privacy Protector module allows you to remove all data that can be used to determine what you did on your computer, including clearing the history of visited pages, links to recently opened documents, and the list of running applications. It is also possible to empty the recycle bin, clipboard, and list of typed addresses in the browser. In addition, you can disable the user activity tracking feature, which is enabled by default in Windows Vista.

The Network section contains options for fine-tuning the network and Internet Explorer. Here you can try to speed up data transfer over the Internet, hide your computer from others on the network, or hide the entire local network, set the parameters of shared resources.
The IE Manager module allows you to configure the built-in browser in Vista. You can change the title, the folder into which the download will be performed by default, home page(there may be several of them in IE7), change the domain substitution parameters, for example, add the RU domain and set priority 1 for it. In this case, when you enter the word 3dnews in the address bar and press the Enter key, the browser will substitute the first-level domain, and you will be taken to to the site. By default, the COM domain has priority 1.
Other browser options include disabling the ability to download files, opening links in a new tab, disabling the use of tabs, displaying not the entire Favorites list, but only frequently used items, and disabling notifications when a new RSS feed is detected. In addition, Vista Manager displays a list of all browser menu items and all its settings. You can block access to any of them.
To ensure security, you can disable the ability to use plugins or view a list of all installed ones and disable suspicious or simply unnecessary ones. The convenient Favorites Checker function will help you get rid of old and long-dead links in your Favorites. If Internet Explorer for some reason begins to work incorrectly, you can reinstall it or try to repair it. Vista Manager also has separate tools for restoring normal operation of the browser if it stops throwing out file download windows or does not save the username and password.
The Windows Mail category is worth a look both for those who do not work with the new email program and for those who actively use it. The former will find here the option to disable the application, and the latter will find options for blocking attachments, disabling checking for new messages on startup, allowing images in HTML emails, and backup mailboxes and other program settings.
Finally, another interesting feature of the Network section is an increase in the number of connections via the TCP/IP protocol. By default, Windows Vista uses two connections by default, but when working with some programs, such as P2P clients, this may slow them down.
Misc. Utilities
The last section of Vista Manager contains some useful modules for which the developers could not find a place in other sections. This is an application for cutting files into pieces of a given size, a utility with which you can remind yourself of an important event, run a selected file at a certain time, or turn off your computer on a schedule.
Also in the Misc section. Utilities you can view the Windows Vista key and ID. There is also a window where links to all the main standard Vista configuration tools and built-in applications are collected.
Conclusion
There are not as many programs for optimizing Windows Vista yet as, say, for Windows XP, but among those that have already been released, it is quite possible to find the optimal tool for fine-tuning the system. It is gratifying that many programs are free, and in them you can find the most popular functions, such as disabling unnecessary applications, prohibiting automatic updates, disabling User Account Control, etc.
However, additional optimization tools, such as a system cleaner, registry defragmenter, service manager, etc., can only be found in commercial programs that offer all kinds of tools combined under one shell. Therefore, the price of Vista Manager and TweakVI Ultimate seems quite reasonable to us (both programs cost $40). The same cannot be said about the Vista Smoker Pro, which offers significantly fewer features for the same price.
All optimizers discussed in this review were created exclusively for Vista. You can also find optimizers that existed for previous versions of Windows and whose developers have declared support for Vista. We tested several well-known tweakers with “support” for Vista and came to the conclusion that it is better to opt for programs created specifically for this OS.
For example, in the "Vista-ready" HS Winperfect program, various additional utilities worked, such as a registry cleaner, but not a single optimization option was available - the Advanced tab, where they should have been, was simply empty.
Having launched the same version of the program under Windows XP, we saw a decent set of parameters.
WinTools.net Professional, which also claimed support for Vista, generally worked correctly, but we couldn't find a single parameter in it that would relate specifically to this system.
In this article we will tell you how you can force the OS while consuming less memory. It is no secret that after installation the system does not work in the best way, since a bunch of unnecessary programs, services, etc. are launched. This is what MirSovetov will do now - we’ll tell you how to disable unnecessary services, programs and optimize the registry and virtual . Windows edition– Windows Ultimate (32 bit). But everything stated above is also suitable for other versions of this OS. It is assumed that you already have the system installed and everything you need software. Keep in mind that the list of services may vary slightly on different PCs, since different software is installed, but the main ones remain unchanged. So let's begin.
Removing unnecessary Windows components
Most home PC users are unlikely to need the following components installed by default: Telnet Server, Tablet PC Options, Telnet Client, TFTP Client, SNMP Component, Unix Application Engine, RIP Listener, IIS Service, DFS Replication Service, NFS Services .Some users may not need Windows Indexing Service (you can remove it if you rarely search your computer), Print Services (if you don't have a printer), or Windows Scan and Fax Services (if you don't have a scanner and fax machine). Uncheck the boxes next to the names of unnecessary services, click OK, wait for Windows to remove them, and restart your computer.
Interface optimization
If your PC has less than 512 MB of RAM, then you can forget about the beautiful Windows Aero interface. We disable it: right-click on “Computer”, in the “System” window, select “Advanced system settings”, click on the button in the “Performance” frame, on the “Visual effects” tab set “Ensure the best performance”. Click the “OK” button (this item is also useful for those who do not like all the modern bells and whistles of the Windows interface, but prefer the strict style of Win 98). If you want to disable something that you personally don’t need—for example, the transparency effect or you just don’t like the Windows Aero interface—then just uncheck the box next to the description.
 Let's take a look at the taskbar. Right-click on it and select “Properties”. A window opens as in the picture.
 The following checkboxes affect performance: “Display sample windows” (this is when a thumbnail of the window appears when you hover over a button on the taskbar) and, to a very small extent, “Group similar taskbar buttons”. To improve performance, it is better to disable window thumbnails. MirSovetov recommends leaving the grouping of buttons, since with a large number of open windows it is easier to find the right window.
 Next, go to the “Start Menu” tab.
 Set the switch to “Classic Start Menu”. But if you don’t like the classic menu look, then you can optimize the one that Vista offers. To do this, on the “Start Menu” tab, put the switch in the “Start Menu” position (if it wasn’t already there) and press the “Customize” button.
  For productivity in to a greater extent This is affected by the “Highlight recently installed programs” element (on many computers with the checkbox enabled, noticeable slowdowns appear when opening the menu), so it is better to remove it.
 The “Search” element has a lesser effect; it can be left in place.
 The remaining parameters configure the display of various menu elements, this is at personal discretion, this does not affect performance.
 The two remaining tabs “Notification Area” and “Toolbar” are used to customize the menu, so everyone decides for themselves what to enable, what to disable, etc.
Registry optimization
Optimizing the Windows Vista registry means, in most cases, speeding up the operating system by 40-50%. But, at the same time, this is the most risky stage of setup, so we will not dwell here, but will only tell you about secure settings registryNote. Most OS customizer programs also optimize the registry; MirSovetov will talk about one such program at the end of the article. This section contains registry settings that the program does not change.Let's enter the registry editor: press the key combination “Windows” + “R”, the “Run” window opens, enter regedit in it and click the “OK” button. The Registry Editor will open. Go to the HKEY_LOCAL_MACHINE branch, then SYSTEM, CurrentControlSet section, FileSystem subsection (see).

Attention! This setting is for those who have NTFS file system on their hard drives! You can find out what file system you have in the disk properties (go to “Computer”, select the hard drive, right-click the menu, select “Properties”).Double-click with the left mouse button on the NtfsDisable8dot3NameCreation parameter and set it to 1 in the “Value” window. This parameter prohibits the creation of backup file names in the system in MS-DOS format (8 characters – file name + 3 characters extension), which is created for compatibility with MS -DOS. Who needs this compatibility now...
 Next, open the NtfsDisableLastAccessUpdate parameter and set the value to 1. This will speed up the hard drive. If the value of the NtfsEncryptPadingFile parameter is not equal to 0, then set it to 0. This option provides encryption of the page file, but for most home users it is completely useless. We don't touch anything else here.
 Scroll down the list below and find the PriorityControl section.
 The Win32PrioritySeparation setting allocates processor resources between background and active applications. You can set it from 0 to 32, but the recommended value is 6. Do not set it to 0, because in this case your computer will simply go into a stupor.
 This concludes the optimization of the Windows Vista registry (we will set the remaining parameters using the program described at the end of the article).
Service optimization
Services (or services) are system programs necessary for the operation of OS components. But not all components are exactly what you need. The list of services on different PCs may vary, because... They run different software. You can access services through “Control Panel” - “Administration” - “Services”.
 If you highlight a service name, you will see a description of that service on the left.
 Double-clicking the service name with the left mouse button will bring up a dialog box as in the figure.
 The “Startup type” drop-down list specifies whether the service can be started:
 - automatically (Auto) – the service starts when the OS starts;
- manually – the service starts on demand;
- disabled – the service does not start under any circumstances;
- delayed start – the service does not start when the OS starts, but a little later.
Below is a service setup that will suit most users. MirSovetov draws your attention to the fact that you may not have some services, and some of your services may not be in this description! So, setting up services:
DHCP client - manually (but if you don’t know if you need DHCP to access the Internet - set Auto).
DNS Client – Manually.
InstallDriverTableManager – Manually.
KtmRm for Distributed Transaction Coordinator – Disabled.
Microsoft .Net Framework (the version number follows) – Manually.
Plug-and-Play - Auto.
Quality Windows Audio Video Experiense – Manually.
ReadyBoost – if you do not want to use flash memory to speed up the system – Disabled, otherwise – Auto.
Superfetch - Auto.
Windows Audio - Auto.
Windows Card Space - Disabled.
Windows Driver Foundation – User-Mode Driver Framework – Auto.
WmiPerfomanceAdapter - Manually.
Offline Files – Disabled. Most home users don't need support for offline files.
Note. By and large, after disabling this service, it would be a good idea to disable the Offline Files driver. This can be done in Device Manager. But since when manipulating system drivers there is a high risk of bringing the system into an inoperative state, this operation is not described here (for the same reason, the article does not describe the part devoted to manipulating system drivers).Network Access Protection Agent – Disabled.
IPSEC Policy Agent – Disabled.
Windows Backup - Manually.
Windows Firewall ( Windows Firewall) – Disabled. It's better to install a third-party firewall.
Web Client - Disabled.
Virtual Disk – Manually.
IP Helper—Disabled.
Secondary Logon – Be sure to DISABLE!
Peer Networking Grouping – Manually.
Remote Access Auto Connection Manager - Manual.
Print Spooler – if there is no printer, then disable it. If you have a printer, try installing Manually; if it doesn’t work (this depends on the printer driver), then Auto.
Note. If you disable this service, icons from the Printers folder may disappear.
Remote Access Connection Manager - Manual.
Desktop Window Manager Session Manager - Provides a Windows Aero interface. If you use it, then Auto, otherwise – Disabled.
Peer Networking Identity Manager – Disabled.
Security Accounts Manager (SAM) – Auto.
Access to HID devices (Human Interface Devices Access) – if there is a USB keyboard or mouse, as well as a wireless keyboard/mouse, then Auto, otherwise – Manual.
Windows Event Log – Auto.
Performance Logs & Alerts – Manual.
Windows Defender - Disabled. It's better to install a third-party program.
Protected Storage – Manual.
CNG Key Isolation – Manual.
Windows Management Instrumentation – Auto.
Application Experience Information - Disabled. You already have applications, don't you?
Group Policy Client – Auto.
Distributed Links Tracking Client – Disabled.
Distributed Transaction Coordinator – Disabled.
Windows Presentation Foundation Font Cache - Manually.
Software Licensing – Auto.
SNMP Trap – Disabled.
Remote Procedure Call Locator (RPC) – Disabled.
Routing and Remote Access – Disabled. Most home users do not need this, but if your local network does not work, try setting this service to Auto.
Internet Key Exchange and Authenticated IPsec Keying Modules (IKE and AuthIP IPsec Keying Modules) – Disabled.
DCOM Server Process Launcher – Auto.
Windows Media Center Service Launcher - Manually.
NetBios support module via TCP/IP (TCP/IP NetBios Helper) - most users do not need it, Disabled.
Terminal Services Configuration – Disabled.
Windows Connect Now – Config Registrar – Manual.
SSDP Discovery – Disabled.
Interactive Services Detection - Manual.
Computer Browser - Disabled.
Internet Connection Sharing – Disabled.
Shell Hardware Detection – Auto.
Trusted Platform Module Base Services – Disabled unless you are using TMP and/or BitLocker chips.
Terminal Services UserMode Port Redirection - Manual.
PnP-X Bus Enumerator - Manual.
Task Scheduler – Auto (otherwise you won’t be able to switch keyboard layouts).
Multimedia Class Scheduler – Auto (otherwise you will be left without sound).
Problem Reports and Solutions Control Panel Support - Manual.
Windows Search (Windows Searcher) – If you don’t search much on your computer, then Disabled.
Smart Card Removal Policy – Disabled if you do not have smart cards.
Wired AutoConfig – Manually.
Microsoft Software Shadow Copy Provider - Manual.
PNRP (Peer Name Resolution Protocol) – Manual.
Function Discovery Resource Publication – Disabled.
Workstation – if the computer is not used as a server, then Manually.
Certificate Propagation – Disabled.
Extensible Authentication Protocol (EAP) – Manual.
DFS Replication – Disabled.
Parental Control – Disabled. If necessary, it is better to install a third-party program. Because any student who has the slightest understanding of the principles of operation of such programs can disable this parental control. And you can be sure that everyone at this age is a hacker.
Windows Event Collection – Disabled.
Application Information - Manual.
Server – if the computer is not used as a server and sharing of files and folders is not needed – Disabled.
Thread Ordering Server – Manual.
Network Logon (Netlogon) – Disabled.
Network Connections – Auto.
Com+ Event System – Manual.
Systemic Com app+ (COM+ System Application) – Manually.
SSTP Service - Manual.
WinHTTP Web Proxy Auto-Discovery Service – Disabled.
WLAN AutoConfig service (WLAN AutoConfig) – if there is no WiFi, then Disabled, otherwise – Auto.
Base Filtering Engine – Auto.
Tablet PC Input Service – Disabled. Unless, of course, you work on a tablet.
Windows Time Service – Disabled.
Windows Image Acquisition (WIA) - Manual. If the digital camera does not want to work (again, it depends on the driver) – Auto. If there is neither a scanner nor a camera and there will not be one – Disabled.
Note. If you disable this service, icons from the Scanners and Cameras folder may disappear.Microsoft iSCSI Initiator Service - Manual.
Network Store Interface Service - Manual.
Windows Media Center Extender Service – Disabled. If you don't have this media console.
Block Level Backup Engine Service – Manual.
Service public access to Net.TCP ports (Net.Tcp Port Sharing Service) – Disabled.
Network Shared Resource Service Windows Player Media (Windows Media Player Network Sharing Service) – Manually.
Portable Device Enumerator Service – Disabled.
Windows Media Center Scheduler Service – if not used, then Disabled.
Service Bluetooth support(Bluetooth Support Service) – if there is no Bluetooth, Disabled, otherwise Auto. If you set it to Manual, for some reason the service does not start when necessary.
Diagnostic Policy Service - Manual.
Program Compatibility Assistant Service – Disabled.
User Profile Service – Auto.
PNRP Machine Name Publication Service - Manual.
Windows Error Reporting Service – Disabled.
Windows Media Center Receiver Service – Disabled if not used.
Network Location Awareness – Auto.
Network List Service – Auto.
Software Licensing Notification Service (SL UI Notification Service) – Manually.
System Event Notification Service – Manual.
Windows Remote Management (WS-Management) Service – Disabled.
Application Layer Gateway Service - Manual.
Cryptographic Service – Auto.
Terminal Services – Manually.
Smart Card – if not, Disabled.
Finite Builder Windows points Audio (Windows Audio Endpoint Builder) – Auto (otherwise you will be left without sound).
Telephony – Manually.
Themes – if not used, Disabled, otherwise – Auto. For the Aero interface to work, this service must be started as Auto.
Volume Shadow Copy - Manually.
Link-Layer Topology Discovery Manager – Manually.
Remote Procedure Call (RPC) – Auto.
Remote Registry – Disabled.
Diagnostic System Host - Manual.
Diagnostic Service Host - Manual.
UPnP Device Host – Disabled.
Application Management – Manually.
Health Key and Certificate Management – Disabled.
Windows Installer ( Windows Installer) – Manually.
Windows Modules Installer - Manual.
Fax – if not, Disabled, otherwise Manual. If the fax does not work - Auto.
Background Intelligence Transfer Service (BITS) – Disabled.
Function Discovery Provider Host – Disabled.
Windows Color System (WCS) - Manual.
Security Center - How tired everyone is of him... Disabled.
Windows Update - Manually. If you want updates to be downloaded automatically – Auto.
These are the main Windows services, but you may have other services. If you experiment with them, remember the startup type of each service so that later you can restore the system.
Other optimization elements
Disable UAC. Many people are probably tired of him already. Disable: press “Windows” + “R”, enter msconfig in the “Run” window, click “OK”, on the “Service” tab find the line “Disable User Account Control”, select this line, click the “Run” button. Reboot the computer. If you have a better system recovery program, then the built-in system restore service can be disabled. To do this, right-click on “Computer”, select “Properties”, “System Protection”, and uncheck all drives, click “Apply”.
  Most users don't need them. And they also take up memory. So let's turn it off. Download the program from Microsoft at:
 http://download.microsoft.com/download/win2000platform/exctrlst/1.00.0.1/NT5/EN-US/exctrlst_setup.exe
The program has the clever name Extensible Counter List, install it, run it (shortcuts are not created in the main menu, so we go to the folder where it was installed and run exctrlst.exe, and one by one selecting each counter from the list, uncheck the box at the bottom of the window.
 Then close the program and restart the computer.
 Setting up the OS using a special program
Setting up the OS using a program is the safest way to configure the system, which also does not require lengthy digging in the registry. For Windows Vista, Vista Manager from Yamicsoft (www.yamicsoft.com) is recommended. You can download it for free, the demo version is limited to 15 days of use.
 Let's start setting up the computer with its help. Expand the “Optimizer” list and select “System Speed”. And we begin. On the first tab “Speed”, check the following boxes:
- Enable SATA disk advanced function (if you have SATA, otherwise a message about IDE disks will appear there);
- Force .DLL unload from memory;
- Turn off the Search Indexer in Windows Vista (if you don't use search much, this will increase hard drive performance);
- Disable Vista Zip Compressed Folders;
- Always show icons but no thumbnails – if your computer is weak. However, the option is useful to many - it disables thumbnails of drawings.
 Then we go to the next tab “RAM and Disk Cache” - and there we set the size of our RAM and the second level cache of the processor; If you don’t know, click “Query” - the system itself will determine your amount of RAM and the size of the processor cache.
  Go to the next tab “Startup”. We put a tick on it:
 - Disable auto-detection of IDE drives during startup;
- Disable updating Group Policy during startup;
- Disable Windows logging on system crash;
- Disable creation of Last Known Good Configuration.
 Go to the “Shutdown” tab. It contains sliders that show how long the system waits before closing hung/unresponsive programs and services. MirSovetov recommends moving them to the middle.
  The last tab “Perfomance” configures various “beauties” of the interface, we will not dwell on it, only one option deserves attention: “Force to enable Aero on older PC” - this is the forced inclusion of the Aero interface on PCs that, according to Vista, are not capable support him. After completing all the settings, click “Save”; do not restart the computer yet.
 Next, open Startup Manager:
Here we see all the programs that start when Windows Vista starts. We go through all the branches of the tree, uncheck unnecessary programs (ideally, it’s better to leave only the antivirus and firewall), which frees up a lot of memory and reduces the number of programs constantly hanging in the task area. You don’t have to touch System Service, since we’ve already configured everything there.
 Then close Startup Manager, go to the Cleaner tab and launch Registry Cleaner.
  Click Start Scanning and then wait for the scanning to complete. After the scan is completed, click Delete Entry and agree to create an archive copy of the registry. Although you may disagree, it’s your business. In any case, we have removed unnecessary entries from the registry, close Registry Cleaner and run Registry Defrag. This program optimizes your registry. Click the Analyze button, and if the program determines that the registry needs to be optimized, click the Defrag button.
  After optimization, the computer will reboot automatically. Yes, you must close all programs except Vista Manager before using this program.
 Final touches
Removing files from temporary folders. Windows and programs put temporary files in which they write some intermediate data into temporary folders, which can ultimately take up to 2-3 GB of disk space, since not all programs “clean up garbage after themselves.” Therefore, periodically you have to remove it manually. Or use the Disk Cleanup utility. We delete all files from the folders ..WindowsTemp, ..Users (Users)Current_userAppDataLocalTemp.Removing program launch optimization files (prefetch files). It also takes up a lot of space, storing files to speed up the launch of various programs. They can be deleted, they are located in the ..Windows Prefetch folder. MirSovetov warns that after this, the computer may initially boot a little longer than usual, and the launch of some programs may take a little longer than usual.
Disk defragmentation. Over time, files “scatter” to different corners of the hard drive. To collect file fragments together and thereby reduce the time it takes to read files, you need to periodically (once a week or two) defragment your hard drives. In this case, it is better to delete the paging file: go to the system properties, select “Advanced system settings”, click on the “Options” button in the “Performance” window, select the “Advanced” tab, in the “Virtual memory” window click the “Change” button.
 In the window that opens, select “Without a paging file”, click the “Set” button, and restart the computer. After the reboot, delete the pagefile.sys file from the disk on which virtual memory was enabled. We launch the defragmentation program (it is located in Start - All Programs - Accessories - System Tools - Disk Defragmentation). We perform defragmentation, after which we again open the “Virtual Memory” window and begin to set the virtual memory size we need. In this case, virtual memory should be located on the fastest hard drive and/or (if the disk is divided into several partitions) on the 1st partition of the hard drive (which is closer to the beginning of the disk). Then select “Specify size” and select the desired size: as a rule, this is calculated using the formula:
 - 2*number of_installed_memory + 1024 – for systems with RAM capacity less than 1024 MB;
- 2*number of_installed_memory – for systems with RAM from 1024 to 2048;
- 1024 + quantity_of_installed_memory – for systems with RAM from 1024 to 2048.
This material is provided for informational purposes; the author and the website www.site are not responsible for possible errors in the operation of the system caused by interference with OS components. This material is written based on personal settings by the author of computer users and is suitable for most users who use a computer for personal purposes.
Many of us, due to duty or necessity, have to deal with the new operating system from Microsoft. As you know, it is very demanding on system resources: video card, RAM and processor speed. However, the situation can be improved a little. Eat standard methods acceleration Windows operation Vista on existing hardware. These are basically well-known methods that are familiar to us from previous versions of Windows.
Of course, no amount of optimization will make Vista work as quickly as on the fastest processor with several gigabytes of RAM and an expensive video card. But if Windows XP was fast on your computer, but Vista was slow, then these tips may help.
Clean house
One of the main reasons for system slowdowns is the many extraneous applications that run in the background and clog up RAM. You need to get rid of everything unnecessary.Disable unnecessary services
Services are background processes that are activated completely unnoticed and without notification. Since Vista tries to run as many processes as possible by default, there are likely to be unnecessary ones among them. To destroy them, run command interface through Start-Run and run the command services.msc. A list of services will appear on the screen. By double-clicking, the properties of each of them are displayed. There you can change your boot options, including turning off the default boot.
Here are some examples of services that you are unlikely to need: Secondary Logon, Remote Registry, Computer Browser, KtmRm for Distributed Transaction Coordinator, Tablet PC Input Service And Distributed Link Tracking Client. There are dozens more. Study the list, use an Internet search by name.
Order on the hard drive
Like most users, you probably have a lot of third-party programs installed that eat up disk space. To get rid of unnecessary programs, we can recommend the CCleaner program, which works much faster and better than the native Vista tool Add/Remove application.
Speed up downloads
When Vista starts up, it automatically loads a bunch of programs, some of which are unnecessary. By using System Configuration Utility or Windows Defender you can put things in order.
In the first case, the procedure is as follows.
1. Open msconfig(use the function Instant Search from the main menu: press the Windows key, type the word “System” and press Enter).
2. Select a tab Startup.
3. Disable objects that should not be loaded at system startup and click OK.
How to do the same using Windows Defender.
1. Launch Windows Defender.
2. Choose a menu Tools on the toolbar.
3. Choose Software Explorer.
4. Item Show for All Users.
5. Select the application and the option for it: remove (Remove) or deactivate (Disable).
Hard drive defragmentation
Fragmentation of files on the hard drive inevitably accumulates during system operation. Due to the fact that individual pieces of files are physically located in different places on the hard drive, file access time is slowed down, which depresses the operation of the entire system. Combining files into single clusters on a hard drive is called defragmentation.
It should be said that Vista, by default, defragments in the background automatically once a week. But this seems like a disservice, because the vast majority of users do not need to defragment files that often, and this process has a huge impact on system performance. Therefore, it is better to disable the automatic start of the process altogether and run defragmentation manually as needed.
To manually run defragmentation, open the folder My Computer, right-click on the desired drive, select Properties and tab Tools where you will see the command Defragment Now.
Unfortunately, the Vista defragmenter is deprived of many additional important options that we have become accustomed to since the days of XP, so for better defragmentation you need to resort to the help of specialized programs, for example, the free Disk Defrag utility from Auslogics.
Use ReadyBoost
ReadyBoost is one of the most attractive Windows functions Vista. Simply put, it allows you to use any external drive to store cache memory. For example, you can take a fast USB flash drive and Vista will dump memory dumps onto it. All information is automatically encrypted, so even if the flash drive is lost, your secrets will remain with you.In some cases, the ReadyBoost function can speed up the operating system, but this is not an alternative to upgrading the operating memory, of course.
Use vLite
To radically free up space on your hard drive, you can install the free program vLite. It reduces the size of the operating system distribution by about half, destroys without a trace a number of components, such as Windows Media Player, Windows Mail, Windows Photo Viewer, MSN components, desktop wallpaper and SlideShow. This saves gigabytes of hard drive space.Speeding up Vista on old computers
Chic GUI"Whist" is pleasant to the eye, but puts a very large load on the CPU and a video card. Because of this, older computers can slow down. It is not necessary to upgrade, you can simply change the system settings.* Get rid of Aero. The operating system itself will disable this interface if it considers your computer’s video card to be too weak. However, this may not happen. Then open the window Window Color and Appearance(right click on desktop) and select Open classic appearance properties for more color options. There you can choose other options besides Aero.
*For a less drastic option, simply turn off the option glass transparency, which is responsible for the bulk of memory usage.
* Another option to reduce the load on resources is to disable animation and other visual effects.
* Disable Sidebar, because widgets also crave RAM, and disabling it will speed up the operating system even more.
Introduction
Let me assume that many laptop owners would like their laptops to work faster. To do this, you need to take the following measures:
- Installing and updating drivers;
- Windows update and Service Pack installation;
- Cleaning startup from unnecessary programs;
- Optimizing hard drive performance;
- Disable unnecessary services.
There are also other ways. Among them are overclocking the processor/video card, various kinds of upgrades (replacing laptop components), and various fine-tuning of the system. These methods will be described in the following materials.
And so, let's consider each of the above methods.
1. Installing and updating drivers
The Windows distribution contains a large number of standard drivers. When installing the system, the necessary ones are installed and the system can work with this or that equipment. The problem is that often the standard drivers are outdated. Also, for some devices, Windows does not have drivers at all. How to solve this problem and install the necessary drivers is described in this material:.
Particular attention should be paid to updating the drivers for the video card. You can read how to do this in these materials: and. The remaining drivers do not need to be updated. As they say: “Does it work? Don’t touch it!”
When all the drivers are installed, you can move on to the next step.
2. Windows Update
This may sound a little banal, but the system is worth updating. Vulnerabilities and errors are often fixed, but sometimes there are slight speed improvements.
In addition to the Service Pack, it is also worth installing DirectX. The latest version can be downloaded from the same Microsoft website or from this link: /.
Let's look at how to install updates on Windows:
Installing updates on Windows XP
First you need to go to Control Panel and select item Automatic update:

Let's turn it on:

When updates are downloaded in the background, the following prompt will pop up near the clock:

Click on this sign:

Choose Custom installation and click Next:

We select which updates we want to install and click Install. During installation you may be required to agree to the following terms:

After installing the updates, you can restart your laptop. Let us now consider the update process on Windows Vista And Windows 7
Installing updates on Windows Vista and Windows 7
Installing updates on Windows Vista and Windows 7 is essentially no different. Therefore, their description can be combined.
Let's go to Control Panel and launch Update Center:


At the end of the search, click to select which ones to install and which ones not to:

Select the updates you need and click Install:

We agree to the license agreement:

After installing the updates, it is advisable to restart the laptop. Also, the necessary drivers may often come with updates.
3. Cleaning startup from unnecessary programs
It just so happens that many programs and drivers love to be registered in startup. In other words, they boot with Windows. This is fraught with the fact that Windows takes longer to load because of them, and the running program takes up a certain amount of memory and processor resources. Among such programs, some are necessary (antiviruses, for example), and some are not so good. Let's look at how to remove unnecessary programs from startup and thus speed up your laptop.
There are many programs to solve this kind of problem. Autoruns is considered the most functional. In the same article we will look at managing startup using System Configurations.
First we open the window Execute:

Enter the command there and click Enter:

A window should open with System configuration. Go to the tab:

We mark the programs that should be loaded with Windows. You can understand where and what program using the columns Startup item And Team.
Discussion on the forum: If you don’t know what to disable and what not, then please refer to this forum thread: .
When finished, click apply and reboot:

4. Optimizing hard drive performance
This part will cover the following points:
- Disable disk indexing and scheduled defragmentation;
- Enable caching;
- Enable DMA.
4.1 Disable disk indexing for quick search.
This option should be disabled if you are using the NTFS file system. The fact is that the contents of the disk are constantly indexed. This allows you to quickly search for files and folders. If you do not use search, then this option should be disabled. To do this, go to the disk properties:
 Index this drive for faster searching and press Apply:


Windows Vista and Windows 7 defragment on a schedule by default. Defragmentation is a very useful thing, but it is better to run it manually. To disable automatic defragmentation, you need to go to the tab in the disk properties Service and click on

Uncheck and click OK:

That's it. If you wish, then on this tab you can configure automatic defragmentation in the way that is convenient for you.
4.2 Enabling caching
What is caching and what is the use of it you can read in this material: NCQ Technology. In a nutshell, the benefits of caching are many. It allows you to significantly speed up work with your hard drive.
Let's look at how to enable it. To do this, open and go to the tab Equipment:

Select your hard drive and click on the button Properties. In the properties window, go to the tab Policy:

Put a check mark there and click OK. Caching is now enabled.
4.3 Enabling DMA
DMA (Direct Memory Access) technology should be enabled by default, but there are cases when it is disabled. In this case, playback of music, movies, and the laptop as a whole may slow down.
To check if it is enabled, you need to go to . In Windows Vista, to do this you need to go to computer properties:


We are interested in IDE ATA/ATAPI controllers. Let's go to their properties:
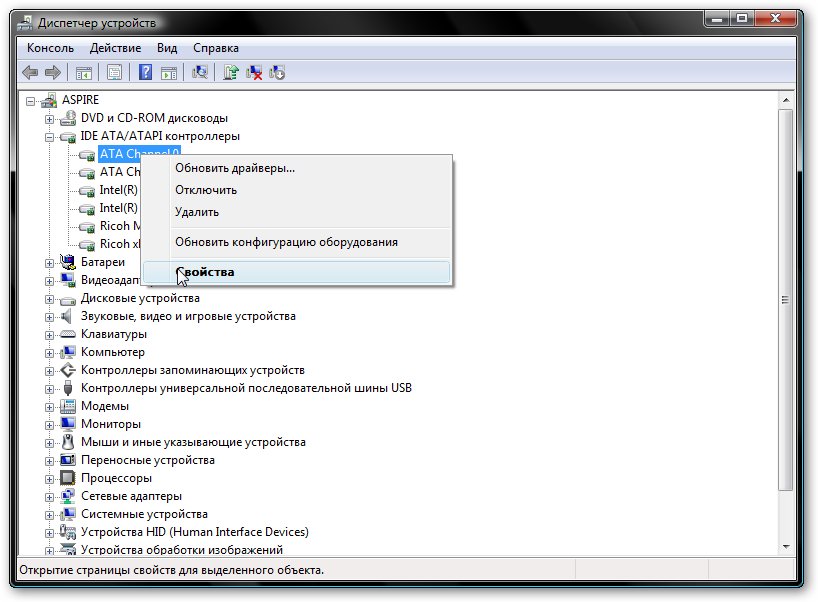
As you can see, on the tab Additional options the check mark is:

This means everything is fine.
We sorted out the hard drive. Let's move on to services.
5. Optimization of system services
Windows Vista introduced such technology as UAC, which is particularly intrusive. Constant dialog boxes asking you to confirm this or that action are the result of her work. It's been tweaked a bit in Windows 7, but it's still annoying to use sometimes.
To turn off UAC, you need to go to Control Panel and select item User Accounts:


And uncheck:

Click OK and reboot. That's it.
Let's now look at setting up system services. A service is a small program that runs in the background and performs a specific function. Setting up services is quite a complex task and requires special knowledge. This operation can be completely abandoned.
To go to configuring Windows services, right-click on Computer (My computer) and select from the menu:

In the window on the left select Services:

That's it. Thank you for your attention.
If you have questions about this material, you should first read it and then ask a question on the forum.
Please post all questions about setting up Windows in this forum thread: .
You can make all comments and suggestions regarding the article itself through this contact form: Please note that if something doesn’t work out for you, then you should only ask. These types of emails will be ignored.
Solving the problem with an upside-down image from a laptop webcam.
A detailed guide on how to install Windows XP as a second operating system on a laptop or computer running Windows 7 or Windows Vista with the ability to choose which system to boot when you turn on the laptop. It will also be described how to painlessly remove Windows XP.
Many users are thinking about upgrading to Windows Vista, and due to this... that Microsoft has officially announced the end of sales of Windows XP, for many, migration is already becoming a necessity. And after the installation stage, in any case, users think about how they can configure their computer to increase its performance.
Let's try to analyze What are we being asked to do to increase productivity and ease of use?
Administrator Activation
So, the first thing we are most often recommended to do is activate the administrator account. It is unclear what this will do to optimize the system, but it can obviously cause considerable harm. After all, by default the built-in system administrator account has the value SID=1. And again, by default, any attacker will strive to obtain the password for this particular account. Now imagine that if this account is disabled, he will need to not only select a password, but also determine which account has system administrator rights.
That's right, after installing the system by default, access to some folders will be closed not only for modification, but also for reading. These are mainly the Windows and ProgramData folders. But do you really need this access to compromise your security for it?
In addition, it is worth considering that thoughtless use of the “Administrator” account can lead to irreparable consequences and may require you to completely reinstall the system.
To sleep or not to sleep
Another one of the recommendations- disable Hibernation mode. Most of us really rarely need it. However, if you use a laptop, or prefer not to turn off the computer, but to “put it to bed” so that it boots faster, you should not disable this mode.
Speed up the Start menu
Worth noting, that if you use the classic menu, you don’t need to configure anything. However, if you prefer graphical mode, it is worth considering the following recommendations:
Right-click on the Start menu;
Select "Properties";
Click "Configure";
Find the item “Highlight recently installed programs” and uncheck the box;
Save your changes.
In addition, you will need to make changes to the registry key HKEY_CURRENT_USER/Control Panel/Desktop. Set the parameter value MenuShowDelay=0.
It is worth noting, however, that in the case of using modern computing base The speed gain from such settings is practically not felt.
Optimizing hard drive performance
Such optimization in case sudden shutdown electricity may cause data loss. However, if you are using a UPS, complete this. Otherwise, this operation may result in data loss. Although, without a doubt, you will benefit in performance. But in my opinion increased productivity at the expense of reliability is a bad choice, and you will see this after the first power outage.
Activating ReadyBoost on unsupported devices
At first glance, this recommendation seems successful. After all, not all devices can pass the ReadyBoost compatibility tests. However, at the same time, you should understand that you risk losing information. In addition, if you have 2 or more gigabytes of memory installed, using the ReadyBoost mode will not provide a significant performance increase.
Disabling automatic shutdown of hard drives
Many people are annoyed by the fact that Windows Vista turns off hard drives when idle to save power. What is recommended in this case? It is often recommended to disable the following services:
SSDP Discovery
Volume Shadow Copy
Windows Search
However, you must understand that disabling the Volume Shadow Copy service will make it impossible to use the System Restore function. However, maybe you don’t need it? If you don't use it, then turn it off. I, in turn, do not recommend disabling this very useful service in some cases.
Disabling UAC
It is often recommended to disable the account control function as an optimization measure. User Account Control (UAC). However, let's think about whether this should be done? A modern computer user is a person who is very far from information technology and for him a computer is at best a tool, and at worst just a toy. Therefore, before disabling this function, you should think twice. After all, you don’t always know exactly what this or that action can lead to.
Freedom should not come at the cost of your safety.
You can often hear a recommendation- disable recovery mode. Whether to do it or not is up to you to decide. However, I have repeatedly encountered situations where the presence of such restore points helped significantly in case of trouble.
Well, you say. You can’t do that either, and that’s bad. But what should we do? What actually needs to be done to improve system performance? Is it really only hardware upgrades that can help?
Of course not.
And the recommendations will be very simple:
Disable all kinds of “decorations” of the system.
Look carefully at what is in your “Startup” section (not only in the folder, but we will talk about this later).
Disable unused services.
Let's try to configure the computer in such a way that it does not interfere with the basic requirements for system stability and security.
Disabling "embellishments"
To speed up the GUI you should right-click on the “My Computer” icon and select “Properties” - “Advanced system settings” - “Performance” - “Settings” (Fig. 1).
tooltip="Optimizing Windows Vista">
Figure 1. Performance parameters
In the list that appears, select “Ensure the best performance.”
So, we have already received a certain percentage increase in performance. Now let's see what's hidden in the startup section.
There are many ways to start programs, Below are some options. I hope this can help you in removing unnecessary startup partitions, which will significantly increase the speed of loading the operating system and its operation.
Startup methods
Registry
In the Windows Vista registry, startup is presented in several sections:
- programs launched upon registration in the system.
Programs that run in this section run for all users on the system.
- programs that are launched only once when a user registers in the system. After this, program sections are automatically removed from this registry section.
Programs that run in this partition run for all users on the system.
- programs that are launched when the current user registers in the system; - programs that run only once when the current user registers in the system. After this, program sections are automatically removed from this registry section.
For example, to automatically launch the Notepad application when the current user registers, open the registry editor, regedit.exe, go to the section
and add the following entry:
"NOTEPAD.EXE"="C:\WINDOWS\System32\notepad.exe"
Using Group Policy for AutoPlay
Open the Group Policy snap-in (gpedit.msc), go to the " Computer Configuration - Administrative Templates - System". On the right side of the snap-in, go to the “Login” item (Fig. 2).
tooltip="Optimizing Windows Vista">
Figure 2. Using Group Policy for AutoPlay (for all users)
By default this policy is not set, but you can add a program there: enable the policy, click the “ Show - Add“, indicate the path to the program; Moreover, if the program to be launched is located in the ..WINDOWS\System32\ folder, you can specify only the program name, otherwise you will have to specify the full path to the program. At the same time, in the system registry in the section
a subsection \Explorer\Run is created with entries for the added programs.
Example:
"1"="notepad.exe"
"2"="iexplore.exe"
As a result, we get the launch of Notepad and Internet Explorer for all users. Autostart is set similarly for current users, in the snap-in " Group Policy"this is the way" User Configuration - Administrative Templates - System"(Figure 3), and in the registry section
tooltip="Optimizing Windows Vista">
Figure 3. Using group policy for autorun (for the current user)
Important!However, programs from this list are not displayed in the list of programs available for disabling in msconfig.exe, and are also not detected by all startup managers.
Autostart from a special list
Programs can also be launched from the following registry section:
Parameters:
"load"="program"- programs launched before the user logs into the system:
"run"="program"- programs that are launched after the user logs into the system.
These parameters are analogous to startup using the Win.ini file in Windows 9x systems.
Example: we launch Internet Explorer before the user registers in the system and Notepad after the user registers in the system:
"load"="iexplore.exe"
"run"="notepad.exe"
Assigned Tasks
Programs can be launched using the Task Scheduler. You can view the list of installed tasks, as well as add a new one: “ Start - All Programs - Accessories - System Tools - Task Scheduler" - this will open the task scheduler window, which displays the assigned tasks (Fig. 4).
tooltip="Optimizing Windows Vista">
Figure 4. Task Scheduler window
To add a new task, you need to select “Create task” in the “Actions” menu (Fig. 5).
tooltip="Optimizing Windows Vista">
Figure 5. Creating a task in the task scheduler
You can launch programs using this wizard once, when registering in Windows, when you turn on the computer, or according to a schedule.
The folder in which shortcuts for programs are stored launched after the user logs in. Shortcuts to this folder can be added by programs during installation or by the user independently. There are two folders - common for all users and individual for the current user. By default these folders are located here:
..\Users\All Users\Microsoft\Windows\Start Menu\Programs\Startup- this is the folder from which programs will be launched for all users of the computer.
%USERPROFILE%\AppData\Roaming\Microsoft\Windows\Start Menu\Programs\Startup- this is the folder from which programs will be launched for the current user.
You can see which programs you run in this way by opening the ““ menu. If you create a shortcut for a program in this folder, it will launch automatically after the user logs into the system.
Windows reads the path to the Startup folder from the registry. This path is described in the following sections:
“Common Startup”=“%ProgramData%\Microsoft\Windows\Start Menu\Programs\Startup”- for all users of the system.
"Startup"="%USERPROFILE%\AppData\Roaming\Microsoft\Windows\Start Menu\Programs\Startup"
- for the current user.
By changing the path to the folder, we have the ability to autoload all programs from the specified folder.
Example:
"Startup"="c:\mystartup"- the system will load all programs whose shortcuts are in the folder c:\mystartup\, while the “Startup” folder will still be displayed in the “Start” menu, and if the user did not have anything in it, then he will not notice the substitution.
Replacing a shortcut for a program from the Startup folder
Let's say you have Acrobat installed. Then in the “Startup” folder you will have a shortcut “Adobe Reader Speed Launch” - this shortcut is installed there by default. But this shortcut does not necessarily refer specifically to the corresponding application - any other program can be launched instead, especially since this will not affect the functionality of Acrobat.
You can view the list of automatically downloaded programs by opening the program " System Information"(open " Start - All Programs - Accessories - System Tools - System Information» or dial msinfo32.exe on the command line) and going to " Software Environment - Automatically downloaded programs". System Properties displays startup groups from the registry and Startup folders.
However, please note that not all programs that download automatically will be visible in this case.
Disabling unnecessary services
It is worth understanding that disabling some services, on the one hand, can increase the performance of the computer, but on the other hand, it can cause it unstable work. Therefore, instead of disabling services, you should set the download status to “Manual”.
Computer Browser. This service is responsible for compiling a list of computers on the network. The functions of this service are required by such operating system tools as the network environment, Windows Explorer and the netview command. If you are not using a network (for example, on a home computer), this service can be disabled.
Desktop Window Manager Session Manager/DWM Session Manager. If you don't use Aero Glass mode, you can disable this service.
Distributed Link Tracking Client/Client for tracking changed links. This service supports links between NTFS files that are moved within a computer or between computers in a domain. If you do not have such connections, you can disable the service.
IP Helper provides automatic operation IPv6 based on IPv4 networks. If you are not using IPv6, disable this service.
Offline Files/Offline files- registration of offline file creation events and monitoring of their cache. If you do not use such files, disable this feature.
Portable Device Enumerator Service/Portable media device numbering service. Designed to activate group policies for portable media devices. Allows applications such as Windows Media Player and Image Import Wizard to transfer and synchronize information between your computer and portable devices. If you do not have such devices, disable this service. If yes, set it to Manual.
Print Spooler/Print Spooler. If you don't have a printer and don't print, turn it off.
Program Compatibility Assistant Service Enables the Program Compatibility Assistant application to work. If you do not use this application, disable this service.
ReadyBoost: provides support for the ReadyBoost feature. If you have two or more gigabytes of RAM or you do not use this service, disable it.
Security Center/Security Center: monitors security settings. If you have an antivirus and firewall installed and monitor Windows updates yourself, set this service to Disabled.
Server: The server system service provides support for remote procedure calls, as well as file, printer, and named pipe sharing across the network. The Server service allows you to share local resources, such as disks and printers, so that they can be accessed by other network users, and provides named pipe communication between programs on the local and remote computers.
Table PC Input Service mobile computers TabletPC class. If you don't have a TabletPC, you don't need this service. Turn it off.
TCP/IP NetBIOS Helper: Enables support for the NetBIOS service over TCP/IP (NetBT) and NetBIOS name to address resolution. If you do not use NetBIOS or WINS, disable the service.
Terminal Services/Terminal Service: supports interactive connection to remote computer. If you don't use remote connection, turn it off.
WebClient/web client. This service allows you to create, receive and modify files on the Internet. Thanks to it, it becomes possible to use web folders. If you don't use it, turn it off.
Windows Defender: Scans your computer for malicious software (spyware or adware), allows you to do it on a schedule and downloads its own updates. If you use another program for these purposes, disable it.
Windows Error Reporting Service. On the one hand, this service will allow you to solve certain problems, on the other hand, it can be disabled. It's up to you to decide.
Windows Time/Windows Time Service. If your organization does not have a unified time service, disable it. For home users, this service is practically useless.
Windows Update: Detects, downloads and installs updates for Windows and other applications. It is recommended to set the status to “Manual”.