How to configure manual updating of Windows 10. “Local Group Policy Editor.” Setting up the registry or group policy
As you know, in Windows 10, the new operating system from Microsoft, not only the components of gadgets, widgets and built-in utilities were radically changed, but also the overall design and navigation system. As a result, the method of access to some services has changed, including the Center Windows updates" Because of this, it has become problematic for many users to configure the automatic system update mode for themselves.
What is Windows 10 Update?
“Update Center” is a special set of tools designed to automatically search for system updates and their subsequent installation. All necessary updates for OS "Center" downloads from the official website of the Microsoft company.
How to enter Update Center in Windows 10
In Windows 7 and 8.1, the Update Center icon was located in hidden icons on the taskbar. In the “top ten” everything is different. To launch the Update Center you need to do the following:
- Right-click on the Start icon and select Settings. You can also use the Windows search bar to open Settings
- After that, in the settings window, go to the “Update and Security” section.
 The Windows Update window can also be found using the search bar
 - Then click on the “Windows Update” submenu.
 You can see the date in the Update Center window latest update systems
Video: how to enter Windows Update
How to check for new updates
To manually start the verification process you must:
- In the “Windows Update” window, click on the “Check for updates” line.
 By clicking on the “Update Log” line, you can view all previously installed update packages
 - The search for current update files will begin, and upon completion of the search, the files will be downloaded and subsequently installed.
 By clicking on the “Details” line, you can view the entire list of downloaded files
 - Ready. To complete the installation of updates, restart your PC.
The author of this article recommends that before downloading and installing system updates, create a “restore point” each time. This will help you roll back the system without unnecessary losses if some of the downloaded files are damaged during the installation process. Rolling back to a restore point several times allowed the author to avoid complete reinstallation OS after an unsuccessful update attempt, sacrificing only the most latest changes. The creation of such a point is carried out in the “Settings - System and Security - System Protection” window.
Ways to configure Update Center in Windows 10
Like all available system applications, Windows Update has the ability to be configured according to the user’s wishes. It can be configured so that the search and installation of OS updates is performed completely automatically, or you can set it to a mode in which you have to manage this process manually. There are several configuration methods, so let's look at each of them separately.
Configuration via the built-in Services tool
The Services tool is a database of all system services running in Windows. To launch the Update Center, you will need to complete a number of steps.
- Once you open the Start menu, search for "Services" and then launch the tool.
 You can also launch the Services tool through the Windows 10 Device Manager by pressing the key combination CTRL+ALT+DELETE
 - In the Services window, scroll down and open Windows Update.
 In the services window you can also check the status of any running Windows service
 - In the window that opens, four tabs will be available:
- “General” - allows you to configure automatic start"Update Center" when loading the OS, as well as disable or temporarily suspend this tool;
 If you click on the “Suspend” button, “Windows Update” will automatically start again after you restart your PC
 - “Login to the system” - makes it possible to launch the “Update Center” only when logging into the system under a certain account user;
 If you select the “With a system account” option, the update center will automatically launch under any user account
 - “Recovery” - here you can configure options for actions in the event of critical errors or system failures of the Update Center;
 You can configure an automatic algorithm of actions in case of failures in the Update Center.
 - “Dependencies” - this tab displays settings for how the Update Center depends on other Windows services.
 It is advisable not to change the settings in the “Dependencies” tab, otherwise “Update Center” may stop working correctly
- “General” - allows you to configure automatic start"Update Center" when loading the OS, as well as disable or temporarily suspend this tool;
Setting up Windows Update to run through the system registry
System Windows registry is, among other things, a means of managing OS processes. Therefore, you can adjust the operation of Windows Update in it.
- Launch the task bar (WIN+R) and enter the regedit command.
 You can also open the “task bar” by right-clicking on the “Start” menu
 - In the root registry folder, navigate to the subfolder HKEY_LOCAL_MACHINE\System\CurrentControlSet\Services\wuauserv.
 The entire registry directory path will appear in a separate line at the bottom (or top)
 - Find the file called Start and double-click on it. In the “Value” field, set the required parameter: 0 - disable Update Center, 1 - enable.
 If you set the “Value” field to 2, then “Update Center” will only notify about found updates, without downloading or installing them
 - Save changes and reboot.
Configuration via the “Advanced Settings” function
When you open the Windows Update window, you will find three categories of settings:
- change the period of activity;
- restart options;
- additional parameters.
 Thanks to the expanded parameters, you can easily customize the Update Center to your liking
 Let's take a closer look at them.
- “Change activity period.” In this item you can configure the operating period of the Update Center. Set the start and end of the period and click the “Save” button.
 The rest of the time (outside the specified period) “Update Center” will be disabled
 - "Restart options". This settings menu allows you to set the time to restart the PC after installing the update files.
 The restart setting is convenient when you do not want to immediately restart your PC after installing updates
 - « Additional options" Allows you to configure:
- parameters for downloading update files: set a download speed limit, as well as the monthly amount of downloaded data;
- download parameters, including setting a download delay for a certain number of days;
- ability to download updates via another PC local network.
 The "Advanced Options" provides a wide range of additional features Windows Update settings
Video: setting up the “Update Center” through additional parameters
Configuring the installation of individual update packages using the Show or Hide Update program
This utility is provided by Microsoft itself, so you don’t have to worry about the security of your PC when running it. The utility is designed to configure automatic updates of the system or its individual components. Unfortunately, it is only partially translated into Russian.
- Go to the official Microsoft page and download the Show of Hide Update utility.
- After downloading, run the utility. An automatic database scan will begin to check for updates to your OS.
 The utility allows you to specify a list of updates that will be installed automatically
 - Upon completion of the process, you will be offered a choice of two options for further actions:

- By selecting one of the options, you will see full list update packages. By placing markers, you can leave only the necessary updates.
 If you hide an update for specific device, then Windows Update will no longer look for updates for it
Video: how to deactivate Update Center using the Show or Hide Update utility (using the example of nVidia video card drivers)
Setting up Update Center using the PowerShell system utility
PowerShell is a Windows scripting engine. The utility is designed to configure and optimize existing processes.

Table: command decoding in PowerShell
| Team name | Decoding |
|---|---|
| Get-WUList | opens full list found update packages |
| Get-WUInstall | starts the process of downloading files followed by installation |
| Get-WUUninstall | starts deleting the selected update files |
| Invoke-WUInstall | makes it possible to manage update files on remote PCs (in local networks) |
| Hide-WUUpdate | hides update packages from Windows Update |
| Get-WUHistory | opens a detailed description of all installed files updates |
| Add-WUOfflineSync | runs a Windows system service that is capable of installing updates without an Internet connection (via the system cache) |
| Remove-WUOfflineSync | starts the process of removing the selected system service (registered) |
| Get-WUServiceManager | opens a complete list of available system update services |
| Add-WUServiceManager | starts the registration (installation) process of the selected system update services |
| Remove-WUServiceManager | starts the process of uninstalling the selected system update services |
| Get-WUInstallerStatus | opens the working status of the system Windows utilities Update Installer |
| Get-WURebootStatus | reboots the PC |
| Update-WUModule | launches the update on all computers simultaneously (relevant for a local network) |
Setting up Update Center using the Windows command line
This option allows you to configure the autostart of Update Center. To activate or deactivate auto-update:
- Open command console Windows strings(press the key combination WIN+R, and then enter cmd command).
 The command line console can also be launched by typing the appropriate command in the Windows search bar
 - Enter the value net start wuauserv - if you want to enable autorun of Windows Update, or net stop wuauserv - if you want to disable autorun.
 Thanks to the command line, you can configure Windows Update to autorun in just a few seconds
 - Wait until the settings are applied, and then restart the PC.
 After entering the command, messages about its launch and execution will appear in the window.
Configuration via “Local Group Policy Editor”
This setup method is intended exclusively for owners of Windows 10 Professional (the Home version does not provide this option). “Local Group Policy” is a set of system rules that help manage Windows settings. To make changes to Update settings, you need to follow several steps.
- Launch the “task bar” (WIN + R), enter the value gpedit.msc.
 If you have Windows 10 Home installed, entering this command will not work
 - In the root directory, navigate to the option: Computer Configuration/Administrative Templates/Windows Components/Windows Update. Double-click on the “Set up automatic updates” line.
 The editor also provides informational help for each of the presented parameters.
 - In the settings that appear, place the checkbox next to the “enabled” value, and then set the desired parameters.
 Before choosing a specific value, you can familiarize yourself with detailed description each setting parameter
Video: ways to deactivate Update Center in Windows 10
In addition to all publicly available system tools on setting up Windows Update, the author of this article can also recommend using various third party utilities and programs. The most famous utility is WSUS Offline Update. Using this program simplifies the process of setting up Update Center thanks to a wide range of tools and quick access to them. In addition, the interface of the WSUS Offline Update utility is intuitive and learns very quickly.
Possible problems with Windows Update and how to solve them
In the Update Center, as in any system utility, sometimes errors occur. Let's look at the most common of them.
Error Service Registration is Missing or Corrupt
This error occurs when Update Center tries to automatically install downloaded updates. The cause of the problem lies in system failure Windows or the Center itself.
 The error only occurs when trying to install an update, but the update files can be downloaded to the PC without problems
 To resolve this error, you must complete the Update Center repair process.
- net stop wuauserv;
net stop cryptSvc;
net stop bits;
net stop msiserver;
ren c:\Windows\SoftwareDistribution SoftwareDistribution.old;
ren c:\Windows\System32\catroot2 catroot2.old;
start wuauserv;
start cryptSvc;
start bits;
start mserver.
 When entering commands, you must follow the order in which they are executed.
 After entering and executing all commands, restart your PC.
Windows 10 Update keeps rebooting
The problem is that when you open the Update Center window, it immediately disappears (closes). The reason for the failure is the presence in the “Center” system errors. To correct the situation, you need to reset its settings.
- Open a notepad and write in it a series system commands.
 Each command must be entered on a new line
 - Save the created file, naming it winupdate-reset.bat and selecting ANSI encoding.
 Be sure to include the bat extension in the file name
 - After saving the file, right-click on it and click “Run as administrator.”
 This file will reset the Update Center settings through the system registry
 - Wait for the process to complete, then reboot the system.
 The process of resetting Update Center settings will take only a few seconds
When you click on the “Search for updates” line, a search error message may appear.
 When I try to search again, nothing happens
 This happens due to a critical failure in Windows that has caused damage to the Update Center service. To restore, you must perform the following steps:
- Right-click on the Start menu and launch Command Prompt from the list that appears.
 You can also open the command prompt by typing cmd in the task bar (WIN+R)
 - In the system console window that opens, enter the value sfc /scannow, press Enter and wait until the scan is completed.
 Enter and run sfc team/scannow on the command line
 - Once the scan is complete, run the command dism/online/cleanup-image/restorehealth.
 After successful completion of the recovery process, be sure to restart your PC
 - Close the Administrator command window and restart your computer.
If malfunctions occur that affect the performance of the Update Center, you can also use the built-in Windows tool"Troubleshooter" To start it, just enter search bar“Start” menu value “Troubleshooting Windows Update”, start the corresponding service and wait for the diagnostic process to complete, followed by automatic correction of errors found. Many users underestimate the capabilities of this utility, calling it useless. But the author can testify that this is far from the case. For some critical system failures, the Troubleshooting Wizard turns out to be a very effective tool.
“Update Center” is one of the most important tools in Windows 10. It helps you search, download and install all the necessary system update files. Thanks to a wide selection of settings, the work of the Update Center can be fully automated or, vice versa, switched to manual control. Like any other system Windows service, "Update Center" is prone to errors, but each of them can be eliminated by using the internal OS tools.
This lesson will discuss setting up Windows 10 updates. Let's look at a couple interesting moments. I'll tell you where it is Windows 10 Update and what settings it has.
By default, the update center is no longer in the control panel, and the update itself contains a couple of surprises, which we will discuss below.
You can find Update Center in Windows 10 Settings. Go to the Start menu and then Settings.
There is another way to access them. To do this, click on the special tray icon next to the clock, and then select “All settings”.

A new window will open in front of you with all the settings. We are interested in the "Update and Security" item. This is where it happens setting up Windows 10 updates.

In the window that opens, you can check for updates and go to “Advanced options.” If everything is clear with the first one, then let’s figure it out with the second one.

The first parameter that we see in the window that opens indicates how to install updates. The choice here is not great: “Automatically” or “Notify when a reboot is scheduled.” You won't be able to simply disable the update.
The "Defer updates" option allows you to defer the download of updates with new operating system features, except for security updates. They will always download and install.
And finally, let's look at the item "Choose how and when to receive updates."

Microsoft makes your computer the source for downloading updates by default, thereby relieving its capacity. Those. if you download new updates to your computer, then other users can receive these files not from Microsoft servers, but directly from your computer, and vice versa, your computer can receive updates from another similar computer. Everything works here the same way as when the computer becomes a server when downloading a torrent. On the one hand, this is good, but it is not always to the user’s liking, so let’s disable this feature.

Of course, all settings are your own business. That's all. If you have any questions, ask them below.
In this lesson I will show how to open command line on Windows 10. The fact is that in the new operating system there is no “Run” item as such, so at first glance there may be a problem with the fact that you will not be able to open the command line. It's actually not a problem.
In the last lesson I already told you how to remove cloudy font in Windows 10. Unfortunately, icons that become too small on high resolution The screen is not suitable for everyone. So today I’ll show you how to remove muddy font at separate program. By the way, this setting is also available in more early version operating system, such as Windows 7.
Today I’ll tell you how to get rid of muddy texts in some programs in Windows 10. After I switched to Windows 10, I myself encountered a problem that when I opened some (not all) programs, I had muddy font.
Windows 10 differs from previous Microsoft operating systems in many ways, including the location system files, as well as availability and access to special features and OS functionality. The Update Center has also undergone certain changes, which will be discussed below. However, setting up Windows 10 System Update itself has not become more complicated, but on the contrary, it has become simpler and more convenient.
Windows 10 Update- a program with which the operating system is updated to more current versions, and also downloads updates for related programs. Without it, the operating system on your computer will quickly lose its relevance and will not have many additional features that appear over time.
Location
Previously, this program could be accessed through the Control Panel, but now no user finds it there. Now the Update Center can be opened through the menu " Start" In it you need to go to the section “ Options", from there to the section " Update and Security" In this submenu you can easily find this program and update your system with it.
How to check for updates
To make sure that your system has updates, you need to click the button Checking for updates, which will show all the updates found and suggest their installation. In addition, in basic settings There are only so many properties that can be adjusted. You can configure a wider range of parameters if you click on the item “ Additional options" Not every build of Windows 10 supports this method. It is available in Pro, Education and Enterprise versions.
How to set up Update Center
The automatic operating system update process is configurable and can be disabled in several ways. The methods below allow you to quickly do this without the need to install additional utilities.
Using the built-in Services program

Using the Registry Editor
- Open the Registry Editor using the Win + R key combination.
- Type regedit command
- There, go to the folder " Auto Update", located along the path " Hkey_Local_Machine» → « Software» → « Microsoft» → « Windows» → « CurrentVersion» → « WindowsUpdate».
- In the menu that appears, double-click on the item “ AUOption" After that, set it to 1. This means that Update Center will stop checking for new versions of Windows programs. If you want to enable updates again, just change the value to 0.
It is possible that such a parameter will not exist, then you need to write it down yourself. Just right-click on a section of the field and select to create a separate parameter with the DWORD type. Name it the same as indicated here.

In the Advanced Options menu
Go to the Update Center menu according to the guide above. Select " Additional options" and go to the window " Notify about reboot" There select " Defer updates».
It is worth saying that with this method of disabling, updates will still be installed.
Turn on automatic update you can do it from here.
Possible problems
Sometimes it may happen that a previously working update center stops functioning. unknown reasons. Below are the most common problems with this program and solutions if suddenly the update service does not work.
Solving problems using the Troubleshooting Manager in Windows 10
Modern Windows operating systems have a built-in way to deal with application failures and problems. You can also use it to deal with problems with Update Center not working.
- Go to the menu " Start».
- In the search field write " Troubleshooting».
- Double-click on the icon that appears. A window will open with the menu “ System and security" There, at the very bottom, click on the item “ Troubleshooting».
- In the menu that appears, click " Additionally", check the box " Accept corrections automatically" and confirm running as administrator.
- After that, click Next and wait. After some time, the repair process will complete and “ Update Center» will resume work.
Error "Service Registration is Missing or Corrupt"
This problem occurs if a proxy server is registered on your computer without permission to update. There are two ways out of this situation: do not use a proxy for updates, or set the permission in the system itself.
Restarting Update in Windows 10
In the operation of this program, situations sometimes arise when the error is not corrected by the Troubleshooting Center, as well as by other methods.

Thus, the most effective method The solution to the problem is to reset the system Update Center and restore it to default.
To do this you need to do the following:

Upon completion of this procedure, the Update Center will be reinstalled along with all related services. This way, the system will stop crashing and start updating.

In general, this is all that can be said about Update Center in Windows 10. Its work, of course, is somewhat different from what it was before, however, it still performs the same functions as before the new OS from Microsoft. Moreover, in the tenth Windows versions it is in a different location, which changes the steps to configure and debug it.
Video on the topic
All IT forums are teeming with different opinions regarding Windows 10 updates. Some say that the updates broke the system, although they were designed to protect it. Others say that without updates you can easily pick up viruses. Whether you plan to use updates or not, you need to be able to configure them.
What is Update Center
The Update Center (OC) in Windows 10 is a very simple environment with a very clear, albeit slightly limited in functionality, interface.
Getting to the update center is very easy.
- Open Start and click on the gear icon called Settings.
Through the “Start” menu we get to “Settings”
- In the window that opens, go to the “Update and Security” section.
In the “Options” window, select “Update and Security”
- By default, the Windows Update tab opens, where you can schedule system, driver, and security updates.
In the CO we get acquainted with the possibilities of updating the system
How to check for Windows 10 updates
Your device must be connected to the Internet. Or at least to a local network that is connected to the Internet. Computers on this local network must be updated to allow your device to download necessary files from their hard drives.
By default, checking for updates occurs automatically. But it often happens that users accidentally or intentionally disable the verification option or some glitches occur in the scheduler. Automatic search updates may not work for other reasons.
You have the option to run a manual check for updates. To do this, click on the “Check for updates” button in the update center. This will start the process of searching for files that can update your system.
The “Check for updates” button starts a search for system updates
How to disable Windows 10 update
Disabling updates is the same as breaking the warranty seal and freeing yourself from service.
The easiest way to disable Windows 10 updates is through services.
- Right-click on the “This PC” icon and select “Manage.”
IN context menu computer, select “Management”
- In the window that opens, on the left, select “Services and Applications”, then “Services”.
Go to “Services” through “Services and Applications”
- Scroll down the list of services to the very bottom. We are interested in the one called “Windows Update”. Double-click on it with the left mouse button. In the service settings that open, change the “Startup type” to “Stopped”.
In the properties of the Windows Update service, change the “Startup type” to “Stopped”
- Click OK and restart the computer.
Video: How to disable Windows 10 update
Setting up updates in Windows 10
Depending on the edition of your operating system, the settings that will be available for change will be different.
On Windows 10 Home
Windows 10 developers provide a very limited set of settings for installing Windows 10 updates. This is especially true for the Home version.
Setting the computer restart time
The only thing you can change during the process of updating your system is choosing the time when your computer will restart. The updates will be installed and you can continue working safely. You have three options for rebooting:
- agree with the time that the system offers you;
- choose the time as you wish;
- restart your computer manually.
On Windows 10 Pro and Enterprise
In the Pro and Enterprise versions, users have much greater freedom in updating settings. These versions have an "Advanced Options" window.
In Enterprise, you can change the "Activity Period". This setting provides additional notification that the computer will be restarted outside of business hours. As for the “Advanced Settings” window, you still won’t be able to change much.
If you check the box next to "When you update Windows, provide updates for other Microsoft products," in addition to Windows components, the CO will also look for updates for Office products, OneDrive and other software from Microsoft
IN Pro version It is possible to delay the installation of updates. However, you should understand that you won’t be able to postpone it constantly unless you disable the update center.
Windows 10 Pro has the ability to defer updates, but you won't be able to do it all the time
How to remove updates
If the update did not install correctly or you did not like it, you can remove it.
- Open in the CO and click on the “Update Log” button.
Among installed updates select those that we are going to delete
- After removal, reboot the computer.
Video: How to remove updates in Windows 10
There's nothing wrong with system updates. They are designed to optimize the performance of your computer, and not harm it. Our instructions will help you update your system in a timely manner and protect yourself from malware.
Windows 10 Update allows you to promptly download operating system updates from official servers Microsoft. After installing the OS this service enabled by default and works in background. However, you can disable it yourself and not receive new versions. If you don't care about loading your computer with processes related to monitoring and installing system files, then you can enable Windows 10 Update in several ways.
Execute this procedure only possible using the built-in functionality of the operating system. Third party software you won't need it. First, check if Update is running by default on your computer. You can do it like this:
- Launch Task Manager using combinations Ctrl+ Shift + Esc .

- Open the Services tab. Here, look for a service named "wuauserv".

Thanks to it, auto-update works in the background in the operating system. If you don’t have “wuauserv”, then go to one of the inclusion methods:
- through group policy;
- through "Windows Settings";
- using the command line;
- through registry settings;
- via Services.
Let's consider each method in detail.
Enable in Local Group Policy
Restore work of this service in “ten” you can do this:
- Open the Run program using the key combination Win + R. Enter the command “services.msc” and start execution with the OK button.

- The “Services” window will appear in front of you. In the right list, find the line “Windows Update” and using RMB in the menu, select “Properties”.

- In the “General” tab, find the “Startup type” line and set the “Automatic” option in the menu, then apply the changes with the “OK” button.

- Restart your PC.
In this way you can start a central heating center in the operating room Windows system 10. This method can help you get rid of error code 0x80070422.
Now let's figure out how to check availability available updates manually and start downloading/installing them. To do this, you will need the functionality of the “Parameters” section:
- Right-click on the “Start” icon on the bottom panel and select “Settings” from the menu.

- Open the "Update and Security" section.

- Go to the “Windows Update” subsection in the left column.

- In this window you can make all the necessary settings for the central heating center and check the availability of files for download. To check, you need to click on the button marked in the screenshot.

- The tool will now scan for new Windows 10 patches and notify you about it. In the “Advanced Settings” section, move the option to the “Off” position, as shown in the screenshot. By clicking on “Choose how and when to receive updates,” you can configure delivery methods (from a PC on a local network, the Internet, etc.).

If you have a problem with the operation of the central heating center, you need to check the settings in the editor group policy.
"Local Group Policy Editor"
To run the program, follow these steps:
- Go to "Run" with using Win+R. Write the command “gpedit.msc”.

- Open the “Windows Update” branch, which is located along the path “Computer Configuration” - “Administrative Templates” - “Windows Components”.

- On the right side of the window, find the line “Setting automatic updates” and right-click on it. In the menu, go to “Edit”.

- Set the setting to Enabled (1). In the "Settings" section, select the settings according to which automatic updates will work (schedule, installation, notifications about available downloads etc.). Apply the changes with the “OK” button.

Using the Windows 10 command line, you can disable or enable Update Center. This will force you to start the “wuauserv” service.
- Open a command prompt with administrator rights. Type the command “net start wuauserv” and press Enter.

- The program will start the service, after which you will see a corresponding message. The process will start every time you turn on your PC, so you won't have to repeat this procedure. To disable the Windows 10 CO, you must enter the command “net stop wuauserv”.

- Now it remains to check whether the system will be updated.
Registry
Also, the central heating center will not work unless the value of the parameter in the registry is corrected. You need to do the following:
- In the “Run” window (Win + R) enter the command “regedit”.

- In the registry editor, find the HKLM\System\CurrentControlSet\Services\wuauserv branch. Just copy the path from these instructions and paste it into the search bar at the top of the window.

- On the right side of the window there will be a “Start” option. Right-click to select “Edit” from the menu.

- In the disabled state, the parameter will have a value of 4. For the CO to start downloading updates, set the value to 1.

The launch of this service is not affected by any others, so malfunctions and performance problems should not arise. You can also check the HKEY_LOCAL_MACHINE\SOFTWARE\Microsoft\Windows NT\CurrentVersion\Hotfix branch, which contains information about all update files.
Third party programs
What to do if you can’t set up automatic downloading? Starting the service doesn't help, but you don't have the time or knowledge to find workarounds? Then try updating operating system using the WSUS Offline Update utility. Download it from the official developer website using this link. On home page Click on the button marked in the screenshot. The creators guarantee complete safety for users and their personal data on PC. After downloading, follow the following procedure:
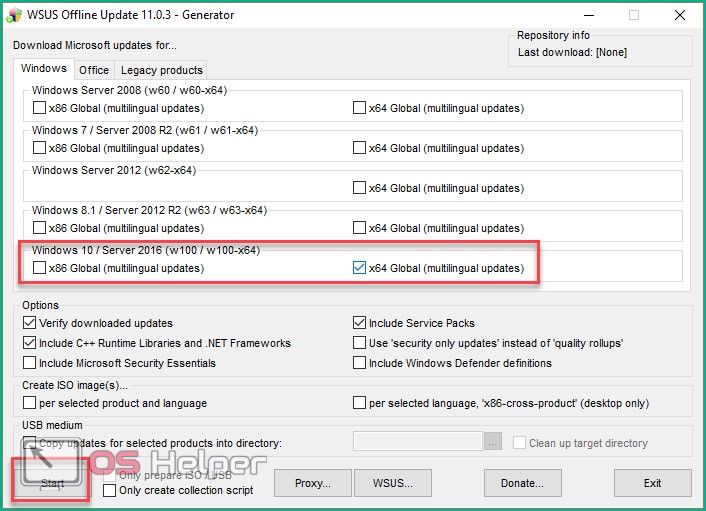
- In the program folder, open the UpdateGenerator.exe file.

- Select your OS version: Windows 10 x32 or x64. To start downloading files, click “Start”.
- Once the download is complete, you will see a log on the screen with a list of all downloaded files. The download and installation time depends on how long it has been since you updated Windows. Now you need to go to the “client” folder and open the UpdateInstaller.exe file.

- In the program window, click “Start” to begin installation.

If WSUS Offline Update starts to freeze or stops searching for files, try using an earlier and stable version programs.
You only need to update the operating system in this way once, since after installing the patch, troubleshooting will be carried out and the default central processing center will be launched.
Bottom line
If you would like to install extreme Windows version 10, then all the methods described will help you with this. Don't forget to adjust the settings for yourself so that downloading or rebooting with scheduled installation doesn't take you by surprise.
Video
So, to consolidate the material received, let's watch a video on this topic.