Corporate mail for Android. Setting up mail on Android - basic parameters of the Gmail application
Subscribe:

It is clear that email has become an integral part modern business and a communication tool for millions of users around the world. However, there are times when access to personal computer is not possible, but there is an urgent need to send or receive email message. A modern smartphone is designed to solve this problem.
Below we will look at instructions for setting up email on an Android smartphone.
Procedure for setting up mail in Android
1. Go to the menu and open the built-in Mail application.
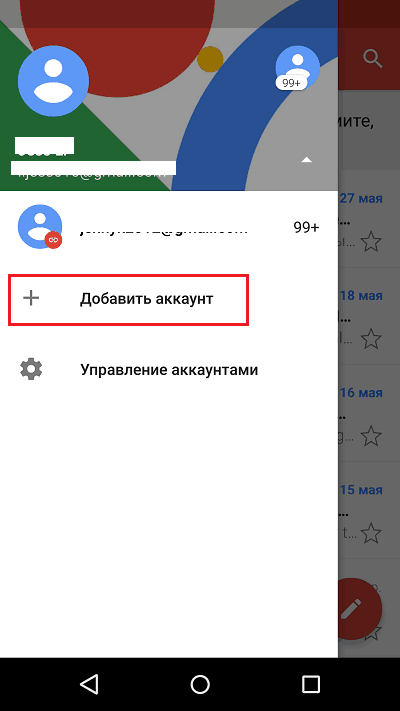
2. If you do not have an email address, the application will prompt you to create an account on one of the servers. If postal address already exists, you need to go to the accounts menu and click “Add account”.
4. After confirming the password, you need to decide on the protocol for connecting to the mail service; it is recommended to select POP3.
For reference. In mail from Google mail server - pop.gmail.com, in Mail.ru mail - pop.mail.ru, yandex - pop.yandex.ru If you use Google mail, Android has special applications that make your work easier.
6. Install encrypted SSL connections and TLS in additional parameters messages.
7. Set/change parameters for outgoing messages. Initially, you need to switch the connection security type to SSL, as well as TLS. Next, you must enter the name used by the outgoing server. SMTP mail. It will look like smtp.*mail client domain. So for the popular ones SMTP services will be as follows: Yandex - smtp.yandex.ru, Mail.ru - smtp.mail.ru and Google - smtp.gmail.com
8. If you need to add an additional mailbox to your Android mail client, then follow all the instructions (points 1-7) again.
If you followed all the instructions, then mail client automatically synchronizes all incoming and sent messages from your mailbox.
In some smartphones, email clients are synchronized with the settings of the servers on which your mail is located. This significantly simplifies the process of setting up mail on Android phone. This convenient function will allow you to use e-mail services. You will become mobile with constant access to letters from any mailboxes belonging to you.
Comments
Our man won’t go into his pocket for words, but for mail he will. No, we are not talking about an envelope with a letter taken out of a box and stuffed into a pocket, but about a smartphone, which is our personal “postman” in a modern version.
Many people think that Android phones allow access, which is linked to a Google account, and iPhones only work with a mailbox that is associated with an Apple ID. And what are needed for other email accounts? additional programs. In fact, gadgets have enough capabilities for everything. Let's talk about how to set up email on your phone to receive emails from all your accounts in one mailbox - built into the system.
Setting up mail in the Gmail app on Android
Adding and setting up a new account
Mail client " Gmail", pre-installed on Android phones, can be used to assemble letters from various mail services, except those that do not support third-party applications, such as the highly secure ProtonMail and Tutanota. By default, it collects emails only addressed to the Google account associated with the device.
To connect to Gmail client another mail account, do the following:
- Launch the application. If anyone doesn’t know, his label is a white envelope with a red letter “M”.
- Tap the hamburger button and open side menu. To access the account management section, tap the triangle circled in the screenshot.

- Select " +Add account».
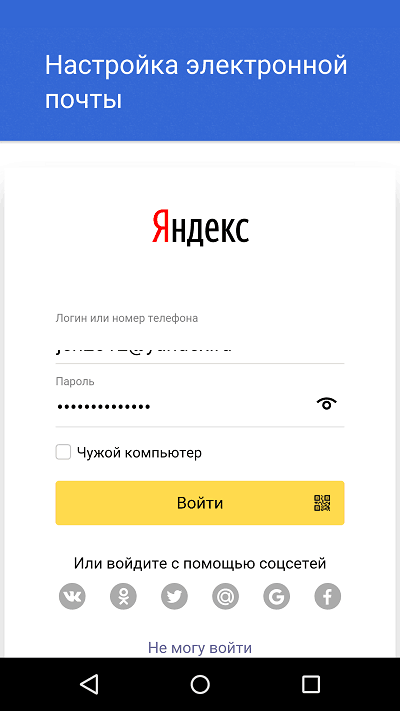
- Select the mail service you want to connect. For example, if domain name server where your mailbox is located, yandex.ru or ya.ru, select Yandex; if gmail.com, choose Google, etc. If the required service not in the list, your choice is " Another». Next steps Let's look at the last option as an example.

- Enter your email address. To set it to default settings, click " Next" If you want to specify your settings, tap the " Manually».

- If you choose manual setup, the program will ask you to specify one of three account type options. For personal mail these are POP3 or IMAP protocols (you can find out what to choose from the user manual of your mail service). For mail at corporate server– Exchange, unless otherwise used.

- Enter your login or full mailbox address and password again to log in.
- On next stage specify the incoming message server. If the program does not detect it itself, you will have to once again refer to the manual of your mail service.

- Next, enter the address of the outgoing message server and, if desired, enable automatic login into the system. Then you won’t have to enter a password every time you access your mailbox.

- The basic setup is almost complete. The only thing left to do is to allow or disable synchronization of the program with the mail server. If allowed, set the synchronization frequency (15 minutes by default), and also enable or disable notification of new emails and auto-downloading of attachments when the phone is connected to a Wi-Fi network.

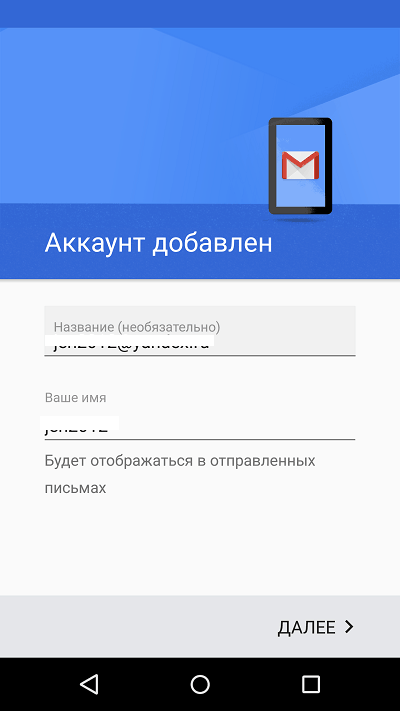
- Account added. As a final step, you can change your name, which will be displayed in the emails you send. By default, the account login is specified instead of the name.
You can finish here, but if you want to configure new box more subtly, open the side menu in the application again, scroll down and tap the button Settings».

Select the account you want to edit.

The following parameters are available for change:
- Account name ( email address).
- Your name (by default, this is your account name).
- Signature in the letter.
- Linking an address to another Gmail account.
- Request to display images in emails (if your Internet connection is slow or is charged based on traffic volume, it is better to enable it).
- Synchronization with the mail server and its frequency ( high frequency synchronization increases the amount of traffic and speeds up the drainage of the phone's battery).
- Automatic downloading of files attached to emails when connected to Wi-Fi.
- Notifications about new letters.
- Sorting of incoming correspondence by categories (unsorted letters, social networks, forums, promotions and notifications). Not supported by all email services.
- Automatic reply to incoming emails. Not supported by all email services.
- Automatic substitution of quick answers. Not supported by all email services.
- Select a ringtone to notify you of an incoming message.
- Adding shortcuts.
- Vibrating alarm to notify you that a letter has been received.
- Incoming and outgoing mail servers (user name, address, port and encryption type), etc.

In exactly the same way, accounts for other mail services are added to Gmail. There are no restrictions on quantity. Use manual settings, as described above, is usually not needed, except for connecting corporate or some exotic mail accounts. In other cases, the application chooses optimal parameters default.
How to change and delete your Gmail account
By default, Gmail displays only one correspondence account– currently active. To check another person's mail, you need to make it active.
All connected accounts are displayed in the top field of the main application menu (hidden behind the “hamburger” button). To switch between them, just touch the desired shortcut. And to simultaneously download messages from all your mail, select “ All boxes».

To delete an account from Gmail apps press the triangle button in the main menu and open “ Account management».

Next select postal service and the account you want to delete. On the next screen, highlight again required address and go to the menu hidden behind the “three dots” button (top right). Tap " Delete account».

Setting up mail on iPhone and iPad
Connect and set up your account
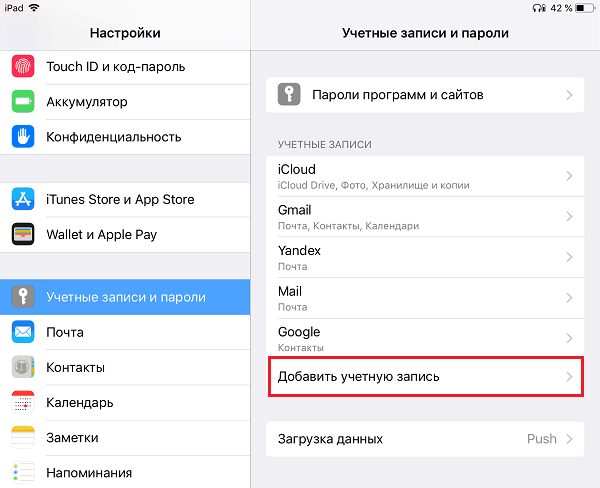
Adding and setting mail account on mobile devices ah Apple is no more labor intensive than Android, but, in my opinion, less intuitive. And they are executed not in the mail section, but in “ Accounts and passwords».
To use a different email account on your iPhone or iPad other than the one linked to your Apple ID, do the following:
- In the list, tap " Accounts» point « Add».
- Select the mail service where your mailbox is registered. If it is not in the list of suggestions, click " Other».

- Next, select the section “ Mail" And " New account».

- Enter your account information: username (by default the email account login is entered), email address, password and description (the latter by default matches the mailbox address). Tap the button Next».

- In the next window - IMAP, check " Mail" Paragraph " Notes» It is not necessary to mark. Save the setting.
- Next, if you think the settings are sufficient, click “ Ready" A new account will be added. If you want to edit settings that are not displayed in this window, click " Additionally».

In the section " Additionally» contains the following options:
- Behavior of boxes. Allows you to assign or change the roles of some folders - drafts, sent, archived and deleted messages.
- The place to move unnecessary letters is to the trash or archive box.
- Frequency of emptying the recycle bin (complete destruction of deleted messages). The default is one week.
- Options for receiving incoming correspondence: using SSL encryption, selecting an authentication method, port number IMAP server and IMAP path prefix.
- Whether to use S/MIME encryption. Disabled by default, supported by most but not all email services.

After closing the settings window, you will be taken to the newly created account section. By the way, there is also a button to delete it.

Now the mail program built into the system will receive letters, including from this mailbox.
Setting up the mail application
Built-in parameters mail program are configured, as you probably already guessed, through the “ Mail».
The following is collected here:
- Application integration with Siri and search system.
- Ways to notify about incoming correspondence (ringtone and sticker). You can assign individual notification settings to each mailbox.
- Message list display: number of rows to display when viewed, labels, swipe options (right, left, adding a flag, etc.), flag style and color.
- Actions when reading a message (request confirmation for deleting a message, uploading pictures).
- Sorting and processing of correspondence: grouping by topic, collapsing read letters, location of the last message (top or bottom), ending topics (showing a chain of letters that make up one topic, even if they have been moved to other folders).
- Options created message: sending a copy of the letter to yourself, marking addresses, indenting when inserting a quote, signatures - general or separate for each account and the default account from which new letters will be sent.

As you can see, the email program on Apple phones and tablets allows you to completely configure it to suit your own needs. Not everyone can boast of such functionality. third party application. Another plus in the collection of mailers built into the system - both on Android and Apple - is the absence of advertising, which almost all of them are stuffed with free analogues. So both programs are quite good.
Enjoy it for your health!
Also on the site:
How to set up email on your phone for Android and iOS updated: September 13, 2018 by: Johnny Mnemonic
Without email, it is difficult to imagine the full use of a smartphone. And on the Internet, without it, certain functions of many sites will not be available to you. Often, creating an account on most web portals involves entering your email address. Therefore, you definitely need to know how to set up mail on Android and how to create email box.
Nowadays there are many large sites on the Internet that allow you to register your email. But we cannot say that they are all equally reliable. Some are functioning intermittently, while others are suspected of reading personal information contained in letters. That's why we recommend paying attention only to the following services:
- Gmail;
- "Yandex";
- "Rambler";
- Mail.ru;
- Outlook;
- Yahoo!.
To register your email, you can go to the main page of any of these sites. But on a phone, for these purposes, the easiest way is to use the proprietary application of the selected “mailer”. Let's look at each of them in a little more detail.
Price: Free
One of the most famous Russian postal services. Its creators could do their best to attract the user to them. But, surprisingly, mobile application allows you to add an account from other popular “mail providers”. If you have several email addresses, then the Mail.ru program unites them all!
As for the application interface, absolutely anyone should understand it. It is made in signature blue and white colors. If the sender has an avatar, it will be displayed in the program. The client can also boast of a combined address book, so you can find the recipient very quickly. Everything is fine here with Push notifications, thanks to which you will definitely not miss the next letter you receive! At night, the sound of notifications disappears - this way the client will not disturb your sleep. The creators should also be thanked for introducing PIN code protection. Of course, if you only use the device at home, then such protection can be disabled.
Yandex.Mail
Price: Free
Another very convenient mail for Android. The application is pre-installed on many budget smartphones, supplied to Russia. The program works stably, automatic push notifications allow you to instantly know when a letter has been received. Also, this application is ideal for those people who work very actively with mail. Even if the account contains several hundred letters - smart search will allow you to find what you need very quickly.
The Yandex service allows you to assign different labels to letters. The most commonly used label is “Important”. This allows the letter to stand out among all other messages. It also supports grouping emails by topic. And Yandex is almost better than all other services at identifying spam, second only to Gmail in this parameter.
Price: Free
In the mid-2000s, the Rambler mail service was extremely popular. This cannot be said now. However, this does not prevent the service from working stably and doing an excellent job of blocking emails containing spam. Mobile client for Android has been around for several years now, at the moment it has been downloaded approximately 300 thousand times. It should be noted that this application can work not only with Rambler mail, but also with letters from other electronic mailboxes.
Like other programs of this kind, Rambler/Mail has a clear interface and support for Push notifications. At the same time, developers are always ready to meet users halfway. If you have interesting idea, which can be implemented within an email client, then it is enough to write to the creators of the utility at a special address. As for the shortcomings, the application also has them. The most important of them is the display of advertising - this was introduced into the program with the autumn update.
Yahoo Mail
Price: Free
It's hard to believe, but postal Yahoo service! has been around longer Google search engine. Therefore, you can install a branded client, at least for the sake of curiosity. With its help, you can read letters received not only on your native Yahoo, but also on Gmail, Outlook, AOL and some other services. At the same time, the search part is well implemented here - you can find the desired letter in literally a couple of clicks.
Yahoo! provides 1 TB cloud space. In this regard, you don’t have to worry about the fact that attachments in letters weigh a lot - there will definitely be enough space for them. Those who like to customize should also like the application. The client already supports many color schemes, and in the future there will be even more of them. Another nice addition is the ability to send GIF animation.
Microsoft Outlook
Previously, the word Outlook meant a special computer program, which collects letters from various web services. It still exists today. But along the way, Microsoft decided to rename its own email service to Outlook. Users note that it has a good fight against spam. As for the proprietary client created for Android, you can also enter data from other email accounts created on other services. There is also third party support here cloud storage, where you can move existing attachments.
Gradually the client learns to recognize the most important letters. If any are present, they will be moved to the very top of the list. In short, the application relies on smart filters, as well as comfortable work with a calendar. It's a pity that the program has Microsoft Outlook and disadvantages. Among them, it should be noted that there is no possibility to add email from Yandex or any other Russian services. But the utility competently interacts with attachments in the form of presentations, tables or text files V Word format. This should not be surprising, since it was Microsoft that invented such documents at one time.
Gmail
Price: Free
95% of our readers already have Gmail installed. But you still need to talk about this email client. As you might guess, it was created by Google. First of all, it is designed to interact with its own mail service, in which almost every person familiar with the operating system has an account. Android system. But you can also enter data here from other “mail providers” that use the POP and IMAP protocols.
The American company provides each user with 15 GB of cloud space. For small investments in the form of documents, this is quite enough. It also has excellent spam protection. Available in the program and automatic sorting mail - all kinds of notifications from social networks will be placed in separate folders that you can read only from time to time. Everything is fine here and with the search.
Mail settings
If you decide to download one of the applications discussed above, you will definitely not encounter any difficulties in setting up. You will only need to enter your username and password, after which you can start reading mail. Setting up mail on Android causes certain problems only if you want to use the built-in client. It is often used as Gmail, which is not as intuitive as we would like.
Step 1: Launch Gmail. You can use another built-in client, but our example will be based on a Google product.

Step 2. If you already have Google account, then your email is registered in Gmail. Accordingly, you can already read incoming letters.

Step 3. To connect an account from another mail service, you need to pull out the curtain from the left edge and click on the “ Settings».

Step 4: Here click on the button Add account».

Step 5. This will take you to the section where you can select the email service you are using. Select the one you registered with. For example, if your email address - [email protected], then you should be interested in the item “ Yandex" If your service is not in the list, then select " Another».

Step 6. Now all that remains is to enter your email address and click the " Next", enter a password and confirm your actions.

This is how easy it is to set up email on Android. Don't forget that you can adjust the client to your own rhythm of life. The same Gmail allows you to select actions performed after clicking the “ Delete", enable automatic navigation through email chains and use many other options. You'll soon be surprised at how convenient email can be!
Despite the fact that classic email is losing popularity, it is still one of the most popular methods online communication. Therefore, users often ask how to set up mail on an Android smartphone.
You can set up mail on Android in two ways: using a client application that is tailored for one email service, or using a universal email program. The first method is best suited if you use only one email service (for example), the second method will be useful for those who need to receive mail from several mailboxes that are located on different mail services. In this material we will look at both of these methods of setting up mail on Android.
Method number 1. Use special application client.
If you use one specific email service, then you can download an application created specifically for this service. There are apps like this for everyone. popular services email. As an example, we will demonstrate how this is done for Yandex mail.
First, we need to find and download the client application. To do this, open and enter the name of your email service into the search. Then open the page of the found application.

After installation is complete, launch the application. This can be done directly from Play Market or using a shortcut on the desktop.
After launching the client application, you should see a form to sign in to your email account. Typically, this form contains only two fields: your login and your password. In general, everything is exactly the same as when accessing email through a browser.

Enter your username/password and click on the “Login” button. After this, the client application will automatically download your letters and display them on the screen.
As you can see, setting up mail on Android using a special client requires very little effort. Install the application, enter your data and you're done.
Method No. 2: Using a universal email application.
If you want to receive mail from several mail services, or you have corporate mail on a separate domain, then you will have to use universal email applications. There are quite a lot of such applications for Android. As an example, we will demonstrate how to set up mail using the K9 Mail application as an example.
First, open the Play Market and enter the phrase “K9 Mail” in search bar. Then open the page of this application.

Here we click on the “Install” button and wait for the installation to complete.

After opening the application, click “Add a new mailbox” and see in front of you a form for entering your login and password. After entering your login and password, you can click on the “Next” button, in this case the application will try to connect to mail server using standard settings. If you need to enter the settings manually, then click on the “Manual” button.

After clicking on the “Manual” button, the application will ask you to select the protocol type for accessing your email. For example, let's choose POP3. You can choose the one you need.

The next stage is settings for accessing the mail server. Here you need to enter the server address, security method, connection port and authentication method.
Information about the settings to use can be found in the help of your email service. Or from your administrator if you are using corporate mail. After filling out all the fields, click on the “Next” button.
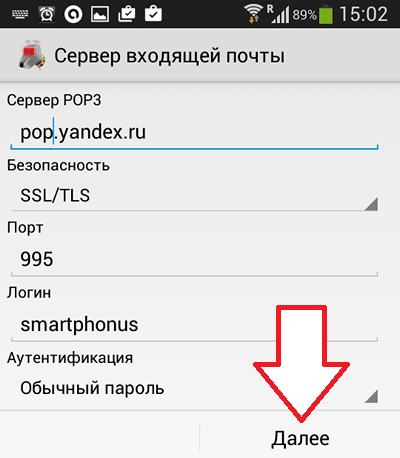
If all the entered settings are correct, then after clicking on the “Next” button, the program should download your mail and display it on the screen.
E-mail from Mail.ru today is one of the leading in the Internet space. For users whose work involves the exchange of information in this postal service, the company of the same name released an application for mobile devices on Android. Next, you will learn how to configure it for comfortable use.
The mail client from Mail.Ru for Android provides almost the same capabilities and functions as its desktop version. Here you can send images, videos, documents various formats, music and much more. Now let's move on to setting up the application.
General
- To get to the settings panel, swipe to the right, or click on the three horizontal stripes on the left top corner screen, thereby calling up the application menu. Next, tap on the gear-shaped button.

- In the tab "Notifications" move the slider to the active position, select a different melody from other signals, and set a time when the application will not notify you of new messages. Here you can enable several filters and select email addresses from which incoming messages will not be accompanied by a sound signal.

- Next tab "Folders" allows you to create another folder in addition to the preset ones. A very convenient feature for storing important emails. To create it, click on the plus button.

- At point "Filters" you can add addresses that will pass through automatic processing and go to the specified folder or mark as read. To do this, on the first page, click on the plus button, then add the required email address in the input line and below select the action that will be applied to it.

- The next two parameters and "Upload images" apply to downloading files sent to you. In the first tab, select in which cases the email client will download attachments, in the second - indicate how images will be downloaded: manually or automatically if there is a good connection.

- Next, check the boxes next to the required items in the application.

- If you do not want anyone else to be able to log into the Mail.Ru email client from your device, then in the tab "PIN & Fingerprint" You can set up login using a password or fingerprint. To activate PIN protection, check the appropriate box and then enable the appropriate settings.

- In the tab "Sound Settings" select an action that will be accompanied by a specific signal.

Accounts
In the next two subparagraphs you can set a profile photo and enter the signature text. 

Registration
This group of settings provides parameters for regulating the appearance of the list of letters.

Having analyzed in detail and applied all sub-items of the settings, you will be pleased to work with email in the Mail.Ru Mail application.