How to format a hard drive with an operating system. Formatting a non-system hard drive. Formatting the system disk when installing Windows
Hello Friends! Why might you need it? hard formatting disk or partition? There are a lot of options, starting with the fact that you need to make a new hard drive usable and ending with the next reinstallation of the operating system. With partition formatting of course. In this article we will understand what formatting is, how to format hard drive using built-in Windows tools and using the operating system installer.
While writing this article, I was lucky enough to expand my knowledge on this topic. For that, readers, thank you.
Formatting hard drive This is the process of marking out a data storage area. Includes several stages:
- low level formatting
- dividing the entire region into logical drives or sections
- high-level formatting of the latter
Low-level formatting all modern hard drives carried out at the manufacturer using special equipment. This process cannot be done at home or in service center. At low level formatting Servo marks are applied to the surface of the disk, thanks to which the reading heads are positioned. The new, just purchased hard drive is formatted only at a low level.
Dividing the hard drive into partitions. The first step is to create partitions on the new hard drive. This is most likely done when installing the operating system or if the hard drive is the second one in the system, built-in using Windows. How to partition a hdd in Windows - .
High-level formatting . After the partition is created, it is formatted. This is high-level formatting. You decide on the file system (in most cases, you can accept the default settings. Let's hope Microsoft doesn't give bad advice :-) and format the desired partition. In this section, a file table appears and system information is recorded. In this case, the entire section is divided into clusters given size. Default is 4KB. A cluster is the minimum amount of information that can be allocated for data storage. Those. if you have a 20 Byte file, then a whole cluster will still be allocated for it - 4,000 Bytes by default. You can learn more about clusters.
There are two types of high-level formatting:
- fast
- complete
At quick formatting The file table is updated and that's it. All files remain in their places. By updating the file table, the operating system sees the partition as empty and writes information over the old one. At full formatting section (how to do below), in addition to deleting the file table, the entire section is checked for professional suitability. (More about hdd diagnostics— ) If the scan reveals an unreadable cluster, it is marked as not working and the operating system will no longer write anything to it. This is done using software the hard drive itself.
It is precisely due to the fact that when formatting, even complete, information is not deleted, you can try to restore it. How to recover data from a flash drive - .
Quick formatting is called because the process itself is fast. Only clearing the table of contents. Full formatting may take several hours depending on the size of the partition or volume.
Format the partition using Windows.
You can format your hard drive using Windows by opening Computer and selecting required disk or section. Right-click on it and select Format...
Click OK. Your partition is formatted. Close the window with formatting options.
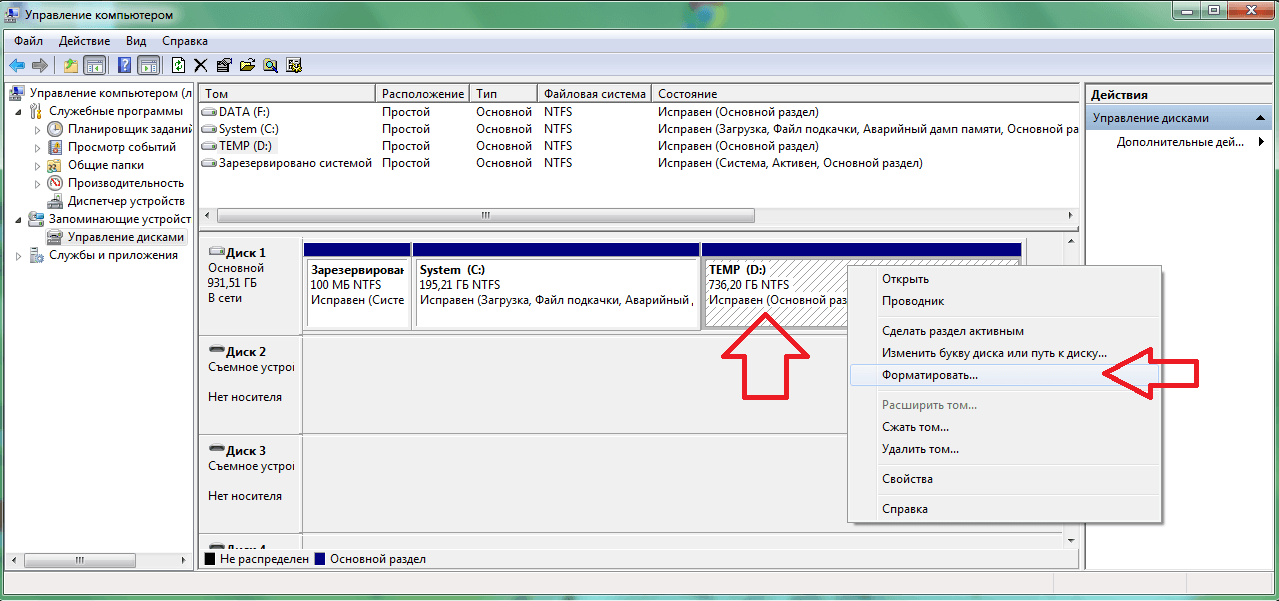
Formatting from Disk Management
You can also format hard disk partitions from Disk Management. To get there you need to go to the Start menu, right-click on Computer and select Manage. In the window that opens, in the left field, in the Storage devices section, select Disk Management.
Here it is convenient to see what kind of disks are connected to your computer and how they are partitioned. To format, right-click on the desired partition and select Format...
Formatting using the command line
Hard disk partitions can just as easily be formatted using the command line. Open the Start menu, write CMD in the search bar and run the found utility. Running the command line with Administrator rights is not necessary.
Write the command:
Replace f with your drive letter. Press Enter. Then press Enter again and formatting will begin.
Carefully! There is no warning that all data will be deleted.
The default is full formatting. If you need something quick, use the command:
If you need more information about the parameters of this command, type:
At the end of the formatting process, you will have the opportunity to set a volume label. If you don't need it, just press Enter. Upon completion, you will see approximately the following picture.
Formatting is complete. Close command line.
Formatting the system partition
The information from point 2 is good, but you cannot format the system disk this way. A message is displayed.
This is the system Windows security warns the user about incorrect actions. This will prevent accidental formatting. If our system is infected (In this section you will find everything to clean your computer from viruses, Trojans and other evil spirits), or is somehow damaged and restoring the system does not help, then you need to format system partition. A good way to do this is to use the installer's built-in disk management tools. Comfortable. You immediately format the partition and install a new operating system.
You can also format the system partition by connecting your hard drive to another computer. In this case, proceed as in the second point.
Formatting system disk at Windows installation
For this you need installation disk or flash drive. How to make a disk, how to make a bootable USB flash drive.
Then you need to install boot from disk or flash drive. You can read how to do this in the article about installing Windows 7 from a flash drive.
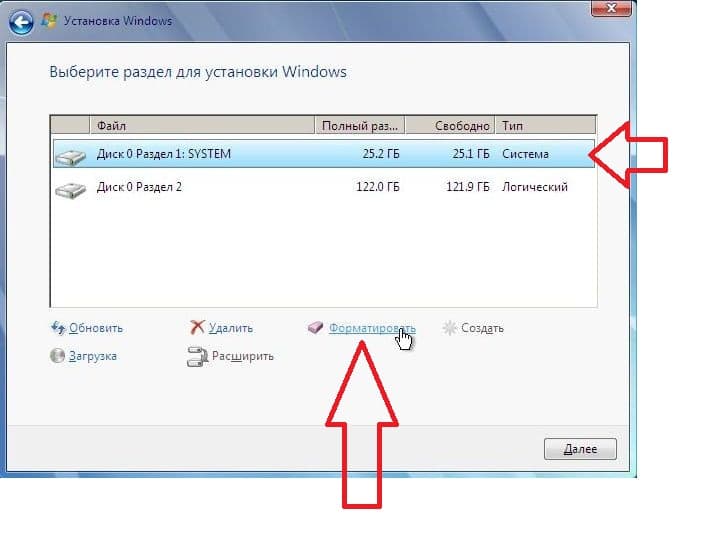
Boot from the prepared drive and do everything as if you wanted to install Windows. When you select the installation partition, you click on the Disk setup link.
Additional links appear: Create Volume, Delete Volume, and Format Volume. Select your system disk and click format. Will be produced quick formatting system partition of the hard drive. Then, if you don’t need to install Windows, just close the Windows Installation window and the process will be interrupted.
Conclusion
In this article, we learned how to format a hard drive in the Windows operating system and how to format the system partition. As you can see, there is nothing complicated, everything is simple. If you have any questions, ask in the comments.
Video - how to format your hard drive in the Windows operating system and during its installation process
Thank you for sharing the article on social networks. All the best to you!
Team FORMAT allows you to format a disk/floppy disk in the command line Windows line.
Command line format:
FORMAT volume
FORMAT volume
FORMAT volume
FORMAT volume
FORMAT volume
Command line options:
volume- Specifies the drive letter (followed by a colon), mount point, or volume name.
/FS:filesystem- Indicates the file system type (FAT, FAT32, NTFS, or UDF).
/V:label- Volume label.
/Q- Quick formatting. Overrides the /P option.
/C- NTFS only: Sets the default compression mode for all files created on the new volume.
/X- Initiates dismounting of the volume as a first action, if necessary. All open handles to the volume will be invalid.
/R:edition- UDF only: Formatting in the specified UDF version (1.00, 1.02, 1.50, 2.00, 2.01, 2.50). The default version is 2.01.
/D- UDF 2.50 only: Metadata will be duplicated.
/A:size- Replaces the default cluster size. In general, it is recommended to use the default cluster sizes.
NTFS supports sizes 512, 1024, 2048, 4096, 8192, 16 KB, 32 KB, 64K.
FAT supports sizes 512, 1024, 2048, 4096, 8192, 16 KB, 32 KB, 64 KB, (128 KB, 256 KB for sector size > 512 bytes).
FAT32 supports sizes 512, 1024, 2048, 4096, 8192, 16 KB, 32 KB, 64 KB, (128 KB, 256 KB for sector size > 512 bytes).
exFAT supports sizes 512, 1024, 2048, 4096, 8192, 16 KB, 32 KB, 64 KB, 128 KB, 256 KB, 512 KB, 1 MB, 2 MB, 4 MB, 8 MB, 16 MB, 32 MB.
The FAT and FAT32 file systems impose the following restrictions on the number of clusters on a volume:
FAT: number of clusters FAT32: 65,526 Execution FORMAT commands will abort immediately if a violation of the above restrictions is detected using the specified cluster size.
NTFS compression is not supported for clusters larger than 4096.
/F:size- Indicates the size of the floppy disks being formatted (1.44)
/T:tracks- The number of tracks on each side of the disc.
/N:sectors- Number of sectors on each track.
/P:times- Resets each sector of the volume to zero the specified number of times. This option has no effect with the /Q option
/S:state- Where "state" can take the values "enable" or "disable". Short names enabled by default
Examples of using the command FORMAT:
format/?- display help on using the command
format/? | more- display help on using the command with page-by-page display mode.
format/? > C:\formathelp.txt- display help on using the command with output in text file C:\formathelp.txt
format A:- format the floppy disk in drive A: with default settings.
During command execution format messages displayed:
Paste new disk to drive A:
and press ENTER...
File system type: FAT.
Check: 1.44 MB
The floppy disk will be formatted using the file system type FAT and volume 1.44 MB
If the disk you are formatting contains open files, then the command format will issue a warning:
The Format command cannot be run because The volume is in use by another process.
You can run Format if you unmount the volume first.
ALL OPEN VOLUME DESCRIPTORS WILL CONTINUE TO BE INCORRECT.
Do you confirm that the volume is disabled?
The user has the option to cancel the formatting or continue it by entering Y. After confirmation of the request it will be executed forced closure all files and dismount the volume. This operation cannot be performed on the system drive.
Volume is disabled. ALL OPEN VOLUME DESCRIPTORS HAVE BEEN INCORRECT.
After formatting starts, information about its progress, a request for a volume label and the results are displayed:
File Allocation Table (FAT) is initialized...
Volume label (11 characters, ENTER - no label needed):
Formatting is complete.
1,457,664 bytes total on disk.
1,457,664 bytes available on disk.
512 bytes in each cluster.
2,847 clusters on disk.
12 bits in each FAT entry.
Volume serial number: 3281-2839
FORMAT A: /T:80 /N:9- format the floppy disk to file system FAT, using geometry 80 tracks and 9 sectors per track (720kb floppy disk).
FORMAT F: /FS:NTFS- format removable disk(flash drive) to file NTFS system. Please note that the NTFS file system is not supported on devices optimized for quick removal. Therefore, in order to format a regular flash drive in NTFS, you need to change the optimization method, for which in the manager Windows devices open the properties of the removable drive and go to the "Policies" tab
After setting the policy Optimize for execution formatting a flash drive partition into the NTFS file system will be possible:
Insert the new disk into drive F:
and press ENTER...
File system type: FAT32.
New file system: NTFS.
format L: /fs:UDF /V:UDFTOM /Q- format optical disk to the UDF (Universal Disk Format) file system disk format) . Label of the volume being formatted - UDFTOM. Quick formatting (/Q) is used, i.e. creating a table of contents without checking blocks. If the rewritable optical disk contains data, the program will ask for the label of the existing volume:
Enter the volume label for drive L: Disk19- label of the existing volume.
If the disk is not empty and the current volume format does not allow quick formatting, then the utility format will display the message:
The current format is invalid.
Quick formatting of the disk is not possible.
Start unconditional formatting?
After answer Y formatting will continue:
Performing formatting at a lower level...
Creating file system structures.
Formatting is complete.
4.38 GB total on disk.
Available: 4.38 GB.
After formatting is complete, the rewritable optical disc containing the file UDF system can be used in both Explorer and the Windows command line to create, modify, and delete files and directories, just like a floppy disk large capacity or flash drive.
When installing the operating system, as well as when changing files or redistributing space between partitions, it is necessary to format the hard drive. This is a fairly common operation performed by PC users. If you haven’t done anything like this before, then let’s look at the theoretical part of the question.
What is the formatting process?
Marking areas for storing information, in which some of it is deleted, is called formatting. It creates a system for accessing stored information.
Typically done for:
- changing one file system to another;
- deleting files from your hard drive.
On at the moment exists large number various file systems. They are used on a variety of equipment, including not only computers, but also mobile devices. To work in latest versions Windows uses the NTFS file system.
Video: How to format a hard drive
Why format your hard drive?
Formatting is performed to delete files from the hard drive, as well as to change one file system to another.
In most cases they resort to it:
- before installing a new operating system;
- to create an installation Windows image, for example, on a flash drive;
- due to the need to clear the disk of files if they are not needed.
Formatting with Windows tools
Despite the large number of various programs for working with hard drive The Windows operating system has its own set of utilities.
Let's look at the process of formatting disks using Windows:
- select the disk that needs to be formatted;
- press the right mouse button;
- select Format;
- in the window that appears, select the file system, cluster size, and formatting method;
- It is recommended to set NTFS as a file system, and leave the cluster size at the default – 4096;
- After setting the necessary parameters, click Start.

Windows also includes more full service for working with hard drives.
To open this menu, do the following:
- right-click on My Computer;
- select Management;
- open Disk Management;
- In this menu, the user can perform various operations on the hard drive, including formatting.

Formatting via the command line
Execute this operation You can also use the command line:
- Press the key combination Win+R;
- enter cmd and press Enter;
- in the command line we write the command format y:, where y is the letter of your drive, maybe, for example, c or d;
- the system will ask you to confirm the operation by pressing the Y key;
- after confirmation, the system will begin the formatting process;
- When finished, this message will appear


Formatting HDD in BIOS
If you need to format from the BIOS hard section disk, you'll have to tinker a little. Unfortunately, the BIOS does not have tools for formatting the hard drive, so you should use third party programs to perform these operations.
One of the most common is Acronis Disk Director. To work with it, you need to create bootable media in the operating system with the files of this program. But before you start creating bootable media Another option worth considering is formatting using Windows installer. This decision is a simpler option compared to Acronis Disk Director.

For this method you only need a disk or flash drive with the recorded installation package operating system.
To format, you must perform the following steps:

Attention! The drive partition letters may not match. For more precise definition required disk use the wmic logicaldisk get deviceid, volumename, size, description command.
Creating a bootable USB flash drive for Acronis Disk Director
To create a bootable flash drive you will need:

Algorithm of actions:
- insert the flash drive;
- install and open the program;
- in the application, open the Tools section and select Acronis Bootable Media Builder;
- click next;
- select the Windows PE boot media type;
- in the next menu it should be noted necessary components for recording to a flash drive;
- After selection, you must select the media on which to record and click Next. The flash drive should be formatted in FAT 32 format using the Windows utility;
- you can also create an image for later burning to a flash device or disk using Ultra programs ISO.
Working with a bootable USB flash drive Acronis Disk Director
To load a flash drive you need:

How to format an external hard drive to NTFS
The most convenient formatting method is to do everything using standard utilities operating system. This solution does not require installation additional programs and creating additional boot disks.
If you do not have an operating system installed, then in this case you should use special programs, such as Acronis.
Steps describing how to format a hard drive as ntfs:

Utilities
In addition to the standard Windows programs There are various utilities used for the same purpose.
The most common options include the following:

What is the best program to format drives in ntfs?
Each program has its own characteristics, but the main direction for all utilities remains the same - working with disks, including creating partitions, forming into other file systems, etc. Therefore, the choice of program is purely personal question each user, which depends on his preferences.

Problems and solutions when formatting
How to quickly format a disk without losing data?
Unfortunately, this is not possible. All stored information will be deleted. Only part of the data can be recovered.
Which drive is better: external or external?
Formatting external drives is performed in the same way as for a regular hard drive. At this process All information will be deleted, including windows, after execution the disk will be like new without windows.

Unable to format hard drive
If you did everything according to the instructions, but did not achieve results, do not sound the alarm. This doesn't always mean something bad.
- format command - cannot be used for a system disk if it is in its environment;
- if the operating system is located in another partition of the HDD, it cannot be deleted;
- settings antivirus program access to different partitions of the hard drive may be denied;
- various applications and viruses can block access.
If you have removed the above factors, but still cannot format the hard drive, you will have to resort to special programs. The most popular tool is HDDscan, which is easy to install and also free.

Algorithm of actions:
- download the utility;
- open and install;
- run as administrator;
- click on the icon in the form of a sphere located in the center of the interface;
- select Surface tests;
- check the box next to Erase;
- go to the Add test tab;
- click on Scan;
- in the lower right corner, write down the error data;
- set the EraseWAITs option to ON and select Scan again;
- repeat until the error is cleared.
You can also use Acronis Disk Director. If you can't format portable hard disk, using this program, most likely the hard drive is partially damaged. And the entire procedure can sometimes be performed only from bootable media, that is, not in the operating system.
How to force format a flash drive?
To format flash drives you can use the program HP USB Disk Storage Format Tool
- provide the necessary set of functions;
- They have a fairly simple interface that will be easy for novice users to work with.
How to format a disk? This question is often asked by users who have just purchased a new one. Once connected, the new unformatted hard drive begins to appear in the system. However, it cannot be opened and cannot be worked with.
In order to bring such a disk into working condition, it is necessary to at least format it. In addition, if necessary, you can perform logical partitions, we have already talked about this in one of the previous articles.
Formatting a disk is preparation for writing files. Formatting records the necessary logical information to store data and boot the operating system (if necessary).
Format the disk using standard Windows utilities
Operating room facilities Windows systems There are several ways to format a new drive. The easiest way is to format it through “My Computer”.
- Open My Computer
- Find the required drive
- Right-click and select “Format”
After this, the format disk window will open, here you can specify the volume label, select quick or full format, and also specify other formatting options, if available.

After clicking on the “Start” button, the disk will be formatted. You can use any other removable drive in a similar way.
Another method to format the disk is formatting through Disk Management. In order to launch this program built into the operating system, you must follow the path: Start - Control Panel - System - Administration - Computer Management - Disk Management.
Here you also need to select the disk to format, right-click and select “Format”. You will then be given the option to specify formatting options.

Another way to format a disk is formatting via . To launch the console, click the “Start” button and enter CMD in the search bar.
Formatting disks via the console is performed using the FORMAT command; in order to find out what parameters we can pass to this command, we need to enter FORMAT /?. As you can see, after this we will receive detailed help on the FORMAT command. The command to format a disk might look like this: FORMAT D: /FS:NTFS /V:DATA /Q. In this case, drive D: will be formatted into the NTFS file system, the DATA label will be assigned to it, and the formatting itself will be performed in “Fast” mode.

If you need to format the C: drive, most likely you are planning to reinstall the operating system. The most in a simple way to do this will be to use the installer's capabilities. Here you need to select drive C: and click on the text link “Format”
Often, before installing an operating system, users wonder how to format a hard drive via BIOS. This procedure must be resorted to in order to clear partitions that are inaccessible after Windows startup. However, it is worth remembering that it will not be possible to completely delete information from the hard drive itself in this way.
Description of the procedure
To perform this, you will need a boot device with a recorded OS (it is advisable to create it in advance). The sequence of steps to format a disk via BIOS is as follows:
- Restart the computer with the connected media and immediately after startup enter the I/O system using the appropriate key. Usually this is F12, F8 or Escape, but if the version is very outdated, other combinations may be used.
- In the window that appears, you need to open the Boot tab, then Boot Option Priorities. This section allows you to select where the OS will be loaded from (from a flash drive or other device), which is what you need to do. Depending on the removable media, mark the USB port or CD-ROM.
- Exit by saving changes made, after which the computer will reboot. Before you start formatting the disk, you will need to launch the OS from the selected device by pressing any key on the laptop.
- Call the command line. If the procedure is carried out using Windows 7 media, press the combination Shift+F10. For version 8, this method does not work; it is replaced by the user interface.
- Make sure the drive letter is correct before formatting the drive. After starting with boot device it may change, so don't delete it important files, you need to enter “wmic logicaldisk get deviceid, volumename, size, description”.
- Go directly to the cleaning procedure. To do this, you need to enter “format /FS:NTFS X: /q” in the window, instead of X entering the desired designation, for example, C (the drive that most often needs to delete data from the system partition).
Then all that remains is to wait for the end of the process, confirming the command by pressing Enter.
Other methods
The Windows installer allows you to do without CMD, which some people are afraid to use for some reason. Only the familiar interface, however, before you start formatting the hard drive through the BIOS, you will have to carry out the first 3 points of the previous section.
After the language selection step, click on “ Full installation", call up a list of available disks and configure the installation. In the parameters that open, you need to mark the “Format” item with the cursor and follow further instructions. However, this method will not work if installing the Windows operating system is not required.
In addition, you can use the ERD Commander program by creating a bootable CD based on it. In the BIOS you will also need to select a priority device to start (in in this case- drive). When the program opens, go to the MicroSoft Diagnostic and Recovery Toolset section and click “Next” until it opens working window. In it you need to click on the “Cleaning” item, after which formatting of the hard drive will begin (via BIOS without software third party tools this is impossible).
There is another program that allows you to do the same and burn an emergency flash drive - AOMEI Partition Assistant Standard Edition. She is free analogue utilities for working with various drives and has a friendly interface, so the user can understand how to format a hard drive without third-party tips.
In general, the algorithm of actions is almost the same for most operating systems, but the names of the items may differ significantly from each other. The same applies to the input/output system: the names of the sections may not be the same as those given above due to differences in versions. However, although it is easier to clean a Windows hard drive, it is important to remember that using third-party tools is mandatory. It is not possible to format via BIOS due to the lack of proper functionality, so you will have to stock up on a boot device.