How to connect an old computer to Wi-Fi. How to connect your computer to a wireless Wi-Fi network
After Wi-Fi installations router, many people have a question: how to connect a regular one to the Internet now? desktop computer, which does not have Wi-Fi. Previously, the Internet was connected to the computer via cable, but now what to do? Pave network cable I don’t really want to go from a router to a computer. That's why we installed the router, to get rid of wires in the house.
Yes, after installing the router and Wi-Fi settings networks at home, or in the office, all laptops, tablets, phones and a number of other devices will be able to connect to the Wi-Fi network, “over the air”. These devices have a built-in Wi-Fi receiver. And if you also have a desktop computer to which you also need to connect the Internet, then there are only two options:
- Lay a network cable from the router to the desktop computer. But, this option is not often suitable, since you don’t always want to bother with cables, and sometimes there is simply no way to run this cable to the PC.
- Well, the second option, which we will talk about in this article, is connecting an external or internal Wi-Fi adapter A. With its help, a regular desktop computer will be able to connect to the Internet via Wi-Fi.
I faced exactly the same situation at home. After installing the router, all devices were connected via wireless network. But I connected the computer that needed to be left via Wi-Fi with via USB Wi-Fi receiver. It is these receivers that I will now tell you in more detail.
Connecting your computer to Wi-Fi using an adapter. Without cable
As I wrote above, for ordinary computers that do not have built-in wireless network receivers, there are large number network adapters. These adapters are available both external and internal. As for the prices, they are not very expensive. Of course there is different models, y different manufacturers. But the cheapest one will cost you about 6-7 dollars (these are devices from popular manufacturers). Tenda has inexpensive models. For example, I also have an inexpensive external USB WiFi adapter TP-LINK TL-WN721N. It looks like this:
Works great. You will need to prepare instructions for setting it up on a PC. By the way, many people call such adapters “flash drives for connecting to Wi-Fi” :)
How to choose a Wi-Fi adapter for a computer: external and internal
Let's figure out what these adapters are and how to choose such an adapter for your PC. This means that they are external and internal.
External adapters
Connect to the USB connector of the computer. To install it, you do not need to open the system unit, this is undoubtedly a plus. They look like regular flash drives. There are small ones, like those in the picture above, and there are also ones with antennas. I recommend buying those with antennas if the room where you have a computer is not very strong wifi signal networks.
If you are not very computer savvy, I recommend buying this external Wi-Fi receiver. Almost anyone will do. The installation is not false: you plug the adapter into the computer’s USB connector, install the drivers, and that’s it, you can do it.

Here are some more photos of external adapters:

Internal adapters
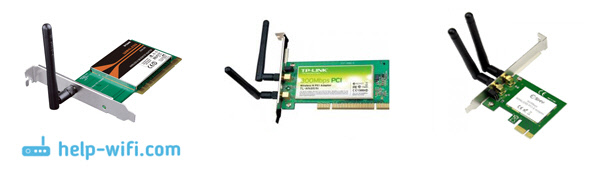
These adapters connect to PCI (or PCI Express) connector on your computer's motherboard. It is clear that to install such an adapter you need to disassemble the system unit. Installation is also not difficult at all. Removed the cover from system unit, installed the adapter in the PCI slot, rebooted the computer, installed the driver and that’s it.
Outside the system unit, the adapter antenna, or even several, will peek out. This is all for best reception. After all, if a regular USB receiver can be connected via an extension cord so that it can better receive the signal, then this will not work with an internal adapter.
Here's what the internal PCI adapters look like:
Which adapter is better to buy for connecting regular computer to Wi-Fi? Yes, in principle, what's the difference. But for some reason it seems to me that external USB adapters more convenient and practical. They can be connected to another computer without any problems. The connection and installation process is a little simpler.
As you can see, connecting a desktop computer to a Wi-Fi network is not at all difficult. But you can get rid of the wires. This is especially true if the router is located far from the computer.
So, you have become another lucky person who bought this brilliant invention of mankind called a personal computer. You bought a PC, brought it home, and what to do next? How to connect correctly personal computer? And then you need to connect all the components of your PC in series.
If you have a friend who understands computers, then you can contact him, but if you don’t have such a friend, then it’s okay. We’ll tell you how and what to do, and what connectors to insert into.
It doesn't really matter what you connect first, so let's start with the monitor...
Connecting monitor to video card connector on the rear panel of the system unit. There are three types of connectors: VGA (Video Graphics Array) - an older analog interface, DVI (Digital Visual Interface) - a more modern digital video interface and HDMI (High-Definition Multimedia Interface) - a high-definition multimedia interface. HDMI is an analogue of DVI, which has a more compact appearance and supports audio transmission. They look like this:
Left - VGA, middle - DVI, right - HDMI.
It often happens that both the monitor and the video card support all three interfaces. In this case, I recommend using DVI or HDMI interface, at your discretion.
Well, you say, they began to express themselves in all sorts of incomprehensible terms. But don’t be afraid ahead of time. Computer language is replete with such terms that you will need to gradually learn. There is no way without this.
An interface is, simply put, interaction, pairing.
Let's move on... The video card can be built into the motherboard ( integrated), and external (discrete), that is, being separate device, connected to the corresponding connector on the motherboard.

In the picture in the rectangle numbered 1 video card connector is closed, built into the motherboard. IN in this example this VGA connector. Rectangle number 2 shows external video card connectors. And here, as we see, are all three video interfaces described above.
If on your computer both video cards are present, then it would be better and more correct to use an external one. Why? The integrated video card does not have its own RAM, so it will use the system memory, which cannot be said about an external video card. An external video camera has not only its own RAM, but also its own processor. But now let’s not go deeper into the jungle, we have a different task...
So let's see what interfaces supports your video card and monitor, take the appropriate cable (as a rule, they come with the monitor) and connect them to each other.
We insert the network cable into monitor connector, other end to the surge protector. Surge filter- this is an extension cord to connect several(usually at least five) devices and a power button. There is also a fuse there, so if there is a strong voltage drop in the electrical network, then the fuse will trip, and your PC will not be harmed.


Keyboard and mouse connected to the system unit via a PS/2 connector or via regular USB. Green for the mouse, lilac for the keyboard. 
Don't confuse it with USB 3.0. These connectors differ in color.

Connecting audio speakers. Almost all motherboards have a built-in sound card. On the back panel of the system unit you can see from three to six multi-colored holes.

The green input is for speakers, the pink one is for a microphone. All the others are not needed if you have regular speakers.
All! Your computer is ready to turn on. Let's check all connections again. We connect the surge protector to the power supply and press the red button on it. Also check the position of the switch on the power supply. Naturally, it must be turned on. Keep in mind that not all power supplies have a switch.
Instructions
Take the main cable intended for the system unit from the network. There will be a plug on one side and a trapezoidal connector on the other. It is necessary to turn the system unit towards you with the back (rear) side, many connectors of the “female” and “male” type. We take the power cord, on the side of which there is a female connector and connect it to the male connector located at the top of the system unit. You should not connect it directly to the network.
Place it next to the system unit to connect the monitor to the system unit. To do this, we need the same power cable from the network. The principle is the same, only now we connect the cable to the monitor. We also do not connect it to the network.
We take the following cable - to connect the monitor and the system unit (VGA cable). We connect one side to the monitor, the other to the system unit, first you need to find the VGA connector on. After connecting this cable, tighten the plastic bolts with your fingers or a small screwdriver. This is necessary for a constant and stable signal.

Connecting the keyboard and mouse is very similar. The only difference is the color of the plugs and sockets designed for these devices. The keyboard and mouse sockets (PS/2) are located below the power socket of the system unit. The keyboard is lilac, and the mouse is green.
IN lately began to produce devices using the USB interface. In this case, everything is much simpler. You need to insert the plug of the device you need (or mouse) into the USB port.

The last stage of connection will be the speakers and the system unit. There are 2 cables coming from the main speaker - a power cable and an audio cable. We need to connect the audio cable to the system unit. We find a green round socket on the system unit and.
Now we need to connect all the power cables to the outlet. Here you can use (pilot). After connecting all devices for the system unit to operate, we need to press the computer by pressing "Power" on the front panel.

If you turn on the computer, but no image appears or there is no sound, then you did something wrong. We advise you to seek help from people who are well versed in this issue.
Sources:
- connecting the system unit
- Types peripheral devices and rules for connecting them
Several methods can be used to connect two computers to a local network. Much depends on the ultimate goal of implementation of this connection. To create a miniature home network You don’t have to use a router or switch.

You will need
- - network cable.
Instructions
Purchase a network cable with LAN connectors on both ends. Do not use too much so as not to reduce the speed of data exchange within the network. Connect it to the network cards of both computers and turn on these PCs. If you need to connect both computers to the Internet, then purchase an additional network card.
Install this device on one of your computers and configure it. Be sure to update the drivers for all network cards. Connect an Internet connection cable to this network adapter. Set up your Internet connection using standard settings.
Go to the properties of the newly created connection. Open the Access menu. Check the box next to “Allow to use this connection to the Internet to other network users." Mandatory in the next paragraph open menu indicate the local network that your two computers form.
Now move on to setting up another network adapter. Select TCP/IPv4 Internet Protocol properties. Enable the option to use a permanent IP address. Enter the numbers 201.101.156.1 in the appropriate field. Press the Tab key and look at the subnet mask. Save this settings network card.
Go to the second computer. Configure your network card by opening the TCP/IPv4 Internet Protocol properties. Enter an IP address value that will match the IP of the server computer in the first three segments, for example 201.101.156.10. Now find the "Preferred" fields DNS server" and "Main gateway". Enter the IP address of the first computer in them. Save the settings for this network adapter. Reconnect to the Internet on the server computer. Check that both PCs have Internet access.
Tip 3: How to clean the system unit and components from dust
Not only viruses pose a threat to your computer, but also dust. It settles on all parts, thermal conductivity decreases, as a result of which the computer may begin to glitch and slow down.

But if you clean it from dust from time to time, you won’t have to waste time and money on repairs. The first thing you need to do is disconnect the system unit from the power supply, disconnect the mouse, keyboard and other components. Take it out onto the balcony, if you live in a private house, outside. Unscrew the lid, and then clean all the parts separately or in the system unit, so as not to remove anything.
If you decide to clean the parts separately, therefore, they need to be removed, in order to assemble them correctly at the end, it is best to take a photo of what the assembled part looked like before cleaning. Then take a vacuum cleaner and attach the attachment for better cleaning. After cleaning, take a paint brush and go over all the details, there is probably still some dust left somewhere.
To clean cooling system coolers, it is best to take a hair dryer and blow all the sawdust off the blades. After which you can wipe the system unit itself with a cloth, but carefully so as not to catch the component boards. There are small contacts and they can be accidentally damaged, which will result in expensive repairs.
Cleaning your keyboard and mouse is much easier, but also very necessary. Sometimes the keys on the keyboard freeze because there is a lot of dust or food particles, for example, bread crumbs. It is best to unwind the keyboard and blow out dust and debris with a hairdryer. After this, assemble the system unit, connect all the wires, and plug it into the power supply. Then you need to turn on the computer and check if everything is connected correctly and correctly.
When system block the computer stops turning on and making any sounds, the most common reason this behavior is a malfunction block A nutrition. The easiest way to check if this is true is to spin up the system block and connect another one to the motherboard block nutrition suitable power.

You will need
- - screwdriver;
- - power unit.
Instructions
Remove the side cover from the system block and a computer that allows access to the motherboard. Make sure your computer is unplugged and remove cables from all devices nutrition from the established block A nutrition- from the hard drive, drive, video card (if connected), floppy drive and, of course, motherboard. Typically, you will need to check that the cables coming from the block A nutrition to all components of a personal computer.
Put a new one block nutrition next to the computer. Connect the cables nutrition to the motherboard. If the board is not very old, then two connectors are connected to it - the main power supply and the additional one. Do not push the connectors in with force. If the connectors don't fit, it means you're trying to put them in the wrong place. Insert the connector nutrition until the latches located on the plastic fastening of the connector close.
Connect to block at nutrition network cable. Power the video card if it needs power additional nutrition. Connect a monitor, keyboard, and mouse to the motherboard. Switch the switch to block e nutrition(if available) to the on mode (one is drawn) and turn on the computer in the usual way.
If the motherboard starts working, the fans spin up and boot up, and a video signal appears on the monitor screen, this means the motherboard (and with it the processor and RAM) is in working condition. Also, do not forget that block nutrition distributes all power to all spare parts of a personal computer. If you don't have enough power, your computer may work with some glitches or not work at all, so carefully calculate the power.
No matter how roomy modern hard drives, sooner or later they turn out to be full, and then it becomes necessary to connect second screw- more correctly speaking, a hard drive.

Instructions
Disconnect the system unit from the power supply and remove it from the case sidebar, unscrewing the fastening screw s. If your hard drive connects to the motherboard via IDE interface, you will use a wide 80-pin cable gray with two or three. The cable is connected to the motherboard through one connector, and hard drives or optical drives are connected to the other two.
On the hard drive, on the side where the interface cable and power connectors are connected, there is a special field with several contacts, two of which are connected by a jumper. Closing different contacts, you tell the computer's BIOS (Basic In-Out System) what role is assigned to this hard drive. If you are going to install an operating system on it and make it bootable, set the jumpers to the Master position. If this second hard drive, and its destiny is to become a storage facility for information; use jumpers to designate the Slave position. A Cable Select connection option is possible, in which the cable operating mode: the device connected to the outer cable connector is assigned Master, and the one connected to the middle one is assigned Slave. For such a connection, a special cable with cable outlet is required. The contact jumper combinations are drawn on a sticker on the top side of the hard drive.
Carefully inspect the connectors of the interface cable and the hard drive - they have “keys” on them in order to avoid incorrect connection: on the hard drive connector there is a notch, on the cable connector there is a protrusion. Sometimes the cables are additionally marked: a red stripe is applied along one of the sides. The cable should be connected so that the strip is closer to the power connector of the hard drive. The cable is connected to the motherboard in the same way, taking into account the “keys”.
Connect the power supply to the hard drive. The upper parts of the cable and hard drive power connectors are rounded, so it will not be possible to connect incorrectly. Replace the side cover and connect the computer to the power supply. Click Power button, after the initial scan of the hardware, go to the BIOS and make sure that the system “sees” the new hard drive.
After loading the operating system, if necessary, split the new hard drive into logical drives and format them.
Video on the topic
Please note
If the hard drive supports SATA interface, no jumpers are required.
The computer system unit is a case, inside of which there is a power supply and a system (mother) board with controllers connected to it for external devices. The system unit case also contains the following: hard drive (HDD), data reading and writing devices: DVD drives, CD and others. That is, the system unit of a computer is the computer itself.

Materials and tools
To replace the system unit, you will need:- new system unit;
- monitor;
- keyboard;
- mouse;
- screwdriver;
- a package of reference documentation for all devices included in the system unit;
- media with software for all available devices.
Compliance
Replacing a system unit is practically replacing a computer. With this operation, you will have to solve two main problems, namely: to ensure hardware and functional combination of devices. You will have to take the first step in this direction when purchasing a new system unit. When purchasing a system unit, be sure to request documentation for it. Check the documentation to see if the architecture of the computer you are purchasing matches the tasks you intend to solve with its help. What matters is the speed and type of processor, the amount of random access memory (RAM), the volume hard drive, video card parameters. Pay attention to the video card connectors. Depending on the type of monitor you have, you will need VGA (analog) or DVI (digital) video outputs. Their connectors are different. Additionally, if you plan to output video to a TV, you may need S-Video or HDMI connectors, for example. If you are interested in the multimedia capabilities of your computer, you should find out what sound card is installed on it. Its parameters and number of channels should also be indicated in the documentation. To connect a keyboard and mouse, PS/2 type connectors are sometimes located on the back wall of the system unit. If you don't have them, you'll have to use them USB connectors. The latter is not always desirable, as it leads to a reduction in the number of free USB ports required for connection mobile devices. USB ports are available for any modern car, but their number is different. Make sure there are enough for your purposes. It is advisable that the computer architecture also includes a network adapter with a LAN connector; this will allow you to connect the computer to local network or to the Internet. You will need a FireWire connector if your peripheral devices require it. The same applies to SCSI devices.Connection and setup
If you are satisfied with the hardware configuration of the new system side, you can proceed with its installation. First, assemble the minimum configuration: system unit, monitor, keyboard, mouse. If your computer has PS/2 ports, then the mouse and keyboard symbols are already marked next to them. Nests on sound card are color coded. It is almost impossible to mix up the remaining connectors. While connecting the monitor cable may sometimes require a screwdriver, all other connections are made without tools. On older system units there is sometimes a three-pole connection for connecting power to the monitor. If the new case does not have it, purchase a network cable for the monitor and use it. If the operating system you need is already preinstalled on your computer, you can immediately begin installing external device drivers and the software you need. In other cases, you will need to install or reinstall the operating system. Additional software, necessary for all devices of the new system unit, must be provided to you by the supplier.To connect old hard disk computer, you should take certain precautions. Otherwise, you risk not only burning the hard drive, but also getting an electric shock.

You will need
- Personal computer, hard drive.
Instructions
First of all you need
Desktop computers are usually connected to the Internet using wired connection. But sometimes it’s not very convenient to pull wires and you want to organize everything using wireless connection. If you are also interested in how to connect a desktop computer to a Wi-Fi network, we suggest that you read this article.
Equipment for connecting a desktop computer to Wi-Fi
In order to connect your computer to a Wi-Fi network, you need to have a Wi-Fi adapter installed on it. Such adapters are available on any laptop, but with desktop computers it’s not so simple.
Motherboards for desktop computers are very rarely equipped with built-in Wi-Fi adapters. Such adapters can only be found in the most expensive models or models designed for HTPC. Other motherboards are produced only with a regular network adapter designed for connecting to wired Ethernet networks.
If you don't know if your motherboard has a Wi-Fi adapter, then just look at back computer, where the motherboard connectors go. If the motherboard has a built-in Wi-Fi adapter, then there will be two connectors for connecting antennas.
Connectors for Wi-Fi antennas
But, most likely, you will not find such connectors, which means that to connect your desktop computer you will need to purchase a separate Wi-Fi adapter. There are two types of such adapters: external and internal. External ones are connected to the computer via USB, like a regular flash drive, while internal ones need to be installed in the PCI Express x1 slot.

The speed that Wi-Fi adapters can provide depends on the standards wireless communication, which they support, and the class of the device itself. Models from the lower and mid-price range usually support the 802.11n standard and in practice provide speeds from 50 to 100 Mbps. More expensive adapters support the 802.11ac standard and in real use can provide 200 Mbps or more.
At choosing Wi-Fi adapter you need to take into account not only what speed you need, but also what kind of router you have. If your router only supports 802.11n Wi-Fi, and you do not plan to change it to more modern model, then overpay for the expensive and fast wifi the adapter makes no sense. Because without support from the router, the Wi-Fi adapter will not be able to show everything that it is capable of.
Connecting a desktop computer to Wi-Fi
Connecting a desktop computer to Wi-Fi is not much different from connecting a laptop. First you need to install the drivers for the Wi-Fi adapter. If your motherboard has a built-in Wi-Fi adapter, then you need to look for drivers for it on the website of the manufacturer of such a board. If you use a separate Wi-Fi adapter, then you need to look for drivers on the website of the manufacturer of the adapter itself. Installing drivers is not difficult; they are installed into the system in the same way as regular programs. After installation, you may need to restart your computer.
After installing the drivers, a Wi-Fi icon should appear on the taskbar, next to the system clock. Depending on version Windows given the icon may look different. The screenshots below show how this icon looks in Windows 7 and Windows 10.

Wi-Fi icon on the taskbar
To connect your computer to Wi-Fi, you need to click on this icon and select one of the available networks. Below is shown how this happens in Windows 7 and Windows 10.

Connecting a computer to a Wi-Fi network
After selecting a network, you may be asked for a password, or the Wi-Fi connection will occur automatically. If you have any connection difficulties, we recommend that you read our articles on how to connect Wi-Fi to and. The entire connection process is described in more detail there.
Today we will talk about how you can connect Wi-Fi to a computer via a network cable. After you have installed an Internet cable and connected a Wi-Fi router to it, you can start creating your own small local network. Surely you have not only a desktop computer (or maybe more than one), but also a tablet, a laptop, a smartphone, and plasma TV. And all this can be combined into one network with each device connected to the Internet.
This way, your entire family can enjoy the Internet at their own discretion without disturbing each other. Someone will play on the computer online games, someone will watch their favorite films or videos from YouTube on TV, someone will work or communicate via the Internet on a laptop, and someone at this time can communicate via WhatsApp or Viber via mobile phone or smartphone. And all these pleasures can be configured with one access point via a Wi-Fi router.
And in order to create (deploy) such a grid, you must use one of two connection options:
- Lay a network cable from the router to a desktop computer and TV.
- Connect a desktop computer via an external or internal Wi-Fi adapter. Moreover, laptops, tablets and smartphones already have this adapter built-in.
In this article we will look at the first connection option.
ConnectionWi— Fito a computer via a network cable
Previously, the Internet could only be connected via telephone line. Now this can be done using a network cable (twisted pair). To do this:
- Connect the provider wire to wi-fi router in the slot with the inscription WAN(or Internet);


- Network cable twisted pair insert into one of the connectors LAN. Which one doesn’t matter;
- Connect the second end of the cord to the computer (or laptop) into the connector RJ 45. If the computer is turned on, the light next to the connector should blink.

The network cable can be connected both when the router is turned on and when the computer is turned on. It's safe.

If the Internet does not connect
Usually a computer with operating system Windows 7/8/10 automatically receives an IP address and immediately connects to the Internet. But you may have to make some adjustments yourself.
If there is no connection to the Internet in automatic mode, then perform the following manipulations:
- Check if your Wi-Fi router is turned on;
- Check whether the network cable is well connected to the connectors of the router and computer;
- Check the visibility of the network card in Device Manager. If there is no entry in Device Manager " Network adapters ", this means you need to install or reinstall the network card driver.
- Turn off the router for 30-40 seconds and turn it on again. This usually helps.
Configuring your computer's network card to connect viaWi— Firouter
If, after the above manipulations, the Internet still does not connect, then you need to manually register the IP address for your network card.
To do this:
- right click on the icon network connection on the taskbar. It is located near the clock), and select " Network Sharing Center».

- If this icon is not on the taskbar, then open Control Panel.
IN Windows 7 The control panel is located in the menu " Start».

Select in view " Small icons", and click on the item " Network and Sharing Center».


Right-click on the network card icon and select “ Properties».

Highlight " Internet Protocol Version 4 (TCP/IPv4)" and click the " Properties».

Set the switch to " Use the following address" and below write the following:
IP address 192.168.1.5 (last digit can be anything from 1 to 255)
Subnet mask 255.255.255.0
Default gateway 192.168.1.1
Preferred DNS server 192.168.1.1
An alternative DNS server is not needed
 Check the box next to " Confirm settings on exit».
If a small window pops up with some kind of warning, press the “ Yes».
Now it would be good to restart your computer.