How to make a mirror image in Photoshop. Very detailed instructions. Mirror text in Microsoft Word
PowerPoint allows you to add all kinds of media files, such as images, to your presentation.
What happens when you need to reflect an image in a presentation? The good news is that you don't need to open Photoshop or another editor just to flip an image.
Let's learn how to mirror and manipulate images right in PowerPoint.
We also have a useful addition to this lesson. Download this free eBook:The Complete Guide to Making Great Presentations .
Get it before you continue reading.
Note: in this tutorial we use Simplicity PowerPoint Template. You can find more PPT presentation templates on GraphicRiver or in our Ultimate Guide to the Best Microsoft PowerPoint Templates.
How to Quickly Flip a PowerPoint Drawing
Note:
watch this short video tutorial or follow the steps below that complement this video.
1. Place the drawing you want to display in PowerPoint
I'll start by pasting an image from my clipboard. I'll place it on the canvas and then reduce the size by holding Shift and, at the same time, I will press and pull the corner. The image looks good, but it needs to be reflected.
An upside down PowerPoint image that needs to be flipped.2. Mirror the drawing horizontally or vertically in PowerPoint.
Select the picture, let's make sure that the PowerPoint menu is open on the ribbon: Working with Pictures > Format. Let's click on the "Rotate" button on the right side. If I choose Flip from top to bottom, the image will be mirrored vertically.
Let's flip it horizontally, go back to the same menu and now I'll select Flip from left to right. You see that the image is mirrored.
Flip an image horizontally and vertically in PowerPoint.Let's finish!
These maneuvers are useful if your image is initially upside down or flipped and can be corrected using the menu Turn. These manipulations happen right in PowerPoint and in just a few clicks.
Discover more great PowerPoint tutorials
Continue exploring on Envato Tuts+. We have a variety of PowerPoint resources to help you create a great presentation:
Make great presentations ()
We also have the perfect companion to this tutorial that will guide you through the entire process of creating a presentation. Learn how to write your presentation, how to design it like a pro, and how to prepare to deliver it brilliantly.
Download our new eBook: The Complete Guide to Making Great Presentations. It's available for free with a Tuts+ Business Newsletter subscription.
1 voteGood day, dear readers. Today I will tell you about a simple tool, which is sure to be useful to any web designer: to create a landing page or, if you are creating an online store, to improve the pictures in the product card.
I'll show you how to make an image mirror. First, use two buttons to simply expand the picture, and then professional way reflect an object as if it were in a mirror or on a glass table.

Let's get started?
Two buttons for mirror effect
So, this method works no matter what version of Photoshop you use CS6, CS5 and even in online versions. I work at CC.
Once you open a photo in Photoshop, you need to unlock it for editing. Without this, you will not be able to use most functions. Click the lock to the right of the layer's thumbnail.

Now press the keyboard shortcut Ctrl+T.

Right click anywhere free space selected fragment. Will open additional menu with many functions for rotation: vertically, 180, 90 degrees. Now you select "Flip Horizontal".

Done, you have flipped the image as a mirror image. If there are any logos or mention on your photo brands and you don't want readers to see them, this is an easy way to complicate things. Many TV channels now use it.

If you don't like using the keyboard shortcut, you can top panel select "Edit", then "Transform" and "Flip Horizontal".

Well that's all, with simple method figured it out. It's time to make something beautiful. By the end of the second part of this tutorial, you will have an attractive image that can be inserted as a design element or simply as an illustration for a product card in .
Mirror effect
The first step is to prepare the background. As a rule, professionals work with light and black to see the result in different colors. To do this, you will have to learn how to work with gradients. If problems arise, read my detailed step-by-step instructions.
Create a layer, then under the Fill tool find a gradient and fill the layer radially in dark colors. Can be used depending on color #655959 to #3f3535.
Now you need to create another layer with a light color. Click on the icon next to the basket. Or in the "Layer" tab top menu select "Create" new layer».

You can use the keyboard shortcut Shift+Ctrl+N. By the way, I recommend that you keep a notebook where you will write down all the hot keys. There are a lot of them in Photoshop, but they make your work much easier.
At first, you can write down the keyboard shortcuts that you use every time. Suppose you forgot - looked and wrote it down again. I managed to remember on my own - there is no need to look for honor, praise and a pen. At one time I studied this way English language. Helps. You sit until the last moment until you remember without prompting, so as not to write the same thing a hundred times.

Fill the top layer in light colors from #cdc6c6 to #948d8d.


Make the drawing a little smaller. To make it shrink proportionally, while you move the mouse, hold down shift on the keyboard. Once finished, apply the changes by pressing Enter.

Right-click on the layer thumbnail and bring up an additional menu, in which select the “Rasterize Layer” function.
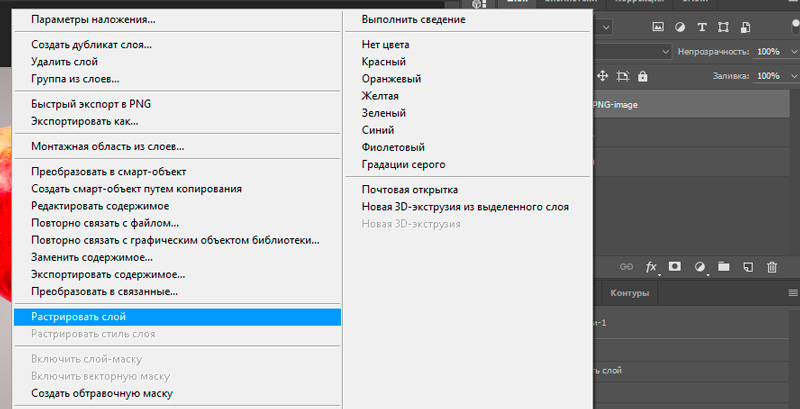
In the same menu, also click on “Create a duplicate layer” or use the Ctrl+J button combination.

Now you need to press Ctrl+T, “Transform”, and right-click inside the object, as I described in the previous paragraph. Select the Flip Vertical option.

Drag the new layer down, this can be done in its current state. Alternatively, press Enter to finish the transformation, select the Move Tool (overlapping arrows) and drag the new layer down.
Add . A rectangle with a circle inside. I have already described this function in detail. It is somewhat reminiscent of an eraser: it erases objects or makes them transparent.

Now you'll need a gradient again. From black to white, but this time mirrored (indicated by number 3 in the screenshot).

Draw a line somewhere from the middle of the object from the first visible layer to the end of the “reflection”, as shown in the figure.

Be careful when you apply the gradient, white frame should be on the layer mask, the one to the right of the sketch. Double-click on it and you can adjust the density and make the reflection transparent.

Now we need to blur the object a little, since there is no “pure” reflection in nature. Click on the layer's thumbnail to apply the edits specifically to it. In my case with the image of an apple. Next, go to the “Filters” – “Blur” – “Gaussian Blur” tab.

Adjust the radius as you like. It all depends on the resolution of the source. In my case 5 is perfect.


You can remove the visibility of the light gradient layer by clicking on the eye next to it, and see how the photo will look on the dark one. All that remains is to choose the best option.

Well, that's all. If you liked this tutorial, subscribe to the newsletter and learn more about the world of Photoshop. Now you can create very beautiful pictures on one's own. Well, if you don’t have time to wait, I can recommend the course “ Photoshop lessons improving skills " In it you will find a whole collection of professional techniques and methods.

Well, if you think that your knowledge is not yet enough to raise the level, learn all about the tools in the course " Photoshop from scratch in video format " It will help you learn not just to use some techniques, but to independently figure out how to apply this or that effect of a complex program.

See you again and good luck in your endeavors.
When working in MS Word the need arises to rotate text, not all users know how to do this. For effective solution For this task, you should look at the text not as a set of letters, but as an object. It is on the object that you can perform various manipulations, including rotation around an axis in any precise or arbitrary direction.
We have already discussed the topic of text rotation earlier, in this article I would like to talk about how to make a mirror image of text in Word. Although the task seems more complicated, it can be solved using the same method and a couple of additional mouse clicks.
1. Create a text field. To do this, in the tab "Insert" in the group "Text" select item "Text field".

2. Copy the text you want to mirror ( CTRL+C) and paste into the text field ( CTRL+V). If the text is not yet printed, enter it directly into the text field.
3. Perform the necessary manipulations on the text inside text field— change the font, size, color and other important parameters.

Mirror text
You can mirror text in two directions - relative to the vertical (top to bottom) and horizontal (left to right) axes. In both cases, this can be done using the tab tools "Format", which appears on the panel quick access after adding the shape.
1. Double-click on the text field to open the tab "Format".

2. In a group "Arrange" click the button "Turn" and select "Flip Left to Right"(horizontal reflection) or "Reflect from top to bottom"(vertical reflection).

3. The text inside the text box will be mirrored.

Make the text field transparent by following these steps:
- Right-click inside the field and click on the button "Circuit";
- Select an option from the drop-down menu "No outline".

Horizontal reflection can also be done manually. To do this, you simply need to swap the top and bottom edges of the text box shape. That is, you need to click on the middle marker on the top edge and drag it down, placing it under the bottom edge. The text field shape, its rotation arrow will also be at the bottom.

Now you know how to mirror text in Word.
Sometimes even minor changes at first glance improve a photo and give it a completely new look. new look. For example, you can experiment with composition: flip the image horizontally or vertically, crop the frame, or rotate the image. All of these tasks can be completed quickly and easily if you have some suitable program for photo processing. Photo editor Movavi- this is exactly what you need. You don’t have to spend a lot of time understanding the settings and spending time learning how to use our program, because it’s simple and user-friendly interface suitable even for beginners.
Below you will learn how to mirror a photo without extra effort using Movavi Photo Editor. Just download the Windows or Mac version and follow the step-by-step instructions.
1. Install Movavi Photo Editor
Open the downloaded file and follow the instructions on your computer screen.
2. Open the photo in the program
After launching Photo Editor, drag required file from folder to work area programs or click the button Open file and select the image you want to mirror.
3. Flip the image
Open the tab Turn on the toolbar at the top of the Photo Editor window. In the section Reflection press one of two buttons: if the reflection of the photo should be horizontal, press left button, for vertical reflection, click the button on the right. Pressing the button again will return your image to its previous appearance, reflecting it again.

4. Save the result
Now click the button Save to save the processed photo. A dialog box will open in which you can specify the desired save folder and, if necessary, change the file format or name. After that click Save.
In Word every day around the world a huge number of text documents. For some, this is a work report, a thesis, an essay, course work. And every second user is faced with adding pictures to a document. Although many, to the best of their ability or ignorance, omit at the moment. After all, it only seems that inserting a picture takes long time. And if you suddenly need to make a mirror image of a picture, then the older generation will probably ask a friend or loved one for help, or maybe skip this step altogether, citing lack of time. Let's figure out the emerging problem together.
Reflection of the image "mirror"
You can mirror your drawing using the following steps. Initially, insert the image into the Word document:
To display an image you need:

Horizontal reflection of the picture
There are situations when it is necessary to change the direction of the drawing. IN in this case, it is necessary to change the direction of Santa Claus in left side. To flip the image horizontally you need to do the following:


Note. If you need to place two pictures next to the original result as in the screenshot above, you need to copy the picture and then set the desired reflection.
Setting to Mirror a Pattern
To achieve desired effect While reflecting the photo, you can adjust all the parameters manually. Click on the photo and go to the “Format” tab.

In the “Picture Format” window, set the desired type of “Blanks”, for example “Medium... touch”.

Note. You can mirror a photo with a shift of several points from the original picture; to do this, you need to select the “Reflection at 4 pt or 8 pt” option.
Any shift can be observed even when open active window"Drawing Format". To do this, move the parameters window to the left or right of the image that is located on the Word document sheet.