How to replace a specific color in Photoshop. Replace color in Photoshop
In this lesson you will learn in detail about ways to change colors in Photoshop. All steps are described in detail, accompanied by pictures, so that it is clear and intelligibly explained where and what function can be used. So let's get started!
The first way to replace a color is to use the ready-made function in Photoshop “Replace Color” or Replace Color in English.
I will show you with a simple example, a simple picture. First you need to download photoshop cc. Let's take the icon and open it in Photoshop.
Trowel on a yellow icon. We will replace yellow with any other color that interests us. To do this, go to the menu Image - Correction - Replace Color (Image - Adjustments - Replace Color) 
The Color Replacement Function dialog box appears. Now we must indicate what color we will change; to do this, activate the Eyedropper tool (see arrow) and click on the trowel with it. You'll see this color appear in the dialog box at the top, which is labeled Highlight.

At the bottom is the Replacement heading - there you can change the selected color. But first, you can set the Scatter in the selection parameter. The larger the parameter, the more colors it will capture. IN in this case can be set to maximum. It will capture all the yellow in the image.
Configure the Color Replacement settings - with the color you want to see instead of the one being replaced. I made it green by setting the Hue, Saturation and Brightness parameters.

When you're ready to change the color, click OK.
So we changed one color to another.
It often happens like this: found the desired picture, but the color is not the same; or just wanted to diversify the usual. How to replace a color in Photoshop with another? The question is justified, because in Photoshop you can replace color in several ways. Much depends on the dispersion of a certain shade throughout the image. The less often the color being replaced appears in other areas of the image, the easier it is to replace the color in Photoshop.
Now let's look at several methods and figure out how to replace one color with another in Photoshop.
The first method is the easiest and fastest. But the object of repainting should not be too complex. For example, let's take a photo of a lime on a table. The background is almost uniform, green present only on lime. The fruit is round, it won’t be difficult to recolor.

Open the image in Photoshop and unfreeze the layer by right-clicking on the castle image.

Create a new one above the photo layer transparent layer (Shift+Ctrl+N). Calling the tool "Brush"(key B). It is better to use a hard brush. On the control panel, call up the brush properties and select a hard one, with clear edges of the stroke.

Select the color of the brush that you want to repaint the lime with. Let's take blue for example. The palette is in the toolbar at the bottom. Called double click by icon. By moving the sliders on the spectrum, you can select a color range. We select the color tone by moving the white ring in the square window, where the tone changes from white to black.

Stand on the transparent layer, select the brush size using the keys Kommersant- increase, or X- reduce and paint over our lime.

Now let's change the layer blending mode from “Normal”/Normal on Hue. You can do this in the layers palette. This will cause the lime to change color.


If you hold down the key Ctrl and, moving the cursor to the layer icon, click once, the shading area will be highlighted. Now, without removing the selection, you can change the brush color and select other colors. There is no need to repaint. After selecting a color, you can press the key combination Alt+Delete. This will fill the selected area with a new color.

In the next example, we'll look at how to replace a color in Photoshop with better quality. This method may take a little longer, but the results are worth it.
How to replace one color with another in Photoshop if shades of the color being changed are often found in the photo
Let's say you need to change the color of a model's lips. Red, pink and shades of these colors are present in skin color. When changing the color of your lips, you need to leave your skin color unchanged.
Open the image in Photoshop. Create an adjustment layer. The list of adjustment layers can be expanded in the layers palette below.

In the adjustment layer settings window, select the “Red” color channel and click on the tool Eyedropper Tool, then make one click on the model’s lips. This way we will determine the color that we will change.

Movable brackets will appear on the gradient below. With their help, you can make the range of a given color wider or narrower. When moving the checker "Color tone" /Hue The chosen lip shade will change throughout the spectrum, depending on where you point the checker. In this case, the shade of red will change throughout the image.

Ctrl+I

Having selected the color you want to change, close the adjustment layer editing window and step on the adjustment layer mask ( white square) and press the keys Ctrl+I. The mask will be inverted to black, and all our changes will be visually lost.

When all the areas where the color needed to be changed have been worked out, you can save the image (keyboard shortcut Shift+Ctrl+S). If you miss in some area, you can cancel the action Alt+Ctrl+Z or paint over all the mistakes on the adjustment layer mask with a black brush. This method will help you choose a new color more accurately, and the work will look neater.
You can learn even more about Photoshop in the course at Fotoshkola.net.
How to replace one color with another in Photoshop if the original color is black or white
Affairs with the change of black and white things are different.
To change the black color, you can apply an adjustment layer “Hue/Saturation”/Hue/Saturation, but work not with the color channel, but with toning. To do this, you need to check the box in the layer settings "Toning"/Colorize.

Let's take a closer look. Let's say you need to repaint a black sofa. Select the sofa using the tool (call with the key W).

Using combinations Ctrl+C And Ctrl+V transfer the selected area to a transparent layer and apply an adjustment layer to it “Hue/Saturation”/Hue/Saturation. To do this, between the adjustment layer and the layer with the selected object, you need to left-click while holding down the key Alt.

Now double-click on the adjustment layer to call up its settings, check the box "Toning"/Colorize and by moving the hue, saturation and brightness checkers, we select the desired color.

It turns out simple, beautiful, without a catch.
To repaint white, you can use an adjustment layer "Color" in blend mode "Multiply".
Open the image and create an adjustment layer "Color". We immediately set the color of the layer to the one we plan to paint white.

Change the blending mode to "Multiply", step on the adjustment layer mask and click Ctrl+I.

Go to the layer with the image and select the desired areas of white with the tool "Quick selection"(call with key W). Without removing the selection, stand on the adjustment layer mask and paint over the mask with a large white brush. The color will change only where you selected with the tool "Quick selection", which can be determined by the dotted line.

If desired, you can change the color of the adjustment layer. To do this, double-click on it and select any new color in the spectrum.
It's that simple. Try it, experiment. You will definitely succeed. Now you know several ways to replace a color with another in Photoshop.

You can learn even more about Photoshop in the course at Fotoshkola.net.
Hello again, my dear readers. Today I would like to tell you how to replace a color in Photoshop with another one by separate area and even throughout the whole picture. After all, you probably have often had the desire to repaint something just to see how it would look. But in order not to make a mistake, it is better to first do this on some kind of layout or photograph. Then you will already know how and what it looks like. Let's see how to change the color of an object to a specific one using the example of repainting the car in the picture.
First way. Color replacement
Let's look at the simplest case, when our background is completely different from the object itself, i.e. cars.
- So, upload a photo, picture or drawing into our editor and now go to the familiar “Image” menu. Next, select “Correction”, and then “Replace Color”.

- A color replacement window opened in front of us. What are we doing here? First, let's make sure that the active tool in this window is a regular eyedropper (without signs). Now just left-click somewhere on the hood of the car.

- As you can see, we have a small drawing in the window. What is colored light shows us which area will undergo a color change. Now start dragging the Hue slider. Do you see? Some of the color starts to change as you move that tone. Don't be upset that not the whole car is painted over. We'll fix it.

- To begin, press and hold left button mouse on the Scatter slider and drag it to big side. Just try to make sure that the car is painted over as much as possible, while the background remains untouched. In this case, there are no yellow tints in the background, which allows me to set the maximum spread to 200.
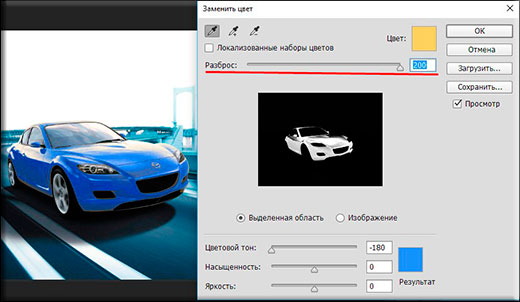
- Has the desired object changed almost all its color, but not completely? Again, no problem. Activate the internal tool “Pipette+” and left-click on those areas of the car where there are unpainted areas in the drawing.

- Voila!) As you can see, everything worked out and even our background was not damaged. And by the way, you can also move the “Hue”, “Saturation”, “Brightness” sliders to achieve the desired shade.

Look. It looks like it should be. And this function can be used in different areas, for example, to replace the color of clothes, or to give an unusual but specific shade to vegetables or fruits. In! Try making a blue watermelon. I assure you. It's easy, very interesting and useful for consolidation.

Correcting Misunderstandings
Let's look at a slightly more complicated case. Let’s say I again want to change the color of the car, but this time it’s different. As you can see, the color of the car is the same as in the background. Well then? Let's do everything the same as above and see what we get.

But we’re doing a bad job, the background is so similar to the color of the car that neither the “Pipette-” nor reducing the spread helps. If we want ours to be purple, then our mountains will also be similar. What to do?

In such difficult situations, you will have to do a little manual work. There's really nothing wrong with this. You'll just have to use the one you know. Yes, yes. Using pens we erase failed painted objects or background, thereby leaving with a certain color only the object itself, i.e. in our case a car.

Even better, before you start changing the color, duplicate the layer and perform all the actions on the created copy. And unnecessary details can be erased with regular . This will be better if you suddenly want to change the color later.
Second way. Blend Mode
Well, since we’re talking about repainting a car in Photoshop, I can’t help but mention another good way to carry out this action. True, here you will also have to work with your hands, since you will have to change and paint over everything. But we can easily replace the color in Photoshop with any other.
Let me load the same car as above.
- We take and how we would like to paint this car. Well, let's say I want to see it green, then this specific color I will choose.
- Now create new layer by pressing the key combination SHIFT+CTRL+N. And then take a look at the Layers panel. Do you see any blending modes there? The default is normal, but open the drop-down list and select “Color” (By the way, the “Color Tone” mode is also suitable, so you can select that too). Great. Well done.

- Now choose the size, shape and hardness of the brush, and go ahead! We paint the car. Just be careful not to touch too much. Well, if you hit it, then use an eraser to correct it, no big deal.

- And now, if you want to change the color that you sculpted, you need to go to our again familiar “Image” menu and select “Correction” there - "Hue/Saturation". But I advise you to immediately use a simple key combination CTRL+U.

- Well, in the newly opened window, you can also move the hue, saturation and brightness sliders to change the hue. It's simple.

Well, how do you like the lesson? Was everything clear and interesting? I hope so. Personally, when I learned about changing the color of an item in Adobe Photoshop, was simply delighted. If, of course, something is unclear, you can always clarify or ask. I will be glad to help as much as possible.
I would also advise you to look cool video course on photoshop. The video lessons are simply awesome, the course goes from easy to complex, everything is told in human language, nothing is missed and at the same time there is no unnecessary “water”. Everything is spot on. So be sure to check it out.
Well, I say goodbye to you today. I will be glad to see you in my other articles. Well, in order not to get lost, be sure to subscribe to my blog updates. I won’t spam - everything is just to the point, honestly. Well, you practice. See you in other lessons. Bye bye!
Best regards, Dmitry Kostin.
1 voteGood day, dear readers of my blog. Today we are again talking about Photoshop and its tools. Not many people know that the “Color Replacement” brush is hidden among them. Nevertheless, thanks to it you can very coolly change the color of any object in the photo.
I already wrote about this, but if you use the tips from that article, you can quickly get rid of a certain shade from the entire photo.

Today we will talk about the Color Replacement tool in Photoshop. I'll show you how to work with certain objects. For example, change not all the red in the picture, but only the hair. You don't have to bother with any masks. Everything will be very easy and simple. A couple of moves and you're done.
Well, shall we begin?
Color Replacement Tool
How does Color Replacement work? It recolors pixels of one color to another. And although this method cannot be called super-professional, the darker and lighter areas and highlights remain as such even when repainted.
The method is very easy to use and is ideal for solving simple tasks of changing colors and shades in Photoshop.
This tool “hides” on the same button as the other brushes. Hold down the left mouse button for a few seconds and additional tools open.

You can control the size of the brush using brackets ( and ) (“X” and “B” on the keyboard). In this, the brush is no different from its other “brothers”.
How does the brush work? You move the arrow and everything that falls within the diameter of the brush changes its color to the one you need. It's very easy to set it up. This is active. To replace it, just click on the front color plate, select a shade and click “OK”.

Look, I took the color black and moved it over the girl’s head. Her hair has changed, but all the shades have been preserved. They don't look like a dark spot.

Tool Settings
If you zoom in on the image, you will see that the color has moved onto the girl’s body. One of the brush parameters is “Tolerance.” It determines how different the color can be from the samples. By default this figure is 30%. If I set it to 90, I’ll go over the girl’s forehead and eyes, but if I set it to 1, I won’t paint anything.

There's another one here interesting setting- mode. If you try to change something now, it will seem to you that the option does not work. The whole point is that you first need to set the settings, and then work with the brush.

See in the picture below, I tried all 4 modes. 1 – hue, 2 – saturation, 3 – chroma (this parameter is set by default) and 4 – brightness. You already know how to use them, but what is each of them?
If the colors in the photo are not too saturated and minor changes are required, then it is best to use “Color Tone”. In this case, you will only change the hue, but the saturation and brightness of the original color will not change. The hand looks dull blue.
If you need to slightly reduce the intensity or even completely remove the color, then it is better to use the “Saturation” mode. It will not affect the hue or its brightness. The lower part of the arm has remained virtually unchanged. The color only hints that the hand is bluish.
“Color” will change both the hue and its saturation, but the brightness will remain unchanged. The girl's face became like the Avatar's.
“Brightness” will not change the hue and saturation, but its brightness, of course, will be completely different. You see, in my case, the girl’s hand became almost white.

Another interesting setting is “Restrictions”. Of the three available options in life, as a rule, only two are used: Adjacent and all pixels. The settings determine the location of the points that you are going to change.

In the “Adjacent Pixels” mode, only those points that are adjacent to the center of the cursor and do not differ from them in color change. This allows you to make changes more accurately, taking into account contrasting borders. If the diameter of the brush suddenly contains a color of a completely different shade, it will not change.
If you set the “All pixels” mode, the photo will be “blurred” evenly, without taking into account the difference in shades.

Well, that's all. The tool is, in principle, not complicated. To make a real masterpiece you will have to dig deeper, but changing parts of the object will not be so difficult. If you need to turn a large photo into a spectacular miniature, then better tool just can't be found.
If you are concerned about how to make the quality of your work more impressive, then I would probably still recommend that you take a deeper look at Photoshop. Get to know him better. The course will help you cope with this " Photoshop from scratch in video format ».
In this course you will be told all about the tools and capabilities that this program has. You no longer have to look for answers to your questions on the Internet. They will appear on their own. You will be able to find ways to solve any problem yourself and create incredible masterpieces.
Well, if you already know enough and want to start making money on your skills, then I’ll advise you another “ Commercial Web Design Basics " These lessons will help you understand what web designers do. If you already know something about Photoshop and want to take this hobby to a whole new level, then this option is for you.
 An online course with the support of the author is a reliable investment in your future profession.
 Stop inventing your own work. Let other people pay you to solve their problems with this powerful program. I assure you, you will be able to quickly find clients, and thanks to the ability to make collages, you will be able to complete the most incredible projects.
Read my introductory article about web design and learn as much as you can. I'm not talking about scams and games, but about real work, for which someone is willing to pay. I won’t hide that at first the money won’t be that much, but now you don’t earn anything from your hobby. Isn't it?
I wish you success and want you to succeed. Subscribe to the newsletter and VK group, and let every day bring you one step closer to your dream of becoming better.
See you again and good luck in your endeavors.
Another color, give it a working brushes" At first glance, this is the same as “mixing a new one on the palette.” color" for simple . But the process of selection and mixing itself color ov in graphic editor completely different. To change color working brushes V Adobe program Photoshop, left-click on the "Main" icon color/Foreground Color" at the bottom of the Tools palette. It is this icon that displays the current color brushes.
In the “Color Picker (Foreground Color)” dialog box that opens, select the one you need color one way: by moving the sliders on the vertical color new scale by clicking on a specific point color new field (like a pipette), entering the values of the components of this color and in the corresponding palette fields (RGB, CMYK) or hexadecimal color a, which is defined by html- color ov. Samples of changing color and (new) and current (current) you can in color ny rectangles to the right of color new scale.

There is another convenient palette for selection in the program color A. This is the Color palette. You can open it through the Window>Color menu or by simply clicking " hotkey» F6. Typically this palette appears on the right side of the screen. Select the required color moving the red (R), green (G) and blue sliders color a (B) or click on color new field at the bottom of the palette and move the cursor over it without releasing the mouse button. The cursor will look like an eyedropper. Changing color displayed on the main icon color but in the same palette.

Change color brushes you can also use the Swatches palette, where various libraries are collected color ov. By default, this palette is located next to the Color palette, but if it is closed, to bring it up, use the menu command Window> Swatches. Choose another library color You can do this by clicking on the small arrow on the right top corner palettes. In the list that opens, select the desired library.
