Do-it-yourself indoor UHF antenna wave channel. Simple DIY digital antenna: device requirements
Digital television T2 is gaining momentum in popularity. And this is natural, analogue television is being replaced by digital television and this is an irreversible process. Moreover, in the near future, analogue broadcasting will be stopped altogether. What should users who have TVs without a T2 receiver do? cable television? The answer is simple - buy a T2 set-top box. Today, the price of T2 consoles has dropped greatly and does not look exorbitant. The advantages are quite big: you have many channels in digital quality, with no monthly fees, minimal costs and without having to buy a new TV. Only by comparing the quality of digital and analog TV will you never regret your choice.
Quite a lot has been written on the choice of T2 receivers. Moreover, new models are constantly being released. I would advise taking an inexpensive one, but new model, after reading reviews on online store websites. As a rule, any receiver works, but the antenna has great value. Even if you are close to a TV tower, but are blocked by high-rise buildings, etc. - and this is almost always the case, then good antenna- a guarantee of problem-free (and most importantly, nerve-free) quality reception maximum quantity digital channels TV.
But an expensive antenna is not always a good antenna. Especially if you are 50 km or more away from the TV tower. Stores offer “special” antennas for T2. In fact, there is nothing “special”; you need a good antenna for the DCM range. If you still have an old DCM antenna, try connecting it first. Widespread "Polish" antennas are not suitable for receiving T2 digital channels.
I offer a proven option that is simple, but at the same time has proven itself, homemade antenna for T2. The shape of the antenna is not new; it has been used for a long time and when receiving DCM analog television, but the dimensions are optimized for receiving T2 digital channels.
It is worth noting that the Internet offers large number options for homemade antennas for T2: from beer cans, from antenna cable, converted Polish, etc. This is for the completely lazy, and you shouldn’t expect quality from such antennas.
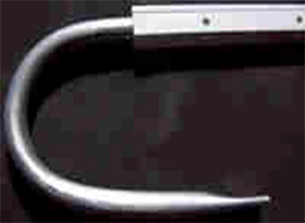
So. The long-known “figure eight” was taken as the shape of the antenna. The antenna body is made of any conductive material of suitable cross-section. This can be copper or aluminum wire with a thickness of 1 to 5 mm, a tube, strip, busbar, corner, profile. Copper is, of course, preferable. I used 6mm diameter copper tube. Good option And copper wire. I just had such a pipe.
Dimensions
The outer side of the square is 14 cm, the inner side is slightly smaller - 13 cm. Due to this, the middle of the two squares does not converge, leaving a gap of about 2 cm.
In total, you will need a tube, wire or other material 115 cm long (with a small margin).
The first section is 13 cm + 1 cm for a loop (for strength), if made of wire, or riveted for overlapping soldering for a tube. The second and third - 14 cm each, the fourth and fifth - 13 cm each, the sixth and seventh - 14 cm each, and the last eighth - 13 cm + 1 cm, again for connection.
We strip the ends by 1.5 - 2 cm, twist the two loops behind each other, and then solder the joint. This will be one cable connection pin. After 2 cm another.
From a copper tube it looks like this

It’s a little more difficult to bend the tube, but we don’t need much precision. Minor flaws in the shape do not affect the performance of the antenna. But the fact that the conductor area increases is a plus. Well, the conductivity of copper is higher than that of aluminum and, especially, steel. The higher the conductivity, the better reception antennas.

The connection prepared for soldering is first riveted and cleaned. For soldering you need to use a powerful soldering iron (from 150 W). Simple amateur radio at 30 watts. don't solder. You can use acid for soldering.

Check the geometry again and solder the connection


If you are not particularly bothered by the aesthetic appearance, you can simply attach the antenna to a glazing bead or any other available holder. This antenna was located in the attic, so the simplest mounting method was used - electrical tape. If the antenna will be placed outdoors, take care of more aesthetic and reliable mounting.

This is a version of the T2 antenna made of aluminum wire with a diameter of 3 mm. Secure with one screw to the window. The distance to the TV tower is about 25 km. True, the 6th floor, I didn’t check lower, but in these conditions the signal level is 100% and the quality is 100%. The cable is old, 12 meters to the TV. Receives all 32 channels. At first I was worried that it wasn’t copper, but as it turned out, it was in vain. Everything worked out perfectly on ordinary aluminum wire (which happened to be available). That is, if you have a zone confident reception, then you don’t have to bother and feel free to use aluminum (I don’t know, maybe steel will do).

This antenna does not use any amplifiers. It is very easy to set up - just turn maximum level signal and quality on your tuner channels. Check other channels and fix the antenna. If reception is poor, you can experiment with not only rotating, but also changing location and height. Very often, the signal can be many times stronger if the antenna is shifted only 0.5-1 m to the side or in height. Good luck - the antenna has been tested - 100% functional and better than at least half, or even more, of purchased antennas, where they save on everything and sell garbage for good money.
For those who want to set up an antenna for television, understand this: digital gizmos were not created by nature. There are analog signals in the Universe, the power varies according to the quantum states of electrons. The transitions are so small that to a person they seem continuous. The signal can be represented by a certain number multiplied by elementary energy. We would like to make it clear: the nature of a digital signal is not understood by mankind; a digital antenna cannot be constructed independently. It is possible to make an antenna for reception analog signal, carrying digital information.
Digital signal reception antennas
Today exclusively digital television. However! Multiplexes, where programs are stamped into frames, contain radio broadcasts. We would like to clarify: in the current state of affairs, radio broadcasting has shifted upward, capturing the frequencies of the FM range, television has been completely pushed out to the UHF. Explained by features modern life. The driver wants to listen to the radio and watch TV on the way. Have you seen the long antennas of walkie-talkies? 34 MHz. Compare: Channel I of the USSR broadcast at 50 MHz. Should everyone on the roof have a two-meter long antenna to watch the central channel?
Just ridiculous. In contrast to sticks, FM-UHF antennas are relatively small. Easily fits on the roof. Easing the suffering of moviegoers, the channels are carried by one frequency. The picture is divided into frames, it turns out that many programs are available with a single antenna setting. Comfortable. Lots of benefits technical solution we will see from the phenomenon called today digital multiplex. It becomes possible to accurately target the antenna at the receiving frequency (which is a trivial UHF channel) in order to watch programs or listen to the radio.
To solve the problem, a device is constructed that some consider to be a “homemade digital antenna”. The antenna is ordinary, and if you are interested in the type, let’s add – linear. The design was chosen due to its small dimensions. Highlighted in digital transmission one problem...
Television is accustomed to using horizontal polarization. Suffered a fate digital multiplex. It turns out that the signal is caught amazingly when the antenna line is perpendicular to the beam of the incoming signal. If we break the rule, power begins to be lost and reception deteriorates.
Receiving a digital signal with an antenna
Those wishing to receive a digital signal must understand the type of polarization electromagnetic radiation. Discard satellite television broadcasting in frames; polarization, as Vladimir Volfovich says, is definitely horizontal. It is customary to catch the type of signal on television using a half-wave vibrator; there are two types of signal:
- Symmetric.
- Asymmetrical.
Let me explain. The first is formed by identical shoulders equal to a quarter of the wavelength. The total is half the wavelength. The signal core of the cable is connected to one arm, the screen to the opposite. The shoulders form a line in a row, separated by a gap of 20 mm. To match, equalize the resistances of the antenna and cable, take the trouble to balance them. The first condition is ideally satisfied, the second at UHF frequencies plays a lesser role as the wavelength decreases.
To make a digital antenna yourself, it is enough to equip the mast with a carrier plate and attach horizontally and symmetrically two wire arms 3 mm thick, each a quarter of a wavelength.
The resulting device is soldered onto a coaxial impedance of 75 Ohms, as indicated above, the length of the reduction cable is taken as low as possible, each meter eats up a part useful power losses. Only the length to the first amplifier stage matters. Supplying the roof with power by installing a purchased unit desired frequency, a bay in the corner, rolled up behind the TV, deprives us of the opportunity to spoil the reception. The over-amplification effect sometimes introduces unpleasant visual effects, the most famous is considered ghosting.
Another negative is possible. First you should try an antenna without an amplifier. Reception will not be distorted in any way by excess power. If unpleasant side effects are observed, it is worth trying to improve the quality. It is important to point the antenna more accurately. In the city, due to the multi-beam effect, in the village, due to the deviation of the direction of wave movement from a straight line, the exit point of the beam is not where the compass points (according to the map). You should move the antenna slightly, setting the right direction, finding the best position.

Antenna signal reception
The half-wave vibrator of the design described above forms two main lobes in the radiation pattern. Separated by 180 degrees. The radiation pattern is symmetrical in the horizontal plane. Therefore, we will improve the characteristics by installing a screen. An obvious solution, we rarely see it for a simple reason: the antenna must catch a wide range, it is difficult to choose the correct distance. For a half-wave vibrator, the screen will not be a piece of conductive material - a couple of pieces of wire from which the arms are made. The distance between them is not so important and should not be large. 5 centimeters up and down from the plane of the shoulders is quite enough. The screen length exceeds the span of both and is electrically located on the cable braid.
The distance between the screen and the half-wave vibrator becomes important. We find it difficult to answer correctly what gap separates the parts; for zigzag loop antennas the value is 0.175 of the signal wavelength. We believe that amateurs have the right to try to experimentally select the desired distance; professionals have a chance to simulate the MMANA system. The former will get an acceptable result faster, the latter will be able to predict the final outcome. arbitrary length waves, which is preferable. Modeling antennas is not among the interests of the authors; enthusiastic people are able to post a finished file, flavoring the comments with the fruit of technical thought. We believe that the alignment will reduce the amount of interference.

Single-ended digital antenna
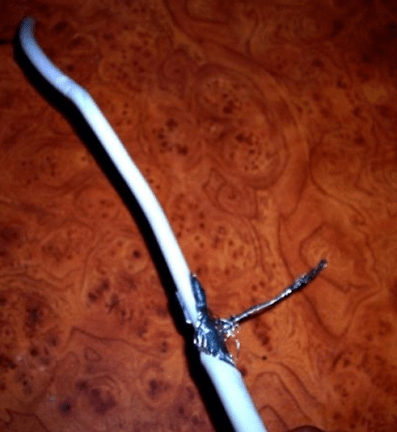
As for the asymmetrical half-wave vibrator, it represents one shoulder. The second is replaced by “earth” (an infinite plane of zero potential); in practice, there is simply nothing in this place. The manufacture of a half-wave asymmetrical vibrator has been repeatedly shown on forums, the VashTekhnik portal, and the network. Usually the antenna serves as an indoor addition digital receiver who is afraid to catch himself. To make the fixture, the channel wavelength is calculated and divided by four. The cable screen is stripped along the segment, the internal insulation is preserved - it will not interfere with reception.
An F-connector is screwed onto the end bent 90 degrees, which is inserted into the receiver, TV socket (contain the receiving part of terrestrial digital television with the required generation of microcircuit). Almost all modern plasma panels what you need inside. Setting up will take time, the channel frequency is known. We need to find out the number - visit the website http://rtrs.rf, look at the region, call the right phone number. Requests by e-mail are accepted. Of course, if the region is deprived of digital television, no information will be found.
The given site is official resource state unitary enterprise entrusted with the task of digitizing the space of the Russian Federation. Ask if you can make a log-periodic digital antenna yourself? The answer is no need. The log-periodic antenna covers a wide range, if you want to watch three Moscow multiplexes, take it. Discarding caution, use a wave channel type antenna, which differs from the log-periodic one in slightly worse range characteristics and is simpler in design. The manufacturing method was discussed; the province has little point in wasting time.
Readers understand: the design of a digital antenna is identical to the usual one. Polarization is linear horizontal, frequency is determined by the channel. The operating principle of a digital antenna is similar. Conversion of an electromagnetic wave into current inside a conductor. The peculiarity of digital antennas is that they are precisely tuned to one frequency. The design is simple and effective. Promising high-quality viewing (without visual, audio interference). Naturally, the TV and set-top box must decode the signal.
All that remains is to say goodbye to the readers. Today the amateur radio industry is becoming a thing of the past, who will predict the awaiting humanity of tomorrow...
Today, almost all homes are connected to cable or satellite television, and almost all channels are in good quality. But what to do if you are just renting an apartment? Here on help will come a homemade antenna for digital television - as a reliable and inexpensive alternative to a factory one. Read on to see how it is done.
To make this device, you will have to use 550 by 70 mm plywood, several self-tapping screws, and a forty-centimeter copper wire 40 cm long (the central core is 4 mm in diameter).
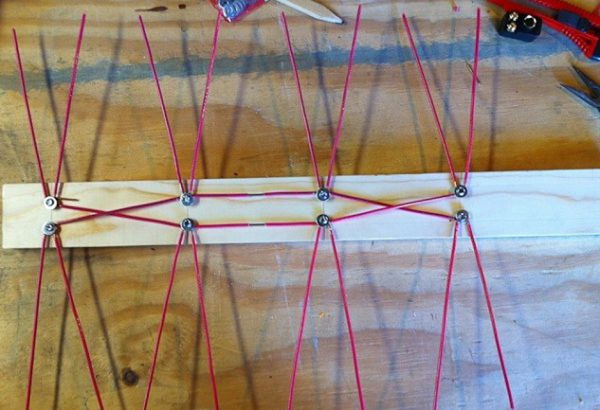
The base of the product is a board. Next, cut 8 pieces of wire, the length of which is 375 mm, while they should be stripped in the center by 20-30 mm. This is necessary to ensure good contact in signal transmission.
Now, cut out 2 wires, the length of which is 220 mm and, based on the dimensions of the board, they should be cleaned where the connections will be. After this, the remaining wires (eight pieces) need to be bent so that they acquire a “V” shape.

An antenna for digital television is absolutely no different from a regular decimeter antenna.
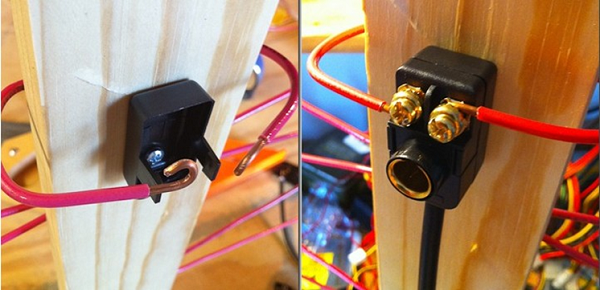
First, you should start purchasing a special plug, after which it should connect the antenna and cable. This is easy enough. Using a benchtop soldering iron, the plug is attached to the wire. This cable is installed over the bottom connection of the instrument. At this stage, the production of the antenna can be considered completed. It is already ready to be turned on.

An antenna for digital television is absolutely no different from a regular decimeter antenna.
The second method of making a digital television antenna from cans
Here, we will not use a ready-made device as a basis. The device will be completely assembled from available materials. A homemade antenna for digital television is made using:

- wooden trempel;
- adhesive tape or tape;
- soldering iron;
- two tin cans;
- several meters of wire (about 3-5 m);
- plugs.
First, you need to modify the standard television cable. To do this, you need to slightly cut its soft shell. Under the shell you will see a silvery “foil”. This material covers the cable in several layers. For this reason, in order to see the wire itself, you will have to cut about 10 cm from the edge. After this, you should twist the foil layer in order to make a sample of its middle layer by about 10 mm. The reverse end of the cord is equipped with a plug used to connect to the TV.
We're done with the cable, the banks are next. If we talk about sizes, then to accept digital signal A tin container with a volume of 750-1000 mm is enough. The end of the wire with the “foil” is attached to one can (otherwise, the display of channels will be incorrect). The cable core is screwed onto the second can. It is preferable to connect the cable and cans by soldering. If the wire is secured with tape, most likely the product will not work.
The only option for using such material is when the cans are installed on top of the trempel. However, here too one cannot deviate from the technology of application. Namely, the arrangement of the cans should form a straight line. Tin containers should be located at a distance of about 7-8 cm from one another.
That's all, the homemade antenna for digital television is ready. Now you can start searching for a suitable signal and securing your device. Such an antenna will allow you to view several channels, up to 10-15, if the signal is not password protected.
Video: homemade antenna for digital television
Digital coding TV signal allows you to deliver it to the receiver, minimizing any losses. To support the technology, the TV needs an antenna for DVB-T2. Making such a device with your own hands is much cheaper than buying a ready-made one, paying about 3 thousand rubles for it. Terrestrial digital television displaces all similar types of signal transmission, while offering high-quality broadcasting and a variety of channels.
Changes on air
Making an antenna for an old-style tube TV was considered prestigious in its time and showed the level of skill, in modern world interest in homemade devices does not fade, and many make terrestrial antennas DIY DVB-T2. Manufacturers of industrial equipment adapt to the changed reception conditions by connecting modern electronics to standard well-known designs, completely ignoring the fact that the main condition for the operation of the antenna is its interaction with the terrestrial signal.
In recent years, almost all broadcasting takes place in the DVB-T2 range, which reduces the cost and simplifies, from an economic point of view, the antenna-feeder system of transmission stations. Periodic maintenance requires fewer highly qualified personnel, and their work becomes less harmful and dangerous.
Transmitters television broadcasting They cover all large cities and sparsely populated villages with signals, so catching waves from unattended low-power stations in remote areas becomes important if you install an antenna for DVB-T2 reception, made with your own hands from scrap materials.
Due to the expanded construction of reinforced concrete buildings within the city, the conditions for signal propagation in populated areas have changed significantly. Multi-storey buildings with a metal frame are like mirrors, reflecting waves several times until they are completely attenuated.
There are many TV channels broadcast on the air today. A digital signal differs from others in that it either exists or it doesn’t; there is no middle position. Other transmission systems differ in that the channels perceive interference differently, which reduces their broadcast quality, and sometimes the image may simply disappear. A self-made antenna for DVB-T2 will allow you to receive the same signal for all channels that show the same high-quality picture.
Signal digital broadcasting special in that it is not affected by interference; if it exceeds noise by one and a half decibels, then it is carried out good welcome. Signal dropout is affected by cable mismatch or phase distortion at any point in the transmission from the camera to the tuner, and the image can be scattered into small pieces even with a strong signal.
Basic features for making an antenna
Before making DVB-T2 with your own hands, you should study the principle of its operation.

To capture a digital signal, it is required that it can be very simply constructed, even from a simple cable, after making the correct calculation.
The theory says that digital signals are easily transmitted in the UHF range and can be received by any type of antenna, but in reality this does not always work out.
Do TV antenna you can do it yourself with minimal costs and without the help of strangers, but it should be remembered that the resulting device is inferior in reception quality to professional devices.
Requirements for antennas
New conditions for broadcasting, distribution and on-air reception have changed the basic requirements that DIY TV antennas must meet. DVB-T2 has abolished the previously significant directional and protective coefficients. In modern devices they do not matter, since the air is polluted, and even small penetrating interference can only be dealt with using electronic means. At the same time important role plays the antenna's own gain (GA).
An antenna that tracks the air well has a power reserve for the received signal, which allows the electronics to sift it from interference and noise. A modern antenna for DVB-T2, made with your own hands, preserves electrical parameters in a natural way, and does not adapt to acceptable parameters using engineering techniques. It is consistent over the entire operating frequency range without the use of balancing devices.
Antenna amplitude and frequency characteristics
The antenna is made as smooth as possible; phase distortions arise due to sharp emissions and dips. Single-frequency antennas are stretched to an acceptable noise-to-signal ratio, thus allowing them to receive up to 40 channels. But matching amplifiers are additionally installed to them, which absorb waves or distort phase indicators.

The most effective digital DVB-T2 antenna is made by yourself:
- frequency-independent - with low performance, but cheap and easy to manufacture, constructed in a short period of time, intended for reception in relatively clean air on a short distance from the transmitting station;
- periodic band, catching all waves in space, ideally sorting them, which has a simple design, ideally works in tandem with a freeder throughout the entire reception range.
If we talk about the design, then the most simple antenna DVB-T2 is made by hand in the “eight”, “Polish” and “square” versions.
Figure-of-eight antenna
Refers to easily constructed devices, made like a standard figure eight, from which the reflector is removed. The ideal material is an aluminum strip, corner, tube, tire, or other profile. Top size 140 mm, side length 130 mm, but these dimensions are given as a guide; during manufacturing they should not be kept exactly to the millimeter.
To begin with, cut a wire 112 cm long, begin to bend the first part 140 mm long, of which 130 mm goes to the antenna, and 10 mm remains for the loop. The next two sections are bent equally to a length of 140 mm, the next two - 130 mm, the next pair - 140 mm, then another 140 mm, then - 130 mm and make a second loop. The connections are pre-cleaned, connected and soldered; they are also contacts for fastening the cable core.
Stripping the cable and plug is done using a scalpel and a file. After soldering, the joints are sealed and secured with glue from a hot gun. If we talk about the plug, then the glue is poured into the solder joint, then into the cavity of the cap, the excess is then removed. The joint is assembled so quickly that the adhesive mass does not harden. The result is an eternal, strong and elastic connection. To make contact, we strip the ends of the cable from the plug side by 1 cm, from the antenna side by 2 cm.
A do-it-yourself indoor digital DVB-T2 antenna, when connected by soldering, is also sealed with glue, where it is recommended to install a rigid frame at the point of contact according to the size of the joint. If the device is made for yourself and will be rigidly fixed during operation, and transfer is not needed, then the frame is not made. A device made of this type easily picks up digital signals in the line of sight TV tower at a distance of up to 10 km when installed outdoors.

Using a “Polish” antenna
The “Polish” antenna received its name during the times of the former Soviet Union as a reliable device for receiving signals from Soviet television, as well as channels in the UHF range. Digital broadcasting is practically not received on it due to its low efficiency. Some amateurs are trying to bring the design to ideal by shortening the long decimeter mustache and removing the reflector. Such a change in some cases allows you to adjust the image in digital format, but talking about guaranteed receipt there is no reliable result. Speaking about Polish devices, we can note the high-quality operation of the amplifier, which works effectively with a digital signal.
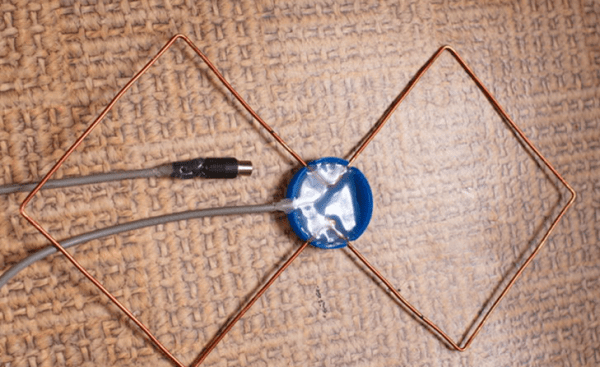
Antenna type "square"
This DIY indoor DVB-T2 antenna is a modified copy of the standard design, known as “three squares,” which has six components and a matching transformer. A homemade antenna of this type confidently copes with the reception of TV channels digital format up to 10 km in a straight line, longer distances require a signal booster.
The antenna design is simple to implement. The main structural element consists of round aluminum wire and single-core wires. The wire is bent to obtain six squares and a matching tap is made, which is a transformer high frequencies so that the signal matches the cable and the DVB-T2 antenna with the amplifier. With their own hands they solder the wires to the points, wrap them with copper wire and tin them with a soldering iron.
The cable is attached to the antenna with special clamps or using ordinary insulating tape. The cable is connected by placing a support, using a wooden plank or other material. When installing indoors or outside a building, the main condition is precise alignment with the television tower. This is done using a navigator; if there is no line of sight, the direction is clarified until the effect of receiving a powerful signal.
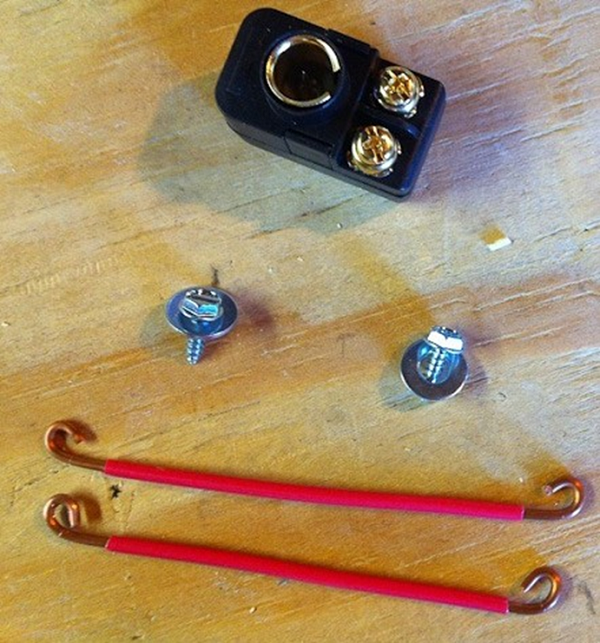
Antenna made from beer cans
The manufacturing technology is like this efficient antenna very simple and does not require special skills.

Using a thick awl or screwdriver, make neat holes in the neck of each of the two cans, then screw screws into them. The cable ends are freed from the braid, the copper wires are cleared of varnish with a knife, and they are attached under the screw heads. It is very good to solder the resulting connection, but not necessary.
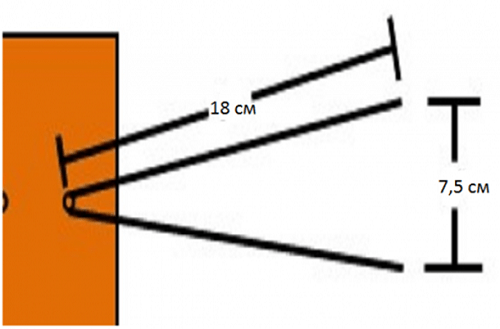
Digital antenna The DVB-T2 is almost made with your own hands, all you have to do is fix the cans on a prepared rail or pipe so that there is a distance of 7.5 cm between them. The second cable end is equipped with a standard plug that connects to the receiver, the device is installed in the place where the signal is best fixed. Placing this type of device outdoors requires reliable protection from bad weather. This is done with any waterproof material, often plastic bottles are used. large size. The antenna receives up to 15 channels satellite television and digital broadcasting.
Using Instruments and Amplification
At a certain distance from the television tower, the antenna is capable of receiving signals without installing additional amplifying devices. To receive a signal from greater distance stocked with a wave amplifier with separate power supply. The device is installed near the tuner, and the matching device is made additionally; for its manufacture you need:
- potentiometer for gain adjustment;
- standard decoupled throttles L4 and L3;
- coils L2 and L1 are wound according to dimensions from the directory;
- a metal screen to separate the output circuits from the device circuit.
The amplifiers are placed no further than 3 meters from the place where the DVB-T2 cable antenna is installed, which receives power from its own unit with its contacts. When installing an antenna near a broadcasting tower, it is not recommended to use an additional amplifier, since a strong signal degrades the image and has an additional effect on the entire structure. The recommended cable length is three meters; a larger wire will lead to imbalance of the balun.

Application of a symmetrizer
This device is needed for any type of antenna, and it does not matter whether it was made at a factory or in a craftsman’s workshop. Antenna for DVB-T2, made by yourself, gives good quality images when connected to a tuner. If the cable length is more than 10 m, then when installed outside the building, inconsistencies in the resistance of the external space and the cable arise. In this case, it is necessary to use a balunizer in a comprehensive antenna solution, which greatly improves the quality of the image on the screen.
Cable laying and antenna installation
The main rule is to install the antenna at a height. If this cannot be done in the room, you need to move the device to an external wall. To install an antenna in a private building, digital broadcasting operators rely on a device height of 10 m. If the antenna is located on the ground floor of a house, then nearby metal structures and industrial objects cause poor reception.
When placing the antenna under a canopy or the roof of a house, pay attention to the roofing material - it should not contain a metallized coating or spraying. Metal tiles, corrugated sheets, iron or foil insulation create significant interference with the reception of digital television signals.
For high-mounted receiving antennas on a metal mast or pin, a steel rod measuring at least one meter is provided, to which a grounding wire is connected. The device located on the roof is included in common system grounding of the house.
The cable is not routed through smoke and ventilation ducts, and is not hung on existing electrical wires, even if they look more than reliable. The holes in the walls are placed at an angle so that moisture from the street does not flow into the room; special commercially available plugs are used. If the antenna is made well and correctly, take the cable and wall sockets high quality, since after the final finishing of the walls it is difficult to redo the cable in the wall and replace it with a more reliable one.

Compliance with safety precautions when installing the antenna
Before installing or adjusting an already mounted antenna at a height, make sure that this action is safe:
- do not climb onto weakly secured and shaky structures; if working at height is associated with danger, be sure to wear a mounting belt and attach it to a fixed part of the building structure;
- The assistant is not allowed to hold the end without first securing it; if he falls, the assistant will not be able to hold his body weight in his hands;
- It is forbidden to climb to a height alone, when structures are icing, to walk on an old roof, or to step on connecting seams;
- Do not install the antenna in rain or fog.
In conclusion, it should be said that it is quite easy to do it yourself receiver in order to watch digital television. DVB-T2, a home-made antenna, is almost as good in quality (if you follow the right technology) as store-bought counterparts. The cost of materials will allow you to save a decent amount of money, which is important for some people.
Despite the huge number of television antennas presented on the consumer market, which can be easily purchased at any electronics store, interest in how to make an antenna for a TV with your own hands does not disappear. This interest can be explained by the reluctance to spend money on buying an antenna, being away from retail outlets(if you are in the outback or at the dacha) or failure of the purchased one.
Antennas for a television receiver can be divided into several types.
- All-wave antenna– the design is easy to manufacture; it can be made from simple available materials. It picks up a digital signal quite well outside the city, where there is not much interference. When located near a broadcast tower, it can receive analog television.
- Log-periodic band antenna also easy to make. It has perfect consistency with the feeder across all ranges, without changing its parameters. Since this design has average technical parameters, then it can be used in the country, or as indoor antenna in the city.
- UHF antenna. A simplified modification of the Z-antenna is often used; it works well, regardless of signal reception conditions.
All-wave antenna
All-wave TV signal catchers are also called frequency independent (FIN). Their designs can be different.
Of two petals
The figure shows an all-wave antenna made from two metal plates triangular in shape and two wooden slats on which copper wire is stretched in the shape of a fan.
Copper wire can be taken of any diameter, it does not play a special role. The ends of the wire are attached at a distance of 20 to 30 mm from each other. The plates with the other ends of the wire soldered together should be located at a distance of 10 mm from each other.
The metal plate can be replaced with a square piece of fiberglass, which has copper foil on one side.
Since the design of the homemade antenna is square, its height will be equal to its width, and the angle between the panels will be 90 degrees. Zero potential point marked in yellow in the figure. There is no need to solder the cable braid in this place - tying it tightly will be enough.
A television signal receiver assembled in this way in the form of two lobes is capable of receiving both all decimeter channels and meter ones. Moreover, it picks up signals well in all directions. But if you install the CNA in an area of poor signal reception from a TV tower, it will only work normally with amplifier. Others can also be used.
Butterfly shaped
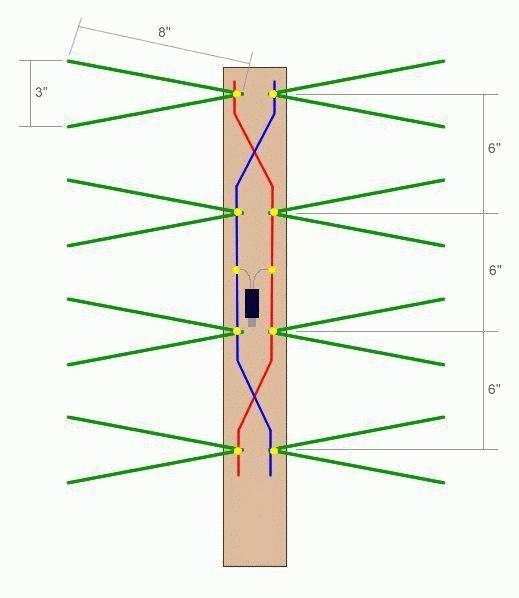
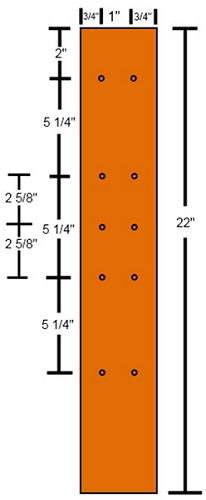
You can make a television antenna in the shape of a butterfly with your own hands. To make this yourself it is enough powerful antenna, you need to prepare a board or plywood with dimensions of 550 x 70 x 5 mm, a wire with a copper core with a cross-section of 4 mm, and, accordingly, a PK75 cable.

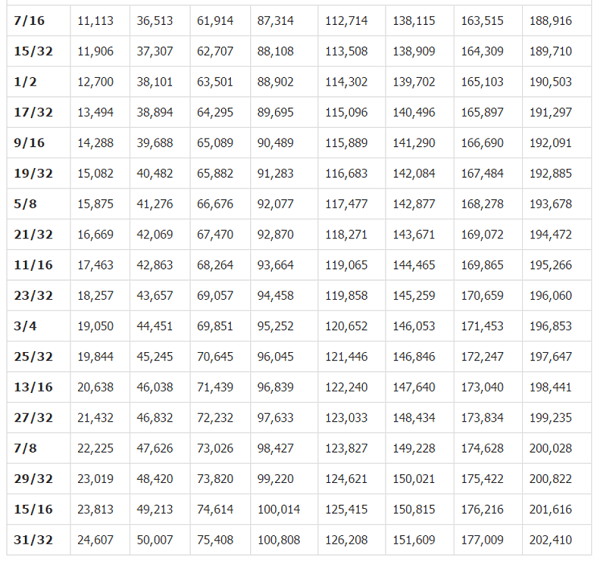
- Mark the holes on the plywood and drill them. Dimensions in the picture are in inches. Below the figure is a table for converting inches to mm.

- From copper wire you need to cut 8 pieces of the same length, 37.5 cm each.
- In the center of each wire, clear sections of insulation (2 cm each), as in the figure.

- After this, you should cut off 2 more pieces of wire, already 22 centimeters each, divide them into 3 equal parts and remove the insulation at the separation points.
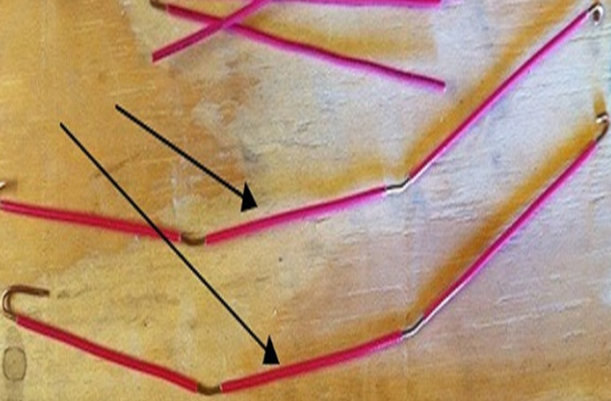
- Give the segments V-shape. You should be careful to maintain a distance of 7.5 cm between the ends of the wire. This is the optimal distance to receive a clear signal.
- Connect all the elements according to the figure below.
- Next, you need to purchase a socket to connect the plug to it.
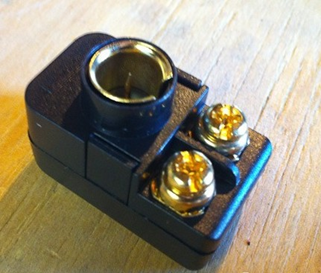
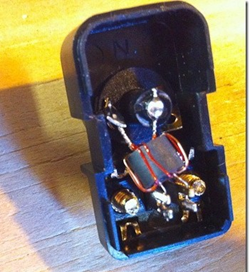
- The cable must be soldered to the coil contacts, as in the figure.

- Make 2 more pieces of wire of the required length to connect the antennae to the socket.
- Screw the socket onto the board and connect all the elements.
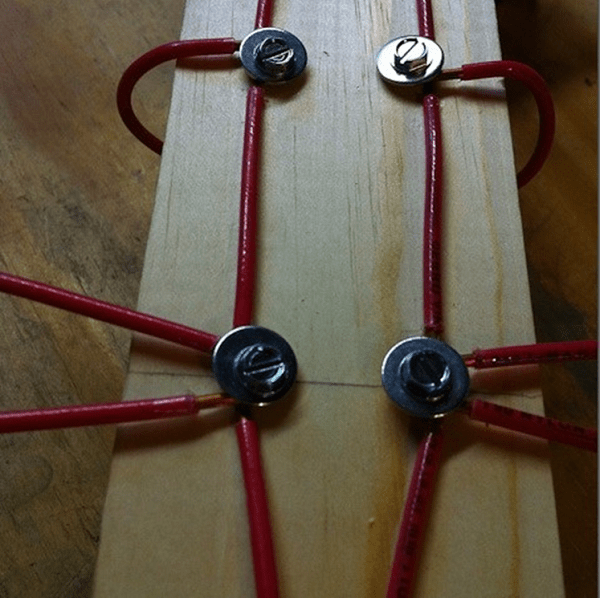
That's all - you have made an antenna for your TV with your own hands.
From beer cans
To make such an original ChNA you will need 2 cans (0.5 l or 0.75) of beer or other drink. But before you make a television antenna, you need to consider some material requirements. Namely, it is recommended to purchase high-quality tv cable, having a resistance of 1 meter of 75 Ohms. Which is correct? Make sure that the central core is strong and that the braid is double and continuous.
Don’t forget, the longer the cable, the stronger the signal attenuation will be, which is especially important for receiving meter waves, in contrast to UHF, for which the length of the wire also matters, but not so much.
It will also be necessary to prepare the usual wooden trempel, a couple of self-tapping screws, electrical tape or tape and, if possible, a soldering iron with tin.
An antenna made from beer cans can receive both the decimeter wavelength range and the meter wavelength range.
To illustrate the entire process, you can watch the video.
Log-periodic antenna
A log-periodic antenna (LPA) can be used to receive radio waves in both the meter and decimeter ranges. To make such a signal receiver, you can use an aluminum tube with a diameter of 10 mm and metal rods (studs) as a stand, which can be purchased at a store that sells fasteners. Ideally, instead of threaded rods, it is better to use smooth tubes or rods. A plastic U-shaped box is used as a base.
When the soldering is completed, the manufacture of the device can be considered complete and you can begin testing your creation.
UHF antenna
Homemade decimeter signal catchers can have different shapes and designs, from the simplest to manufacture to more complex devices.
Ring-shaped
The simplest design for UHF reception can be made in short time with your own hands from scrap materials. All you need is a coaxial cable and a piece of plywood of the appropriate size.

Now all this needs to be assembled:
- prepare a piece coaxial cable(RK75) 530 mm long (a ring will be made from it);
- also cut another piece of cable 175 mm long - this will be a loop;
- make a ring (1), solder a loop (2) and a cable (3) to it, which connects to the TV;
- secure it all to a plywood sheet and point the completed TV signal receiver towards the TV tower.
If your TV receiver uses such an antenna, try making a more complex device.
Figure 8
You can make your own home UHF antenna from wire in the shape of the number 8. To make such a receiver, you can use copper or aluminum wire with a diameter of 3 to 5 mm, as well as PK75 cable. During the manufacturing process you will also need glue gun

Manufacturing progress.
- Using wire cutters, you need to cut 2 pieces of wire 56 cm each.
- At the ends of each segment, make a loop, which should take 1 cm.
- Bend the wire squares and connect the loops. Solder the cable to the squares as shown in the picture. The central core is soldered to one square, and the braid to the other. The distance between the elements should be 2 cm. The entire structure can be secured in the lid of a 20 liter water bottle, filled with glue.

Such a UHF receiver can be placed anywhere, and it does not require an amplifier. Perhaps an amplifier may be needed if the device is outdoors and the cable length is significant. In this case, to compensate for signal losses, its installation will be required.
From a metal-plastic pipe
You can make a television antenna with your own hands from an ordinary metal-plastic pipe. This will result in a device for receiving UHF with a possible range from 480 MHz to 1000 MHz. This “model” uses a pipe with a diameter of 16 mm and a cable of 5.5 m. The ring will require 55 cm of pipe, and the stand will require 14 cm, which is equal to a quarter of the wavelength. This serves to better match the outer braiding of the cable and reduces high frequency currents.

The cable exit in this design is made through a hole in the pipe. The cable braid should be attached with a clamp to the stripped part of the pipe. The central core of the cable is attached to the ring (you can use a screw with a washer and a nut). This homemade product works well as an indoor antenna in apartments with reinforced concrete walls that do not transmit television waves well. Thanks to the extended cable, you can take it out onto the balcony or place it on the windowsill - the quality of reception will only improve.
In the form of a frame
Another UHF antenna design is assembled in the form of a frame. It will be made from aluminum plates(stripes).

Thus, home-made antennas will help you save money on purchasing them, and in some cases get out of the situation where you have a TV, but the standard antenna is out of order, or it doesn’t exist at all. Moreover, the quality of reception of homemade products is no worse than their factory counterparts. If you do not want to make the device yourself, then the information in the store will be useful to you.