Is it possible to connect a large monitor to a laptop? Using a laptop as a computer monitor
Before connecting an external monitor to your laptop, it is recommended that you familiarize yourself with the following procedure.
1. Turn off both the laptop and the external monitor (projector).
2. Connect a multimedia projector (external monitor) to the laptop video connector (VGA connector).
3. First turn on the monitor, then the laptop.
In most cases, the image will immediately appear on the multimedia projector (external monitor), but sometimes you need to switch the image manually.
Manual switching Images from the built-in laptop monitor to an external monitor (projector) are done in fundamentally the same way for different laptops.
To do this, use the function keys available on the laptop's built-in keyboard. They typically have distinctive graphics (and sometimes colors) printed next to the symbols on a regular keyboard. Typically these special icons printed on the function keys designated "F1" to "F12".
However, these function keys work in a laptop only when you simultaneously press the “Fn” key and one of the “F1” - “F12” keys.
The key in the row of function keys responsible for switching between the built-in and external monitor (projector) most often has the image “ Laptop/Monitor" or "Monitor/Monitor».
It could be like a key "F5" and "F7" or another key - this information can be obtained by carefully examining the built-in keyboard of the laptop or reading the instructions for it.
Thus, upon completion of loading operating system press "Fn" key + system button laptop, designed to switch between monitors.
If after all the above actions the picture still does not appear on the screen external monitor or multimedia projector, this does not necessarily mean that the video processor is faulty. Perhaps the monitor/projector simply does not match the laptop's video card. This is rare, but it does happen.
try "Start" - "Control Panel" - "Hardware and Sound" - "Connect to an external display" ( Here are the settings for an external monitor or projector.
And also “Start” - “Control Panel” - “Hardware and Sound” - “Connecting to a Projector”(here you can choose the option of connecting an external monitor (projector), only a monitor, together with a laptop monitor, etc.). There, in these windows, everything is clearly visible.
If the external monitor is visible to the computer, you will be prompted a menu of 4 options: “Disable projector”, “Duplicate”, “Expand” “Projector only”.
If this menu appears, then try the “Duplicate” option first. In this case, after a pause, the image will appear on the screen of the external monitor, and at the same time the same image will remain on the laptop monitor.
After this, you can use the “Projector Only” option, then the image will remain only on the screen of the external monitor.
If all of the above does not help, then you need to do the following:
1. With the laptop turned off (completely) and the external monitor turned off (from the electrical network), you need to check the connection between the monitor and the laptop. Check all connectors on both the monitor and computer sides. All connections must be reliable, the connectors must be inserted “all the way” without gaps or distortions.
2. After that, turn on electrical network Monitor only, do not turn on the PC. Launch its own menu on the monitor (there should be a button labeled “Menu”, or read the instructions for the monitor if it does not have such a button, and then press the corresponding button to enter the monitor menu).
3. In the monitor menu, find the option responsible for connecting the monitor to the PC. For example, on my monitor (in “Menu” mode), among all the menu options there is an option in the form of a drawn connector for connecting the monitor to a PC. This option may look different on your monitor. Read the instructions for the monitor.
4. In this option, which is responsible for the option of connecting the monitor to the PC, specify the “Analog” option (in Russian - “Analog”) if you connect the monitor to the PC using a fifteen-pin connector. Usually the monitor is connected to the laptop exactly via an analog 15-pin port.
5. Now plug in and boot PC. Do not turn off the monitor. If everything is done correctly, then already at the stage of loading the PC, the monitor can be detected automatically, and the expected image will appear on it.
If this does not help, then perhaps Windows 7 really does not know your monitor and cannot connect it. But this is unlikely.
Since in this Windows case 7 should have written to you that unknown hardware was detected and suggested that you install drivers for it.
Since you don’t have this inscription, the problem must be in physical connection monitor to PC. Those. the monitor (according to Windows 7) is not physically connected to the PC (it has no connection with it or the monitor is turned off from the electrical network).
Or maybe you just don’t plug the monitor into the electrical network? Same possible option. Then you cannot “reach” the monitor by any means.
The laptop can be turned into the system unit of a “stationary” computer. To do this, you should connect not only an external monitor to it, but also an external keyboard and mouse. There are as diverse external keyboards, connected to USB ports, and mouse manipulators with a similar connection.
The convenience of such a “stationary” PC with system unit in the form of a laptop is that it is easy to dismantle and then use the laptop for its intended purpose to work anywhere where it is required.
Otherwise, if you use a desktop PC together with a laptop, the problem of transferring data from the desktop PC to the laptop and back always arises.
This option is convenient for those who are mobile and use a laptop both outside the home (office) and at home (in the office). In addition, the option of combining a laptop and a “stationary” PC based on a laptop is much cheaper than paying for the purchase of 2 computers at the same time: a desktop PC and a laptop.
Everything described above about a laptop is also true for a netbook.
Better turn off laptop, since some of them check for the presence of an external monitor when starting the laptop ( The monitor must be turned on first).
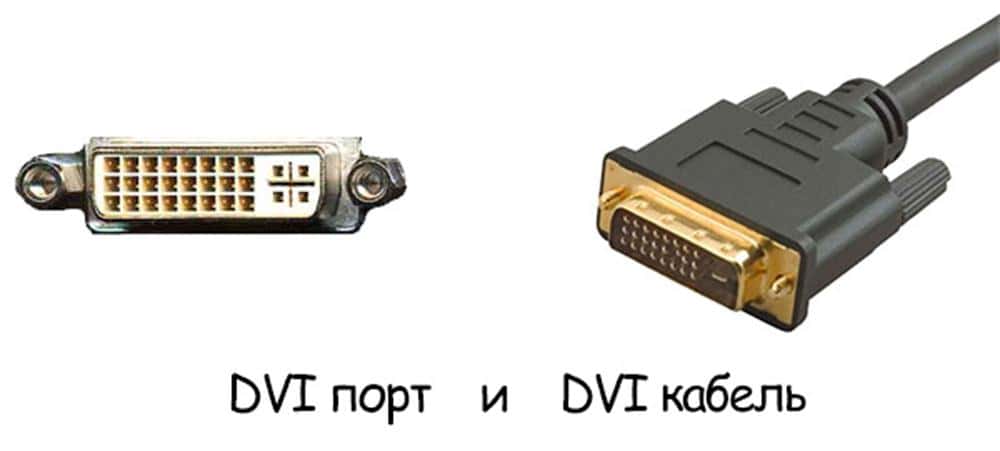
Connect your laptop to an external monitor via VGA port or DV I (if on a laptop DVI port, and you have a VGA monitor, then use a special adapter).
On some laptop models, the image on the external monitor will appear immediately, while on others you may have to manually switch the image.
To do this, wait until your operating system loads and press the Fn key and the key responsible for switching from the laptop to the screen.
What to do if you have problems connecting an external monitor to your laptop?
The image can only be duplicated and there is a problem with the resolution and frequency of the screens.
Surely you have ATI drivers. Anyway The problem is most likely in the drivers.
Try deleting current version drivers, and install the latest or previous one, if installed version and there is the latter (in the case of ATI it is better use special utility to remove them).
If reinstalling the drivers did not help, try replacing the wire connecting the laptop and monitor.
We take our laptop and regular monitor. Let's call a laptop monitor "monitor 1", and a regular monitor will be called "monitor 2". You can do the same with a desktop PC if it has more than one VGA or DVI port.
Connect the VGA wire of "monitor 2" to the VGA socket of your laptop. The VGA socket is blue as standard. You can do this with the laptop turned on.
A new window will pop up, use the "Extend monitor" option. And now you see two monitors with identical screens - as if you had two monitors behind which you could do the same thing.
Further, at your discretion, you can configure the monitors so that they display completely different windows. Click on free space desktop right-click and click on “Personalization”.
Next, select “Monitor settings”.
The monitor settings window should appear. Select "Monitor 2" and click "Extend desktop onto this monitor."
Now you can adjust the resolution of both monitors at the same time:
You can choose the layout of your monitors by placing "Monitor 2" on the left, right, above or below "Monitor 1" - basically, anywhere by simply dragging it with your cursor.
Nobody forbids you to use more than two monitors, if your motherboard holds more than one video card.
Example. If you have two video cards with two DVI connectors, you have the opportunity to connect no less than four monitors to one computer.
There are four modes for running your graphics card with dual monitors.
— Dual-View: displayed on 2 monitors various pictures. And at the same time, the window resolution and refresh rate can be different for each monitor.
- Clone-View: two displays display identical pictures.
— Screen stretching horizontal line(Horizontal Span): this treats two different monitors as one big screen, and the desktop is split into two parts.
In our case, the horizontal resolution is doubled. The refresh rate is the same for both monitors. This mode supported by games.
— Screen stretching vertical line(Vertical Span): The mode is similar to horizontal stretch, but only the desktop is stretched vertically. Accordingly, the vertical resolution of the window doubles.
I will devote a little space in my article to problems that may arise when connecting a second monitor to a laptop.
U Windows XP There was such a moment - if you have two monitors, and one of the monitors is turned off, then the windows located on the second (on the turned off) monitor remain there. You need to carry them or turn them on and drag them with handles, or in other rather tedious ways.
In the new one Windows 7 This problem was seen and solved, but, as is typical for Microsoft, it was not obvious.
Method one: when you press the win+p buttons, it appears quick selection option of operating two monitors and, if you turn off the 2nd monitor through it, then the windows that “remain” there will crawl onto the main monitor by themselves.
Method two: when the desired window is selected (i.e. when it is in an active state), after using the win+shift+"left/right arrow" keys, the desired window slides to the right or left, respectively.
There is such a way. After full load Windows (just in case, wait a second minute so that the monitor drivers, if any, are installed and the laptop “sees” the new device) press Ctrl+Alt+F3 OR Ctrl+Alt+F1.All three buttons at the same time.
These are hotkeys for switching between the built-in monitor and VGA output.
At least the TravelMate 2413 helps me on Acer. Not the first time, though, I have to switch back and forth several times at the beginning (meaning I have to press one or another key combination, You DO NOT need to touch the monitor connection cable) to grab the external one. But you can understand him, he’s old, he can barely breathe.
After the first connection and setup, the laptop should then display the image on an external monitor.
Unless, of course, you configure the external monitor as the main one, and it is advisable not to disconnect it (the monitor) from the laptop afterwards, otherwise the settings will be reset again and you will have to configure it again. At least that's how it is for me. Try it. Maybe this method will help you too.
Default: Ctrl+Alt+F1 is the internal monitor, and Ctrl+Alt+F3 is the external monitor.
It is important to understand that switching between monitors is not done quickly: you press Fn simultaneously with one of F1-F12, and you have to wait until the switch occurs. If the switched option does not suit you, press the same key combination again and wait again. And so on until you select the mode you are interested in.
Try driving mouse beyond the edge of the monitor, the cursor should go to the plasma. (with plasmas there are problems with resolutions... it may not show the whole picture, sometimes you need to adjust it)
go to device manager, find there graphics adapter, open it, click update the driver, and do it from the folder you unpacked it into, or from the subfolders of this folder
Will it be possible to use both monitors at the same time?(at one movie, at another work)
Moreover, everyone has their own settings (1024x768 for beech and 1680x1050 for an external monitor).
That's exactly how Extended desktop works.
On the monitor blurry image , as if the pixels are floating a little. Although I set the recommended image to 1920x1080. There are also small ripples in horizontal stripes. White gives to purple. The monitor from the desktop PC works perfectly through this cable. I have Windows 7 on my computer. Perhaps the video card in a desktop PC is better and more powerful than in a laptop. Try setting the resolution lower than recommended when connecting your monitor to your laptop and see what happens.
Sooner or later, everyone thinks about improving or increasing the capabilities of their laptop. The most common and fairly simple method of modernization is connect a second monitor to the laptop via VGA connector. In the same topic you can also consider how to connect a projector to a laptop, since the algorithm of actions in these two situations is absolutely the same.
If our devices are functioning normally, then we only need to perform 3 simple steps:
1.
Turn off the laptop.
2.
Connect an external monitor (or projector) to the laptop via the VGA port.
3.
Turn on the monitor (projector), then the laptop.
Let's explain this algorithm. It is better to connect for the first time with the laptop turned off, as some laptops check for the presence of a second monitor when booting. Our second screen is connected via a VGA port (rarely DVI).
After turning on the laptop, an image should appear on the external monitor. If this does not happen, and the computer boots, then we have to supplement the above procedure:
4. Manually switch the laptop to an external monitor.
To do this, you should carefully study a number of function keys on the keyboard (F1, F2, ..., F12).
The F4 key is responsible for switching the monitor operating mode
Depending on your laptop model, one of the function keys on your device is responsible for switching the screen to an external monitor or projector. This could be F1, F4, F5 and others. If nothing happens when you press it, then you need to use a key combination, for example Fn+F1 or Fn+F4. If again to no avail, you can use - Win+P (P-English).
We figured out how connect an external monitor to the laptop, however, they did not consider the nuances of such a symbiosis. Let's go to the following links:
Start -> Control Panel -> Display -> Adjust screen settings

Here we can specify which screen will be the main one and which will remain secondary. This menu can also be useful when we place the second monitor to the left or right of the laptop, and select its appropriate position in the settings. Actually, complete connecting a monitor to a laptop remains an indication optimal parameters screen resolution and orientation.
Using the same “hot keys” F1, F4, Fn+F4 or others, you can set the screen operating mode (your modes may be called differently):

1. Extend - the laptop screen and external monitor work separately.
2. Duplicate - the image on two screens is the same.
3. Turn off the projector (external monitor).
4. Projector (monitor) only - laptop screen is turned off.
– practically not inferior in performance to full-fledged ones desktop computers. At the same time, the laptop user is not tied to one point and can move freely with his PC. Therefore in lately All more people prefer to use a laptop as their main computer. However, when home use The laptop has one drawback - a small screen. To neutralize this problem, you need to connect a full-fledged one to the laptop. In this material we will talk about how to connect a monitor to a laptop.
To connect the monitor to the laptop first
VGA is the most common interface and can be found in almost all laptops. VGA is an outdated analog interface. However, it is still quite relevant and can be used to connect or projector to your laptop without any problems.
HDMI is also a very common interface for connecting a monitor or. Often used in conjunction with VGA. You can also often find a port on another computer technology. For example, on tablets or smartphones.

DVI- ideal option to connect a monitor to a laptop. On at the moment considered the standard for connecting monitors. However DVI interface quite rare to find on laptops.
DisplayPort is one of the newest interfaces for image output. Recently it has been rapidly gaining popularity and can be increasingly found in laptops.

After you have examined your laptop and determined what interfaces it is equipped with for image output, you need to do the same with the monitor. In general, you need to find interfaces that are available on both the monitor and the laptop. With their help you can connect your monitor to your laptop.
To connect the monitor you just need to connect two identical ports on the monitor and on the laptop using a cable suitable for the ports. After this, the laptop should detect the additional monitor and the picture from the laptop will appear on it. If the monitor is not detected after connecting, restart the computer.
A situation may also arise when you do not have the same ports on your laptop and monitor. For example, a laptop is equipped with only an HDMI port, but the monitor does not have an HDMI port. In this case, you will need adapters.
Now you can find an adapter from almost any interface to any:
- DVI – VGA;
- DVI - HDMI;
- HDMI - VGA;
- DisplayPort - DVI;
- DisplayPort - HDMI
- etc.
Setting up a monitor connection to a laptop
After you have connected the two ports, a picture from the laptop should appear on the monitor screen. However, working in duplicate screen mode is not always convenient. To change the mode you need to go to “Screen Settings”. To do this, right-click on the desktop and select “ ”.

In the window that opens, you can select the mode for displaying images on connected screens. The following modes are available:
- Duplicate screens. In this case, both screens will work simultaneously, both on the laptop and on the monitor. In this case, the picture on both screens will be the same. This mode is especially convenient when connecting a projector or monitor to demonstrate presentations.
- Expand screen. In this case, the connected monitor will expand the screen of your laptop. By choosing this mode, you can work with two screens at once and move windows between them.
- Display desktop on 1 (or 2) only. In this case, you select only one of the screens. While it won't work. This mode is suitable if you only want to work with a connected monitor.
Modern laptops can replace full-fledged computers, but they have one drawback - small screen. For comfortable work, a larger diameter monitor is connected to the device.
There are different options for connecting an additional monitor. First, determine what output ports the manufacturers equipped the laptop and second monitor with. Almost all laptops have a VGA port. It's a reliable, if dated, analog interface. Connection is made without problems. The second most popular is the HDMI port, digital high frequency.


It is practical to use a TV as an additional monitor. In this case, it is pleasant to watch movies on a television screen in good quality, saved on a portable device.
There are several desktop display modes:
- Laptop screen only
- External monitor only
- Laptop screen and external monitor.
a) Clone (duplication) mode;
b) Desktop extension mode.
“Laptop screen only” and “External monitor only” modes
With these modes, as a rule, everything is extremely clear and understandable. If the video card drivers are installed correctly, then:- in the “Laptop Screen Only” mode, the resolution on the laptop screen should be native, and the fonts should be perfectly straight;
- When switching to External Monitor Only mode, the native resolution of the external monitor should be set, even if it exceeds the resolution of the native display. If the monitor is connected to the laptop via the VGA port, then the only thing that may be required from the settings is to press auto-tuning button on the monitor.
For example, a 2006 HP nx6310 laptop with an outdated 1024×768 matrix resolution should produce a 1920×1080 resolution absolutely without problems when connected modern monitor via VGA connector.
Modes for combining the laptop screen and external monitor
1. Cloning (duplication) mode
If not produced additional settings, as a rule, the image cloning mode is turned on. As you understand from the term itself, in this case, all connected monitors (or projectors) will display same image with the same resolution. In this mode (cloning or duplicating), the lowest resolution of all screen resolutions is taken as the basis. If the laptop screen has a resolution of 1366x768 and the monitor has a resolution of 1920x1080, then both screens will have a resolution of 1366x768. However, in some cases the image on the external monitor may not stretch to fill the entire screen:
Duplication mode on an Intel video card
If you have a laptop with integrated video from Intel, the setup can be done using the Intel utility.
- Graphics options;
- Output to;
- Additional displays;

2. Desktop extension mode
Extended Desktop Mode requires initial setup. Sign in Control Panel and select setting Screen:


In the next window, you can configure the resolutions of all displays connected to your computer (laptop, netbook).
- Select Expand these screens.
When you switch modes, it doesn't matter which display is currently selected. - Select an external monitor.
In our case it is number 2. - Specify its native resolution.
Typically this is the maximum resolution available. In Windows 7 and 8, you need to move the slider all the way up. - Click OK to save settings sharing screens and their resolutions.

Desktop Extend Mode on Intel Graphics Card
If your laptop has integrated Intel video, you can enable extended desktop mode using the Intel utility.
Right click on empty field on the desktop and select the following menu items:
- Graphics options;
- Output to;
- Extended desktop;
- Built-in Display + Monitor:

Later (that is, after you have configured the layout of the displays and screen resolutions), you can switch modes very conveniently Internal-Dulbbing-Expansion-External using the laptop's function key. Usually this is the keyboard shortcut FN+F4:
This is an Acer netbook:

This is a Samsung netbook:

Below we provide a screenshot of what the display manager looks like on an HP G62 laptop.
After connecting an external monitor, we select the duplication mode, desktop extension or image output to an external monitor (projector), depending on what mode we need:

When we want to turn off the output of any image on external display, we choose Computer only:

Attention! Display manager program that is controlled by function keys V top row keyboard paired with the FN key will look different on different laptops. In addition, at different manufacturers Different function keys can be responsible for switching displays.