Is it possible to connect a hdd to a computer that is turned on? How to connect a second hard drive to your computer
Good day!
There is never too much disk space!
This truth has been more relevant than ever for the last 30 years. Despite the development of the IT sector (the emergence of cloud drives, network storage, high speed internet) - anyway, we are facing a shortage free space on HDD.
The obvious solution to this problem is to buy and connect another drive. But, as with any issue, this has its own nuances... Actually, in this article I decided to consider this issue in more detail (so that the article would be understandable to most inexperienced readers).
So, let's start to figure it out...
Note! Please note that disk space may be wasted due to optimal settings Windows (for example, paging and hibernation files are “bloated”), or a large accumulation of garbage. I recommend clearing all garbage and optimizing the OS ( ) before you buy new disk(perhaps the freed space will be enough for all your tasks).
Option 1: installing a classic HDD in a PC system unit
A few words about choosing a new disk
In general, the choice new hard disk is a separate big topic. Here I want to focus on one important detail - interface. Nowadays the most common ones are IDE (obsolete) and SATA. Before buying a disk, I recommend checking your PC (especially if you have an old one) and find out what interface is supported (otherwise, in addition to the disk, you will have to purchase adapters/adapters - and additional problems often arise with them...) .

SATA III and IDE - comparison (as an example. The photo shows 2 hard drives)
About installation:

Addition (if the PC does not see the new disk)!
After you turn on the computer (with installed second disk *) - it’s not at all a fact that you will immediately see this drive in “My Computer” or “Explorer”. The fact is that new disks often come unformatted (and such a drive cannot always be seen by Windows).
Therefore, after turning on and Windows boot, I recommend immediately (This system utility on Windows) or use special ones to format the drive and start working with it fully.
Option 2: connecting the drive to the USB port (external drives)
If you don't want to "climb" through the insides system unit (and many novice users ask to suggest exactly this option so as not to do this), or you simply have no warranty on your PC (and you don’t want to open the unit and risk it once again) - that is, a way out...
The fact is that now there are hundreds of different specials on sale. boxes: they are a collapsible box (see screenshot below), inside which you can install a classic hard drive (both 2.5 and 3.5 inches (i.e. drive from both a laptop and a PC)) and then connect it to the USB port. Moreover, you can connect not only to a computer, but also to a small netbook, for example.
Working with such a disk is no different from regular disk(which is inside the system unit): you can also store music, movies, documents, games, etc. on it (plus, it’s easy to carry and connect it to other devices).
The only negative: there may be problems with installing Windows OS on it (therefore, use external drive as a systemic one, it’s not worth it. For everything else, it’s a pretty good option).

By the way, there are now not only boxes on sale (for classic HDDs), but also full-fledged external hard drives. There is quite a wide variety of them now; they differ not only in volume, but also in connection interface, dimensions, speed, etc.
Help! How to choose external hard disk (HDD) - 7 important points -

Stationary external hard drive - connects to a 220 V network via a power supply
Help!
Option 3: if you have a laptop...
When many people use the word “computer” they often mean a laptop. That is why in this article I will also consider this case...
In general, the laptop is difficult to upgrade. If you can “stuff” several into a regular system unit hard drives(for example, 5-6 pieces), then many classic laptops have only 1 HDD slot (provided by the manufacturer). And, as a rule, it is already occupied by the current disk - i.e. There is no slot for a second drive.
However, do not rush to despair, there are solutions:

That's all for now, additions on the topic are welcome.
Happy work!
On your own and without the involvement of a specialist, if necessary, you can connect it to your computer extra hard disk. Next we'll look at installation diagram and then connecting a new hard drive to the system unit. It should be noted that the actions are performed smoothly, clearly, without the use of force or sudden actions.
The first step will need to be de-energized the entire system unit, to do this, turn off the power, and then disconnect absolutely all the wires. Next, the side covers are unscrewed and removed, just as in the image.
The hard drive, of course, has its own compartments, which, depending on the model of the system unit, can be located in different positions and have different positions. 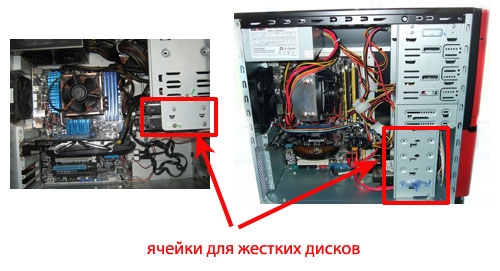
According to the method of connecting the hard drive directly to the motherboard, they are divided into two types, and exactlySATAAndIDE. The second option, which has very wide cables and ports for connection, is considered obsolete and is now used extremely rarely. Due to its irrelevance as an IDE, the variation will not be considered here.
If hard drive SATA already connected to the computer, you can add a second one quickly and easily. Additional disk is inserted into the appropriate free cell and attached to the body. It is advisable that they be located at a sufficient distance from each other to avoid overheating. 
In order to connect new hard drive to the motherboard itself, you will need a cableSATA. Plug one end into the corresponding slot on the board, and the other into the hard drive. 
It is worth noting that in each modern model system unit, a minimum of twoSATA- connector.
The next step is to connect a new hard drive directly to the power supply. For this purpose it is used special cable
, the plug of which is slightly wider than that of a SATA cable. If there is only one plug coming from the power supply, you will need a splitter. It happens that a narrow plug was not provided in the power supply, then you should purchase an adapter. Examples are shown in the images: 
Having obtained all the above-mentioned cables, you should connect the hard drive to the power cable.
The auxiliary media is now fully connected. You can then start the computer by attaching the covers, connecting the cables, and turning on the power. After this, if necessary, the stage will follow system settings new hard drive.

I recently received a question by mail:
Hello Maxim. Your subscriber writes to you with a proposal - a request. Tell us how to properly connect a 2nd hard drive and 2 DVD writers. I think this is of interest to many ordinary users PC.
The fact is that it is impossible to describe all connection methods and options in one note, due to the variety of connection interfaces and their combinations on motherboards from different manufacturers.
On the one hand, now only two interfaces are most common connecting hard disks and optical drives: IDE (IDE) And SATA (SATA), and it seems that connecting everything is simple.
On the other hand, motherboard manufacturers have done very large number boards with a variety of configurations of these interfaces: ranging from 2/4 IDE and 1 SATA at the moment the CATA interface enters the market before 1 IDE and 6/8 SATA V present moment(hereinafter the number in front of the interface means the maximum possible number of devices that can be connected via the interface to the motherboard).
At the same time, there are motherboards in which simultaneous operation of all interfaces is impossible, i.e. for example, when connecting one drive via SATA switched off 3rd and 4th IDE.
With a gradual transition to the interface SATA everything will become easier - one device - one connector.
This means that each device is connected to its own connector, and the user does not need to additionally configure the device and think about which side of the cable to connect to the motherboard and which to the device. And in case of problems, it is better to tell in detail about the option where the problems arose.
On my home PC (GigaByte GA-P35-DS3L motherboard) there are two SATA hard drives, one SATA DVD-RW and one IDE DVD. I will show how they are connected in the following picture:
The figure shows approximately 1/6 of the motherboard. Green– this is a connector for IDE devices, I have an IDE DVD connected to it. Yellow– these are connectors for SATA devices; I have two SATA hard drives and one SATA DVD-RV connected to them.
Radiator south bridge and PCI-Express slot latch are shown for quicker slot locating. In most motherboards, the IDE and SATA connectors are located next to the south bridge.
The following pictures show the connection cables IDE devices. These cables have 80 cores and can be designated as "cable IDE-100/133" or "ATA-100/133 cable". There are also options for 40 cores, but they are practically no longer used.


The following figure shows the connection cables SATA devices. Manufacturer GIGABYTE does not make simple cables for connection SATA, but “with amenities.”
The first is a metal retainer at both ends of the cable. This lock prevents the cable from accidentally disconnecting, for example, when you insert or remove a video card from the system unit and accidentally touch the cable.
The second is an angled connector at one end of the cable. This cable is convenient to use for short bodies, in the case when the cable must be led directly down from the DVD or hard drive. I recommend using these cables.
At the moment, other manufacturers have begun to equip their motherboards with cables with such “options”. You can also try purchasing them separately.

If you purchased a new hard drive or DVD with a SATA connector, and your PC is not older than 2 years, then connecting via SATA is very simple.
First– install the device in the housing. DVD - as convenient for you, and hard drive - preferably so that there is a small empty space above and below it for better ventilation.
Second– connect the information connector of the device and a free connector on the motherboard.
Third - connect power to the device. The device may have a new type of power connector (for SATA), it may have an old type (Molex), or there may be both connectors.
The following picture shows, as an example, the back side of the hard drive and the connectors are labeled: SATA power, SATA data, Molex power.

If there is only one connector, then connect it.
With the advent of SATA devices, power supply manufacturers began to equip their units with special power connectors for connecting such devices.
Most new devices are already released without a Molex connector. If there are no connectors for SATA in the power supply of your PC or they are already occupied, then you can use a special power adapter, which is shown in the following picture.

The white connector with 4 pins is the connector Molex. Two black flat connectors are connectors for SATA devices.
If the power connector two, then you need to connect any one of them, but not both at once! I recommend using the power connector for SATA devices.
After this, you can turn on the PC, go into the BIOS and check that the device is visible. If it is not visible, you need to switch all SATA connectors to AUTO mode. Then you need to save the changes in the BIOS and exit. After this you can work with the device
If you are not sure how to connect the device correctly or are having problems connecting, then watch the video tutorial below or take our step-by-step video course "Assembling a computer from A to Z".
The article uses materials from the site www.nix.ru

Hello dear visitors. In this lesson I'm on real example I'll show you how to connect to your computer hard disk. I want to warn you right away that this is not difficult and it will not waste much of your time.
Let's get started right away!
First of all, prepare the system unit: turn off the power and disconnect all cables from it so that they do not interfere with us. After this, remove the side cover from the system unit by unscrewing the two screws on the back.

Now we can already see the insides of our computer. Please note to the lower right system unit. Here are the bays for connecting hard drives.

Pick up the hard drive and carefully insert it into the free slot. The main thing is that the connectors for connection are turned inside the system unit.


Here the holes in the hard drive and on the slot itself where the drive is connected must also match. We will use these holes for fixation. We take 4 bolts and fasten them on one side and the other.

On at this stage completed installation hard drive into the system unit. Now you need to connect it to the motherboard. To do this in modern computers A SATA-power cable and a SATA-interface cable are used. This is what they look like:

First of all, connect the SATA interface to the hard drive.

Be sure to connect the correct way. If you suddenly feel that the cable does not fit into the connector, then try connecting it on the other side. He'll definitely fit in.
The other side of the cable needs to be connected to the motherboard. We look for a suitable connector and connect it. Typically, these connectors are located at the bottom of the board and are labeled SATA.

The last step remains - supply power to the hard drive.
We take the SATA power cable and connect it to the hard drive, next to the first connector.

The other side of this cable must be connected to the power supply. Examine the wires coming from the power supply and find the connector for connection.

By the way, if you already have another hard drive is connected to the computer, then most likely the power is already leaving it and of course you can use it so as not to create new wires.
This is how it can hang unnoticeably among the wires:

After connecting the hard drive to the system unit, we proceed to setting it up in the system. Close the system cover and reconnect all the wires. Let's turn on the computer!
If you have a new hard drive, then most likely it will not be immediately detected by the system and you will need to format it.
Open the Computer section and see if a new hard drive has appeared?


Right-click on the Computer section and select Manage.


ATTENTION! The main thing here is not to mess anything up and not to delete data from the necessary disks!!!
Create a simple volume and format the new hard drive and, if necessary, assign a drive letter to it.


Well, as you can see, in modern computers connect hard drive very simple! It only remains to mention that, in addition to modern interface SATA, there is also IDE, which is used in old drives! It looks like this:

Now let's summarize briefly. So, to connect the hard drive to the computer you need to do the following steps:
1. Install the hard drive in a free slot
2. Connect the SATA interface
3. Connect SATA power
4. Set up a hard drive in Windows
That's all, I wish you good luck connecting hard disk!
Hello! We have looked at it in detail hard device disk, but I didn’t specifically say anything about interfaces - that is, ways of interaction between the hard drive and other computer devices, or more specifically, ways of interacting (connecting) the hard drive and the computer.
Why didn't you say so? But because this topic is worthy of no less than an entire article. Therefore, today we will analyze in detail the most popular ones on at the moment hard drive interfaces. I’ll immediately make a reservation that the article or post (whichever is more convenient for you) this time will have an impressive size, but unfortunately there’s no way to go without it, because if you write briefly, it will turn out to be completely unclear.
Computer hard drive interface concept
First, let's define the concept of "interface". Speaking in simple language(namely, I will express myself to them as much as possible, because the blog is on ordinary people designed for people like you and me), interface - the way devices interact with each other and not only devices. For example, many of you have probably heard about the so-called “friendly” interface of a program. What does it mean? This means that the interaction between a person and a program is easier, not requiring much effort on the part of the user, compared to a “non-friendly” interface. In our case, the interface is simply a way of interaction between the hard drive and the computer motherboard. It is a set of special lines and a special protocol (a set of data transfer rules). That is, purely physically, it is a cable (cable, wire), on both sides of which there are inputs, and on the hard drive and motherboard there are special ports (places where the cable is connected). Thus, the concept of interface includes the connecting cable and ports located on the devices it connects.
Well, now for the “juice” of today’s article, let’s go!
Types of interaction between hard drives and computer motherboard (types of interfaces)
So, first in line we will have the most “ancient” (80s) of all, it can no longer be found in modern HDDs, this is the IDE interface (aka ATA, PATA).
IDE- translated from English “Integrated Drive Electronics”, which literally means “built-in controller”. It was only later that IDE began to be called an interface for data transfer, since the controller (located in the device, usually in hard drives and optical drives) and the motherboard needed to be connected with something. It (IDE) is also called ATA (Advanced Technology Attachment), it turns out something like “Advanced Connection Technology”. The point is that ATA - parallel interface data transmission, for which soon (literally immediately after the release of SATA, which will be discussed below) it was renamed PATA (Parallel ATA).
What can I say, although the IDE was very slow ( throughput data transmission channel ranged from 100 to 133 megabytes per second per different versions IDE - and even then purely theoretically, in practice much less), but it allowed you to simultaneously connect two devices to the motherboard at once, using one cable.

Moreover, in the case of connecting two devices at once, the line capacity was divided in half. However, this is far from the only drawback of the IDE. The wire itself, as can be seen from the figure, is quite wide and, when connected, will take up the lion's share free space in the system unit, which will negatively affect the cooling of the entire system as a whole. All in all IDE is already outdated morally and physically, for this reason the IDE connector is no longer found on many modern motherboards, although until recently they were still installed (in the amount of 1 piece) on budget motherboards and on some boards in the mid-price segment.
The next interface, no less popular than the IDE in its time, is SATA (Serial ATA), characteristic feature which is serial data transmission. It is worth noting that at the time of writing this article, it is the most widespread for use in PCs.

There are 3 main variants (revisions) of SATA, differing from each other in throughput: rev. 1 (SATA I) - 150 Mb/s, rev. 2 (SATA II) - 300 Mb/s, rev. 3 (SATA III) - 600 Mb/s. But this is only in theory. In practice, the writing/reading speed of hard drives usually does not exceed 100-150 MB/s, and the remaining speed is not yet in demand and only affects the speed of interaction between the controller and the HDD cache memory (increases the disk access speed).
Among the innovations, we can note - backward compatibility of all versions of SATA (a disk with a SATA rev. 2 connector can be connected to a motherboard with a SATA rev. 3 connector, etc.), improved appearance and ease of connecting/disconnecting the cable, increased cable length compared to IDE (1 meter maximum, versus 46 cm on IDE interface), support NCQ functions starting from the first revision. I hasten to please owners of old devices that do not support SATA - they exist adapters from PATA to SATA, this is a real way out of the situation, allowing you to avoid wasting money on buying a new motherboard or a new hard drive.

Also, unlike PATA, SATA interface“hot-swappable” hard drives are provided, which means that when the power of the computer system unit is turned on, you can attach/detach hard drives. True, to implement it you will need to delve a little into BIOS settings and enable AHCI mode.
Next in line - eSATA (External SATA)- was created in 2004, the word "external" indicates that it is used to connect external hard disks. Supports " hot swap" drives. The length of the interface cable is increased compared to SATA - maximum length is now as much as two meters. eSATA is not physically compatible with SATA, but has the same bandwidth.

But eSATA is far from the only way to connect external devices to a computer. For example FireWire- consistent high speed interface to connect external devices, including HDD.

Supports hot swapping of hard drives. In terms of bandwidth it is comparable to USB 2.0, and with the advent of USB 3.0 it even loses in speed. However, it does have the advantage that FireWire is able to provide isochronous data transmission, which facilitates its use in digital video, since it allows data to be transmitted in real time. Sure, FireWire is popular, but not as popular as, for example, USB or eSATA. It is used quite rarely to connect hard drives; in most cases, FireWire is used to connect various multimedia devices.
USB (Universal Serial Bus), perhaps the most common interface used to connect external hard drives, flash drives and solid state drives(SSD). As in the previous case, there is support for “hot swap”; the maximum length of the connecting cable is quite large - up to 5 meters in case USB usage 2.0, and up to 3 meters - if USB 3.0 is used. You can probably make the cable longer, but in this case stable work devices will be in question.
Baud rate USB data 2.0 is about 40 Mb/s, which is generally a low figure. Yes, of course, for ordinary everyday work with files, a channel bandwidth of 40 Mb/s is enough, but as soon as we talk about working with large files, you will inevitably begin to look towards something faster. But it turns out there is a way out, and its name is USB 3.0, the bandwidth of which, compared to its predecessor, has increased 10 times and is about 380 Mb/s, that is, almost the same as SATA II, even a little more.
There are two types of contacts USB cable, these are type "A" and type "B", located at opposite ends of the cable. Type "A" - controller ( motherboard), type "B" - connected device.

USB 3.0 (Type "A") is compatible with USB 2.0 (Type "A"). Types "B" are not compatible with each other, as can be seen from the figure.
Thunderbolt(Light Peak). In 2010 by Intel the first computer with this interface was demonstrated, and a little later, the no less famous Apple company. Thunderbolt is quite cool (how could it be otherwise, Apple knows what is worth investing in), is it worth talking about its support for such features as: the notorious “hot swap”, simultaneous connection with several devices at once, truly “huge” data transfer speed (20 times faster than USB 2.0).

The maximum cable length is only 3 meters (apparently more is not necessary). However, despite all the listed advantages, Thunderbolt is not yet “massive” and is used mainly in expensive devices.
Let's move on. Next up we have a couple of very similar interfaces - SAS and SCSI. Their similarity lies in the fact that they are both used primarily in servers where it is required high performance and the shortest possible hard disk access time. However, there is also reverse side medals - all the advantages of these interfaces are compensated by the price of devices that support them. Hard drives, supporting SCSI or SAS are an order of magnitude more expensive.
SCSI(Small Computer System Interface) - a parallel interface for connecting various external devices (not just hard drives).

It was developed and standardized even somewhat earlier than the first version of SATA. IN fresh version SCSI has hot-swappable support.
SAS(Serial Attached SCSI), which replaced SCSI, was supposed to solve a number of shortcomings of the latter. And I must say - he succeeded. The fact is that, due to its “parallelism,” SCSI used a common bus, so only one of the devices could work with the controller at a time; SAS does not have this drawback.

Plus, it's backwards compatible with SATA, which is definitely a big plus. Unfortunately, the cost of hard drives is SAS interface is close to the cost of SCSI hard drives, but there is no way to get rid of this; you have to pay for speed.
If you're not tired yet, I suggest you consider one more interesting way HDD connections - NAS(Network Attached Storage). Currently network systems data storage (NAS) are very popular. Essentially, this is a separate computer, a kind of mini-server, responsible for storing data. It connects to another computer via network cable and is controlled from another computer through a regular browser. All this is needed in cases where great disk space, which is used by several people at once (in the family, at work). Data from network storage transmitted to user computers either via regular cable(Ethernet), or when Wi-Fi assistance. In my opinion, a very convenient thing.

I think that's all for today. I hope you liked the material, I suggest you subscribe to blog updates so as not to miss anything (form in the upper right corner) and we will meet you in the next blog articles.