Setting up ubuntu 16.04 mate after installation. Customizing and optimizing Ubuntu after installation
Unity is a very nice desktop environment, but standard means Not everything in the system settings can be changed, so we recommend installing the following tools to configure the system.
Basic tools for fine-tuning the Ubuntu 16.04 system.
1. Unity Tweak Tool.
Unity Tweak Tool - is a program for setting up the Unity desktop environment on Ubuntu. Helps in graphical mode to change settings for the appearance and other hidden features of the Unity shell.
The program interface is convenient, the settings are grouped, completely Russified:
All settings are signed in detail and are immediately applied in the system when the values are changed. If you forget what you changed, you can always reset the “Default” values.

To install Unity Tweak Tool, open a terminal and run the following command:
sudo apt install unity-tweak-tool
After installation, the program can be found among Ubuntu applications:

2. dconf editor.
dconf– low-level configuration system. GNOME and Unity use dconf to store settings for most programs.
You may have often seen articles when they advise changing any settings using:
gsettings [--schemadir SCHEMADIR] COMMAND [ARGUMENTS...]
So, to put it simply, the dconf editor allows you to do this in graphical mode:

It’s better not to change the settings there without knowledge!
But often in various manuals, including on my site this tool is used, so it obviously won’t hurt. In addition, you can always return default values.
To install the dconf editor, open a terminal, copy and run the following command:
sudo apt install dconf-tools
These two tools are quite enough.
Especially if you are new to Ubuntu, installing additional tools will be unnecessary.
There was also Ubuntu Tweek- a program designed to configure the basic parameters of the operating room Ubuntu systems. But it is inferior in terms of settings to the Unity Tweak Tool and often duplicates small functionality. And besides, there is no version for Ubuntu 16.04 in the Ubuntu Tweek repository. Therefore, I strongly do not recommend installing this tweaker.
There are two additional tools for fine-tuning, but installing them is absolutely not necessary.
Additional tools for fine-tuning the system.
3. Compizconfig.
Compizconfig allows you to configure the Compiz composite window manager.

To install the Compizconfig editor, open a terminal, copy and run the following command:
sudo apt install compizconfig-settings-manager
I very rarely changed anything there during all the time I used Ubuntu with Unity. Therefore, they do not feel particularly great need.
I strongly do not recommend “playing with the settings” there; you can make the system work incorrectly.
This is a tool for more experienced users.
4. Synaptic.
Synaptic- graphical interface for the Apt package management system. With Synaptic you can install, remove, configure and update packages on your system, view lists of available and installed packages, manage repositories and update your system to a new version.

To install the Synaptic editor, open a terminal, copy and run the following command:
sudo apt install synaptic
Synaptic always seemed so monstrous and confusing to me. For me personally, it is clearer and more convenient to install and manage packages either through the terminal or through the Ubuntu Application Manager. But you may like this graphical tool for managing software packages.
Are you going to upgrade to the brand new Ubuntu 16.04 LTS or have you already upgraded - Cool!
Before you start bragging about everything, check out this a list of 16 things to do after installing Ubuntu 16.04 LTS.
Here you will find a bunch of sound advice, cool stuff and just useful ideas. It doesn’t matter if you are new to Ubuntu or already an inveterate oldfag - all of you will find this useful.
Feel free to comment and post finished screenshots after installing and configuring your system, let other readers be jealous :)
Ready to get started?
1. What's new in Ubuntu 16.04 LTS
New options! New apps! New core! New... everything!
There are some amazing changes, features and applications in Ubuntu 16.04 LTS that are worth checking out and being amazed by.
For example, if you are installing a system from scratch, the Unity panel no longer has a default search function. You will have to enable and configure all this yourself.
Hardcore Ubuntu users and newbies alike can check out the entire list of new features on the official website.
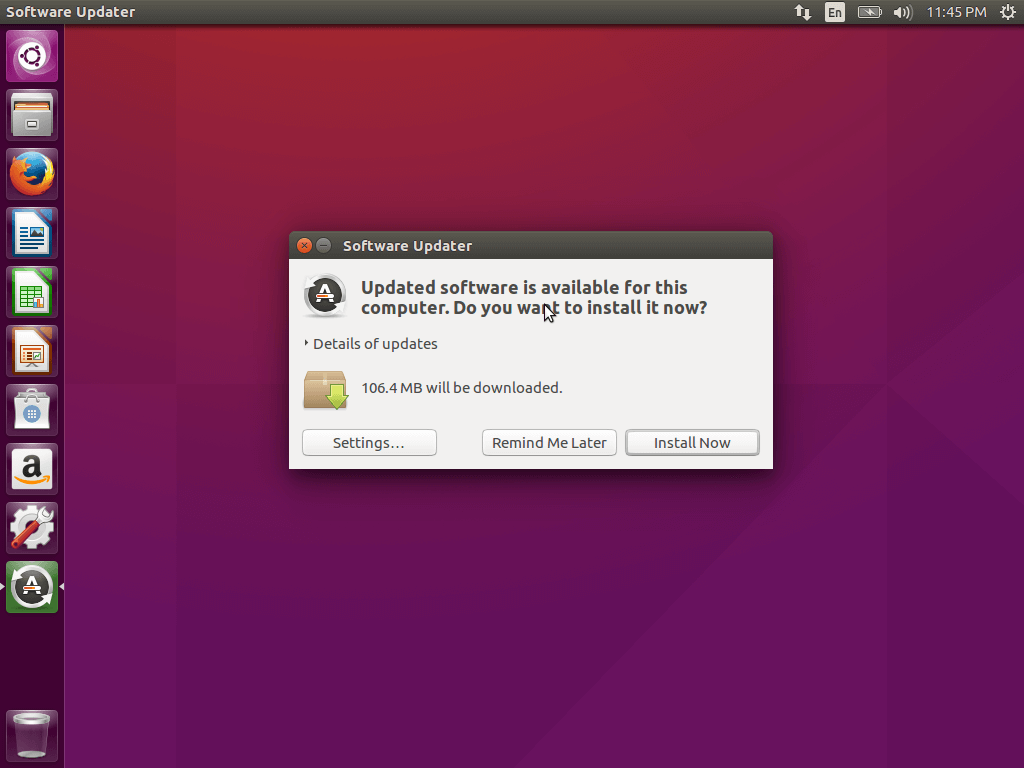
2. Check for the latest updates

You are eager to find out what's new! - but the next step is a little different...
Yes, I understand that this is a strange step after installing the system, but it is a fairly important step.
Firstly, it’s not a fact that you are reading this article on the day of release. And even if so, then some sudden bugs could be found - and developers are always on the alert! Anything is possible.
How to check for updates in Ubuntu:
- Launch ‘Software Update Center’ from the Unity panel
- Click the button to check for available updates
- Install (if necessary)
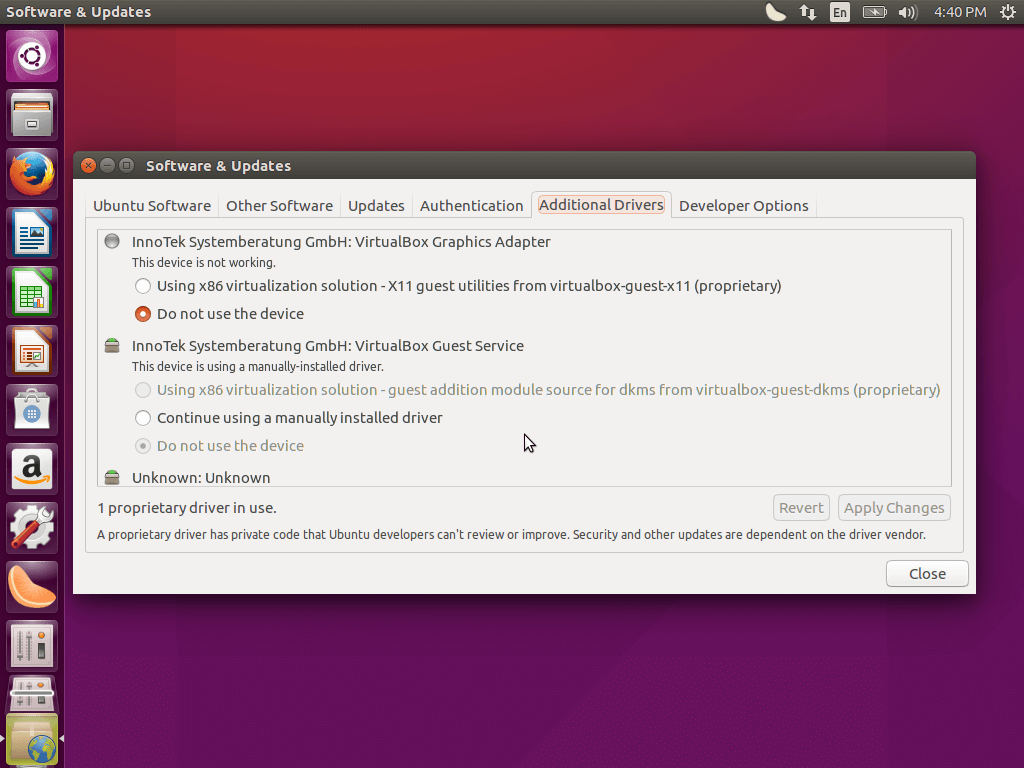
3. Install Linux Graphics Drivers

Ubuntu supports most Nvidia video cards and Intel right out of the box, offering you a choice of open source and closed source drivers.
To get the most out of your Ubuntu PC, you will probably want to install latest drivers, available for your hardware.
In Ubuntu it's easy, in the end everything will fly. By the way, FPS in games will also be higher. ;)
If you plan to play the latest Steam games on Ubuntu or use demanding applications like Blender, you will definitely need to install the latest Linux drivers.
To do this:
- Open ‘Software & Updates’ from the Unity panel
- Go to the 'Additional drivers' tab
- Follow the instructions on the screen, install and accept all changes
4. Installing media codecs

For legal reasons, Ubuntu cannot play MP3, MP4 and other media files out of the box.
But this is all possible in Ubuntu, you just need to tell the system to do it.
The easiest way is to check the "allow prohibited formats" checkbox during installation. Then you will have all multimedia codecs installed automatically, and the system itself, of course.
If you forgot to do this (or are updating from previous version) - you can install codecs manually through the software center:
Install prohibited Ubuntu extensions5. Collapse by click

Click on the application icon. Click on it again to minimize the application. Intuitive, right?
This can be done, but it is not standard behavior in Unity - which may not appeal to new users. But it’s not very obvious how it turns on.
Run the following command (or install/use Unity Tweak Tool > Unity > Launcher > Minimize):
gsettings set org.compiz.unityshell:/org/compiz/profiles/unity/plugins/unityshell/launcher-minimize-window true
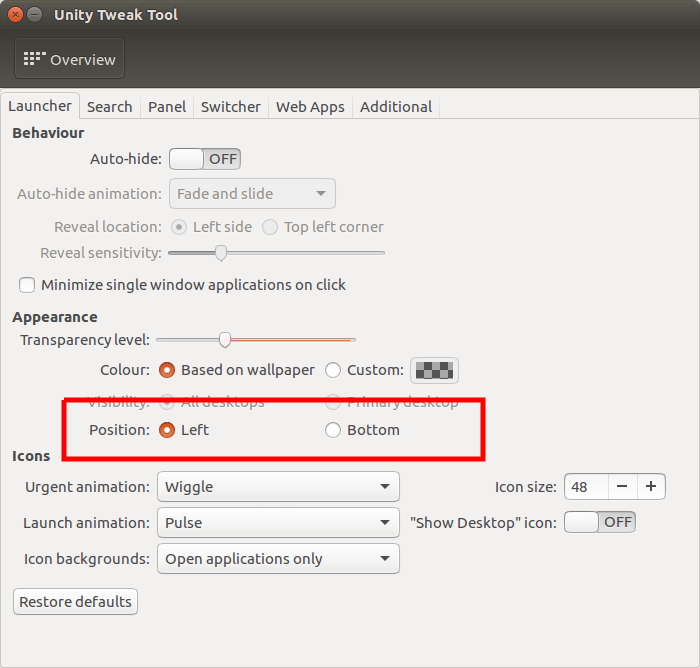
6. Move the Unity launcher

Ubuntu places its application bar on the left by default
With Ubuntu 16.04, you can finally choose where to place your launcher.
If you want to move the Unity launcher to the bottom of the screen, run the following command in the terminal (or install/use Unity Tweak Tool > Unity > Launcher > Position):
Gsettings set com.canonical.Unity.Launcher launcher-position Bottom
7. Install New GTK and Icon Themes

The default look of Ubuntu is pretty good, but it's not to everyone's taste.
For those who switched to Ubuntu from Mac OS X, Windows 10 or other Linux distribution, such as elementary, the stock Ambiance GTK theme and the Ubuntu Mono icon pack may not be to your liking.
Good news - you can make Ubuntu look fantastic. There are various ways to do this.
Chapter ' Appearance' V system settings Ubuntu allows you to customize parts of the Ubuntu workspace the way you want, including:
- Change desktop background
- Switch to light theme
- Adjust icon size in Unity launcher
For other settings, such as changing the font or behavior of the window control keys, install the free Unity Tweak Tool from software center.
Install Unity Tweak Tool from Ubuntu Software Center8. Determine where application menus will appear

The application menu appears on top panel Ubuntu is the default and hides automatically after a few seconds.
In Ubuntu everything can be done in System Settings > Appearance- there you can choose, where the application menu will be displayed.
Want to know which menu belongs to which application?:
- Go to ‘System Preferences > Appearance’
- Select the ‘Behaviour’ tab
- Find the section: ‘Show menu for window’
- Mark the circle next to the inscription ‘In the window title’
How to make the application menu ‘Always displayed’:
- Go to ‘System Preferences > Appearance’
- Select the ‘Behaviour’ tab
- Find the section: ‘Menu Visibility’
- Check the circle next to ‘Always show’
9. Check out the new software store

The new software store comes by default in Ubuntu 16.04 LTS.
Straight from the “Very Long-Term Changes” section, this one new store came to replace the Ubuntu Software Center, which has been in every release since Ubuntu 9.10!
'Software' (inspiring name, isn't it?) will allow you to search, install and update applications. If you are used to the old software center, then be prepared to relearn.
'Software' is your key to thousands free applications, including:
10. Install your favorite apps

Not all the apps you need can be installed from the software store. Actually, a bunch cool apps lie outside Ubuntu repositories.
You won't find them in Ubuntu software. Simple .Deb double-click installers are available for the following applications:
- Google Chrome- Web browser with built-in, modern Flash for Linux
- Nylas N1 - fashionable, stylish mail client
- - cloud storage service
- Spotify for Linux - music streaming service
- Lightworks Free - professional non-linear video editor
- Viber - a cross-platform alternative to Skype
- Vivaldi is a web browser aimed at developers
11. Sync your cloud accounts

Remember that having a backup of important files, folders and documents is very cool.
Regardless of whether you store your personal files in Dropbox, OneDrive or Google Drive, try to set up synchronization immediately after installing the system.
Most major cloud providers except Apple iCloud, can be used on Ubuntu. Some are easier to configure than others:
- - provides native Linux client that is updated regularly
- OwnCloud - allows you to organize your own cloud with limitless control
- OneDrive available via third party scripts
- - unofficially supports Google Drive on Linux (free)
You also need to remember that not all of the listed applications integrate with Nautilus. file manager in Ubuntu.
12. Install Adobe Flash for Linux
Flash is outdated, but some sites can’t live without it.
Adobe has officially suspended Flash support for Linux in 2012; and many web browsers also stop supporting Flash due to its NPAPI architecture.
The simplest and best solution problems with Flash on Linux - this is the use Google Chrome. Chrome comes with the latest Flash plugin right out of the box. In fact, this is the only way to get the last one Flash version player in Linux.
But it's clear that not everyone wants to use Chrome. Some may have a 32-bit version of Ubuntu installed, which Chrome no longer supports. Whatever the reason, here's how to deal with it:
Install Flash Player Plugin13. Load the Unity panel

The Unity panel is the heart of the system. You can search, preview and open recent files, folders, installed applications and media content.
But it can be used to its fullest, you just need to know how.
How to check the weather forecast without opening your browser? What about browsing Wikipedia articles, listening to music on SoundCloud, or browsing eBay? Everything will be possible if you enable the function online search Unity.
Head to the section Privacy & Security V system settings. Here you can also:
- Enable Unity online search feature
- Choose which folders and files to display in the panel
- Enable/disable automatic error detection
14. Choose a cool desktop wallpaper

If you don't like the default Ubuntu 16.04 LTS wallpaper, just change it.
A set of wallpapers from the Xubuntu community of 10 nature photographs in high resolution, including a cute cute squirrel, will help you choose!
Install Xubuntu wallpaper set15. Set up a system calendar
The cache will become cluttered, and the system will accumulate various garbage as it is used. To maintain a sense of order, you will have to tidy up from time to time :)

One of the coolest system calendars is
(free, open). BleachBit can do the dirty work, from clearing your browser cache to apps you forgot about before you even installed it.
Just always be careful what you delete: don’t delete something you’re not sure about
Install BleachBit for Ubuntu16. Tell others about Ubuntu

If you installed Ubuntu 16.04 LTS and liked it, don't forget to tell someone else about it
It was all our vision important steps after installation, what can you advise users? Leave your ideas in the comments!
This article contains several tips that, following immediately after completing the installation of Ubuntu 16.04, will ensure a convenient, fully functional and secure operating system. The article is presented as briefly as possible so that the reader is not tired of the long list. However, there is no doubt that the text below contains absolutely everything necessary for free and comfortable use of the system.
As previously noted - for safe use operating system you should keep it up to date and install everything in a timely manner necessary updates its security, as well as tool corrections. This rule is most important for beta versions.
It is possible to update the OS using a utility that has a graphical interface, or in the terminal. Below we will consider the first option - updating the OS using GUI.
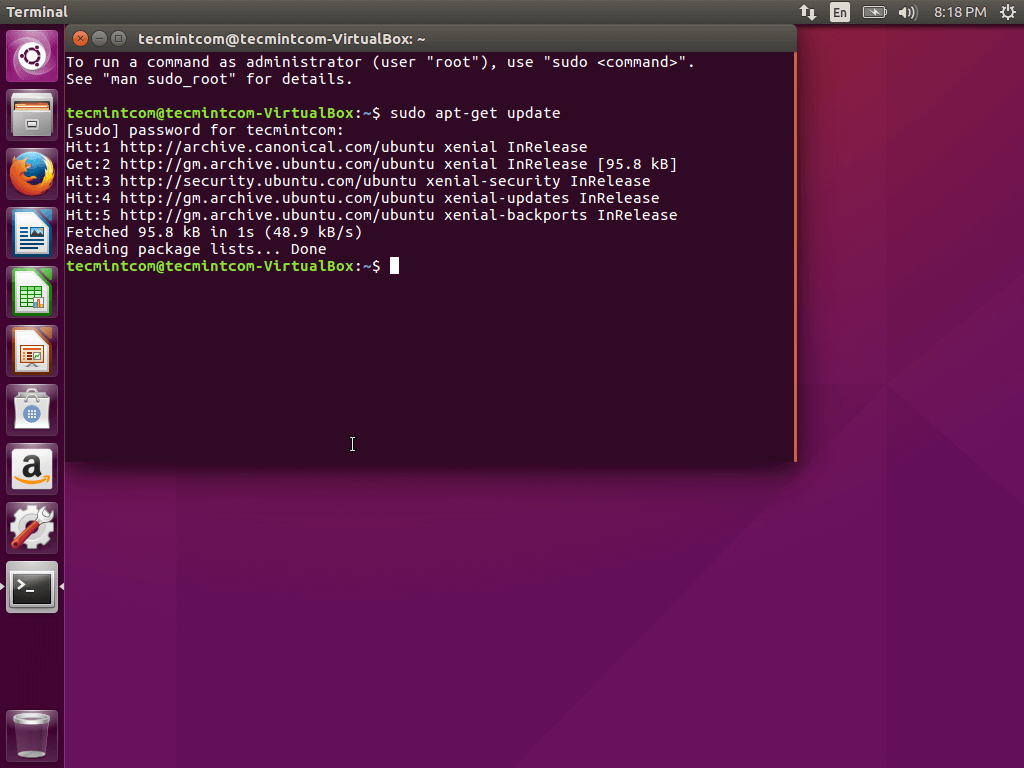
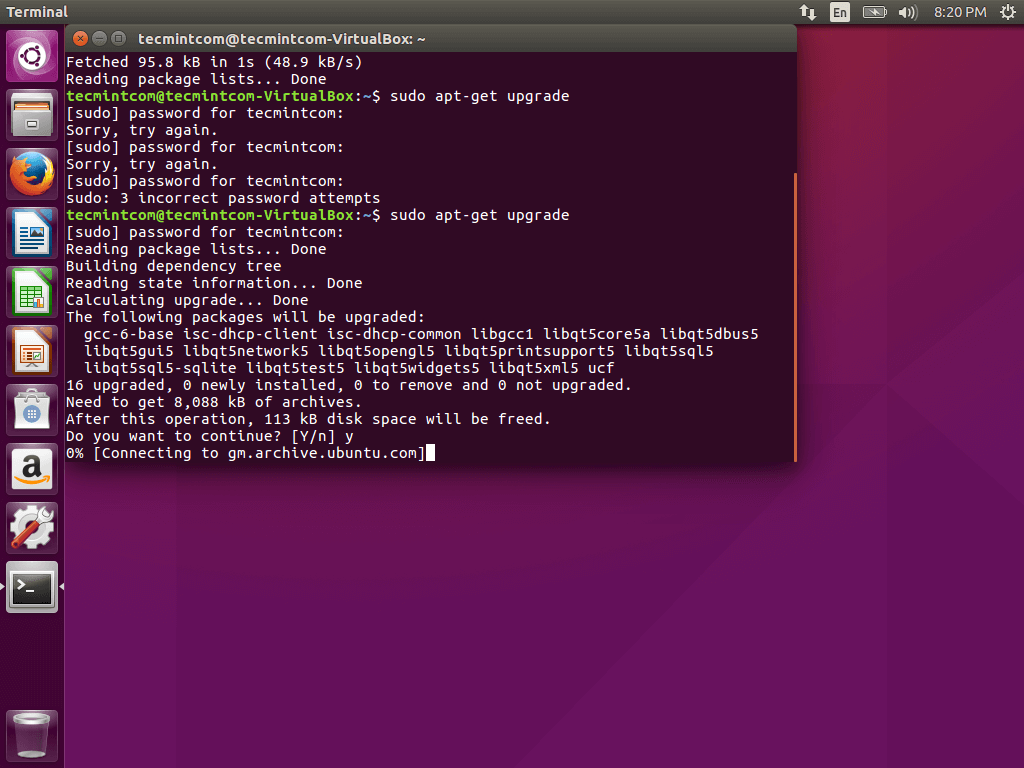
1. Update OC Ubuntu 16.04
First you need to update the repositories software. To do this, open the Dash menu, then type in the search bar.
The next step is to open the application, then go to its tab called Other software. Check both boxes.

Then close the application, after which the system will prompt you to enter a password, and after that the updates will be downloaded.

Then you need to run again Software update in Dash, this time will be shown available updates with a proposal to install them.


To update Ubuntu 16.04, you need to enter 2 commands in the terminal -
$ sudo apt-get update $ sudo apt-get upgrade
2. Installing main applications
The setup of Ubuntu 16.04 upon completion of its installation includes installation additional applications, which allows you to improve the usability of the OS. These include an Internet browser, various editors, utilities, and viewers. Ubuntu includes Firefox by default, but this browser is not the most popular in the world and is inferior, for example, to Chrome in terms of capabilities.
You can find Chromium, which is included in Gnome, the application manager that comes with at the moment with Ubuntu 16.04.
The following applications may also be required:
- Skype- most popular service IP telephony in the world.
- Pidgin- the most suitable messenger for Linux OS.
- Deluge- torrent client.
- Mega- cloud storage.
- CrashPlan— backup system.
- Telegram— cross-platform messenger.
- Uget- download manager.
- Tor- a program to ensure anonymity on the World Wide Web.
3. Installation of Clementine
Clementine is one of the best modern players for Linux systems, featuring the widest range of capabilities. Its functionality can be compared to the functionality of applications such as Rthythmbox, VLC, Audacious and others. It is impossible to configure Ubuntu 16.04 after its installation is complete without installing the player.
One of the important features of this player is the ability to connect to Internet services that provide streaming music without launching the browser or other third party application. You can easily connect last.fm, Spotify, sky.fm, Onedrive, Google drive and many other services. It also has its own equalizer.
Installation of the program is possible using the command sudo apt-get install clementine
Other apps that deserve mention:
VLC- a media player featuring a wide range of media formats, as well as very large functionality.
Audacity is a minimalist and simple audio editing tool suitable for both beginners and experts. It features wide functionality.
Kodi (XBMC) - home theater program with open source code and featuring expanded support for media formats, from mp3 to the most incredible. It is possible to open audio, photos and videos.
Handbrake is an application that also allows you to work with media files, more specifically, convert them.
Spotify - Spotify client designed for the Linux family.
OpenShot a simple video editor for Linux OS. It has a simple interface and a sufficient number of functions.
Ubuntu-restricted-extras— plugins and codecs to avoid difficulties with playing different formats.
Gimp— photo editing program for Linux OS.
To install Spotify, use the following commands:
$ sudo apt-key adv --keyserver hkp://keyserver.ubuntu.com:80 --recv-keys BBEBDCB318AD50EC68650906 $ sudo apt-get update $ sudo apt-get install spotify-client
The rest of the programs can be installed using official repositories.
4. Installing Appgrid and Synaptic
Backup options are very useful and convenient when it comes to installing software, especially if you are a fan of the new application center.
Synaptic also has GUI support without anything extra - just the necessary functions. To install Synaptic, you need to press Ctrl+Alt+T, then run the command
$ sudo apt-get install synaptic


In addition, it can be installed through the application center. At the same time, installing AppGrid is possible exclusively using the terminal by executing the following commands:
$ sudo add-apt-repository ppa:appgrid/stable $ sudo apt-get update $ sudo apt-get install appgrid
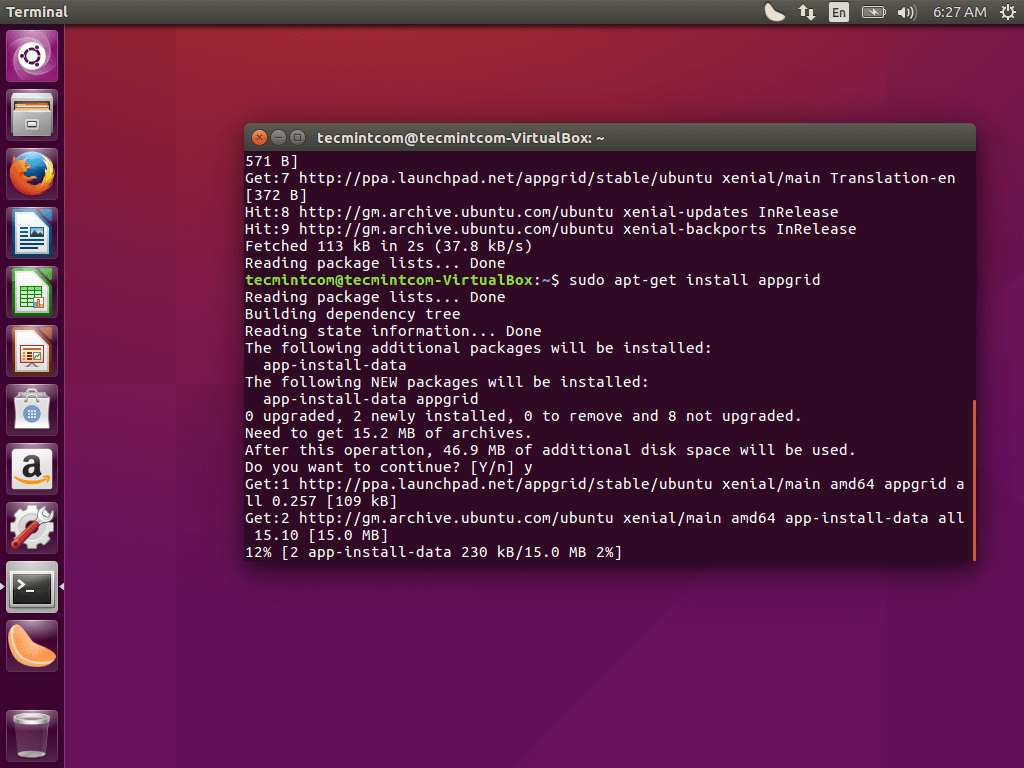

Thus, there are 4 methods for installing applications in Ubuntu OS: using the terminal, application center, AppGrid and Synaptic.
5. Disabling online search
In Dash, search still contains online search results from Wikipedia, Amazon and some others, which may pose a certain danger to your OS.
Disabled this function quite simple. You need to open the utility Settings, then go to item Security and privacy, then on the tab Search need to be disabled Online search results.

6. Installing Ubuntu Tweak Tool to customize the system
Ubuntu has a pretty nice interface and a minimal number of settings. If fine tuning is required, additional utilities can be installed.
Unity Tweak Tool is handy tool, which makes it possible to change Unity, adapting the system to your needs. It can be installed through the Application Center.

7. Installing the graphics driver
To give the video card the best possible performance when initial setup Ubuntu 16.04 needs to be installed graphics driver to provide smoother GUI rendering and the ability to play and edit videos.
To do this, enter the phrase in the Dash search bar Programs and updates, then run the utility, go to the tab in it Additional drivers, choose necessary components and then press apply.
8. Keyboard customization
Only English and Russian layouts are available by default. If you need another, you should click on the layout switching icon located on the panel, selecting Text input options.
In this window, you can add another language, as well as change the key that switches the layout.
9. Disable crash reporting
If you do not plan to inform the system developers about failures and errors that have occurred in it, you can disable reports about them. Of course, it is better to still send such information, especially in the beta version, so that the developers can correct errors.
To disable pop-up crash and error reports, you need to launch a terminal, then run the command
$ sudo sed -i "s/enabled=1/enabled=0/g" "/etc/default/apport"
After this, bug reports will be excluded.
10. Place the launcher at the bottom
Unity has certain views on some issues, but you don't necessarily need to share them. Since the release of the 1st version of the desktop shell, the launcher was located on the left side of the screen. Now the developers have created the ability to move it to the bottom of the screen. This is one of the most frequently discussed features of the Ubuntu system.
This is quite easy to configure using the Unity Tweak Tool.
11. SNAP packages
Important features of Ubuntu 16.04 include Snap support - new system for installing packages, which was developed by Canonical specifically for embedded devices. Its core and main utilities are now supplied in the form of the Snap package.
Resume
Now initial setup The Ubuntu 16.04 system is almost complete. But there are still a lot of actions ahead that are necessary in order to finally tailor it for yourself.
Rate the article!
Time flies, and nothing stands still. On April 21, 2016, a new version of Ubuntu Server 16.04 LTS Xenial Xerus was released. As you already know, LTS is a version with extended support for a period of 5 years. What's new in version 16.04?
- Core Linux versions 4.4
- New version of container virtualization LXD 2.0 with OpenStack support
- ZFS and CephFS support for large cloud installations.
- Support for snap packages.
- Docker has been updated to version 1.10.
- HTTP/2 support
- Open SSH 7.2p2
- Python 3.5
- PHP 7.0.5
- Go 1.6
In fact, the installation process is no different from previous version, but we will still consider in detail the basic installation and configuration of Ubuntu Server 16.04 LTS. For your convenience, the article is divided into thematic blocks. In this article I am using the Ubuntu hostname, IP address 192.168.1.25 and gateway 192.168.1.1; these parameters may differ from yours, so you will have to replace them with your own.
PreparationGo to the official Ubuntu website http://ubuntu.com, select the "Download" section, then "Server".

1. Fast internet- click the "Download" button, the download will begin directly through your browser.
2. Slow Internet- "Alternative downloads and torrents" alternative download sources, including through a torrent tracker.

Select required version distribution for downloading via torrent tracker.

Upon completion of loading we have ISO image installation disk Ubuntu Server 16.04 LTS. This image must be burned to disk (if installed on a hardware server) or used as is (if installed on a virtual machine). If you are planning to install the system on a virtual machine, you may also find the following articles useful:
InstallationWe boot our computer (virtual machine) from a disk (flash drive or mount the database if using virtual machine). Specify the required language and press "Enter".

Mark the first point " Install Ubuntu Server" and press "Enter"

Select your country and press "Enter".

We answer “No” to the prompt to define the keyboard layout.

Select the country for which the keyboard is intended.

Specify the required keyboard layout manually and press "Enter".

Choose your preferred method for switching keyboard layouts.

If you do not have a DHCP server, you will be prompted to configure the network manually. You can skip these steps at this stage.

Specify IP address

Specify the subnet mask

Specify gateway

Specify DNS addresses- servers

Now you need to set the computer name

Specify the username

Let's indicate the name account(login)

Create a password for your account. The "Show Password in Clear" checkbox will display the entered characters. Always use complex passwords!

Enter your confirmation and click "Proceed".

You can increase the security of data stored in the user's home directory by encrypting it; in this case, when starting the system, you will need to provide a password for the container.

Please enter the correct time zone

If you advanced user, you can mark the disks manually (type file system, partitions and LVM). Otherwise, I recommend that you use the entire disk. Detailed disk layout will not be discussed in this article (there is no technical need).

Now you need to choose system disk. Be careful if your system uses multiple disks, you risk losing data if you make a mistake when choosing.

We confirm the changes for recording to disks.

If you are not using a proxy server, then just click "Continue"

Installation program running

I've always liked to have full control over my systems so I don't use automatic update


Software installation process, please wait.

Installing the system bootloader.

Remove the installation media and click Continue. The system will reboot.

That's it for the basics Ubuntu installation Server 16.04 LTS completed successfully. You can log in to the system by specifying your username and password (the password is not displayed when entered).
SettingsObtaining ROOT privileges
Since further configuration will require super privileges root user, let's consider several options:
Just add sudo before your command and it will be executed as root. For example, let's update the system:
Sudo apt-get update sudo apt-get dist-upgrade
You can use the sudo su command, it will allow you to access the root user inside the terminal (without activating it).
Sudo su
You can also fully enable the root user (disabled by default on Ubuntu):
Sudo passwd root
and specify a password. After doing this, it is possible to log in as root, but this is discouraged by the Ubuntu developers and the community for various reasons.
The default user created in Ubuntu (during system installation) can perform all administrative tasks via sudo. Activating the root user to access the system seems to me to be an unreasonable decision.
Network setup
Sudo nano /etc/network/interfaces
We bring the network configuration file to the following form (where enp0s3 is the name of your network interface, for example eth0):
# This file describes the network interfaces available on your system # and how to activate them. For more information, see interfaces(5). source /etc/network/interfaces.d/* # The loopback network interface auto lo iface lo inet loopback # The primary network interface auto enp0s3 iface enp0s3 inet static address 192.168.1.25 netmask 255.255.255.0 network 192.168.1.0 broadcast 192.168.1.255 gateway 192.168.1.1 dns-nameservers 192.168.1.1
Let's reboot the network settings:
Sudo /etc/init.d/networking reload
Now restart the network:
Sudo /etc/init.d/networking restart or sudo systemctl restart networking
On this setting up a network in Ubuntu server 16.04 LTS completed
Update
We will perform a complete system update
Sudo apt-get update && sudo apt-get dist-upgrade -y
Reboot the server
Sudo reboot
SSH installation
If you did not choose to install an OpenSSH server during system installation, you can do it now, I also recommend that you read the article “” in which you will find several useful examples for increasing the security of your SSH connection.
Install the SSH package (server + client)
Sudo apt-get install ssh
Start the SSH server
Sudo service ssh start
Turn on automatic start SSH server at system startup
Sudo systemctl enable ssh
Now you can connect to your new server via SSH, for example using PuTTY
Useful applicationsI'm used to working using Midnight Commander; I'm quite satisfied with both the ease of navigating the file system and the built-in mcedit editor. To install:
Sudo apt-get install mc
This is the installation and basic Ubuntu setup Server 16.04 LTS is complete.