The boot disk does not work. Basic solutions when Windows refuses to boot
Needed good advice how to produce recovery Windows boot loader 7 , if restoring the startup using the 7 installation disk did not help. I’ll briefly explain what’s going on: Windows 7 was first installed on the computer, then the second system needed Windows XP, after installation it naturally started alone, to boot two operating systems I used the EasyBCD program. Later, XP was no longer needed and I formatted the partition on which it was located from Windows 7. Now, when loading, there is nothing except a black screen. What can be done in this case? More details if possible. Sergey.
Restoring the Windows 7 bootloader
Hello friends! The most important thing is don’t worry, your problem is not complicated and, in principle, the “Recovery” remedy is simple. Windows startup 7" described in our article should help, but! If this article does not help you, then two others should help:
These articles describe several more good ways restore the boot of your operating system, besides them there is another one, so try it and don’t just give up.
Let me remind you that you cannot install an older operating system after the younger one, Windows 7 will under no circumstances boot after installation on Windows computer XP, since the latter overwrites the main one when installed boot entry(MBR) to yourself. Therefore, you installed an additional boot manager, which is used to configure the boot of several operating systems and, in turn, has its own bootloader.
- I also want to say that file system errors are often to blame for unsuccessful loading of Windows 7; they can be corrected even if the operating system does not boot; all the details are in our other article." "
- Friends, in this article we will work with the environment Windows recovery 7, or more precisely with the command line of the recovery environment. I will give you the necessary commands, but if it is difficult for you to remember them, you can. This will make your work much easier.
- The master boot record (MBR) is the first sector on the hard drive, which contains a partition table and a small bootloader program that reads from this table the data from which partition of the hard drive to boot the OS, and then the information is transferred to the partition with the installed operating system, to download it. If the master boot record contains incorrect information about the location of the system, then we will receive various errors during boot, here is one of them “BOOTMGR is missing press CTR-Alt-Del for restart” or we will see a black screen. The problem is being fixed restoring the Windows 7 boot loader.
When you uninstalled old XP along with EasyBCD, you left your computer to the mercy of fate with an incomprehensible boot record, and it gives you a black screen as a sign of gratitude. To rectify the situation, we will carry out boot recovery Windows 7, namely, we will overwrite the master boot record using the Bootrec.exe utility located on the recovery disk or on the Windows 7 installation disk (friends, if you have a netbook and you want to use the recovery environment located on a flash drive, then read the comments first). We will also use this utility to record a new boot sector, understandable to Windows 7.
Recovering Windows 7 bootloader automatically
We boot from a recovery disk or installation disk with Windows 7, in the initial phase of booting the computer, when you are prompted to boot from the disk “Press any key to boot from CD...”, press any key on the keyboard for 5 seconds, otherwise you will not boot from the disk

A short search takes place installed systems Windows and analysis of problems preventing them from loading

Usually problems are quickly found and the recovery environment offers to fix them automatically. Click on the "Fix and restart" button, after which the computer will restart and Windows 7 will be booted again.

If problems with loading the system continue or you are not prompted to fix the problems automatically, then in this window you need to select the operating system that you need to restore, you most likely have one and Next.

First of all, choose a productStartup recovery, it can also solve Windows 7 boot problems

Restoring the Windows 7 bootloader manually
If this remedy does not help, choose a remedy Command line

Enter the commands:
diskpart
lis vol (we display a list of hard drive partitions and see that “Volume 1” is a hidden System Reserved partition, volume 100 MB, files should be located on it Windows boot 7 and it is this that needs to be made active). We also see a section with installed Windows 7, it has the letter D:, the volume is 60 GB.
sel vol 1 (select Volume 1)
activ (make it active)
exit (exit diskpart)
bcdboot D:\Windows (where D: partition with Windows 7 installed), this command Recovers Windows 7 boot files (bootmgr file and boot store configuration files (BCD))!
"Download files created successfully"

Restoring the Windows 7 bootloader manually (method No. 2)
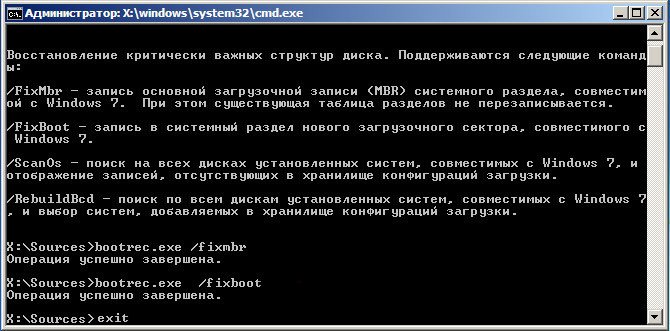
In the command line window, enter the command Bootrec and Enter

comes out full information about the utility's capabilities. Select the master boot record entry Bootrec.exe /FixMbr.

The operation was completed successfully. To the first sector boot partition a new boot record has been written.
The second command, Bootrec.exe /FixBoot, writes a new boot sector.

The operation was completed successfully. Exit. Next, we try to load our Windows 7.
Friends, if the Bootrec.exe /FixMbr and Bootrec.exe /Fixboot commands do not help you, do not despair, there is another remedy.
Method No. 3
Enter the command Bootrec/ScanOs, she will scan all your hard drives and partitions for the presence of operating systems, and if any are found, a corresponding warning will be issued. Then you need to enter the command Bootrec.exe /RebuildBcd, this utility will offer to add the found Windows to the boot menu, we agree and enter Y and press Enter, all the found Windows are added to the boot menu.
In my case, two operating systems were found. Everything can be seen on the screenshot.

In addition to the above method, there is another one, enter bootsect /NT60 SYS on the command line, the main boot code, it will also be updated.

Exit
So, the mistake is that on both of us hard drives x should be marked with a red flag first hidden sections System Reserved. On Windows 7, the volume of such a partition is 100 MB, and on Windows 8, 350 MB, these partitions have the following attributes: System. Active and it is on these partitions that the boot store configuration files (BCD) and the system boot manager file (bootmgr file) are located. And it turns out that these attributes are carried by other sections. Because of this, Windows 7 and Windows 8 will not boot.

Select the first hard disk 1, right-click on the first System Reserved partition and select "Mark as active"

The System Reserved volume will be marked as active. Click OK.

We do the same with Disk 2. Acronis program Disk Director works in the pending operation mode, for the changes to take effect, click the "Apply pending operations" button

Continue.

As you can see, after our changes, those sections that were needed became active.

We exit the program and reboot. The result of the work is positive - both operating systems are loaded one by one.
To install almost any operating system from the very beginning, you must configure the computer's input/output system (BIOS) to change the boot priority. You will install the operating system from optical storage media, that is, from (CD/DVD) or from a flash drive, you must set the BIOS settings correctly, believe me, it is not difficult. So, whatever happens in the BIOS, you will have to change it yourself BIOS settings so that when you turn on the computer, an attempt is made to boot from a CD or flash drive, and then from hard drive. If you don't find something in this article, try searching in others.- Acer laptops, Sony, Samsung, MSI, Toshiba, HP, ASUS...
- and how to use it!
- differs from booting from a disk drive on a desktop computer.
- on any computer, laptop, netbook.
- let's think about why we can't boot from a flash drive.
- or how to configure two hard drives correctly IDE drive on one loop.
- error when loading the computer, how to deal with it.
- How to reset BIOS settings to default.
- if you cannot enter the BIOS itself
When you turn on your computer, the first thing you do is test the hardware for functionality. in simple words it kind of tests itself, this is the so-called procedure (POST), then the baton is passed to a special program (MBR), which selects from which partition on the hard drive to boot the operating system, so before this choice we must boot from the compact disk or from a flash drive, see our article on how to do this.
How to enter (BIOS)? If by some miracle you still have instructions for motherboard, then it is definitely written about it, if not, then when you turn on the computer, we look at the inscription on the monitor, it may look like this: Press DEL to enter SETUP, that is, in order to enter the (BIOS) you need to while the inscription on the monitor is lit, press the key several times
The inscriptions may be different, there may not even be any inscriptions, this should not confuse you, in most cases these are the F2 or Delete keys, less often F1, even less often
Ami BIOS
Award BIOS

BIOS: Boot from Disk
For many who will do this all for the first time, and do something wrong, it will sound important information, if you have changed parameters that are unfamiliar to you, you need to go to the (Exit) tab, it is located from the (Boot) tab to the right after the (Tools) tab and is underlined in red in the photo. Next, you need to use the arrows on your keyboard to the item Load Setup Defaults, and press Enter, then go to the menu.

Load Setup Defaults will apply the default settings (BIOS), and they will be the same as they were before your experiments, select OK and the settings will be reset to default, remember this.

After all these necessary digressions, let's return to the main topic and the first photo. We need the Boot item, use the arrows on the keyboard to select it, press Enter and then go to the item Boot Device Priority.
Hi all! I have a terrible problem with my laptop. Yesterday I found an SD card at home and decided to check what was on it, but after I inserted it into the card reader, the system froze and did not respond. I went to make tea, deciding that the windows would come to my senses in 15 minutes, but the hell with it, she didn’t want to sag. Seven troubles, one Ctrl+Alt+Del, but windows just showed a black screen and nothing else. I left her to think, but she didn’t care. I took out the damn card, but that didn’t make the system any better. I decided to turn it off via emergency shutdown, it switched off... And didn’t turn on. More precisely, the laptop turned on, the BIOS booted, threw out a warning that the shutdown was incorrect, and gave the following options: 1). Download normal restoration, but when clicked, windows is loading files loads it, opens a progress bar similar to Vista and that’s it. He stops rustling the hard drive and just draws this animation. 2). Regular download, but loading did not occur on it. Spat, took installation disk windows... and it didn't work either. The same song - it loads windows is loading files and dies on Starting windows (Win7 x86 image) or on the same green progress bar from Vista (Win7 x64 image). I gave up again, dug up the image with Ubuntu 10.10, and it started working. Everything worked from LiveSide, hard drive read. I decided to install it, and the OS stood up. That is, Ubuntu was launched from Grub, but Venda continued to go on strike. After installing Ubuntu, I tried to download the image from Windows again, but it behaved exactly the same.
Question: what can I do so that Windows can at least be installed from scratch? The disks are working (I tried it on another laptop), from one of them I installed the defunct Venda.
- Question asked more than three years ago
- 17794 views
toster.ru
Windows 7 installation from disk won't start
- Click the Start button on the computer
- Finding a Computer
- Open the Windows 7 installation disk in the DVD drive, then click the setup.exe file
- We install an internal or external drive to install Windows 7, provided that your device does not read the DVD format.
- Check the disk for damage. Therefore, we exclude its malfunction.
- If the disc is from a downloaded file, try loading it at a slower speed.
If everything is fine with the disk, check whether autorun is disabled in the Task Manager. If autorun is turned off, you should turn it on and start again.

If the Windows 7 installation disk does not display the " Windows installation", check the following points:
- It is possible that your computer is using a DVD drive as the boot device. To do this you need to change the settings in BIOS system computer.
- You may need to update your DVD drive driver or firmware to install Windows 7.
- Click the Start button
- Find All programs
- Select Center windows updates. Next, follow the installation instructions.
pro-pcservice.ru
How to run a disk with Windows through BIOS and install the OS

At some point, the operating system has to be changed. Perhaps some of you, dear readers, have finally decided to switch to the faster Windows 8, or perhaps the OS has unexpectedly crashed. In any case, if you don’t know how to start a disk with Windows through BIOS, then this article will be an invaluable help in solving this kind of problem.
Basic I/O system - it all starts here
To install the operating system, you need to use some BIOS settings on the microsystem. In particular, you need to set the priority bootloader, in our case it will be a drive for optical CD/DVD discs.
However, first we need to get into the interface BIOS programs. Due to the differences in basic microsystems, the main manufacturers of which are three leading companies - American Megatrends, Inc. (AMI), Award Software and Phoenix Technologies - may provide a specific login method. work area BIOS(a).

The most common access scheme is to use the "DELITE" and "F2" keys. When the computer starts, you need to use the service key several times (with an intensity of one press every half second) to enter the PC control interface (if you have a laptop, then you should pay attention to the article located here).
Assigning the CD/DVD drive as the priority bootloader
It makes sense to consider the above-mentioned BIOS versions separately. Or rather, using the example of each of them, we will show where to go and what needs to be done in a certain place in the BIOS microsystem. As a result, you will understand the algorithm according to which the assignment is carried out specific device priority bootloader.
How to run a disk with Windows via AMI BIOS
- Using the right/left keys, open the “Boot” tab.
- Press the "Enter" button on the first item "Boot Device Priority".
- In the first position it is necessary to place the drive for optical disks- being at the first point, use the “Enter” key to call up the menu for selecting boot devices.
- Set to "CD-ROM".
- Go to the “Exit” tab and use the “Exit&Save Changes” item.
- Confirm your intention to save the settings by pressing the “OK” key.
Selecting to boot from the drive in Award and Phoenix BIOS
- Activate the tab Advanced BIOS Features".

- Select “First Boot Device” and press the “Enter” button.

- Select from the list boot devices"CDROM" and press "Enter" again.

- Press the “F10” key and confirm your consent to change the settings.
Quick Launch Menu
Literally all BIOS systems provide the so-called “ Boot menu", which you can get to initial stage OS loading. From the material you read above, you learned that versions of basic microsystems are different, and therefore the login script quick menu downloads from each manufacturer computer technology may vary. Moreover, laptops sometimes have a special feature for such purposes. remote button(read this article).

As a rule, to call the “Boot menu” you need to intensively press the “F12” or “Esc” key while passing computer system initialization process (POST hardware check). In other cases, the manufacturer may have used a different keyboard access scheme (described in more detail here).
In conclusion
So, now it’s no secret to you how to launch a disk with Windows through BIOS. You can easily repeat all of the above in practice on your own. However, do not forget that the disk with windows distribution, first of all, must be bootable. However, if something still doesn’t work out for you and you decide to use a regular flash drive, then read the recommendations from this article. Happy downloading to you!
Greetings everyone. Typically, if you have problems starting the operating system or the lights turn off during operation, a list of possible startups appears when you next boot the system.
In order not to mislead you and teach you some nuances, I will share some very useful tips. So, if the system did not boot but provided a boot choice, then I recommend selecting the following option - Last Known Good Configuration or loading the last good configuration.
This start option cancels any changes made to the registry key CurrentControlSet which directly caused the problem.
This registry key determines the values of hardware parameters and all drivers installed on the system. Function loading last known known configuration will replace the contents of the above registry key with the data stored in the backup copy that was used during the last successful startup of Windows.
Reboot the computer. After sound signal press the F8 key and hold it until the operating system start selection menu appears. From the list of launch options that appears, select and activate it by pressing the key "Enter".

Remember, you are given one single attempt to restore the system's last known known configuration.
In general, if you were unable to restore the system after starting the OS from the mode, then this means only one thing - the backup copy is damaged. In this case, this recovery method will not help us.
1 Recovery Console
This method involves using the utility "recovery console". How more difficult problem loading the operating system, the more serious the approach to solving it should be. The boot CD with the installation system usually contains very useful utility - "Recovery Console"
To autorun boot CD with Windows OS, place in DVD-CD drive and restart your computer. As soon as the computer restarts and the drive begins to read data from the disk, you will see the Setup and Installation Wizard dialog box.
This will happen if you are in BIOS settings in download priority "Boot first device" put up "DVD/CD-ROM". I wrote about this in more detail in the article -. Once the download begins, follow all instructions that appear on the screen.
The program will provide you with a selection of basic files to run the installation program. The installation wizard greets you with the phrase "Welcome To Setup". Now all you have to do is press the key "R" which facilitates the opening of the recovery console.
Now the Recovery Console dialog box has opened in front of you. Here we will see a folder with files and also a request to select the operating system with which you plan to start working.
Next, you have to press the key with the number corresponding to the operating system number, then the program will ask for the administrator password, if any. Well, now you have it full access to the command line.
I wrote more about how to work with the recovery console in the article -
3 Fixing damage to the Boot.ini boot file
At the initial stage of Windows OS startup, the Ntldr program accesses the boot file Boot.ini. As a result, the program determines the location system files And available options to continue downloading.
This is precisely why, in case of damage to the boot file Boot.ini, the operating system cannot continue or even start booting correctly.
In the event that Windows OS does not boot and the reason for this is a damaged file Boot.ini then the recovery console toolkit will help you - Bootcfg.
To run Bootcfg you will of course need to start the system from boot Windows disk HR. To run the command Bootcfg, must be entered in command line management consoles: Bootcfg /parameter
Where /parameter- this is one of the functions that I will tell you about now.
Add– scans the hard drive for all installed operating systems. In addition, it adds identifiers of new operating systems to boot file Boot.ini.
Scan- scans the hard drive for all installed operating systems.
List– displays a list of records in the file Boot.ini.
Default– displays the identifier of the operating system that is being run during startup
Rebuild– completely restores the Boot.ini boot file. The user is given the opportunity to control every step.
Redirect– in administration mode this function allows you to redirect download operations to another designated port. It has several subparameters, or rather two: | ./Disableredirect – Disables redirection.
It is worth noting that in Windows Xp and Windows 7 boot.ini is formed differently. I have written several articles on the topic of boot.ini for XP and 7:
4 Repairing a defective Master Boot Record
The master boot record uses the first sector of the hard drive and carries out the boot procedure for Windows XP. The entry contains a table of all available hard disk partitions and small program "primary loader" The primary bootloader, in turn, is responsible for placing the active or boot sectors in the partition table.
Once placed in the table, the boot sector begins to start the operating system. If suddenly the boot record is damaged, the active sector will not be able to start the system.
In order to eliminate this problem The recovery console includes the Fixmbr program. Boot from the installation disk and activate the recovery console.
In order to run the Fixmbr command, you need to enter the following into the command line of the management console: Fixmbr
Where
- the compound name of the disk for which there is a need to create a new master boot record. The qualified name for the main boot drive C:\ will look like this: \Device\HardDisk0
5 Restoring a damaged HDD boot sector
The boot sector is a small hard section disk allocated for storing data in the operating system, having a file NTFS system or FAT32, and is also a fairly small program that helps with the boot process of the operating system.
If the system refuses to start precisely because the boot sector is inoperative, the recovery console tool can help you FixBoot. To do this, you need to load the installation disk and go to the recovery console menu.
In general, I have already indicated above how to do this. In order to launch this program you will need to enter the following in the command line of the management console: Fixboot:
Where- the drive letter that requires creating a new boot partition.
6 Quick reinstallation of Windows
In the event that the system cannot be started and you do not have a backup copy, you can perform Quick reinstallation Windows.
This procedure involves reinstalling the operating system in the same directory (similar to updating old version system to a newer one) and can fix almost any Windows boot problem.
Place boot disk into the DVD/CD drive, then restart the computer. Once the disk is recognized and reading begins, you can begin the installation procedure. During installation, a license agreement will appear.
In order to agree to the terms of the agreement, press the F8 key. Next, the program will scan all installed versions Windows. As soon as at least one of the versions is found, the installation screen will appear.
In order to start restoring the version of the system you need, you need to click "R", and to start the installation "Esc". The system recovery procedures will start. The installation wizard will now begin checking the disks for functionality, and then begin a quick reinstallation.
Remember, after reinstalling or recovering a damaged installation, all updates will have to be reinstalled again.
7 How to cancel automatic reboot
Typically, if an error occurs during stable operation The system automatically reboots the operating system.
When an error occurs directly at system startup, a cycle of endless reboots occurs. In this case, you need to disable the function of automatically rebooting the system upon failure.
At the beginning of the operating system startup or after POST, press the F8 key, which will open a menu in front of you "Advanced options".
Next you need to select the item "Turn off automatic reboot in case of system failure" and activate it by pressing the key "Enter". Now, when Windows XP starts up, it will display an error message, the essence of which will tell us about the malfunction.
Restoring the operating room Windows system from a backup.
If one of the system recovery methods did not help you, then there is a chance to restore the operating system using backup copy(if you have one).
The recovery algorithm completely depends on the program you are using. backup, which provides you with all the necessary instructions.
Conclusion
There can be many recovery methods and reasons why Windows does not boot. The main thing is that the system is mostly recoverable and you don’t have to perform. That's all. I wish you success in dealing with the problem.