Creating an FTP server. Create an FTP server using FileZilla or standard Windows tools
FTP is very convenient way exchange with someone various information. By installing an FTP server, you can both receive files and share your files with others. Everything is very conveniently configured, remote computer Your FTP server looks like a regular folder, from where you can copy the necessary files even with Explorer.
There are several various programs in order to make an FTP server from your computer. They differ in capabilities, reliability, security, settings and licenses. In my opinion, one of the best servers under Windows are Serv-U and Gene 6.
The choice of software is a personal matter for everyone, but on this page I will tell you how to configure Serv-U 6 series (version 6.4.x.x).
System Requirements
- Computer, almost any kind.
- Internet, with external IP address, if you are going to exchange or distribute data over the Internet, or anyone if you need to exchange data within a local network.
- It is advisable to have unlimited traffic, but this is also possible with limited traffic - they usually only take into account incoming traffic, and all outgoing traffic is free. The ratio is somewhere around 50 to 1, that is, for every 50 megabytes of traffic downloaded from you, 1 megabyte of reverse traffic will be downloaded to you (FTP commands, various technical information). Well, if it is pumped onto you, then vice versa.
- It is necessary to have several ports open. According to the FTP standard, 2 ports are required: 21 for transmitting commands and a certain range of upper ports (say from 2000 to 3000) for transmitting the actual data. If port 21 is closed to entry (for example, Moscow Stream filters incoming traffic on this port, covering it up with concerns about user protection, and this filtering cannot be disabled), then it can be transferred to another. But in this case, you will need to specify the port when giving the link: "ftp://dimonius.homeip.net:22/" for port 22.
- If you have a router (LAN-ADSL modem or WiFi modem), then additional configuration may be required so that the modem transmits data via the ports specified in the previous paragraph to the computer and back (this is strictly individual for each router, so I will not raise this issue here).
It should be taken into account that the speed of your outgoing channel will be divided among all downloaders, so you should calculate resources and set adequate limits on the number of downloaders and speed.
There is also a chance that your antivirus will warn you that you are installing an FTP server, which will be used to access files on your computer (usually they define it as “Program.Serv-U”), this is normal and you don’t need to pay attention pay attention to this.
Installation and initial configuration of Serv-U
- Download Serv-U from my FTP, or from the manufacturer’s website.
- We install. The installation is no different from installing other programs - you just need to specify the installation folder and click "Next" several times.
- The FTP server consists of a service and a management program. After installation, in the last step you will be prompted to launch the administration module (Start Serv-U Administrator program checkbox), check the box and the setup wizard will start.
- Answer step by step:
- Enable small images with menu items — Yes
- IP address - empty
- Domain name - " Local"
- Install as system service - Yes
- Allow anonymous access — Yes
- Anonymous home directory is the initial folder where all FTP accounts will start. For example " c:\FTP" (the folder must be created with Explorer).
- Lock anonymous users in to their home directory — Yes
- Create named account - No
- Initial setup done, and the main window of the server setup program will open.
- To begin with, it’s a good idea to register the program (the line in the tree on the left is License).
- Next, select Settings and configure 3 tabs there: “General”, “Dir Cache” and “Advanced” according to the illustrations.
- The "Activity" tab serves to control users. On it you can see who is currently logged into the server, who is downloading what, and through “Spy User” with the right mouse button you can track the actions of a specific user from the moment of login.
- Select "Local" in "Domains". Global server settings appear on the right, which we configured through the setup wizard. If necessary, then it will be possible to change them or create them new server with other settings (for example, on a different port or if you have several network cards, on different IP addresses for different subnets).
- Now we will configure the “Local” branch in “Domains” one by one.
- Select "Settings" and configure the bookmarks one by one.
- The "General" tab is configured according to the picture.
- "Virtual Path" is a very important bookmark, and you will need it more than once. A virtual file system is configured on it. That is, regardless of where the folder is located physically (on which disk and in which subfolder) on the FTP server you can place them and name them whatever you want, without affecting physical names and positions.
We will be interested in the top sign "Virtual path mapping", the bottom one is used to create links to already added files and folders (let's say you want to add 1 folder to 2 subfolders at once on an FTP server). Click the "Add" button under top list and enter:
- Physical path - path to the real folder or file. You can select through the button with a box to the right of the input field. For example, enter "C:\Video\"
- Map physical path to - the path to which we will attach our folder. Relatively " C:\FTP", which we entered in paragraph 4.6. In our example, it will be "C:\FTP", and then when entering the server, role users will see the "Video" subfolder in their folder.
- Mapped file name is the name that the user will see. For our example, let's say "Movies" rather than the abstract "Video".
- In the same way, we add the remaining folders to which we are going to give access later.
- On "Dir access" you can add IP addresses and subnets that will be allowed access or, conversely, denied access to the current server. This is used if someone is trying to hack the entire server, or you have several servers and you need to prevent people from one subnet from logging into another server. In most cases, everything here will be empty.
- "Messages" - you can configure the messages that the server will report when connecting, leaving the client, and in some other cases.
- "Logging" - here you can leave the default checkboxes, only in the "Log file name" field, through the "browse" button, select any file (say Log.txt in the folder where the server is installed), and check the "Enable logging to file" checkbox at the bottom . This will allow you to see who did what and who drained and filled what. Do not forget to clean the log file from time to time, otherwise it will grow to a very large size.
- "UL/DL Ratios" - allows you to configure the ratio of uploaded to downloaded, but is usually configured for specific users, and not for the server as a whole.
- On the "Advanced" tab, leave all the checkboxes as default.
- The "Activity" section duplicates the same section above, only for users of a specific server. Since the server is usually configured on one computer alone, this section completely duplicates the same section above.
- Setting up users and groups is described in the next section.
- Don't forget to open ports 21, 2000-2500 on your firewall. Setting up an FTP server without protecting your computer with a firewall is not the best idea.
- If you have a router, then in the “Port Mapping” (or simply “Mapping”) section in the web interface you need to indicate the port number and specify to translate them to the IP address of your computer. In this case, the computer must have a static address - this is done in the Windows connection properties (Start - Settings - Network Connections - Local Area Connection (right mouse button) - Properties - Internet Protocol (TCP/IP) - Properties)
Setting up users and access
- Select the "Users" branch in the Serv-U administrator and click Ins. Next, you should specify the user login one by one (it is better to use english letters and numbers), password, user’s initial folder (which will be shown to him after login, that is, the folder that we selected in paragraph 4.6 of the “Installation and initial setup Serv-U"), and answer “Yes” to the question “Lock user into home dir”.
- If we highlight cos given user, then on the “Account” tab you can configure to change the login and password, temporarily block the account (checkbox “Disable Account”), indicate which groups the user belongs to and his home directory.
- On the "General" tab you can configure basic user settings:
- "Requre secure connection" - require a secure connection. Not needed.
- "Hide hidden files" - do not show hidden files. Usually not needed.
- "Always allow login" - not needed.
- "Allow only X logins from one IP" - allow only X logins from one IP. It is recommended to put 2-4 on general accounts and not on personal accounts.
- "Allow user to change password" - allow the user to change the password. It is not needed on general accounts; you can put it on personal accounts.
- The "Dir Access" tab shows the folders to which the user will have access. First, the folders must be added to the virtual path settings (section "Installation and initial configuration of Serv-U", point 13). There, for each folder, the type of access to this folder is checked: listing (list), reading files (read), writing (write), creating files (create), delete (delete), launch (execute). The same thing, in addition to launching, is also true for subdirectories; in addition, there is a checkbox “including nested ones” (Inherit), so that the same settings apply to subfolders and files. Some folders and files here may be present on gray background- This is what users have access to as a member of groups.
- The "IP Access" tab regulates IP access. If you want to make yourself personal access to important folders, say from work, then it makes sense to limit access by individual entrepreneur - only from work or only from home. Even if you accidentally pick up a Trojan or someone uses a sniffer to find out your password, they will not be able to infect your sites or steal important data.
- You can set ratios on “UL/DL Ratios”, that is, set the condition that until you are flooded with a certain number of megabytes, you will not be able to drain it. The proportions can be adjusted, which is convenient when you want to force people to share with you. True, no one guarantees that they won’t upload something large and completely unnecessary to you, like a file Windows swap or some uncompressed video), as well as regulate how much you can upload in volume so that one user does not completely fill your disk.
- And finally, on the “Quota” tab you can set limits on the disk space allocated to this account (so that users do not fill the entire disk)
Passwords for public access You can set simple ones, but for accounts with important data complex ones - from small and capital letters, numbers and special characters.
Setting up DynDns
If you distribute data on the Internet and you have a dynamic IP, then a problem arises. When reconnecting, the address changes and you need to somehow find out the new one. Constantly editing information about the IP address is not convenient for both the server owner and clients. To solve the problem, you can register on the special DynDns website. After free registration You will be given a third-level name with a second-level domain of your choice (such as dimonius.homeip.net or dimonius.dyndns.org), this service has a lot of different domains and there is plenty to choose from. Then a small program is installed on the computer where account data is entered and when reconnecting it updates the data on the DynDns website and the name always refers to the current IP address. if you have a router, then many of them can work with DynDns right out of the box - just go to the appropriate item in the router’s Web interface and enter your account information.
To register and set up a domain you need:
- Go to the DynDns website, to the registration form.
- Enter your nickname, password, email. Select a subdomain of your site.
- Download the program from here and install it.
- Enter your account information there.
- The program must start with Windows in order to monitor changes in the IP address.
If you are referring to this kind of articles, then it most likely makes no sense to once again remind you about the essence and purpose of such servers, but for the sake of formality it is worth clarifying that File Transfer Protocol uses port 21 by default and can be used for viewing as an Internet browser and by the majority file managers which includes Windows Explorer.
Continuing with the obligatory introduction, let me remind you that for normal operation on the local network you will need to open port 21 in the Firewall of the server computer (obviously the one on which you will configure), and to access from the external network you also need to forward this port on the router. The last reminders are necessary for the happy owners of firewalls and routers. So, if you use these programs and devices, it would be a good idea to read the instructions and complete the setup.
Let's start by making sure that our operating system can do such work at all. To do this, we simply look at the name of the assembly and consider everything above the Home version to be suitable for our needs.
Step one.
Find the “programs and features” item in the control panel and go to the “Turn Windows features on or off” option.
Step two
The menu that opens will offer us a list of components from which we must find and enable “IIS services” and all its subservices. It should turn out like this:

Click OK and wait for Windows to complete the installation.
Step three
Now we need to directly start our server. In the same control panel we find the “Administration” item, and in it “IIS service manager"

In the window that opens, in the left column, open the tree to the “Sites” tab and right-click on this tab. Select “Add FTP site”

Then we set the name of the site and the directory to which the ftp protocol will physically access

Next, the parameters for launching the server are determined and to simplify access, it is worth specifying launch without SSL. Whether to launch it at system startup and whether to bind it to a specific address is at your discretion.

On the next page, check the boxes next to “Anonymous” and “Plain” and click done.

At the moment, the FTP server is ready, but in order for us to use it, we will continue to configure it.
Now let's configure the Windows Firewall
"Control Panel"→ “Windows Firewall”

Here we go to additional options.
Then you need to enable 2 rules for incoming connections
FTP server ( incoming traffic)
FTP server traffic in passive mode (incoming FTP traffic in passive mode).

For outgoing connections, you need to enable the following rule in the firewall " FTP server traffic (outgoing FTP traffic)".

Step five
Now you need to create a user to work with the server. Why open the system console? Press the Win+R key combination and enter “mmc” in the field

in the console that opens, press Ctrl+M or the “file” menu - “Add or remove snap-in”. A menu will open in which you need to add “Local users and groups”

If you did everything correctly, you will get a window that looks like this:

Now we create a group for the user of our FTP server.
Right-click on “Groups” - “Create” new group»

We issue the “create” command and proceed to creating a user.

Now we need to bind our user to the previously created group. To do this, go to the user properties to the “group membership” tab. There we press the “add” and “advanced” - “search” button. Now we add the group that we created a couple of minutes ago.

Step six
We need to specify group permissions for the directory that we specified when creating the server. To do this, open its properties to the “Security” tab and click the “Change” button:

Click the “Add” button and add the group that we created. We provide the group full access by checking the corresponding checkbox at the bottom of the window:

Step seven
Let's go back to the FTP server settings

Go to “authorization rules” FTP "and create a allowing rule, where in Select “Specified roles or user groups” and enter the name of our group. Give this group read and write permissions and click OK.


Now your FTP server is configured and completely ready for use. Don't forget to check your Firewall and router for open ports for the site and you can safely get to work.
, “stitching” the login and password into it. It is also possible to create a shortcut to a directory or even connect it as network drive. All this makes working with the FTP Server much easier. This will be discussed below. All screenshots were taken for Windows 7, on other operating systems of the family Windows actions similar.
1. Direct link to the file stored on the FTP server
Ftp://<Login>:<Password>@<Address>/<Path>
I'll show you with an example. Let there be an FTP Server with the address ftp://site(or ftp://178.74.69.30) and connection data:
- Username - user
- Password - pass123
A gurney has been created on the server Temp where the file is located file.txt. The direct link to this file will be as follows:
Ftp://user:pass123@site/Temp/file.txt
If there are spaces in the file name, you should replace them with a character set %20 , that is, a link to the file file new.txt will be like this:
Ftp://user:pass123@site/Temp/file%20new.txt
2. Shortcut to the folder on the FTP server
Now let's create a shortcut for quick access to the FTP Server. To do this, right-click on the desktop and in the menu “ Create» select « Label» .
The Shortcut Creation Wizard will open. In the field " Object location"let's write
C:\Windows\explorer.exe ftp://user:pass123@site/Temp

3. Connecting the FTP Server directory as a network drive
And finally, let's connect the folder Temp on our FTP server as a network drive. To do this, open the browser to home page « Computer" and in the navigation panel select " Map network drive» .

In the wizard that starts, select the disk drive and set the flag “ Restore on login" and click on the link " Connect to a site where you can store documents and images» .

" Add Network Location Wizard", click " Next" and click on the link " Choose a different network location» .


Click " Next", enter the name of the network location, again " Next" and complete the wizard by clicking " Ready". If everything is done correctly, a direct link to the selected directory on the FTP server should appear in the list of drives.

Did this article help you?
(shareware). In addition, there are somewhat simpler Cerberus (free), as well as an interesting Russian-language project ST FTP-Service (free). Below we will briefly discuss the process of setting up some of these programs.
GuildFTPd 0.999.5
Powerful server, easily customizable, with user-friendly interface and an excellent implementation of the virtual file system (VFS).
Installation and main window
Installing the program is trivial. You have installed the program on your computer, launched it, and look with interest at the main program window:
Setting up the program.
1. Configuring basic server settings(port number, maximum number of connections, number of connections from each ip, etc.) is carried out in the lower right window. If you do this for the System group, then all lower-level groups will inherit these settings. For any group you select, these default settings can be overridden. In particular, I have sometimes used for different usernames different numbers ports.
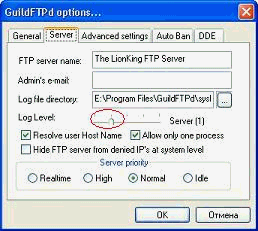
2. Menu item Admin -> Options -> Server: enter the name of your server, and slightly reduce the detail of the server messages (by moving the “Log Level” slider to the left), otherwise the log files will quickly gain hundreds of megabytes:
3. Setting up access to the server. The structure of the user hierarchy in GuildFTPd is such that any user must be assigned to some group. In this case, you have two main ways:
- building FTP based on personal logins;
- building a server based on direct entry into the desired directory.
3.1. Building an FTP based on personal logins.
Let's assume that you decide to organize access for your friends to the Documents directory, and each of them will have to see a unique set of directories (i.e. you should create a virtual file system for each user).
The algorithm is very simple:
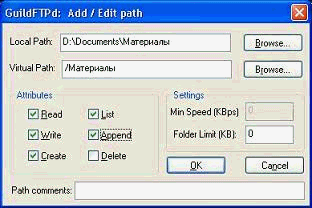
a) create a group, say, Team, and immediately create a common root directory for the group:

Clearly it must already exist on disk. Please note that the virtual value of the selected directory is “\”. Then we will assign the appropriate rights. We get the following:

Compare the last two pictures with each other, and you will have no questions left.
In addition, there are generally accepted conventions for the names of directories located in the root, in particular: \pub - here lies data available for public (anonymous) downloading; \upload - uploads will be made here for you; \incoming and some others. I think that for a private server it is not necessary to follow these conventions.
b) start filling the group with users (Admin -> Add User):

c) create a VFS for each (see a)):
And you get:

Note. You can open access to the entire disk, say, this way:

The physical directory K:\FTP is your root directory, and physical disks- catalogues. Then in the ftp client you will see the following:

The picture1.jpg file is located in the K:\FTP directory, and you can see it again if you go to this directory along the physical path.
3.2. Building a server based on direct entry into the desired directory.
Here you do not need to create many logins. You create one (or even use an anonymous login, for which you enter a name anonymous, and leave the password fields empty), but in the rights of the root directory, uncheck the “list” item. And then you just add directories there. You won't be able to get into the directory without knowing the full name.
At this point, your server is ready for use; to start/turn it off, click the “on” button, or select the Admin -> Allow Logins menu.
4. Extras. Setting up server messages: Admin -> Server Messages

5. Extras. Installing plugins. I recommend installing a plugin to view statistics (on the authors’ website):

6. Extras. Denying access to the server: View -> View Ban List. To get rid of an annoying user, add his address to the ban list.
If you are referring to this kind of articles, then it most likely makes no sense to once again remind you about the essence and purpose of such servers, but for the sake of formality it is worth clarifying that File Transfer Protocol uses port 21 by default and can be used for viewing as an Internet browser and most file managers, which include Windows Explorer.
Continuing with the obligatory introduction, let me remind you that for normal operation on a local network, you will need to open port 21 in the Firewall of the server computer (obviously the one on which you will configure), and for access from an external network you also need to forward this port on the router. The last reminders are necessary for the happy owners of firewalls and routers. So, if you use these programs and devices, it would be a good idea to read the instructions and complete the setup.
Let's start by making sure that our operating system can do such work at all. To do this, we simply look at the name of the assembly and consider everything above the Home version to be suitable for our needs.
Step one.
Find the “programs and features” item in the control panel and go to the “Turn Windows features on or off” option.
Step two
The menu that opens will offer us a list of components from which we must find and enable “IIS services” and all its subservices. It should turn out like this:

Click OK and wait for Windows to complete the installation.
Step three
Now we need to directly start our server. In the same control panel we find the “Administration” item, and in it “IIS service manager”

In the window that opens, in the left column, open the tree to the “Sites” tab and right-click on this tab. Select “Add FTP site”

Then we set the name of the site and the directory to which the ftp protocol will physically access

Next, the parameters for launching the server are determined and to simplify access, it is worth specifying launch without SSL. Whether to launch it at system startup and whether to bind it to a specific address is at your discretion.

On the next page, check the boxes next to “Anonymous” and “Plain” and click done.

At the moment, the FTP server is ready, but in order for us to use it, we will continue to configure it.
Now let's configure the Windows Firewall
“Control Panel” → “Windows Firewall”

Here we go to additional parameters.
Then you need to enable 2 rules for incoming connections
FTP server (incoming traffic)
FTP server traffic in passive mode (incoming FTP traffic in passive mode).

For outgoing connections, you need to enable the following rule in the firewall: “FTP Server Traffic (FTP Outgoing Traffic)”.

Step five
Now you need to create a user to work with the server. Why open the system console? Press the Win+R key combination and enter “mmc” in the field

in the console that opens, press Ctrl+M or the “file” menu - “Add or remove snap-in”. A menu will open in which you need to add “Local users and groups”

If you did everything correctly, you will get a window that looks like this:

Now we create a group for the user of our FTP server.
Right-click on “Groups” - “Create a new group”

We issue the “create” command and proceed to creating a user.

Now we need to bind our user to the previously created group. To do this, go to the user properties to the “group membership” tab. There we press the “add” and “advanced” - “search” buttons. Now we add the group that we created a couple of minutes ago.

Step six
We need to specify group permissions for the directory that we specified when creating the server. To do this, open its properties to the “Security” tab and click the “Change” button:

Click the “Add” button and add the group that we created. We give the group full access by checking the appropriate box at the bottom of the window:

Step seven
Let's go back to the FTP server settings


Now your FTP server is configured and completely ready for use. Don't forget to check your Firewall and router for open ports for the site and you can safely get to work.
technotree.ru
How to create and configure an ftp and tftp server on Windows 7 - how to open, connect, install, why it may not work, instructions with screenshots
You can simplify the work with Windows computers connected via a local network by activating FTP and TFTP servers, each of which has its own characteristics.
Differences between FTP and TFTP servers
Activating both servers will give you the ability to exchange files and commands between computers or devices connected to each other via a local network or other means.
TFTP is an easier server to open, but does not support any identity verification other than ID verification. Since IDs can be spoofed, TFTP is not secure, but it is easy to use. For example, they are used to configure diskless workstations and smart network devices.
FTP servers perform the same functions as TFTP, but have the ability to verify the authenticity of the connected device using a login and password, therefore they are more reliable. They can be used to send and receive files and commands.
If your devices are connected through a router or use a Firewall, then you need to forward ports 21 and 20 for incoming and outgoing connections in advance.
Creating and setting up TFTP on Windows 7
To activate and configure it, it is best to use free program- tftpd32/tftpd64, which can be downloaded from the official developer website of the same name. The application is distributed in two forms: service and program. Each type is divided into versions for 32 and 64 bit systems. You can use any type and version of the program that is most suitable for you, but below, as an example, actions will be given in a 64-bit program running as a service edition.

Creating and setting up FTP
- Expand your computer's control panel.

Launching the control panel
- Go to the "Programs" section.

Go to the “Programs” section
- Go to the "Programs and Features" subsection.

Go to the “Programs and Features” section
- Click on the “Turn components on or off” tab.

Click on the “Turn components on or off” button
- In the window that opens, find the “IIS Services” tree and activate all the components included in it.

Activating the IIS Services tree
- Save the result and wait until the included elements are added by the system.

Wait for the components to be added by the system
- Return to home page Control Panel and go to System and Security.

Go to the “System and Security” section
- Go to the "Administration" subsection.

Go to the “Administration” subsection
- Open Internet Information Services Manager.

Open the Internet Information Services Manager program
- In the window that appears, go to the tree located on the left side of the program, right-click on the “Sites” subfolder and go to the “Add FTP site” function.

Click on “Add FTP site”
- Fill in the field with the name of the site and write down the path to the folder to which received files will be sent.

Come up with a name for the site and create a folder for it
- Begins FTP setup. In the IP address block, set the “All free” parameter, in the SLL block, set the “Without SSL” parameter. The “Start FTP site automatically” feature enabled will allow the server to turn on automatically every time you turn on the computer.

We set the necessary parameters
- Authentication allows you to choose two options: anonymous - without a login and password, regular - with a login and password. Check the options that suit you.

Choosing who will have access to the site
- This completes the creation of the site, but some more settings need to be completed.
The site has been created and added to the list
- Return to the System and Security section and navigate to the Firewall subsection.

Open the “Windows Firewall” section
- Open advanced options.

Let's move on to additional settings firewall
- In the left half of the program, make the “Rules for incoming connections” tab active and activate the “FTP server” and “FTP server traffic in passive mode” functions by right-clicking on them and selecting the “Enable” option.

Enable the “FTP server” and “FTP server traffic in passive mode” functions
- In the left half of the program, make the “Rules for outgoing connections” tab active and launch the “FTP Server Traffic” function using the same method.

Enable the “FTP Server Traffic” function
- The next step is to create a new account, which will receive all rights to manage the server. To do this, return to the “Administration” section and select the “Computer Management” application in it.

Open the Computer Management application
- While in the “Local Users and Groups” section, select the “Groups” subfolder and start creating another group in it.

Click the “Create group” button
- Fill in all required fields with any data.

Fill in information about the group being created
- Navigate to the Users subfolder and begin the process of creating a new user.

Press the button " New user»
- Fill in all required fields and complete the process.

Filling in user information
- Open the properties of the created user and expand the “Group Membership” tab. Click on the “Add” button and add the user to the group that you created a little earlier.

Click the “Add” button
- Now navigate to the folder that is allocated for use by the FTP server. Open its properties and go to the “Security” tab, click on the “Change” button in it.

Click the “Change” button
- In the window that opens, click on the “Add” button and add the group that was created earlier to the list.

Click the “Add” button and add the previously created group
- Grant all permissions to the group you added and save your changes.

Check the boxes next to all permission items
- Return to Internet Information Services Manager and navigate to the section with the site you created. Open the FTP Authorization Rules function.

- Right-click on the empty space in the expanded sub-item and select the “Add allowing rule” action.

Select the action “Add allowing rule”
- Check the box next to “Specified roles or user groups” and fill in the field with the name of the previously registered group. Permissions must be granted for everything: read and write.

Select “Specified roles or user groups”
- You can create another rule for all other users by selecting “All anonymous users" or "All users" and setting the permission to read only so that no one except you can edit the data stored on the server. Done, this completes the creation and configuration of the server.

Create a rule for other users
Video: FTP setup
Login to FTP via Explorer
To log into the created server from a computer connected to the main computer via a local network, through a standard explorer, just enter the address ftp://192.168.10.4 in the path field, so you will log in anonymously. If you want to log in as an authorized user, then enter the address ftp://your_name:[email protected].
To connect to the server not via a local network, but via the Internet, the same addresses are used, but the numbers 192.168.10.4 are replaced by the name of the site you created earlier. Let us remind you that to connect via the Internet received from the router, you need to forward ports 21 and 20.
Reasons why it may not work
The servers may not work correctly if you have not completed all the necessary settings described above or enter any data incorrectly, double-check all information. The second reason for failure is third-party factors: an incorrectly configured router, a Firewall built into the system or a third-party antivirus blocks access, rules installed on the computer interfere with the operation of the server. To solve a problem related to an FTP or TFTP server, you need to accurately describe at what stage it appeared, only then you will be able to find a solution on thematic forums.
How to connect as a network drive
To convert a folder allocated for a server into a network drive using standard Windows methods, just follow these steps:

Third-party programs for setting up a server
The program for managing TFTP - tftpd32/tftpd64, has already been described above in the article, in the section “Creating and configuring a TFTP server”. For FTP management Servers can use the FileZilla program.

FTP and TFTP servers are designed to create local and shared sites that allow the exchange of files and commands between users with access to the server. Complete everything required settings possible both using the built-in functions of the system and through third party applications. To get some benefits, you can convert the server folder to a network drive.
Social buttons:
pcpro100.info
How to quickly create an FTP server? / An easy way to transfer a file locally
Not long ago, in one of the articles we looked at 3 ways to transfer files over the Internet. There is another one for transferring files over a local network - via an FTP server.
Moreover, it has a number of advantages:
The speed is not limited by anything other than your Internet channel (the speed of your provider),
Fast file exchange (no need to download anything anywhere, no need to configure anything long and tediously),
Possibility of resuming the file in case of interruption of the download or unstable network operation.
I think the advantages are enough to use this method to quickly transfer files from one computer to another.
To create an FTP server, we need a simple utility - Golden FTP server (you can download it here: http://www.goldenftpserver.com/download.html, the free version will be more than enough to get started).
After you have downloaded and installed the program, the following window should pop up (by the way, the program is in Russian, which is good news).
1. Click the add button at the bottom of the window.
 2. In the “path” line, indicate the folder to which we want to provide access to users. The "name" line isn't that important, it's just the name that will be displayed to users when they go to this folder. There is also a checkbox “allow full access” - if you click it, users logged into your FTP server will be able to delete and edit files, as well as upload their files to your folder.

3. In the next step, the program tells you the address of your open folder. You can immediately copy it to the clipboard (the same as if you simply selected the link and clicked “copy”).

To check the functionality of your FTP server, you can log into it using Internet browser Explorer or Total Commander.
 By the way, your files can be downloaded by several users at once, to whom you provide the address of your FTP server (via ICQ, Skype, telephone, etc.). Naturally, the speed between them will be divided according to your Internet channel: for example, if the maximum upload speed of the channel is 5 MB/s, then one user will download at a speed of 5 MB/s, two - 2.5* MB/s, etc. d.
You can also familiarize yourself with other ways to transfer files over the Internet.
If you often transfer files to each other between home computers, then it may be worth setting up once local network?
Social buttons:
pcpro100.info
How to connect to an FTP server in Windows 10
If you don’t understand how to connect to an FTP server in Windows 10 quickly and without using third-party programs, then I will guide you step by step through all the steps towards your goal.
You can, of course, once and for all, download and install one of the FTP clients specially designed for this with a large number functions, for example the popular Filezilla, but if access to the server is not required too often, say for example once or twice a month, then the question naturally arises, why do we need to install an extra program on the computer.
Not many people know that she operating system has the functionality we need and can, using simple settings in File Explorer, provide the user with access to a specific FTP server.
These functions are quite enough to upload, send or edit files.
Now let's proceed directly to the installation stable connection with any FTP server on the Internet.
For example, I will connect to mine, which hosts the resources of this blog.
HOW TO CONNECT TO THE FTP SERVER
1. Open an Explorer window, then right-click on “This PC” and then click on “Add an item to my network environment.”

2. Sequentially go through the Add Network Location Wizard, namely:
- in the window to select a network location, click the “Next” button;
- write in the appropriate field network address(which you want to access);
- further, do not change anything if you log in anonymously or, otherwise, uncheck the box;
- if unchecked, then enter your username (login) in the appropriate field;
- for identification network connection call it by a name convenient for you;
- in the penultimate step, without changing anything, click the “Finish” button;
- A pop-up window will open to enter your password, where after entering it, click on the “Login” button.

3. Correctly entered data into the appropriate fields of the wizard will provide you with full access to the FTP server.
When you're done, an icon will appear in the Network Locations section of File Explorer for easy access later.
That's all for now.
P.S. I think it won’t hurt you to visit the Blog Map to find the ones you need computer advice!
P.P.S. The best gratitude for advice or instructions received is to place our link in any social network!
Thank you very much!
liwihelp.com
How to create an FTP server and access it from the Internet
In this article we will talk about the following things:
- how to set up an FTP server on a computer connected to the router;
- how to provide access to it from the World Wide Web.
Setting up the FTP server program
Installing FileZilla Server
Download and install any FTP server that you like or are used to working with. For example, we will download the free Filezilla Server program from the official website: https://filezilla-project.org/download.php?type=server
Run the downloaded installation file:


Click Reject:

Click Reject again:

Click Install:

Click I agree:


Setting up a FileZilla FTP server
Launch the program interface.
Enter the settings: menu Edit -> Settings:

Now you need to configure passive FTP mode.
1) Select the Passive mode settings section;
2) Check the box Use custom port range;
3) Set a convenient range of ports for use in passive mode;
4) In the Use the following IP field, enter your external IP;
5) Click OK to save the settings.

Now you need to set up user accounts and specify home directories.
Go to the Edit menu and select Users:
In the General section, click Add:

Enter your username and click OK:

1) Check the box next to Password. This will indicate that this account will require a password.
2) Set a password for this account;
3) Go to the Shared folders section:

In the Shared folders section, click Add:

and select the folder that will be open to this user for access via FTP protocol. After selection shared folder click OK:

Set permissions for this user on the folder.
In the Files area, you can allow or disable the following file operations:
- Reading;
- Record;
- Delete;
- Change.
In the Folders area, you can allow or disable the following folder operations:
- Creation;
- Delete;
- View list;
- View subfolders.
Once you have set permissions for this user in the current folder, click OK to save the settings:

Setting up your computer
After setting up the FTP server program itself, you need to allow incoming connections in the firewall.
Go to Control Panel and select Windows Firewall.

Right-click on Rules for incoming connections and select Create Rule:

Select the For program option and click Next:

Set the radio button to Program Path and use the Browse button to specify the path to the FileZilla Server.exe file. Then, click Next:

Select the Allow connection option and click Next:


Give the rule a custom name and click Finish:

Setting up a router: creating port forwarding rules
Now we need to create port forwarding on the gateway. The gateway can be a router, modem or other device. Log in to the router’s web interface (read the article about what a web interface is and how to access it: http://compfixer.info/kak-zajti-v-nastrojki-routera/) and open the port forwarding section. Read more about port forwarding in our article: What is port forwarding.
Create two rules.
Rule No. 1: forward external port 21 to port 21 of the computer where the FTP server program is installed.
Rule No. 2: forward a range of ports to the same range of ports on a computer with the FTP server program installed.
Saving the setting.

How to remotely connect to an FTP server
To access the FTP server, you can use either an FTP client, a browser, or even Explorer. Of course, it is preferable to use an FTP client. We recommend the free FileZilla client. You can download it on the official website: https://filezilla-project.org/download.php?type=client
In the Host field, enter either the host name ( domain name), or the external IP address of the router. Then, enter the username you created in the FileZilla Server program on your computer, the corresponding password and click the Quick Connect button:
If in port forwarding in the router settings you did not change port No. 21 to a non-standard one, then the Port field can be left empty - the program will connect to port 21 by default.