Cloud input. What benefits does using the cloud provide to the average user? File synchronization and backup
Cloud Mail.Ru - cloud storage on the Internet and a solution for data synchronization with support for popular desktop and mobile platforms.
You can access your files, photos and documents from any device, anywhere with active internet. Cloud storage will save space on hard drives your computer or in the memory of your smartphone/tablet.
The reliability of storing files on the Internet is ensured by a backup system and anti-virus scanning.
Overview of Cloud Mail.Ru capabilities
Support for popular platforms
Mail.Ru cloud works on all the most popular desktop and mobile platforms: Windows, Mac OS X, smartphones and Android tablets, iPhone, iPad and Windows Phone. Functionality applications allow you to take advantage of the Cloud, no matter what device you have.
The speed of file transfer in cloud storage depends only on the capabilities of your Internet connection.
8GB of free space
The Mail.Ru cloud offers 8 GB of cloud disk space for each user for free. You can store any types of files, including photos, videos, music, presentations, documents.
Synchronization and backup files
To reliably protect your files, create a folder on your computer, save your files in it and synchronize it with the Cloud. Even if the computer breaks hard drive, all your files will be saved online and you will be able to access them. For reliability, Mail.Ru also uses backups of your files at different data centers to prevent data loss.
You can enable auto-download of captured photos and videos on your smartphone or tablet (iOS and Android). This will allow you to save files even if your mobile device is lost or fails. Automatic synchronization also allows you to delete files from your device and make room for new photos and videos.
Shared folders. Sharing to files
The Shared Folders feature allows you to share files with other users and make changes to the content. For example, you can share photos with friends, organize group work on a project or add to a shared folder with educational materials.
Integration with Mail.Ru Mail
The cloud is integrated with your Mail.Ru mailbox. You can save any of the files received in a letter to the Cloud or, when sending a new letter, attach files to it from cloud storage, mail or computer.
Anti-virus file scanning
All files that you save or transfer in the Mail.Ru Cloud are scanned using Kaspersky Anti-Virus technologies. This helps protect all your devices from malware infection. Infected files are blocked and become unavailable for downloading by other users.
Many companies provide free space in the cloud. This means that you can place own files not to the computer’s hard drive, but to an external server belonging, for example, to Mail.ru, Google, Yandex, Apple or other giants e-commerce. However, this does not mean that only they can offer cloud gigabytes. On at the moment Even not very well-known portals and hosters can guarantee cloud services. The only question that remains is the reliability and security of such proposals.
How to use Google cloud.Disk
One of the most popular cloud storage is Google Drive. It guarantees 5 GB. free space for any personal needs, easily expandable up to 25 GB. for only 2.5 dollars (and beyond). How to use it? First of all, you need to register an account with Google. If you already have an email account on Gmail, its data will work. If not, fill in all the required fields via the link and click “Next”. After this we go to home page Google Drive by entering your username and password. Now you can use the storage without any problems. Your documents will be displayed in the “Files” section, and they can be easily accessed by guests and other third-party visitors (for example, via a link or a request from a specific email).
How to use the cloud Google Drive on the computer
Access and management of the storage can be done through a special program installed on a PC. While on the Drive web page:
- look for the “Download for PC” button at the bottom and left;
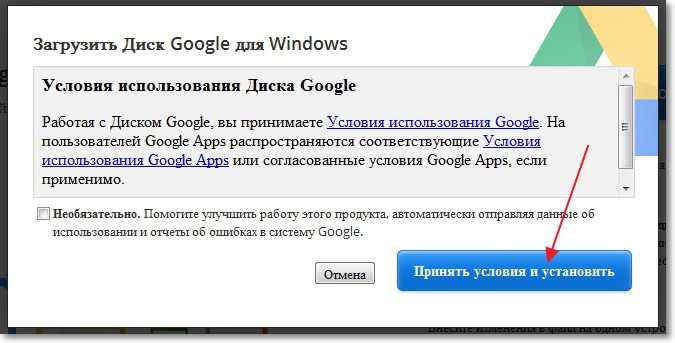
- in the next window, click “Accept the terms and install”;
- the installation process will begin;
- when it is completed, click on the “Close” button;
- launch installed program and click on the “Login” button;
- enter login ( email address) and password, and click on “Login” again;
- in the new window, click “Forward” - the program will notify us that the data from Google Drive will be synchronized with the selected folder on the PC;
- if you select “Advanced settings”, you can change the name and location of the folder on your hard drive, as well as allow/disable autorun after turning on the PC;
- Click on “Synchronize”, after which the setup is complete.
Next, any documents placed in the selected folder will be transferred to the cloud. You can use them online or on any other computer if you enter your login information. The same is true vice versa - once you place documents in Google Drive, you can easily take them to your home PC.

How to use the Yandex cloud. Disk on computer and online
Cloud storage from Yandex works similarly to Google Drive. Register on yandex.ru by clicking the “Mail” button and filling out the appropriate form. When the account is created, in the right top corner The "Disk" button will be available. The file management program can be downloaded to your PC; to do this, from the main Disk window, click on the “Windows” button and go through all the standard installation steps. When the installation is complete, home computer A folder with Yandex Disk documents will appear. In the program settings you can choose:
- on the “Basic” tab: launch when you turn on the PC and the path to the folder with the files;
- on the “Account” tab: login, password, number of remaining GB;
- “Synchronization” - will display a list of all folders located on Yandex Drive and synchronized with hard drive(can be disabled by unchecking the checkboxes, and vice versa);
- "Screenshots" following settings: Places desktop snapshots directly in the cloud;
- “Advanced” - allows you to enable or disable updates, sending crash logs, and so on.

You can get other cloud storage from well-known brands like Dropbox, Mega, Mail.ru, Amazon, iCloud Drive, 4shared, SugarSync, OpenDrive, Syncplicity, SpiderOak.
SovetClub.ru
How to access the cloud on an iPhone and which cloud storage service to choose
After reading these instructions, you will be able to understand the popular issue of transferring and saving photos to the cloud on an iPhone, additional settings for your phone, and choosing the data storage service that is most convenient for you.
Every year, the development of cloud storage for saving personal photos or documents is becoming more popular among iPhone users. This may be due to the small amount of memory on the device or, conversely, to the convenience that online data storage services offer us.
How does the cloud work on iPhone? Operating principle in general terms
The operating principle of cloud storage is based on streaming files to local Apple server storage.
When an iPhone user does new photo, records a video file or works with bookmarks on the gadget, the built-in iOS monitoring system records and saves results about new or previously changed files into the device’s internal cache. When you connect to Wi-Fi, you are automatically connected to cloud storage iCloud data. iOS sends a command to the server about changed or new documents, and they are automatically uploaded to local storage Apple.

The file, when uploaded from the iPhone to the cloud, is divided into equal parts and distributed across storage servers. Each document or photo has multiple backup copies, which allow you to store information in different places. In case of loss of data about the downloaded file or equipment failure, the backup copy will allow you to instantly obtain information about previously downloaded media content to the cloud.
When an iPhone user logs into the cloud storage and downloads the file he needs, it is automatically, through powerful computing equipment, put together and transferred through secure encryption to the owner’s phone.
What is the best cloud to choose for iPhone nowadays?
Indeed, many iPhone users often wonder where to store their photos and videos. How can you access them most quickly from any part of the planet where there is Internet.
The task of choosing cloud storage for your iPhone comes down to several competitors in this area. We will try to talk in more detail about the advantages and disadvantages of each of them.
The evaluation of cloud storage services for iPhone will be based on the following criteria:
Ease of use
Functional
Price
iCloud, Apple's cloud storage service
iCloud is a powerful and high-tech cloud service that can keep your personal media files safe and secure from unauthorized persons. In addition to storing photos and data, it is capable of: tracking the location of your iPhone, computer or other phone; fast and remote setup iPhone, calendar events and more.
Talk about usability iCloud service, which is specifically designed by Apple for iPhone or iPad buyers and users makes no sense. It's quite simple.
By purchasing new iPhone, You create an iCloud cloud account that is linked to one or more devices if you have several.

To access the cloud on your iPhone, you'll need to log in to your device's settings, and any previously saved photos or personal data, such as contacts, calendar entries, or notes, are automatically downloaded to your iPhone. This adds the maximum number of points to the ease of use of the iCloud service, because... You don't need to install additional software on your phone.
When registering for an Apple cloud storage account, the user is given 5 GB of free storage for the most important files on the iPhone cloud. To expand the amount of memory in the cloud, you are offered a choice of three subscription options, which are presented in the screenshot below. The cost is indicated in rubles per month of use.
Yandex Disk is one of the ways to choose cloud storage for photos and videos on iPhone
We recently described in detail one of the processes for downloading music to an iPhone using the Yandex Disk cloud storage. You can read about it here.
In addition to downloading music, this service will allow you to store all the photos and video files that are on your iPhone in your cloud spaces.
Many iPhone buyers use a cloud data storage service. This is primarily due to the small amount of memory in the device. Yandex Disk offers about 20 GB of free space for uploading media files to the cloud from an iPhone. This space is more than enough to understand all the capabilities of the service in free mode.

The ease of use of Yandex Drive on iPhone does not seem to be as promising as in the case of iCloud. Autoload YAD will allow you to automatically upload only photo and video files from iPhone to cloud storage.
As for the cost. Yandex offers, as we said earlier, about 20 GB of permanent space in the cloud for free, as well as the ability to expand memory for additional fee. Get acquainted with current tariffs(at the end of 2017) You can see the screenshot below.

Attention! Yandex Disk constantly holds free promotions with partners that will allow you to significantly increase your iPhone cloud storage space. The price and cost of these services may differ from the prices presented on the official website software product.
Brief summary of choosing cloud storage for iPhone
We considered just a few options for the most popular services storing photos and videos from iPhone on the Internet. There are a huge number of competitors who can offer you the most favorable conditions for renting a storage facility. The main thing is not to forget that proven and popular services have reliable protection data from hacking, which will prevent leakage of personal files to the Internet. Choose the most convenient option for storing data in the iPhone cloud, based on our pivot table advantages and disadvantages.

The rating of the proposed cloud storage options for iPhone is based on personal experience use, reviews from colleagues and users on the Internet. iPhone owners categorically reject the use Dropbox service and reluctantly look towards Google Drive.
How to create a cloud on an iPhone using a PC or phone?
The process of registering or creating an online storage account on iPhone will not take much of your time. Let's take a closer look at the situation using registration as an example. iCloud clouds and Yandex Disk from start to finish.
Create an Apple ID and register iCloud for iPhone
Go to the official cloud storage website: https://www.icloud.com/. Complete the registration by clicking on the “Create” button next to the Apple ID inscription, as shown in the screenshot below.

Fill in the personal information required to register the iCloud cloud.

We advise you to write down new apple ID and password to log in account. Registered data cloud service required to correctly configure your iPhone for your account. In case iPhone sales or transfer it to third parties, be sure to log out of your account so that your personal data is not transferred to other users.
It is possible to create an iCloud cloud not only from a computer, but also directly from an iPhone. To do this, go to “Settings”, etc.
Registering the Yandex Disk cloud on iPhone
We will need to download official application from App Store.
The registration process is quite simple. Open the application and click
If you already have a login from your mail or Yandex Music listening service, you do not need to register. Enter your account details and log in to the application.


Correct setting Yandex Disk and iCloud will allow you to use services in automatic mode. We will tell you how to set up cloud services without errors a little later.
How to quickly access the cloud via iPhone or computer?
If you need to download photos or videos to your computer from the cloud iPhone storage, we recommend using the official and free program from Apple for operating Windows systems- ICloud for PC
Install the downloaded program and make the minimum settings that will be requested automatically.

To go to Apple cloud directly from your iPhone, we recommend that you carry out additional settings on your phone, which will allow you to view files without using additional software. Go to Settings. Select the “iCloud” section.
After you have entered the general iCloud menu, scroll to the bottom to the optional checkbox that allows you to store documents and data in the iPhone cloud. Activate it.


After confirming the storage of data from programs that use the iCloud service, necessary files and backup copies of applications will be automatically copied to the information storage service from the iPhone.
To view files in Apple storage from iPhone, go to home screen or phone desktop. will appear installed application"iCloud Drive" as shown in the screenshot.

The program will allow you to view files in iCloud from iPhone in the form file manager. For the most detailed viewing of not only files and documents from the iCloud cloud storage, we recommend using a data synchronization program for your computer.

Important to know! Try to study all the functions and settings of your cloud storage iPhone devices. “How to use the cloud on iPhone?” There's nothing complicated. Just follow each step in our instructions, and it will answer all your questions in more detail.
How to save photos to the iPhone or Yandex Disk cloud?
To upload photos from your iPhone to the cloud, go to the “Settings” section. Click on your Apple ID account. Next “iCloud” - “Photos”. Make the checkbox next to “Media Library” active.
Apple Company cares about its users and leaves detailed description functions to the most popular menu items in iPhone settings.


As you can already understand, by activating this menu item in the settings, you can upload photos to the cloud on your iPhone. Next, set, if desired, additional settings for saving original photos or, conversely, optimizing the device’s storage.


If you are not sure about synchronizing and transferring photos to iCloud from an iPhone, we advise you to check the downloaded files through the storage program for personal computer.
The simplest and most affordable option for storing photos in the device cloud is to use the Yandex Disk service. The main advantage of this program is comfort and ease of use, and also, compared to iCloud, you are provided with much more free space for saving photos.
Open the disk program and try to configure it according to our instructions. Go to the settings section by tapping the gear in the upper left corner of the display. Pay attention to the menu item “Auto upload photos”. We recommend that you enable active photo uploading only via Wi-Fi to save money. cash, if your telecom operator does not provide unlimited tariff.


Uploading photos and videos to Yandex Disk occurs automatically. On some devices and firmware, users noted minor problems with automatic download. They have to leave the gadget's screen active while data is being uploaded to the server.
You can see the current status of downloaded photos and video files in the “Camera” section. A running bar with the amount of downloaded material will be displayed in the upper status bar of the program. With the Yandex Disk program, you will forever forget about this question, “How to save photos to the cloud on an iPhone?” The application will automatically do everything for you.


Also don't forget, Disk has separate program not only for iPhone, but also for computer. Therefore, downloading photos and video files from the cloud to your computer will be a pleasure.
To transfer a single photo to the cloud on your iPhone from Yandex, click on “Photo”. Select the photo you would like to upload to the server. Click on the sharing button in the lower left corner. You will see a pop-up window with additional information by copy or slide show. Scroll all the way down the apps bar until you find “Disk.” Select or create the desired folder, in which you would like to store photos from your iPhone.


Conclusions
In this detailed instructions We tried to talk about the main advantages and disadvantages of the most popular cloud storage services for iPhone. We advise you to use iCloud to store notes, calendar data, and contacts that are on your phone.
In the case of Yandex Disk, you greatly facilitate the process of uploading not only photos, but also videos from your iPhone to cloud storage.
Don't forget to sync or urgently download photos from the cloud iCloud storage You will need to install additional software on your PC. Yandex Disk allows you to download any files up to 2GB in size from the cloud without installing software.
If you have any questions, we will be happy to answer them in the comments to this article.
protect-sc.ru
How to easily and correctly use the Mail.ru cloud from your phone and computer
Hello, dear readers of the Start-Luck blog. Tired of choosing which game to get rid of on your phone in order to save a photo and vice versa? Yes, the number of gigabytes in smartphones is constantly increasing, but they are still sorely lacking. Our needs grow along with them.
Don’t want to lose important pictures and documents, but don’t know where to send them more securely? Indeed, VKontakte is a great thing, but hacking an account with each saved photo in a dialogue with oneself raises more and more concerns.
My article today will help you solve many problems. I continue to talk about cloud services. Today Mail.ru came into my field of vision.

I will tell you about the Mile cloud, how to use this storage and how convenient it is. In principle, like many products of this company, the cloud from Mail is not much different from its counterparts: Yandex Disk, Google Drive, DropBox, OneDrive from Microsoft, and so on, but I won’t bother you with English-language names that are not familiar to everyone. Let's talk about Mail ru.
What is a cloud
In a nutshell, I would like to tell beginners what a cloud is. I have already devoted a separate article to this issue, but I believe that not everyone has read it. I don't suffer from delusions of grandeur.
So, if you know what hosting is, then it’s not difficult to guess what a cloud is. Essentially, it's the same thing.
Somewhere far, far away in the Mail offices there are servers, in simple terms, large flash drives. You create your personal account (storage) with a login and password on this flash drive, and then upload your documents there. You can access your personal account from anywhere by logging into the site using your details, as well as from your phone through the application or computer through the program.

If you wish, you can assign your document domain name, a title that you can then give to a friend so they can download the file to their computer. This is not necessary. Only you, the sole owner of the login and password for your personal account, can have access.
Advantages
What benefits do the clouds provide? You'll never lose necessary files, since they are, as I already said, somewhere far, far away. You have access to the necessary documents from anywhere in the world. You can easily and simply transfer photos and files to a friend large size via the Internet without meeting anyone in person.
In general, there are a lot of advantages.

Volume
Each company offers free storage space in different amounts. Yandex Disk - 10 GB, although not so long ago this company held a promotion and I managed to get as much as 35 GB for free for unlimited use for connecting the autoload function. I don’t transfer files from my phone to Yandex Disk, but they are downloaded automatically. It is quite possible that similar promotions will be repeated or held by other companies.
Mail.ru not long ago distributed 25 GB in free use, but now the volume has been reduced to 8. In principle, this may suit you. Or, you will work with Mail as additional storage. Together with Yandex, Google and some other cloud storage systems.
How to use
Mile's disk handling technology is no different from the others. First, you need to go to the official website. If you already have mail on mail, then simply click on the login in the upper right corner and enter your login and password. If there is no mailbox, then select “Registration” in the same right corner.

You will be asked to start email. To do this, enter your name and birthday.

It’s great that the system itself offers free and suitable names for mail. All that's left to do is come up with an idea strong password. If you are tired of doing it yourself, then I can offer you a very convenient program RoboForm, she not only comes up with very complex passwords, but also saves them in his memory and enters them every time he sees a familiar interface.
It is not necessary to enter a phone number and additional email.

Ready. You're in the mail. At the top you can see a link-button to the cloud. Click on it.
And here is the welcome inscription. Accept the user agreement.

Computer
On the left side of your personal account screen you will see an application that can be downloaded to your computer. I highly recommend doing this. Since this greatly simplifies working with Disk.

Select the operating system that you have installed.

All, installation file downloaded and you can activate it by double clicking on the program.

Be careful not to install unnecessary functions. For example, I don’t want to change the browser start page to the email one.

Now you see the shortcut on your desktop. Double-click and enter the username and password you recently created for your cloud.

The great thing is that now, in Explorer, when you open any folder, you can see the Mail cloud shortcut on the right. Click on it and you will be taken to a folder stored on the server. You can upload the necessary documents directly here and they will immediately appear in personal account. You can see them both from your phone and by going to the official cloud website using your data.

By clicking on the right button on the file, you will open an additional menu in which you can select the item: “Copy public link”. Select this option, pass the link to a friend and he can receive required document, if he enters your URL into the search bar of any browser.

Smartphone
As I already said, you can also access all documents from Mail Drive from your phone if you install it on it. special application. I use android and the easiest way for me to find it is through Google Play. I enter the name into the search.

I'm installing the utility.

The program weighs only 10 MB and after installation is complete I open it.

Unfortunately, I was unable to take a screenshot of the window in which I was asked to save my login and password. But it appears immediately after opening the program, I don’t think you will be able to miss this moment.

That's it. Now the utility is installed on the smartphone.

By clicking on the three dots next to the file name, I am also prompted to download a link for a friend.

And when you open any document and click on “Send”, in addition to other applications, Cloud Mail is now also displayed. Thus, you upload your file to disk and can view it from any other devices on which the program is installed.

That's basically all. If you liked this article, then do not forget to subscribe to my blog newsletter. And if you are interested additional programs and ways to optimize your work, I can suggest Evgeny Popov’s course “The Secret productive work at the computer."

In it you will find many useful tips about how to make your work more efficient and less time-consuming.
start-luck.ru
Cloud mail.ru - How to use the "storage"
In 2014, the mail.ru company decided to improve the operation of its cloud storage, thus creating a service that is popular today - the mail.ru cloud.
In this article we will look at all the secrets of the cloud service.
Login to cloud drive Every user who has a mail.ru email can. You can log into your account via the link https://cloud.mail.ru/
Custom Vault Login Window for Windows
After the user logs into the cloud for the first time, he will be given 25 GB of free space completely free of charge.
This is quite a large volume compared to similar cloud storages, which provide their users with from one to twenty GB of free free space.
A few months ago, the Mail.ru company decided to conduct a full-scale campaign to attract new customers to its service.
Each registered client not only receives 25 GB of free memory, but he also has the opportunity to become the owner of 1 TB of space on the cloud for free.
To take advantage of this opportunity and get a terabyte of memory, you just need to register in the system. It will happen in time automatic setting user profile and additional free space will appear.
Many people have probably heard of such a concept as cloud storage data. It sounds a little confusing, but in fact everything is simple - it’s nothing more than free hosting for your files. You register in the service, you are given a certain amount of disk space, which you can then increase - for money or for certain advertising actions, which we will look at below. Essentially this virtual hard disk, only the documents are stored not on your computer, but on a server on the Internet. In this article I will show in detail how for free use the best cloud storage in RuNet - Yandex and Mail.Ru
This method of storing information has two big advantages over traditional storage on a hard drive on a computer or on a flash drive.
Therefore, cloud storage is very convenient way creating a backup copy of documents that are important to you. Cloud technology V lately has become very widespread and new services are appearing all the time - free and paid - providing this service. And today I would like to consider two of the best cloud storage services on the Russian-language Internet today - Yandex Disk, which has already proven itself, and Mail.Ru Cloud, which has recently come on duty.
Free data storage Cloud Mail.Ru
This service appeared quite recently - just the other day I saw it and then the idea came to me to write this article. In order to create one, you must first register with Mail.Ru. Initially, 10 GB of space is given, which can be increased up to 100 gigabytes by making several simple actions.
So, register in the mail, log into your account and follow the link cloud.mail.ru.
Click on the “Try Cloud” button

And after a few seconds we get mailbox a letter notifying you that your free cloud storage has been created.


The interface here is very logical, so it’s quite easy to navigate. You can create an unlimited number of subfolders, upload and delete files. But first, let's look at how to increase the space from 10 to the promised 100 gigabytes.
Click on the “Get” button more space».

- Installation on a computer - +10GB.
By downloading and installing the application on your computer, you can automatically synchronize a specified folder on your computer with cloud file storage, which will allow you to automatically do backup copy files. There are versions on Windows, MacOS and Linux.
I selected and downloaded for Windows. Install the application and launch it on your computer. The first window will ask you to enter the login and password for your Mail.Ru mail.


- Installation on a smartphone - +10GB.
The same thing, only for a smartphone. Also present popular systems- iOS and Android. Windows Phone is not on the list yet, but I think it’s not far off, and owners of modern Nokias will soon also receive their own application for synchronizing smartphone folders with hosting.Let's see how this works using an Android smartphone as an example. Download from Play Market Cloud Mail Ru application. Log in using your email username and password.

We accept the agreement, skip the welcome screen and be sure to enable auto-upload of photos, it will add another 10 GB to us. Then click “Get Started”.

The transfer of photos from the phone to the hosting will begin, and in the phone we will receive a catalog of all cloud files.

- Public link +10GB.
To activate this mode, you need to download at least one file and make it public, that is, allow other people to download it.First, let's download the file. To do this, for now, close the window with ways to expand space and click on the “Download” link. A window will open into which you simply need to drag and drop all the files that need to be placed in the cloud data storage.

When the files are uploaded, click on one of them and in the right column click on the check mark icon so that a link to the file appears under it - now it is available for downloading, and the link can be given to friends or posted on the website.

- Auto-upload of photos – +10GB
Let's return to the disk space expansion window. If you have installed an application from this cloud storage on your smartphone, but did not activate auto-upload of photos when you first log in, then do it now. As soon as you go online from your phone or tablet, all the pictures you take are automatically uploaded to your account. Then you can disable it, as well as completely remove the application from your phone - but now our goal is to get as much disk space as possible.5. Tell your friends - + 25GB
This method is the easiest and at the same time the most effective - it will give you a lot of space at once. And there’s nothing to do - log in under your nickname on one of the social networks (Facebook, VKontakte, Odnoklassniki, My World or Twitter) and post a link on the wall by clicking on the “Tell your friends” icon.
- And finally, if you go through all the steps, they will give you the remaining up to one hundred and 25 gigs. We get this beautiful picture:

Cloud storage Yandex Disk
I have been successfully using Yandex Disk cloud storage for a long time to store my video courses. Similarly with Mail, you need to have a Yandex mailbox to receive free storage under files. After that, go to the link disk.yandex.ru and immediately get 10GB.
After that, inviting friends on a special affiliate link For each user attracted by this service, you will receive another 512 MB, until you increase it to 10 GB. This is the limit of free stuff - just buy from there.

In the storage itself, you can conveniently create as many subfolders as you like and upload files there.

In order for your friends to download these files, click on the downloaded document and move the “Public Link” slider to the “ON” position. The resulting link can be posted on the site and given to users. but keep in mind that if you remove this file from public access, and then turn it on again, the link address will change.

You can share not only files, but also entire folders. To do this, just like with a file, you need to enable its publicity and send invitations by email or social network profile to join the shared folder to your friends, selecting the access level - read only or change. In this case, friends, of course, must also have their Disks in the Yandex service. But please note that after accepting the invitation shared folder will be copied to the account of the person who accepted it and will take up disk space.
You can also automate the operation of the service - download a special program and install it on your computer. After this, select a folder on your computer and its contents will be automatically synchronized with your data on the Yandex Disk service. Versions are available for both computer and mobile OS.
How to access the cloud from a smartphone?
I will not consider here an example of installing an application on a PC - this is done in the same way with the cloud from Mail Ru. But more interesting way— log into the data storage from your mobile phone. Special program for a phone is not provided here, but we can still do this using the universal explorer for Android that we have already discussed, from which you can connect and enter folders like network devices, and clouds - we are talking about ES Explorer. If you remember, through it we connected to file server V local network.
Launch this program and open the “Cloud Storage” tab

Click the “Create” button and select Yandex Disk from the list of supported services.


We connect, go into the disk and see all the folders and files located on it. Unfortunately, there is no auto-sync option here, like with email - you can only go to your Drive and download or upload manually.

That's how easy and free you can get a huge virtual disk in a cloud data storage, and for free. By registering in several services at once, you will receive as much space as will definitely be enough for you for the next few years - use it!
The modern Internet has provided all users with such a huge number of opportunities that even simply listing them would take quite a lot of time. And what’s best is that the list of available technological innovations continues to grow quite rapidly, and existing solutions are being improved, rapidly approaching perfection.
Such continuous technological evolution has also affected storage media, adding to the list of stationary and portable devices new group data storage – cloud storage. Thanks to their widespread implementation, user work with information has been transferred to a new, more modern and reliable level.
The idea of cloud disks (storages) is simple and extremely clear: the user can store files that are necessary or simply interesting to the user not on his own PC or mobile device, but on network storage on the Internet (on secure servers) and you can access such information from anywhere in the world.
The concept of such storages turned out to be so popular that Internet giants such as Google and Yandex instantly implemented it for their users.

However, today we will talk about another organization - the Mail.ru company, which developed and put into operation own cloud, often superior in capabilities to the services of the above companies (the size of the provided disk space is noticeably larger than competitors, the file transfer speed - downloading / uploading is also higher).
You can download mail.ru cloud to your computer for free in Russian. The link is available on the Mail.ru website in the user’s account (shown in the screenshot), or on our website at the bottom of this material (before the section " technical information"). Let's say right away that every user who has opened a mailbox on their servers has the ability to access the cloud.
As you already guessed, so The storage can be fully used through any modern Internet browser, however, it is most convenient to do this through free program for Windows computer.

Features of working with the Mail.ru cloud:
- simple and clear user interface both when using the web version of the cloud, and in the case of software installed on the computer;
- The size of the free disk space is 25 GB (for additionally allocated disk space will have to pay);
- The file upload limit is 2 GB (if you install the program, all limits are removed);
- If you install the program on a PC, working with the cloud is reduced to working with a regular Windows folder, data into which can be copied or deleted from there. All changes made in this way will be made on the cloud itself (on the Internet) thanks to the automatically launched synchronization function;

By the way, users are not left out either operating systems Mac OS, Linux, and owners mobile devices based on Android and iOS OS, for which adapted versions of the programs were released.
Advantages of cloud storage Mail.ru disk
- First of all, there are no restrictions on the speed of downloading a file or uploading it to the cloud. The only limit is the speed of the user’s Internet channel;
- You can download from disk or upload to disk several files at the same time (this applies to both the web version of the service and when installing the program on a PC);
- when uploading files to the cloud, they are automatically scanned by Kaspersky anti-virus, which minimizes the transfer of unwanted software inside file archives and malicious macros in office documents;
- high reliability of data storage. It is ensured by the use of two independent data centers, one of which stores the original, and the second acts as a backup storage (in case of failure when using the first);
- a document placed in the cloud cannot be forgotten at home - to access the file you only need access to the Internet;
- text files can be created directly in the browser, and then using a simple web analogue Microsoft Word edit online. The same opportunity is available in the mode of working with presentations and spreadsheets;
- mail.ru cloud can be downloaded for free on any modern device.

Separately, I would like to say that a document posted on the mail.ru cloud can be viewed and edited by all interested parties (employees, friends or family). To do this, you need to share access to a folder or file, such as Google Drive.
We recommend this service as the simplest and most accessible option for simple and advanced users. Let us remind you that you can download the mail.ru cloud to your computer using a direct link on our website or from your personal account postal service. And to remove a program, use the control panel options in the "Add or Remove Programs" section.
Hello dear visitors! If you have come to this page, then most likely you are interested in the question of storing files in the cloud. I’ll write now and, as is already customary on this site, I’ll show you in pictures, how to install and configure Google Drive. But I think it wouldn’t hurt to write a few words about what cloud storage is, why they are needed, and tell a little about Google Drive, also known as Google Drive.
In simple words, cloud storage is a service that provides you with a specific place on the Internet to store your files. One of such services is. He appeared on the market almost simultaneously and began providing his services. There are many more similar services, among which Dropbox is worth highlighting; perhaps there will be a separate article about it.
Why am I going to write about Google Drive today? As you probably already guessed, I myself am using it now, and just yesterday I reinstalled the systems and I need to install this program on my computer again, I’ll just take screenshots :).
The convenience of such services, in particular Google Drive, is that you get a “flash drive” on the Internet on which you can store information, and most importantly, have access to it from anywhere where there is Internet and the ability to access service website. All you need is to know your username and password to access. Of course Google company created applications for computers, tablets and smartphones on different platforms. All this is for the convenience of using the Google Drive service.
Immediately after registration, you will be given 5 GB of file storage for free. For 2.5 dollars you can increase it to 25 GB, and this is not a limit.
I think this useless theory is enough :), let's get down to business.
To use Google Drive, you need to create a Google account.
Of course, you need to register with Google in order to receive a username and password. You can read about how to create an account on Google in the article. Or if you are already using at least one of Google services, for example Gmail, then to log into Google Drive you can use the login and password that you already have.
To register with Google Drive, or to learn more about its capabilities, go to the page. Click the button on the right “Go to Google Drive”.


After registration, log in to the site using your details.
How to install Google Drive on your computer?
Now we have come to the most important part of this article; now we will install a program that will allow you to conveniently work with Google Drive.
Let's go to . Let's go to the page.

Select the version for computers and click “Download”.

A window will appear in which you simply click “Accept the terms and install”.
A message will immediately appear that Google Drive is loading. Then the installation will begin.

When installation is complete, click “Close”.

That's it, the installation is complete. The program will launch itself, click the “Login” button. Enter your address email and password, and click “Login” again.

A window will appear in which we click “Forward”.
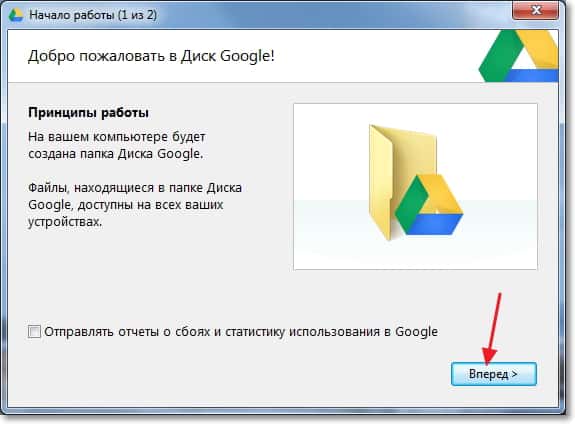
In the next window, the program will inform you that all files that are already on Google Drive will be synchronized with a specially created folder on your computer. For additional settings click “Advanced settings”, but you won’t see anything interesting there, you can change the location of this very folder, and indicate whether Google Drive can be launched when you turn on the computer, and that’s essentially all. Click the button "Synchronize".

That's all.
How to use Google Drive on a computer?
A Google Drive folder will appear on your desktop, and it will also appear in Explorer. Once you move your files to this folder, they will automatically be uploaded to the cloud and you can access them from any device. Or, when adding files from another device, say a tablet, they will automatically appear in this folder.
For example, when I need to transfer photos from my phone to my computer, I simply upload them to Google Drive, then on my computer I go to the Google Drive folder and copy them from there. It's even faster than connecting your phone via cable.
Also, a program icon will appear on the taskbar (in the tray), by right-clicking on it, you can see how much you still have left free memory to Google Drive, you can also go to the program settings.