Word 3 how to make a landscape sheet. Making a sheet with landscape orientation in Word. Setting landscape orientation in any document
Using text Microsoft editor Word, we most often work with sheets that have book orientation. Most documents are based on this view. But often there is a need to use the so-called landscape orientation . In the picture below, you can see both types. This will help you get your bearings if you still don’t know the difference.
A striking example of a document with landscape orientation is an invoice. Surely you have come across a similar option.
In the instructions below you will find detailed description how to do album sheet in Word. This is suitable for the popular versions of the editor 2007 and 2010.
Apply landscape orientation to all sheets of the document
If you need to make sure that all sheets of the future or current document have a given orientation, follow the instructions below.
Please note . We already worked with tapes when we made . Check out this article.
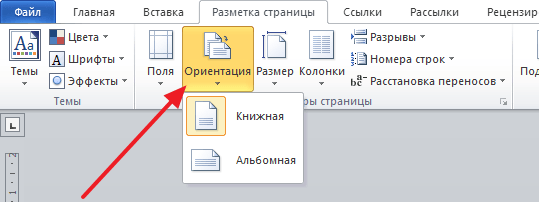
In the menu bar, go to the ribbon " Page layout". Here we click the "Orientation" button.

When you click the button, a drop-down menu will appear. Here you need to put the switch in the "Landscape" position.

If everything is correct, this type orientation will automatically apply to all sheets of the document. In the future, if necessary, you can return the book orientation by analogy.
Landscape orientation for one sheet in a document
Please note . You can use all sorts of tools to create a document. would be perfect for this role.
As you can see, it is not possible to configure orientation settings for all sheets at the same time. a lot of work. It will be a little more difficult to solve the problem when you need to adjust the orientation for one or more sheets. For example, we have a document consisting of 15 pages. We need to make sure that page 13 has a different orientation from the others. Let's see how this can be done.
First, we need to go to the sheet (page) whose orientation we want to change. Go to, this means that the cursor should be on this sheet.
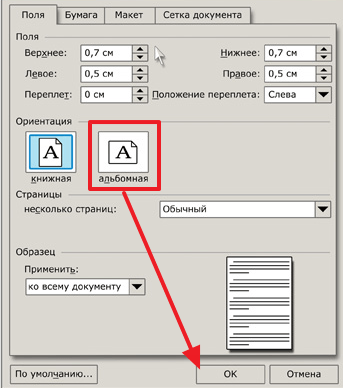
Now go to the tape" Page layout", and click the "Page Setup" icon in the lower right corner:

In the menu that opens we select desired type orientation (different from document settings). And in the lower drop-down menu "Apply", we select the item " Until the end of the document". Then click OK.

Now all sheets up to the end of the document will have the selected orientation type. But we only need to do this for one thing. Therefore, let's move on to the next step.
We skip the sheet for which we have configured the desired type of orientation and place the cursor on the next one after it. We repeat the operation, orientation settings. Thus, we will return all remaining sheets to their original type. If everything was done correctly, you should get the desired result.

To cancel changes, go to the very first sheet, set the desired orientation type in the parameters, and select the " Apply to entire document".
Video for the article:
Conclusion
This instruction can be used in all kinds of technical documents. There the task often arises of publishing tables and graphs on the entire page, and it is advisable to use landscape orientation.
To insert, please download it first.
Why look for information on other sites if everything is collected here?
People are accustomed to completing all office and work documents using the program. Microsoft Word. Beginner users often wonder how to flip a sheet horizontally in Word. By default, the program produces vertical, or book, pages - long but narrow. Find out how to turn a page in different versions of Word.
How to make a landscape page in Word for the entire document
To print a wide table, chart, or insert an image, it is best to use horizontal view pages. For regular text, standard will do. book format. To change the paper orientation, you do not need to install additional editors or programs, you just need to follow the steps and steps from the instructions below. It is important to remember that when using different versions program, it is worth turning to different sequences and algorithms. Learn step by step how to create landscape orientation in Word.
In Word 2003
The oldest, but still no less popular version text editor does not differ in functionality from the newest ones. Additional options, new fonts and beautiful design added every year, but the base remains unchanged. The position of the document is one of the main criteria of the editor. How to make a landscape sheet in Word 2003? Making these changes is easy and simple; you just need to remember the algorithm once:
- Open the File tab. To find it, look to the left top corner.
- In the menu that opens, find and click “Page Options”.
- On the “Page Orientation” line, select the icon depicting the desired orientation.
- Using the same menu, you can return the classic page position.
For Word 2007
The algorithm is simple:
- Since you can make a landscape sheet in Word only using the menu, you need to expand the “Page Layout” column in top line menu.
- The word “Orientation” will be located on the bottom line; it should be the leftmost one. You have to click on it.
- Two items will open: “Portrait” and “Landscape”. Once selected, you can change the layout of the pages of the entire document.
In Word 2010
New and latest versions Word programs are not very different from 7: the design has changed a little, the color scheme has changed, but the functionality meets the highest requirements. Changing the position of the sheet using the tenth year version is as simple as in older ones. To do this you need:
- On the Navigation Panel, select “Page Layout”.
- Among all the functions: theme, color, effects, margins, size, background, border color, line numbers, breaks and others - you need to find “Orientation”. It will be closer to the left edge, but you shouldn't look for it by looking at the corner of the menu.
- After clicking on this button, you should choose from two options that appear: “Portrait” or “Landscape”. The first is vertical, and the second is horizontal. After such simple actions the document will take on the desired appearance, and place necessary information it will become much easier.
How to make one page in Word landscape

If you have figured out how to turn a vertical sheet into a landscape one, all that remains is to learn the last secret, how to delimit each page and give it its own arrangement. You can set a new sheet to have a different orientation than its neighbors. Here are the steps to take:
- We need to make it active. To do this, you just need to place the cursor on this sheet, highlighting any line or word.
- Open the familiar “Page Layout” tab.
- On the expanded window, among all the options, you need to click on the small “expanding” arrow - “Page Options”. It will be in the lower right corner.
- The characteristics window appears. Mark the desired location.
- For the bottom “Apply” column, you need to select “until the end of the document”.
- Click "OK".
- After this, all pages, starting with the selected one, will change orientation.
- To make only one sheet horizontal, you must continue to follow these instructions.
- Make the next sheet from the document active. And do all steps two through six, only changing from landscape to portrait, and not vice versa, as you did from the very beginning.
- As a result, only one page stands out from the crowd.
Setting the sheet orientation to landscape is one of the most common tasks that users encounter when working with the Word text editor. In some cases, you need to change the orientation of sheets for the entire document, and in others only for one or a few pages. If you are also faced with a similar problem, then this article will be useful to you. Here you can learn how to make a landscape sheet in Word 2003, 2007, 2010, 2013 and 2016. We will also tell you how to make a landscape sheet for only one page of a document.
If you want to make a landscape sheet in Word 2003, then to do this you need to open the “File” menu and select “Page Setup” there.
This will open the Page Setup window. Here you need to select the “Landscape” sheet orientation and click on the “Ok” button.
This way you can make landscape sheets throughout your Word 2003 document.
How to make a landscape sheet in Word 2007, 2010, 2013 and 2016
Word 2007, as well as more modern versions of this text editor, uses the so-called ribbon interface. This is an interface in which all the tools are distributed into several tabs.
So if you use modern version text Word editor, namely Word 2007, 2010, 2013 and 2016, then in order to make a landscape sheet you need to perform slightly different operations. To get started, you need to go to the “Page Layout” tab. All the main tools designed to manage are displayed here appearance pages. Among other things, there is an “Orientation” button, by clicking on which you can choose one of two options: “Portrait” or “Landscape”.

By selecting the “Landscape” option, you will convert all sheets of the Word 2007 (or 2010, 2013, 2016) document to landscape orientation.
How to make a landscape sheet in Word only one page
If you want, it will be a little more complicated than converting the entire document to landscape orientation. After all, this will require dividing the document into sections. Below we will demonstrate how this is done using the ribbon interface of Word 2007, 2010, 2013 and 2016 as an example. But, these instructions will be useful even if you have Word 2003, since the same principle is used there.
So, first you need to enable the display of non-printable characters. This will make it much easier to work with sections.

The next step is to place section breaks. In order to make a landscape sheet in Word on only one page, you need to insert a so-called “Section Break” before this landscape page and after the landscape page.” To do this, place the cursor on the page that comes before the landscape one, go to the “Page Layout” tab, click on the “Breaks” button and select the “ Next page" Next, place the cursor at the end of the page that you want to make landscape, and again set the section break after the next page in the same way.

After that, place the cursor on the page that you want to make landscape and change its orientation to landscape.
If you did everything correctly, then you will receive a landscape sheet of only one page, and not the entire one Word document. After this, you can turn off the display of non-printable characters and continue to work with the document as usual.
When creating a new file in Word, the page orientation is initially set to vertical, which is suitable for many tasks, for example: abstracts, reports, books, etc. But sometimes you need to print 1 wide picture or make a wide diagram, which on a regular sheet will look flattened and irrational. In order to figure this out, you need to know how to make a landscape sheet in Word.
How to set landscape orientation in Word 2003 - 2016
In fact, create horizontal pages is not difficult, and beginners usually face this problem. But Word has so many functions that, while learning new, more complex office features, you sometimes forget the simplest ones. To refresh your knowledge, follow the instructions below.
When you launch a document, you can see a menu at the top where you can select specific sections. In order to set landscape orientation in Word, you need to:
- Go to the “Page Layout” menu;
- Click “Orientation”;
- Select "Landscape".

Thus, all sheets will be landscape, but what if you need to make only one sheet horizontal and leave the rest vertical?
It will take a little longer, but even a child can do it if he follows all the steps consistently. If you make changes to a finished document, be careful, otherwise the vertical sheets will turn into horizontal ones and the page markings may move out.

Instructions:
- Go to the “Page Layout” section;
- There is an icon in the bottom right corner of the “Page Settings” block; click on it to open the window;
- Select Landscape Orientation;
- In the drop-down menu in the “Apply” line, select “To the end of the document”;
- Click OK.
If you want to create only one or several landscape sheets, while keeping the rest standard, then add horizontal pages to the very end of the document. If this option does not suit you, then do not forget to return portrait orientation from the page where the standard view is needed. Otherwise, all subsequent ones will have a horizontal appearance. To do this, do all the same steps, just place the cursor on the next sheet and at the end select “Portrait View”.

The standard page orientation in Microsoft Word is portrait, with vertical placement content. But sometimes it is more convenient to expand the sheet in landscape view, on which you can place a wide picture or sign. This is not difficult to do, and you can turn one or several pages at the beginning, end or middle. We'll tell you how to make a landscape sheet in Word, depending on the version of the application.
In Word 2007 and older
If you decide to do landscape page In Word 2007, go to Page Layout. Click the “Orientation” sub-item and click “Landscape” in the drop-down menu – this way you can expand all sheets.
If you decide to make one page landscape and leave the others portrait, select the text that should appear on the unfolded sheets. Open additional settings functions: in the same section of the menu, click on the “Page Options” dialog call - a button in the form of a square with an arrow in the lower right corner.
Here, on the “Margins” tab, options are available: the type of orientation and what to apply it to. Initially set to “to the entire document”, change it to “to the selected text” and set the orientation to landscape. Sheets with selected text will become horizontal, the rest will remain vertical.
In Word 2003 and earlier
How to make a landscape page in Word 2003 and younger: open the “File” menu section and click on the “Page Options” sub-item. In the new window on the “Margins” tab, look at the “Orientation” heading, where there are 2 switches: portrait and landscape. If you need to change the layout format of all sheets of the document, click on “landscape” and confirm your choice with the “OK” button. The pages will unfold, the content will remain in place.

If you want to change the orientation of one page or several, but not all, the settings in the “Apply” drop-down list will help you. Set it to change the location of only the selected sheets - as described above for word versions 2007.
Conclusion
We figured out how to make a landscape sheet in Word. Manage the position of pages, expanding all or just some for a more convenient arrangement of content.