The file is too large for the destination file system. How to write a file to a flash drive
Hello dear visitors. Yesterday they asked me a question: what should I do? I can't send it off large file to a flash drive? The system says that there is not enough disk space, but there is enough space on the flash drive. It was necessary to copy a movie of about 9 GB in size to a 16 GB flash drive. If you think logically, then everything should fit, but the system refused to put such a large file on a flash drive and that’s it.
I knew what was going on, and while I was explaining what needed to be done, a bright thought appeared in my head that I should write about this on a blog, so I’m actually writing it :). Let's first explain why large files, or to be precise, files larger than 4 GB do not want to be written to the flash drive and a message appears that there is not enough disk space.
The fact is that when you buy a flash drive, it is already formatted in file system FAT32, and the file system is FAT32 does not support files larger than 4 GB. Here's the thing, it's very simple. We need to change the file system of the flash drive from FAT32 to NTFS. Because the NTFS file system supports, if I'm not mistaken, files up to 16 GB.
This question is becoming more and more relevant every day, because the size of memory on flash drives is growing and they are becoming cheaper every day. You can already buy a 16 GB flash drive for the same money that a year ago you could only buy a 4 GB one.
We just need to change the file system of our flash drive from FAT32 to NTFS. I will now write two ways in which you can do this.
Format the flash drive to the NTFS file system
I have already written about how. But I think it wouldn’t hurt to repeat it again and pay special attention to the fact that we are formatting it into an NTFS system.
Attention! Formatting a flash drive will destroy all information on it. Make sure that your flash drive does not contain the files you need. If there are, then copy them to your computer.
We connect the flash drive to the computer, wait until the computer recognizes it, go to “My computer” and right-click on our flash drive, select "Format".

A window will open in which we need to select a file NTFS system, select and click “Start”. We agree to the system warning.

After the formatting process is completed, you will receive clean flash drive with the NTFS file system, to which large files can be copied.
Converting a flash drive to NTFS for writing large files
The second method is to simply convert the flash drive to NTFS, this method essentially differs from the first, only in that the files you have on the flash drive will not be lost. But I still advise you not to risk it and copy necessary files to the computer.
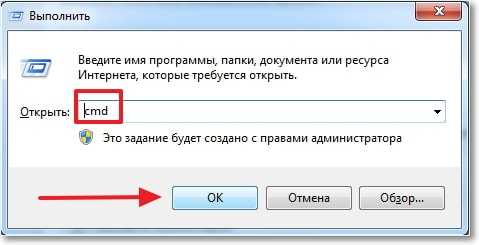
Our flash drive is connected and recognized by the computer. We go to “Start”, “All programs”, “Standard” and select “Run”. Or just press Win+R. A window will open in which we write the command cmd and click “Ok”.
A window will open in which we need to enter a command to convert the flash drive to NTFS:
convert k : /fs:ntfs /nosecurity /x
Where k is the letter that the computer assigned to your flash drive, go to “My computer” and see what letter you have. Enter this command and press “Enter”.
 Once completed, a report will appear:
How to transfer a large file to a flash drive? Converting a flash drive to the NTFS file system. updated: December 27, 2012 by: admin
How to solve the problem with slow data copying to a flash drive? Let's look at the common causes of this problem and talk about ways to solve it.
1. Flash drive performance
If everything is in order with the computer, the culprit of the slow process of transferring files to the flash drive is, accordingly, the latter. Budget flash drives, as a rule, cannot boast of impressive data recording speed. And the speed is 5-7 Mb/s with the interface USB connections 2.0 may be commonplace for those. You can test the data writing speed of a flash drive using Windows speed testing programs hard drives, in particular, through the popular utility. You should not expect more speed from the flash drive tests than it will show in reality.
2. Computer USB ports
Purchased with the expectation of more quick recording data USB flash drive 3.0 will work exactly the same as a USB 2.0 flash drive, if only this interface is supported by the computer, and USB 3.0 is not. The flash drive will limit the speed of the port. To get the performance of a USB 3.0 interface when copying data, your computer's USB ports must be equipped with it. The same applies to the situation when USB drive 3.0 or 2.0 connects to USB port 1.0. Windows, as a rule, immediately reports that the flash drive is connected to a low-speed USB 1.0 port system notification: They say this device can work faster if it is connected to a USB 2.0 port.
If data is slowly copied to a flash drive that is connected to a USB port on the front panel of the PC case, you can test its speed when connected to USB ports motherboard behind the body. It may be that the front panel of the case has USB ports 2.0 or 1.0, while the motherboard ports provide .
Just like USB ports, which limit the speed of data writing, USB extenders can limit the speed of copying files. If a USB extender provides a USB 2.0 interface, it will throughput will limit the speed of the USB 3.0 flash drive interface and the computer’s USB port.
3. Weak computer hardware
On old or budget models computers, slow data writing to a flash drive may be due to weak hardware, in particular, small volume RAM or slow hard drive. In this case, only upgrading your computer will help.
4. Drivers
Slow copying of data to a flash drive may be a result of incorrect installed drivers USB. In this case, you can either update the motherboard drivers or reinstall the USB controller drivers. You can update motherboard drivers manually by downloading the necessary installers from the official website of the board or laptop, or you can entrust this task to special programs - driver installation managers. Among them: DriverMax, Auslogics Driver Updater, SlimDrivers, Advanced Driver Updater, etc.
To reinstall USB drivers-controllers open the manager Windows devices, expand the branch " USB controllers" and using the "Delete" option in context menu For each device in the list, remove its driver.

USB controller drivers will be installed automatically.
5. BIOS settings
In some cases slow speed writing data to a flash drive may be a consequence of limiting the speed of USB ports in the BIOS settings. Such a limitation should be looked for, as a rule, in the advanced section BIOS settings"Advanced". If the “USB 2.0 Controller Mode” parameter is set to “Low-speed”, it needs to be changed to “Hi-speed”.
6. How to speed up writing data to a flash drive using software
If the cause of the problem lies in the low data writing speed of the flash drive itself, unfortunately, it will not be possible to significantly speed up the process of copying files to it. Even if we have a powerful computer. By software The file writing speed can be increased only slightly.
If you need to copy several small files to a flash drive, it is better to combine them into one archive file. And place this archive file on the flash drive. One hefty file will be copied faster than a lot of small ones. By the way, when copying small files, even high-performance USB drives can “sag.”
You can slightly speed up the transfer of files to a flash drive using special programs, winning against regular funds Windows copy some share of performance due to its own data copying algorithms. One of these is WinMend File Copy, it can be downloaded for free from the creators’ website www.winmend.com/file-copy.

WinMend File Copy has Russian-language interface, supports batch file copying, buffer adjustment, and resuming data transfer from the point where it was broken.
Have a great day!
Hello friends, you are absolutely right, most of the flash drives sold in stores are formatted in the FAT32 file system, and if you want to copy a file larger than 4 GB to such a flash drive, the error “The file is too large for the target file system” will appear. Why? Yes, because the maximum possible file size for a volume formatted in FAT32 is 4 GB or 4,294,967,295 bytes. This means that the file size cannot be larger than this value. The same information applies not only to the flash drive, but also to the partition hard drive, if it is formatted in the FAT32 file system.How to win in this situation? The fact that a flash drive can be formatted into the NTFS file system is understandable, but what if there are already files on the flash drive and it’s simply too difficult to copy them somewhere?
Firstly, you can simply convert your flash drive to the NTFS file system without losing data in the command line using the convert command and then copy your 4.7 GB ISO image to it. Details with screenshots below.
Secondly, you can split ISO file into several parts and then assemble, I will explain how to do this later in the article.
Thirdly, if it comes to an ISO image with a capacity of 4.7 GB, then you can simply archive it with the WinRAR archiver program, after archiving your file will be approximately 3.3 GB, you can easily copy such a file to your flash drive and then unzip it.
Fourthly, if it comes to an entire hard drive partition, then it can also be converted to the NTFS file system without losing data.
Now about everything in detail.
How to convert a FAT32 flash drive to NTFS file system without losing data in the command line
We connect the flash drive to the computer and the flash drive, for example, is identified by the letter L:.

As you can see, there are files on my flash drive; nothing should happen to them during conversion.

Opening command line as administrator and enter the command convert L: /FS:NTFS (where L: the letter of the flash drive, in your case the flash drive may have a different letter!) and press Enter, that’s all, converting my flash drive from the FAT32 file system to the NTFS file system took 30 seconds without data loss. The files on the flash drive are safe and sound. Now, when copying a file to a flash drive with a capacity of more than 4 GB, the error “the file is too large for the target file system” will not occur.


How to split an ISO image into several parts and then assemble these parts into one
For this purpose, we can use the most famous WinRAR archiver
http://www.win-rar.ru/product/winrar/
Right-click on our image and select “Add to archive”

The “Archive name and parameters” window will open, in the lower left corner of the window we see “Divide into volumes of size”, select here the unit of measurement for the amount of information GB and set the size to 2 GB, this means that our image will be divided into two archives of 2 GB each - Obraz igra.part1.rar and Obraz igra.part2.rar. If you select MB, then set the number to 2000. Click OK, and the short process of archiving and dividing our file begins.


After the process is completed, copy the two images to a flash drive formatted in FAT32, go home, copy the files from the flash drive to your computer and assemble the image. Right-click on the Obraz igra.part1 archive and select “Extract to image.” A minute later a folder appears with our intact and functional ISO way volume 4.7 GB.

How to convert a hard drive partition formatted in FAT32 to NTFS without data loss
With the command already familiar to you, you can convert even the C: drive with the operating system installed to NTFS without losing data, we have a whole article about this, please read. At the same time, you will find out how else these two file systems differ from each other.
Sometimes problems can arise, as they say, empty space. It is precisely such eccentricities that provoke confusion among users, a lack of understanding of what caused the problem, and even more so, how to solve it.
Any content that is very important for implementation is often dumped onto a flash drive, which is currently the leader among removable drives. professional activities person, as well as to organize your free time in an interesting way.
Resetting a favorite movie is a piece of cake for many. What a disappointment and incredible surprise it is when you suddenly discover that files are not copied to the flash drive.
At the same time, they begin to be even more surprised when they discover that one film is copied without problems, but the second simply refuses. It is for this reason that many people want to figure out why .
Problems with resetting content
In most cases, this problem occurs when the user tries to reset the file large size. Of course, many may object and say that for a large flash drive, a capacity of 4 GB may be negligible, but believe me, even this can act as the main reason.
Causes and solutions to problems
If you are unable to copy a file to a flash drive, pay attention not so much to the size of your removable drive, but rather to the format it comes with.
In most cases, manufacturers format removable media in FAT16 or FAT32 format. In this case, no matter how much you try to change something, to force a video whose size exceeds 4 GB to be copied, you will not succeed.
The fact is that such a file system does not support moving and saving large files. However, this does not mean that you will have to fold your arms and never achieve your goal.
Everything can be solved, you just have to first format the flash drive in NTFS format. Right-click on it, select the “Format” option, and in the window that opens, select NTFS format.

Once this process is completed, repeat the process of copying the large video file. We are confident that this time what you previously failed to do will now work out.
Of course, this is not the only reason for the problem. It may happen that there is simply no free space on the flash drive.
In this case, you should check the amount of filled and free volume. You can open “Computer”, hover your mouse over the removable media icon, and information regarding free space will appear.
You can also simply view this information by right-clicking on the media shortcut and selecting the “Properties” option. A new window will open, which will indicate the information of interest and even demonstrate it in a pie chart.

Greetings, dear users! In my previous articles, I have already written articles on the topic of USB storage media, namely, what needs to be done if, or another example, and important data for us remains on it, what to do in such a situation in order to recover data from a flash drive .
If you really don’t know what to do in such situations, then I recommend that you read these articles. Since I started today’s article by talking about flash media, today we will learn another useful point directly related to the flash drives themselves.
Imagine that you decided to write an image of some program or toy onto your flash drive (by the way, I already wrote an article about what an image is, you can read more). Let's imagine that the volume of your flash drive is 16 GB, and your flash drive is completely empty and formatted. In turn, the volume of the recorded image is about 6 GB. At the moment when you try to write an image to a USB drive, a notification of the following nature appears: “Not enough disk space”. Agree that the appearance of a notification of this kind puts you in a kind of dead end situation, because the flash drive itself is completely empty and has 16 GB free space.
What if we just copy to USB storage a file whose volume is less than 4 GB, then in this case the file itself is successfully placed on the flash drive and no errors associated with a lack of free space occur. The question arises ?
At one time, I also had to deal with a similar phenomenon when a file with a volume of 5.7 GB was not written to a removable disk, while another file whose volume was approximately 4.3 GB was written to a flash drive without any problems. So what exactly is the problem then, you ask?
In this article, we will try to understand why files larger than 4-5 GB may not be written to your flash drive. Do you know why such large files are not written to flash media? In general, more and more often, many users who encounter this problem are asking the following questions: how to write a file larger than 4 GB to a flash drive. Regarding the current issue, I can tell you that I have heard different answers, or rather arguments, reasoning from users who have not encountered a similar phenomenon before.
For example, on one of the forums, a user suggested the following answer options: files are not written to the flash drive because there is a virus there, which takes up all the free space disk space flash drive, or the flash drive is damaged or burned out.
I will tell you that in such a situation, when large files (more than 4-5 GB) are not written to the flash drive, this does not mean at all that it is damaged or there is some kind of virus on it, malware. And the reason for this is the fact that the flash drive has a FAT32 file system.
By the way, I recommend that you also read my article:
From here you should remember once and for all that this file system is not capable of supporting large volumes of files (more than 4-5 GB) for work.
Therefore, if you want files larger than 4 GB to be successfully copied to a USB drive and then used by you for a specific purpose, then in this case you first of all need a flash drive with the NTFS file system. In general, they say that the NTFS file system has the ability to contact such files, the volume of which can reach up to 16TB. From all of the above it follows that in order to To write a file larger than 4 GB to a flash drive, you will need a flash drive with the NTFS file system. Run specifically to the first store you come across computer equipment It is not worth purchasing such a flash drive.
I suggest you move on to the practical part of this article to clearly see how to independently convert the file system of your flash drive. So, I hope it is now clear to you that we will need to perform a number of necessary steps to create a flash drive with the NTFS file system.
In this article we will look at several options that will allow you to convert the file system. Therefore, if you have difficulties copying large files, then this article will help you solve your problem.
First Option:
So, after you have connected the flash drive to your computer, and the latter has successfully identified and recognized the USB drive, you will now need to go to the properties of the removable device.
To do this, open “My Computer” and right-click on the removable device.

From the context menu that appears, select Format. As a result, a special window will open in which you will need to click on the drop-down menu in the “File system” line and select NTFS.
Please note that if there are documents on your removable media, you will need to copy them to your computer.

Then all you have to do is click on the “Start” button. After not long time formatting will occur removable media, upon completion of which removable media will have an NTFS file system. However, one caveat should be noted here. If your computer is still using operating system Windows XP, then in this case it will not be possible to immediately format the flash drive in the NTFS file system.
In such a situation, you will need to open the “Device Manager” and select the value of removable storage, and then, as shown in the figure below, you just have to go to the “Policies” tab to activate the corresponding option.
Finally, you should open the properties of the flash drive again and format it.

After the flash drive is formatted, do not forget to set the parameter value in the “Policy” tab to its original value.
Second Option:
The second option involves changing the file system of a removable device using the “Convert” operation.

To begin, you will need to launch the command line by clicking on the “Start” button and typing “cmd” in the search bar and then pressing “Enter.”

Now in the window that opens, you should specify a special command, which will convert the file system of your flash drive. The command looks like this:
Then just press “Enter”. However, you should know that before converting a removable device, you will need to copy all the data to the hard drive, because you risk losing it.

I also draw your attention to the fact that you need to carefully enter the command and indicate the correct letter of your removable device. Otherwise, the conversion operation will not be completed and an error will appear indicating that the flash drive label is invalid.
At the end of this article, I would like to add that in addition to the above methods, they also resort to using various programs, which also do a good job of changing the file system of a removable drive. However, if there are options for changing the file system that do not require installation software, then it is best to use these simple options, thereby not loading your computer with the installation of unnecessary software.
For today, that’s all I wanted to tell you about today in terms of data transfer via removable devices. Have you ever seen errors of this kind when copying a large file and wondered how to write a file larger than 4 GB to a flash drive? I hope today's article was useful to you. See you all in the next article, dear readers!
P.S Finally, I suggest watching a video clip of a meteorite falling on Chelyabinsk!