Physical formatting of the hard drive. What happens to the data if you format the flash drive?
If you need to completely format a hard disk and return the computer settings to their original settings, then you need to perform a number of actions. Usually you need to reset BIOS settings and perform several operations on the hard drive.
You will need
- – Partition Manager.
Instructions
1. Turn on your computer and hold down the Delete key. After opening the BIOS menu, highlight Use Default Settings and press Enter. Now select Save & Exit. This is necessary to save changes and exit the BIOS menu.
2. There are several methods to format a rough disk. If you have a chance to connect the hard drive to another computer, then perform this action. Turn on this PC and wait for the operating system to load. Open the “My Computer” menu by pressing the Win and E keys simultaneously. Right-click on the hard drive partition that you want to format.
3. Select "Format" and click the "Start" button. Repeat this procedure with all other partitions on your hard drive. If you are unable to connect the hard drive to another computer, then install the Partition Manager program. It will be needed to format the system partition of the hard drive, because... This procedure cannot be performed using Windows tools.
4. Restart your computer and launch Partition Manager. Open the Wizards menu and select Format Partition. Click the “Next” button in the menu that opens. Select hard section disk, the one that needs to be cleaned. Click the "Next" button. Specify the file system type of the upcoming partition. Give it a letter and a label if required. Click the "Next" and "Finish" buttons.
5. Open the "Metamorphoses" tab located above the toolbar. Select Apply Metamorphosis. After a while, a window will appear asking you to restart the computer and continue the operation in DOS mode. Click the "Restart Now" button. After some time, the rough disk of the computer will be completely formatted.
Many PC users often have to repair their computer or install software. Occasionally necessary cardinal decision tasks - and then there is a need to format the rough disk in order to install the operating system and other programs again.

You will need
- Installation disk with operating system.
Instructions
1. You will need installation disk with the operating system. Insert the disc into the drive. Restart your computer. Set the BIOS to boot from CD-ROM. After the Windows Installer loads its files into your computer's RAM, you will see a dialog box labeled “Installing Windows.” Where you will be asked to prefer one of the items.
2. Select "to restore Windows using the repair console, click ". The correction console will open in front of you. If your PC has each one installed operating system, and it is located on the C: drive, then the message will be loaded in front of you: “1: C: \WINDOWS Which copy of Windows should I log in? Enter the number "1". Press the "Enter" key on your keyboard.
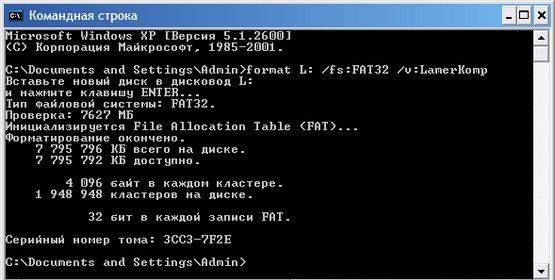
3. The system prompt appears: "C:\WINDOWS>". Write “format with:” or “format with: /Q /FS:NTFS” in this line, where “Q” means quick formatting, and “FS” means file system. Press "Enter" and enter from the keyboard English letter"y". The formatting process will begin.
4. It must be remembered that during the formatting process, data from the disk disappears. And before carrying out this operation, it is recommended to save the files you need on other storage media. After formatting, you can install the operating system.
Video on the topic
When using a computer, various situations may arise. One of them is hard formatting disk, which is done through the BIOS. Many people believe that this process is unthinkable, but this is not so. In order to format a rough disk using BIOS system, certain operations must be performed.

You will need
- Personal computer
Instructions
1. Formatting via BIOS is carried out if you have a floppy disk. Take it and insert it into the drive. Open Control Panel via Start and select Add/Remove Programs and Windows components" A window will open in front of you. Click on the tab " Boot disk" and click the "Make" button. Next instructions will appear on the screen. It’s not difficult to create a disk, just follow each step easily. After this, turn off the entire computer. Insert the boot floppy disk into the drive and turn on the computer. If the BIOS itself is set to boot from a hard drive or from a CD, and not from an elastic disk, then first set it to boot from an elastic disk.
2. To do this, press the “Del” button at the beginning of booting when turning on. Later entry in Bios, find the menu item " Advanced BIOS Features" and enter it. In the “First Boot Device” item, using the “PgDn” key, set the value to “Floppy”. Use the "Esc" key to close the menu. Press "F10" to exit BIOS. Confirm the exit together with saving the changed parameters by pressing the “Enter” key. Now, when you turn on the computer, if there is a boot floppy disk in the drive, the computer will start booting not from the hard drive, but from the floppy disk.
3. A menu will appear on the screen. Using the cursor keys, select “No. 2. Start computer with CD-Rom Support”. To confirm the download, press "Enter". Wait a couple of seconds. When the download is complete, the command line “A:\^” will flash at the bottom of the screen. Type on the keyboard: the command “Format C:”, and press “Enter” again. Later, when a warning appears about the permissible deletion of all files during formatting, press “Enter” again.
4. There may be another option. If the disk is completely new, then after loading a message will appear: “no hard disks were found on the computer.” Then type the command “Fdisk” on your keyboard and press “Enter”. The process of partitioning the disk into sectors will begin. Do boot partition MS DOS. After reboot, do formatting. After this, the HDD is ready for work, namely for installing the operating system. If instead of a floppy disk there is a bootable CD, then enter the BIOS again, as described above. In the “First Boot Device” line, insert the value “CD-Rom”. After loading, follow each message that appears on the screen. Select either NTFS or Fat32. NTFS more new file system.
Video on the topic
Towards hard formatting disk each one must be approached with responsibility. It is extremely important to be very careful when it comes to formatting the system partition of the hard drive. disk .

You will need
- – Windows installation disk.
Instructions
1. To format hard disk There are several proven methods in MS-DOS mode. Firstly, this can be done during the installation of the operating system. First, learn how to format a local disk during Windows installations XP.
2. Run the installation program for this operating system. When the program menu displays a list of available hard drives and their partitions, select the partition that needs to be formatted.
3. Specify the file system format of the upcoming partition. Press Enter. In the next window, press the F key to confirm the selected action. Complete the OS installation process.
4. If you have an OS installation disk at your disposal Windows Vista or Seven, then formatting a disk or its partition will be even easier. When the installation process comes to choosing disk or its section, click the “Settings” button disk ».
5. If you need to keep the current file system of the partition, select it and click the "Format" button. If you need to configure the parameters of the upcoming volume in more detail, then select it and click the “Delete” button. Now click the "Make" button. Set the file system size and format of the upcoming volume.
6. Now learn how to format a partition using the command line. To access it, you can use a boot floppy disk or disk. To make a similar disk, use the following algorithm. Open the System and Security menu located in Control Panel. Go to the “Archiving and Correction” menu.
7. In the left column, select “Make a system repair disk.” Insert a blank DVD into the drive and click the "Make Disc" button.
8. Restart your computer. Press F8 and select DVD Drive. When the additional correction options window appears on the screen, select “Command Line.”
9. Enter the Format C: /NTFS command into the window that appears to format disk C to the NTFS file system.
Popular list free programs for various types of hard drive formatting (HDD, SSD, RAID) and removable media(USB, Firewire, SD). In this article you will learn how to properly format a hard drive, learn about the different types HDD formatting– including low-level. We will also select good program For breaking down hard disk.
Methods for formatting HDD - from simple to complex
Formatting is a simple operation that can be performed inexperienced users. Next, I will tell you how to format a HDD yourself - from simple to complex, depending on your skills and level of PC proficiency.
Using standard Windows tools when formatting
The Windows XP-10 operating system has built-in tools to perform this operation. Formatting a hard drive is done like this:
- Open “Explorer” (or another file manager),
- Go to the “My Computer” section
- Click on to the desired disk
- Select “Format”
- Next, click on the “Start” button
This is the easiest way to format your computer without additional tools. Despite its simplicity, however, all stages must be performed consciously, clearly understanding why you are doing it. Before giving your consent to formatting, carefully check whether the drive is selected.
Perhaps the video instructions show more clearly how to format a disk.
An alternative formatting method in Windows 7/8/10
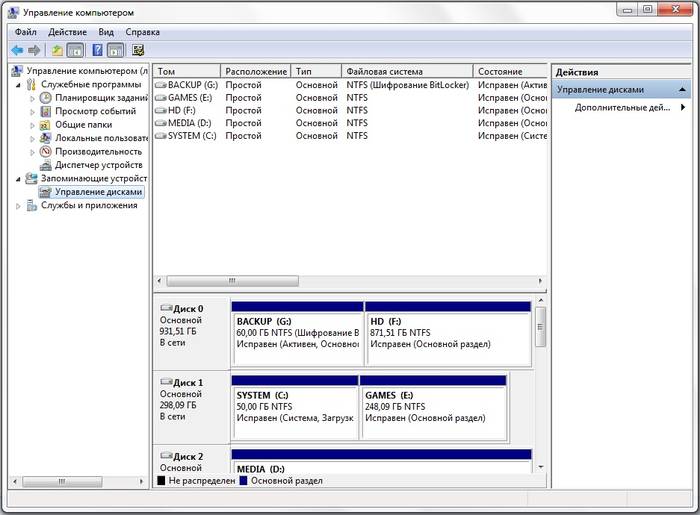
- IN various systems The path to Disk Management is your own - the easiest way is to open the program search and enter “management”. When the system displays a search result, find “Computer Management” and open it
- In the menu on the left, go to "Disk Management"
- Right-click on the desired partition and select Format. Since the process occurs inside a running OS, the “Format” menu item will be inactive on the system partition
- Next, select a label for the new partition, the type of future file system and the required cluster size (if you don’t know what size you need, leave “default”)
- For formatting high level You can leave the “Quick Format” checkbox active. If you need to deep clean the partition contents, uncheck this box.
- After clicking the “OK” button, the system will ask for confirmation - click “OK” again
Formatting a hard drive via the Windows command line
To start formatting, open a command line (console) on your computer. To do this, use the key combination WIN + R, in the "Run" window that appears, enter CMD command, press ENTER.
Note. To format a disk via the command line, you will need administrator rights. Start - CMD - open the context menu by clicking on the application icon "Command Line" - Run as administrator. If you try to format the disk without administrator rights, you will not succeed: access will be denied. Anyway, watch the video where I show you how to format as an administrator.
To format via the console, use the following commands:
Format drive letter
Press Enter. We carefully read what is written in the console, further actions We do it with a hard drive depending on the situation.
Full hard drive formatting via HDD Low Level Format Tool
Low-level formatting will optimize the HDD structure. This is useful when preparing to reinstall the operating system. At the same time, you can solve problems with faulty sectors of hard disk.
HDD Low is suitable for low-level formatting Level Format Tool. The utility will help you format your computer's hard drive, external HDD, tablet SD card and other storage devices.
In addition to the basic functions, HDD Low Level Format Tool can be used to read SMART indicators, check read errors, disk uptime, etc.
How fully format the hard drive:
- After installation, run the HDD Low Level Format program
- In the Drive selection window, select the hard drive (if several HDDs are connected to the PC). The easiest way to distinguish one hard drive from another is by capacity. Click Continue
- Go to the LOW-LEVEL Format tab
- For quick formatting(deleting partitions and MBR records) select the Perform quick wipe option.
- To completely format the hard drive, the above option should be ignored
- Before completely formatting your hard drive, make sure you have selected the correct drive. Only then click the Format this device button.
AOMEI Partition Assistant
AOMEI Partition AssistantThe program offers a number useful functions, including low level formatting hard drives and most types of removable media. The interface resembles standard Windows tools, so it won’t be difficult to understand:
- The main window automatically displays the disk with the installed OS. If you need to format another device, select it by clicking “Disk” in top menu
- In the bottom block of the left menu, select “Erase Hard Drive”
- When you click this button, you will be prompted for the number of passes for the operation. If you intend to restore destroyed data in the future, then select a value from 1 to 7. If you specify a parameter of 8 or more, it will be almost impossible to recover information from the device
- Confirm your choice by clicking "Yes"
- To start formatting, you will need to reboot the system - once you click the “Reboot Now” button, there is no turning back, so make sure you have selected the correct disk and the desired operation settings
After restarting the computer, the program will perform all the specified actions and you will have a clean hard drive at your disposal.
DiskWipe
DiskWipe is an excellent solution for situations when data on storage media needs to be destroyed beyond recovery. The program uses several proven algorithms (Dod 5220-22.M, US Army, Peter Guttman), and advanced settings allow you to select the formatting depth. According to the developers, the program does not contain hidden viruses, etc., and also does not transmit user data.
DiskWipe
It’s extremely easy to format the desired device using DiskWipe:
- Launch the program. In the block on the left you will see all devices available for formatting
- Select the desired device and click "Wipe Disk" in the top menu
- Advanced settings will open with preset standard values. For complete and irrevocable formatting, you can check all available fields and indicate “Highest” in the right block
- After selecting settings and clicking “OK”, formatting of the selected device will begin
Paragon Partition Manager
A test period of 30 days allows you to evaluate the capabilities of the program and format the desired devices in various modes. Since Paragon Partition Manager has several options for working with partitions (partitioning, recovery, and others), it is distributed shareware.
Paragon Partition Manager
The formatting process is intuitive:
- In the main window, click "Partition Manager" in the menu on the left, then select "Launch Partition Manager"
- From the proposed list of devices, select the one you need, open the context menu with the right mouse button, and click “Format partition”
- Specify the type of future file system and volume name, then click “Format”
- The procedure will be queued - to apply the changes, you must click on green tick in the top menu
- After confirming the operation (the “Yes” button), it will no longer be possible to stop its execution.
Separately, it is worth noting the fact that Paragon Partition Manager not only formats the device, but also creates new section with the specified file system, so after the system boots, the disk can be used without additional actions.
Background information
What is formatting?
Disk formatting is the procedure of applying marks to a data storage device - a hard drive (HDD), memory card, CD/DVD or other storage medium. The formatting operation is equally useful for new and “worn” HDDs that have served their life.
A disk that has no partitions is absolutely useless. In addition to the fact that you apply markup to the disk, formatting deletes all data almost irrevocably (although there is). Therefore, you need to be careful and prepare in advance to format your hard drive.
Over the years of operating the operating system (Windows, Mac OS, Linux), the hard drive turns into a “garbage dump”, since many programs leave their files on the disk, and after uninstallation, their “roots” still remain on the HDD. As a result, the system is slow and unstable. There are various freezes, slowdowns, noise - it behaves inappropriately. After reformatting, the hard drive is optimized and begins to work better. Many devices last a long time without this procedure. I advise you to be on the safe side and format your hard drive at least once a year.
Sooner or later, formatting the disk is inevitable. However, before doing this, it is very important to update or reinstall the operating system on your computer. Along with deletion unnecessary files you get a completely clean environment without defects, harmful viruses, unused programs, data that lead to conflicts. Thus, before reformatting the hard drive, we reinstall the OS.
Before formatting, back up all important data to another drive. As already mentioned, during this procedure, various service information and marks are written to the disk, which allow information to be written to the HDD in the future without hindrance.
Steps to format a hard drive
Low level– at this stage, basic markings are applied to the disk at a low level. Typically, this is done by the hardware developer. In this case, special tracks and service data are written to the disk. This information remains on the hard drive almost forever - it can only be overwritten using proprietary utilities. These programs can only replace service data. By the way, if you perform low-level formatting of the hard drive, then you will no longer be able to restore data later, unfortunately or fortunately. Therefore, if your goal is to destroy information, then you can use this format.
Section breakdown. It is clear that storing data on a disk without partitions is quite inconvenient. For some logical organization, the HDD is divided into special zones, disks - drive C:, drive D: and so on. For these purposes, both utility utilities built into the OS and external programs for formatting a hard drive, which I have written about more than once.
High level. During this type of reformatting, boot sectors and file tables are created.
Types of disk formatting
Perhaps you know that regular means systems provide 2 methods by which you can format a hard drive - external or internal:
quick formatting: takes less time, allows you to carry out the procedure as is. The point is that with this type of computer formatting, the files in the file table are overwritten with zeros, while the data is stored as if nothing had happened, and you can later restore it. Also, with this method you do not optimize file structure, and if there were defects on the hard drive, you will not fix them when quick method
normal formatting : Longer and deeper formatting of the hard drive. The data on the internal or external drive is completely destroyed, the file system is checked for possible errors, damage. bad sectors, bad blocks. Thus, when the usual way reformatting, you kill two birds with one stone, although you lose a little more time.
When installing the operating system, as well as when changing files or redistributing space between partitions, it is necessary to format the hard drive. This is a fairly common operation performed by PC users. If you haven’t done anything like this before, then let’s look at the theoretical part of the question.
What is the formatting process?
Marking areas for storing information, in which some of it is deleted, is called formatting. It creates a system for accessing stored information.
Typically done for:
- changing one file system to another;
- deleting files from your hard drive.
On at the moment There are a large number of different file systems. They are used on a variety of equipment, including not only computers, but also mobile devices. To work in latest versions Windows uses the NTFS file system.
Video: How to format a hard drive
Why format your hard drive?
Formatting is performed to delete files from the hard drive, as well as to change one file system to another.
In most cases they resort to it:
- before installing a new operating system;
- to create installation image Windows, for example, on a flash drive;
- due to the need to clear the disk of files if they are not needed.
Formatting with Windows tools
Despite the large number of various programs for working with hard drive The Windows operating system has its own set of utilities.
Let's look at the process of formatting disks using Windows:
- select the disk that needs to be formatted;
- press the right mouse button;
- select Format;
- in the window that appears, select the file system, cluster size, and formatting method;
- It is recommended to set NTFS as a file system, and leave the cluster size at the default – 4096;
- After setting the necessary parameters, click Start.

Windows also includes a more comprehensive service for working with hard drives.
To open this menu, do the following:
- right-click on My Computer;
- select Management;
- open Disk Management;
- In this menu, the user can perform various operations on the hard drive, including formatting.
Formatting via the command line
Execute this operation You can also use the command line:
- Press the key combination Win+R;
- enter cmd and press Enter;
- V command line we register format command y:, where y is your drive letter, for example c or d;
- the system will ask you to confirm the operation by pressing the Y key;
- after confirmation, the system will begin the formatting process;
- When finished, this message will appear

Formatting HDD in BIOS
If you need to format a hard drive partition from the BIOS, you will have to tinker a little. Unfortunately, the BIOS does not have tools for formatting the hard drive, so you should use third party programs to perform these operations.
One of the most common is Acronis Disk Director. To work with it, you need to create bootable media in the operating system with the files of this program. But before you start creating bootable media, you should consider another option - formatting using Windows Installer. This decision is a simpler option compared to Acronis Disk Director.

For this method All you need is a disk or flash drive with a recorded operating system installation package.
To format, you must perform the following steps:

Attention! The drive partition letters may not match. For a more precise definition required disk use the wmic logicaldisk get deviceid, volumename, size, description command.
Creating a bootable USB flash drive for Acronis Disk Director
To create a bootable flash drive you will need:

Algorithm of actions:
- insert the flash drive;
- install and open the program;
- in the application, open the Tools section and select Acronis Bootable Media Builder;
- click next;
- select the Windows PE boot media type;
- in the next menu it should be noted necessary components for recording to a flash drive;
- After selection, you must select the media on which to record and click Next. The flash drive should be formatted in FAT 32 format using the Windows utility;
- you can also create an image for later burning to a flash device or disk using Ultra programs ISO.
Working with a bootable USB flash drive Acronis Disk Director
To load a flash drive you need:

How to format an external hard drive to NTFS
The most convenient formatting method is to perform all actions using standard operating system utilities. This solution does not require installation additional programs and creating additional boot disks.
If you do not have an operating system installed, then in this case you should use special programs, such as Acronis.
Steps describing how to format a hard drive as ntfs:

Utilities
In addition to the standard Windows programs There are various utilities used for the same purpose.
The most common options include the following:

What program in ntfs is better just format the drives?
Each program has its own characteristics, but the main direction for all utilities remains the same - working with disks, including creating partitions, forming into other file systems, etc. Therefore, the choice of program is purely personal question each user, which depends on his preferences.
Problems and their solutions when formatting
How to quickly format a disk without losing data?
Unfortunately, this is not possible. All stored information will be deleted. Only part of the data can be recovered.
Which drive is better: external or external?
Formatting external drives is performed in the same way as for a regular hard drive. At this process All information will be deleted, including windows, after execution the disk will be like new without windows.

Unable to format hard drive
If you did everything according to the instructions, but did not achieve results, do not sound the alarm. This doesn't always mean something bad.
- format command - cannot be used for a system disk if it is in its environment;
- if the operating system is located in another partition of the HDD, it cannot be deleted;
- Anti-virus program settings can block access to different partitions of the hard drive;
- various applications and viruses can block access.
If you have removed the above factors, but still cannot format your hard drive, you will have to resort to special programs. The most popular tool is HDDscan, which is easy to install and also free.

Algorithm of actions:
- download the utility;
- open and install;
- run as administrator;
- click on the icon in the form of a sphere located in the center of the interface;
- select Surface tests;
- check the box next to Erase;
- go to the Add test tab;
- click on Scan;
- in the lower right corner, write down the error data;
- set the EraseWAITs option to ON and select Scan again;
- repeat until the error is cleared.
You can also use Acronis Disk Director. If it is impossible to format a portable hard drive using this program, most likely the hard drive is partially damaged. And the entire procedure can sometimes be performed only from bootable media, that is, not in the operating system.
How to force format a flash drive?
To format flash drives you can use the program HP USB Disk Storage Format Tool.

How to format a write-protected drive?
- open command line;
- enter the following commands:
- diskpart;
- list disk;
- select disk Z. Z - flash drive number, execution of the previous command is shown;
- attributes disk clear readonly;
- clean;
- create partition primary;
- format fs=ntfs;
- exit.
The operating system includes utilities that:
- provide the necessary set of functions;
- They have a fairly simple interface that will be easy for novice users to work with.
In some cases, when other measures do not help, formatting helps. For example, if the hard drive starts to work slowly, copying data from the disk to another medium is slow, etc. Formatting also helps to completely get rid of viruses, because... is happening complete removal all data available on the disk. In addition, proper reinstallation of the operating system is not complete without this procedure.
How to format a hard drive? To perform this action, there are many programs that also allow you to perform other operations on the disk, for example, defragmentation, etc. But in most cases it is enough standard means provided by Windows itself.
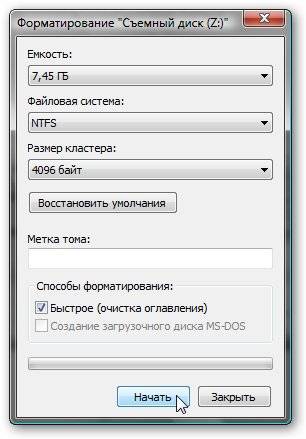
To format the desired hard drive partition, open "My Computer", select a local drive, right-click and select "Format" from the list. But first, save all important data from this section, because... they will be deleted with virtually no possibility of recovery! A window with formatting options will open. Consider these options.
Capacity. Shows total capacity selected section. In this case, the parameter cannot be changed.
File system. A method for organizing and indexing data. In a nutshell, the file system affects the size of the file name and the maximum size of the file itself. Usually, the default for hard drives is NTFS, and for other memory cards, FAT32, etc.
Cluster size. This parameter indicates the minimum volume disk space, used to store the file. In other words, if you plan to store small files on the media, then the cluster size should be small, but if the files take up a lot of space, the cluster size should be increased. In addition, the cluster size affects the speed of the device, but with this increase, resource consumption also increases.
Volume label. By default, this field is empty. If you want the section to be called something other than " Local disk(D:)", and for example, "Cinema (D:)", enter the word "Cinema" in this line.
Quick formatting (cleaning table of contents). If you uncheck the box, the disk will be completely formatted with search bad sectors(if any), and not just clearing the table of contents (in this case, new files will be written directly on top of the old ones). Of course, complete formatting takes much longer.
Once you have selected the required options, click the "Start" button and confirm the formatting.
There are several basic methods for working with hard disks. In the event that you need to change the capacity of the hard drive, it is recommended to use special utilities.
You will need
- - Partition Manager.
Instructions
If you need to increase the capacity of your hard drive, use the included utility standard programs Windows operating systems. Open the My Computer menu. Right click on hard drive, whose size you want to increase, and go to its properties.
Select the General tab. At the bottom of the window, find the option “Shrink this drive to save space”, check the box next to it and click the “Apply” button. The time it takes to complete the compression process depends on the size of the drive, the number of files on it, and the speed of your computer.
If you need to reduce the size of a disk or its partition, then use Partition program Manager. Download the version of this program that is suitable for your operating system and install it. Restart your computer.
Enable Partition Manager. Select advanced user mode. This will allow you to perform a larger set of operations with disks. Open the “Wizards” tab located on the main toolbar.
Select "Create Partition". In the window that appears, activate the “Mode for experienced users" and click the "Next" button. Select the hard drive whose size you want to reduce. Click the "Next" button.
Set the size of the future local disk. It is by this value that the size of the volume being modified will be reduced. Click the "Next" button.
Select the file system for the future partition. Specify the volume label, if required. Click Next. In the new window, click the “Done” button.
To start the process of reducing the size of your hard drive and creating a new partition, click the “Apply intended changes” button. It is located under the main toolbar of the program. If you reduce the size of the hard drive on which the operating system is installed, the computer will continue to perform the operation in MS-DOS mode.
Video on the topic
Most typing jobs require a computer literacy. Specialists should know all the capabilities of the Word editor, in particular, what is needed and how the document is formatted.

Why is it important to know how to format text correctly?
A document typed only using a keyboard looks like a collection of sentences in which it is difficult to grasp the main idea of the author, as well as to trace the logic of his reasoning. To make reading and memorization easier Word editor and other similar programs provide text formatting, including breaking into paragraphs, highlighting a red line, the presence of indents and protrusions, columns, tables, lists and some other points.Particular nuances of document formatting
The main way to divide a document into several logically complete parts is to place paragraph marks, which is done by pressing the Enter button. To make it easier to read, each paragraph should begin with a red line - an indentation, which can be done in two ways. Its optimal size is 1.25 cm, and this is exactly how much you should move the upper hourglass marker located on the horizontal ruler with the mouse cursor. Another method is through the menu located at the top of the window: the “Format” button – the “Paragraph” line – the “Indents and Spacing” tab – the “Indents” column. You need to enter the required value in the “first row” cell, then click “OK”.To move all the text, not just the red line, move the bottom of the hourglass by the desired amount. This is how the “To and from whom” column is formatted in letters. The same action can be performed by following the path described above and entering numbers in the “Indent” column in the “left” or “right” cells.
To ensure that the text evenly fills the entire document and does not shift to its left margin, you can distribute it across the width of the page. To do this, select the required paragraphs and click on the “Fit to Width” button on the formatting panel. It looks like a square of horizontal stripes. There you can center the text for the title or move it to the right in the form of an epigraph.
The list function is convenient when you need to list a large number of items, as well as adding new ones to the middle of the list after it has been created: the numbering will change automatically. Numbered or bulleted list can be set using the corresponding buttons on the formatting panel or through the “List” command in the “Format” menu.
In addition to the listed functions in text editor you can change the size and type of font, bringing it closer to a business one or, conversely, to a congratulatory one, highlight part of the document with underlining, italics, bold or colored font, summarize the data in a table, and also perform other specialized actions (inserting an image, diagram).
Tip 4: How to recover files after formatting your hard drive
Don't be upset if for some reason you deleted important files from your hard drive. Most information can be recovered if you follow the correct algorithm actions.

You will need
- Easy Recovery.
Instructions
Use Easy Recovery to search and restore important files, deleted from the hard drive or external drives. Before installing the application, make sure that the selected version is suitable for the operating system you are using. Install the Easy Recovery program and restart your computer.
It is important to take into account the fact that the application should be installed on an unformatted hard drive partition. This approach will prevent overwriting deleted information. Launch Easy Recovery by clicking on the shortcut on your desktop.
Select the “Data Recovery” operating mode. If you have completely erased a certain partition of your hard drive, go to the “Recovery after formatting” sub-item. Check the box next to “Deep Scan”. Left-click on the local disk that will be analyzed by the program. Click the "Next" button.
Specify local disk settings. Please note that in this column you need to select the characteristics that the volume had before formatting. If you changed the file system, indicate this fact. Click the "Scan" button.
The process of analyzing deleted information can take from 20 to 50 minutes. Much depends on the size of the local disk being scanned. Wait for the list of found files to be provided. Select those that should be kept in their original state with a check mark.
Apply the "File Reconstruction" function if a certain part of the information was damaged during the recovery process. The main purpose of this function is the restoration of documents and archives various types.
Sources:
- recovering files after formatting a disk
Tip 5: How to recover data from a formatted hard drive
Most personal computer users believe that formatting a hard drive permanently erases its contents. Formatting just creates new address tables. By installing a special program, you can return lost information without much difficulty. The most popular and easiest to use is the Data recovery wizard program. It allows you to recover almost all files and directories from a formatted hard drive, even from sectors.

You will need
- - Data recovery wizard program.
Instructions
Download Data program recovery wizard from the Internet. Install it on your personal computer. Launch the program. In its main window, select the Format recovery option. After this command, the program will independently display a list of all partitions that it finds on all logical drives your system. If the disk you need was not found as a result of the search, use the Advanced recovery function, designed to restore areas with serious damage. Next, select the section you need from the list and click the Next button. the program will scan and analyze the file system. You will have to wait for some time while the program scans. The duration of this operation directly depends on the size of your hard drive.
Browse the directory tree that will be displayed at the end of the scan of your hard drive. To restore files, select the checkbox next to them, as well as all directories and folders that also require recovery. Click Next. Remember that when restoring data from a formatted disk, you must correctly specify the directory for the new save. Never save recovered files and folders in the same location where they were before formatting. This action can lead to overwriting of recovered files and their permanent destruction.
Prepare enough free space on your hard drive. To restore formatted data you will also have to wait. Correctly specify the path to save the data and click Next. If the list of restored files is large enough, the operation will be lengthy, but definitely with a positive outcome. All formatted files will be restored and ready for use.
Today the outside is tough disks can be programmed with several file system options. In order for the device to work on your PC, you need to format it correctly.

You will need
- Computer, external hard disk.
Instructions
Today there are several varieties external hard disks. Some of them are implemented with pre-installed formatting for a specific file system, while some devices are universal; they are formatted for the desired file system during installation. Let's consider two options for formatting external .
Formatting a disk with a pre-installed file system. After you connect the device, it will appear in the “My” section, however, writing files to it may not be possible due to the file system of your and hard system disk may not match. In order for the device to become accessible to, it must be formatted to the parameters you need. Right-click on the device shortcut and select “Format”. In the window that opens, set the “Format” option and click on the “Start” button. After the operation is completed, the device will become available for writing and reading files.
Formatting a universal disk. In this case, when connecting the device to the computer, you will need the drivers on the PC that you will find included with the hard drive. The installation wizard will automatically detect your computer's file system and format the device with the appropriate settings.
Formatting, in the usual sense, is the process of recording certain information responsible for proper storage files, and also, in some cases, system boot files to the beginning disk. Formatting is performed to delete data or restore the functioning of the hard drive. Formatting does not physically delete data, so even after complete formatting, information from the disk can be recovered.

You will need
- - a program for working with computer hard drive partitions.
Instructions
Formatting can be done both using operating system tools and using special programs. In some cases, formatting is only possible using special applications, for example, the system disk in the operating room Windows system. Based on this, before formatting it is necessary to determine which partition of the hard drive the operation will be performed on.
If only one hard drive is displayed in “My”, it is the system drive by default. In this case, you can format it only using a special program. If you see multiple hard drives in the My Computer folder, you need to determine which one is the system drive and which one needs to be formatted. The system drive usually has the letter “C” and is called “Local Disk C”. When entering system disk, you will find folders with the names: “ Program Files" and "Windows". This section contains your operating system and it will not be able to format itself.
If you need to format a non-system hard drive partition. In the “My Computer” window, right-click on the desired section, in the pop-up menu at the bottom, select “Format...”. In the window that appears, you can select the type of formatting: quick or full. Full formatting takes much longer, but when you select this item, the system will automatically check the hard drive partition for integrity and try to restore damaged clusters. When you select “quick format,” only the sector in which information about files and folders is stored will be deleted on the disk. In addition to the formatting type, you can select the cluster size. The efficiency of disk space use depends on this parameter. A very small cluster size increases the efficiency of using free space, but slightly slows down the speed of file access and makes it impossible to defragment the disk using the built-in Windows defragmenter. Too much large size cluster will slightly increase the speed of access to files, but will not allow maximum use free space. Optimal size cluster - 4Kb or 16Kb. You can also change the drive letter here. After selecting the required parameters, click “Start”. Once the process is complete, a window will appear informing you that formatting is complete.
If you need to format the system disk. It is necessary to install a program on your computer to work with hard drives, for example, Acronis Disk Director Home. In the program window that opens, you will see a list of all your hard drives and partitions. At the top they are displayed in the form of a list, where they are indicated: type, capacity, activity and file system. And below - in graphical form, with a visual display of occupied and free space. Click on the required section once with the left mouse button. A menu of operations available for this volume. Among them, select "Format". In the window that appears, as described in the previous step, select the cluster size and volume letter. In addition, you need to select a file system. "NTFS" is recommended. After selecting the required parameters, click “Ok”. Next, you need to apply the operations performed. In the left top corner in the main window, click “Apply scheduled operations.” In the window that opens, click continue. After the program has been running for some time, a window will appear notifying you that all operations have been completed. Click "Ok". Using this method, you can format any partition of your computer's hard drive.
Video on the topic
Please note
“How can you format an HDD without uninstalling Windows” or “how to format an HDD from under Windows” - very popular queries in search engines that remain unanswered. In this article we will figure out why there is practically no information on this topic on the Internet, and we will take a closer look at the problem.
What is formatting
To format a hard drive means to create a new file system on it, which means clearing the main MFT file allocation table. MFT is a database of files stored on disk, made in the form of a table, the rows of which are represented by file names, and the columns are their attributes. Attributes are metadata that describes the file. These include the date and time the file was created/modified, its storage directory, and access rights.
Considering the above, we can come to the conclusion that it is impossible to format a computer on which one HDD is installed. At least without resorting to tricks.
Who hasn't realized yet when special program or Windows starts formatting the hard drive, they delete the main file table. Due to this, access to all files using the standard method becomes impossible, and the space occupied by them is marked as free. If you try to format your computer using Windows, the operating system will display the following: information message, because the files it uses are on the first partition of this disk.
Let's be smart
Mentioned above was a certain trick, thanks to which you can format your computer while maintaining Windows performance. Formatting a PC means cleaning a single hard drive.
If the computer has only one magnetic storage device, for some reason you want to format it but keep Windows with programs and settings, we will need a few things:
- Bootable USB flash drive with Acronis True Image;
- external hard drive or the ability to upload images to the cloud.
If user data is also located on the HDD, it will have to be uploaded to the cloud or copied to another medium.
Let's get started
- We restart the computer and boot from the flash drive, be it bootable media with True Image or WinPE with this program included.
- In the main window, click on the button icons as shown in the screenshot to open the window for creating a new copy of the disk.

- Select the source type.

- We indicate the target disk that we will format, making sure to select system reserved space.
If all the information has been transferred to another medium, uploaded to the cloud, or is not valuable, select only the system volume.

- We decide on the storage location for the image. What’s noteworthy is that the program allows you to save it in the cloud or transfer it via local network, which is what we need.

- Click “Create Now”.

- We are waiting for the finish.

Keep in mind that when transferring an image, which can take up a couple of tens of GB, cloud service It will take a lot of time, unlike saving it to a computer on the same local network or to a portable HDD.
- We boot from the flash drive and run the program that allows you to format the computer.
As a tool that can format hard drives, can be DOS, WinPE, Acronis DiskDirector, Partition Manager or another specialized utility.

- Again, boot from a flash drive with Acronis or WinPE and launch True Image.
- Select " Backup"and our copy of hard disk or its system partition. Click “Restore disks” that you were able to format in step 8.
