How to change a program icon in Windows 7. Changing the appearance of icons in Windows
For quick visual search or decoration appearance folders (directories) have custom icons. The recommendations will show how to change the folder icon in Windows 7, 8 to your own.
There are quite a few ways to change the icon of a specific directory or all of them, involving Windows tools, third party programs. Create new folder or select an existing one and follow the steps below.
How to change the appearance of a folder
To change the folder icon in Windows 7, 8 you will need to do a few things simple actions. In Explorer, select a directory and right-click on it. In the menu, click “properties”.
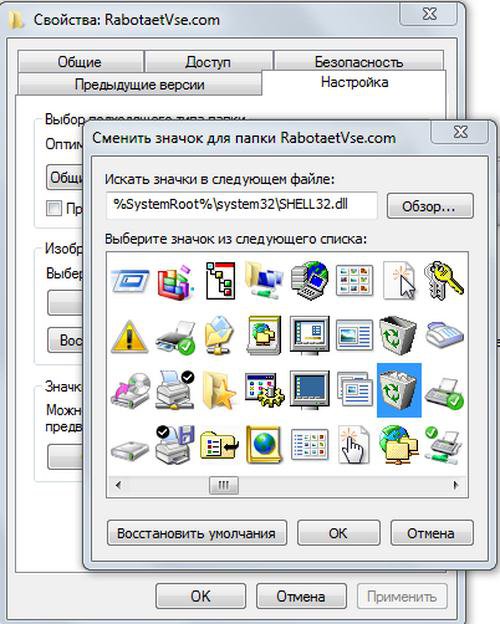
In the properties window, go to the “settings” tab. In the third area, click the "change icon" button.
In the dialog box, select a standard icon from the list (located in the SHELL32.dll file) or click “browse”, specify the path to your image (ico) and click “open”. To practice, download the archive with icons here.
Recommended to use graphic files with a resolution of 256 by 256 pixels so that the icon sizes on the desktop or in Explorer are displayed correctly. If you decide to return the default folder view, click the “restore defaults” button. Once you've made your final selections and completed the steps, click OK.

In the properties window look at preview. Next, click “apply” and OK.

As a result, it is created in the folder configuration file desktop.ini, which contains the parameters and path to the image. To see it, you need to display hidden folders And Windows files 7.
You can manually create or edit the file instead of using dialog boxes. Create text document(txt), name it desktop and change the extension to (ini). Open it and copy these lines:
[.ShellClassInfo]
IconFile=full path to the icon (ico)
IconIndex=0
Save the changes to change the folder icon in Windows 7, 8. The lines in the existing desktop.ini may differ, you just need to enter the path to the image.
It's not always possible change the folder icon to your picture, for example, this is not applicable for Windows directory. You also cannot change the icon inside the library, first right-click on the folder and select “folder location” from the menu. Then follow the recommendations above.
How to change the icons of all folders
Using this method, you can change all folder icons in Windows 7 at once by setting a custom image. You will need administrative access. This will change the icons for all PC accounts. More icons change when changed Windows themes, if it supports such features.
1. In the search bar of the start menu, write regedit and click enter.
2. When the UAC window appears, click “yes”. These messages are annoying, so I suggest you read how to disable User Account Control in Windows 7.
3. In the left pane of the registry, find the Explorer section (the picture shows the full path). Right-click Explorer, point to "New" and select "Partition". Give the Shell Icons a name and press enter. If this section exists, skip this paragraph and go to step 4.
![]()
4. Select the created, existing Shell Icons. In the right pane, right-click, hover over “new” and select “string parameter”. Write it type 3 and press enter.

5. Right-click on parameter “3”, click “edit”. In the value area, write the path to ico file, For example, C:iconcapapka.ico and click OK. It is recommended to use an image size (ico) of 256x256 pixels.

6. Pay attention to Windows bit depth 7, if you have a 32-bit system, go straight to step 7. If 64 bit is installed Windows version 7, then go to the section shown in the picture below and do steps 3 to 5.

7. To change the folder icon on Windows 7, restart your PC.
If you want to return regular folder icons, then visit the Shell Icons subsection and remove type 3 by right-clicking on it. Select “delete” from the menu, then click “yes.” For the 64-bit edition, do these steps in two places. Restart your computer.

Programs for changing folder icons
There are paid and free utilities to change the folder icon. Let's consider free products. I would like to emphasize that programs do not bring more benefit than using regular funds. Such applications include IconTo (we’ll look at it in more detail), FolderIco. To change a folder icon or group of folders, do this:
1. Download IconTo here and install.
2. Launch the program, click “specify folder/file” and select installation for one folder, for several or for a specific file type.

4. Select one icon from the standard ones, in the “favorites”, “software” tabs, or click “specify an icon” to select your picture. Then click “install icon” and enjoy the result.

That's all, I explained how to change folder icon in Windows 7, 8. Feel free to use the capabilities of the operating system itself. The programs do not give the desired result. If the theme goes beyond icons, find out how to change the Start menu icon in Windows 7 to improve the appearance of the OS.
To make Windows 7 more original, you can change not only the theme and design, but also the icons standard folders, Recycle Bin, Startup and Files. The easiest way is to use the capabilities of the system itself, but if you wish, you can install programs and unique icons from the Internet.
How to change the start icon on Windows 7?
For the sake of variety, sometimes you want to change the Windows start icon, because standard image It's boring every day. How to do this for seven?To change the start button, use Windows program 7 Start Button Changer. It can be downloaded for free.
The simplest option
If you have downloaded the program to your computer, all you need to do is run it. But be sure to do this as an administrator. Then all you have to do is select the icon you like, replace it and enjoy the new button.If everything worked for you, you can stop there. However, sometimes things get complicated, so it requires a little more steps and a file called explorer.exe.
Option to change the explorer.exe file
Go to system disk C. Find the Windows folder, open it and find the file we need there. It will be called that way - explorer.exe.Click the mouse (with its right button) so that a list with items appears. There we select “Properties”.

Open the “Properties” item, tabs will appear there. We need "Safety". A list of users will appear in the window. Select the group called “Administrators” and click on the “Edit” button.

In the next window, in the permissions for the group you need to check the boxes vertical column“Allow” next to all items in the box. Be sure to apply the changes and agree to the new permissions.

Now we return to the “Security” tab, we need to additionally set permissions for changes. The button is called “Advanced” and changing this parameter will enable special permissions for the Administrator group.

In the tab that opens, select the line “Administrators” with one click of the mouse. Click on the function to change permissions.
If you did everything correctly, in the “Permission” column opposite the “Administrators” group you will have the rights “ Full access" IN normal mode By default, permissions are displayed at the Read and Execute level.
In the window that appears, you will need to change the permission details and to do this you need to click on the “Change” button. The next window will be called "Resolution Element". In the “Allow” column, check all the boxes. We agree with the changes.

Please note that the Owner tab should display the name of your account or the name of the Administrator.
Now we have all the rights to make changes at the system level. Launch Windows 7 Start Button Changer, first download and install it. Right-click on the icon and run as administrator.

There you need to select an item called “Change Start Button”. We will need the "Sample Orbs" folder. This special archive with a set of buttons. Choose which one you like best and click “Open”.

To cancel the changes, just click on the button called “Restore Original Explorer Backup” and the start icon will return to its original appearance.
How to change a file icon in Windows 7?
For those who want to change personalization computer to suit you and make the file icons different, this step by step instructions- the most accurate.Having completed all the steps, you can now always change the icons at your discretion. Moreover, you won’t need third party applications or additional programs, as in the case of replacing the start icon, here you can get by standard means sevens.
The icons themselves can be downloaded from the Internet or even ordered from a designer if you want something truly unique.


Don't forget after changes made save the data by clicking “Apply” and “Ok”.
How to change folder icons in Windows 7
Changing a folder's icon will allow you to make it unique by making it stand out from the crowd. The steps are quite simple, so even if you are a beginner, you can easily figure out the procedure.
If for some reason you don’t like the result, then you can return everything by opening the same path: Properties - Settings - Change icon. On last tab There is a “Restore defaults” function. By clicking on it, you will restore the icons that are present in the system by default.
Installing icons using IconPackager
There is another way to change folder icons to any others. To do this, you can use the convenient IconPackager utility.
If your collection does not contain icons for certain types of files or programs, the icons for these objects will remain the same - without changes.
It happens that you need to return the icons back. In this case, in the same program, click on “Windows Default Icons By: Microsoft” at the bottom of the screen from the available icons and apply the rule by clicking on “Apply icon package”.
Other programs for changing icons
To install icons, the tools suggested above are not always enough. For example, you liked an icon, but it is presented only in the PNG extension, while installing new icons requires the ICO extension. In this case, two programs will be useful:- AveIcon 2 is a small program that can convert icon files from PNG and ICO.
- IrfanView is a utility that comes in handy if you need to convert an entire collection of icons at once.
How to change the trash icon in Windows 7?
Changing the trash icon requires other steps. You won't be able to access it through Properties.
Video on replacing standard icons in the seven
Watch the visual video instructions on how to change standard icons on your own:Thus, if you want to change the icons of folders, files and other objects in Windows 7, you can use the capabilities of the operating system itself. It is enough to download pictograms from the Internet as individual icons or as a whole collection. Installing icons will only take a few minutes, even if you use third-party programs.
In Windows XP it is possible to change icon types associated files straight from Windows Explorer. In Windows 7, you need to perform some registry tweaks to change the icons of files associated with specific program, but there is a way to do this simply and quickly.
File Type Manager.
File Type Manager is a small, simple utility from NirSoft that includes options functionality windows folders XP and some others additional features. It works great in Windows 7 and its interface allows you to change a whole bunch of file icon types.
Common problem What we encounter are icons of different file types that look the same.

If you look at the picture, in a matter of seconds you can determine that different video formats have the same icon. Let's change the video icon to make a visual separation of file types.
Launch the File Types Manager (FileTypesMan is free application available for download at the end of this article).

Find the “Default Icon” column and click on it to sort the list by the “Default Icon” parameter (Here, for ease of display, we have hidden many columns that we do not use; you can find the “Default Icon” column by scrolling the table to the right).

This will group together all file extensions that have the same icon. This is convenient because we want to change the icon for all video files for which it is in at the moment is the same.
Click on the search button in top menu or press the key combination “Ctrl+F” and enter the file type whose icon you want to change.

Please note that all extensions with the same icon are grouped together by default.
Right-click on the first extension whose icon you want to change, select Edit Selected File Type from the menu, or select the first extension in the list and press F2.

Click on the “…” button, which is located after the Default Icon field.

Click on the "Browse..." button and FileTypesMan will allow you to select .exe, .dll or .ico icon files.

In our case, we selected the .ico file from the Tango icon library.

Select the appropriate or any other icon (you can use files like .exe or .dll, which may contain icons) and press the OK button.
Repeat this process for each file extension whose icon you want to change.

After these steps it will be much easier for you to distinguish different types files. This method works for any file types.
You can download FileTypesMan for X32 from the following link:
You can download FileTypesMan for X64 from the following link:
You can download FileTypesMan for windows 98/ME from the following link:
osmaster.org.ua
How to change file or folder shortcut icons
On your monitor screen there is large number different folders and icons that have a standard appearance. Perhaps you are tired of their usual look and would like to change it. It's possible! But in order to do this, you need to download some collection of different icons for files and folders. For example this one.
Download icon set. IN this set icons in two formats.
How to change a folder icon.
To replace the folder icon, move the cursor over the desired folder and press the right mouse button. A list will appear. Select “Properties” in it.


A window with icons will appear. You can choose your favorite folder icon from this list or select an icon from downloaded icons.

If you want to select an icon among the icons you have downloaded, then to do this, click the “Browse” button, go to the folder with icons, select the one you like among them and click “Open”, then click “OK” in the windows that appear. The icon you like will be applied to the folder.

For example, here is the folder that I got.
How to change a file icon?
Let's do it the same way! Right-click on the file, go to the “Properties” section, but here go to the “Shortcut” tab, click “Change Icon”.

By following these simple rules, you can gradually change all the folder and file icons to the ones you like best. The folder icons are all the same, so they most often need to be replaced. Then you will be able to distinguish them not only by name, but also by color and shape.
Create a shortcut with a relative path to the program on Windows
Now that you have tidied up your folder icons, you need to figure out how easy they are to use. Some programs are better used in portable version, so that in case of emergency you always have them at hand, namely on a flash drive. However, in this case, folders with programs become like a dump, and searching for an .exe file in them to launch becomes inconvenient. This problem can be solved by creating separate shortcuts located in the root of the flash drive. These “smart guys” run everything on their own necessary programs on absolutely any computer, regardless of where you place the storage device.

2. Return to its root and click on empty space right mouse button. Now select the “Create” and “Shortcut” functions.

3. After that, we need to specify the path to it like this:
%windir%\system32\cmd.exe /C start /B /D \*path to the program folder* \*path to the program folder*\*file name.exe*
When you register it, do not forget to indicate and backslash"\". In our case it looks like this:
%windir%\system32\cmd.exe /C start /B /D \Soft\OpenOffice \Soft\OpenOffice\X-ApacheOpenOffice.exe

A small footnote: if you decide to place all the shortcuts in a separate folder, creating an additional one in the root of the flash drive, indicate on the command line that it will need to go back to this folder. Just put a dot as the first slash. In our specific case it looks like this:
%windir%\system32\cmd.exe /C start /B /D .\Soft\OpenOffice .\Soft\OpenOffice\X-ApacheOpenOffice.exe


6. To window command line was not displayed at startup, select the “Collapsed to icon” function in the “Window” field:

7. Right on the tab at the bottom of the window, click the “Change icon” button, and then in the window that appears, open the program’s executable file, since this is what we are creating the shortcut for. Mark it and click “OK” - the same as in the properties window.

8. Now the shortcut will automatically change its icon, and we can launch the program from the root of the flash drive. You can easily move this folder, along with the program and the shortcut, to any convenient place. In this case, they will work normally, maintaining the relative path from the shortcut to the working executable file.

We hope that each of our articles helps you become more confident and not be afraid of any actions when working with a computer. Have a positive working mood!
Did you like the material? Share: Rate it: (3.00 out of 5, ratings: 11) Loading...
Return to the beginning of the article How to change file or folder shortcut icons
AdvancedUser.ru
How to change the folder icon in Windows 7 in different ways?
Greetings, blog readers.
Many users, trying to make the appearance of their operating system unique, change everything they can. These are window colors, backgrounds, sounds, icons, and often the entire design together. I have already touched on various topics regarding this area. At the same time, I did not tell you how to change the folder icon in Windows 7. Well, in the article below I will tell you about this.
Editing with built-in tools (to contents)
This procedure is simple and does not require any special skills from users. In general, to change the directory picture in Windows 8 or similar versions, you need to perform a few simple steps:

It is best to use files whose size does not exceed 256x256 pixels. To return the standard image, simply click on “Restore Default”. At the end we confirm the actions.
Before the final movements, you can preview the icon to be installed. If everything is fine, click “Ok”.
If you want to know in which folder the icons are stored – Shell32.dll. It would be more accurate to say that this is a library that is responsible specifically for icons.
As a result, a desktop.ini configuration file is created in the directory. It states required parameters and the path to the image. By default it is hidden. To see it, you need to go to the “View” tab in the directory, and then to “Options.” This is where you uncheck the box that hides these types of documents.
Manually(to contents)
How to change the folder icon manually? Simple - you can create the above file yourself:

It is worth noting that not all catalogs can be changed to your own image. For example, for windows partition this is prohibited.
All folders (to contents)
The first thing you need to do is a restore point. Only after this proceed to the procedure itself:

This is how you can change images in directories in Windows 10 and other versions.
If you want to put new picture on a flash drive or any other partition, refer to this article Icons for Windows 7. It describes in detail how this can be done.
If you are tired of the standard icon design in Windows 10 and 7, you can change it. Who needs monotonous folders that are no different from each other? After all, they can choose individual icons. For books - a volume in a beautiful binding, for documents - a stack of papers with a paper clip, for music - sheet music, for games - a joystick. If you do the same with shortcuts and system directories, you get a unique design theme. Find out how to change icons in Windows 7 and other versions. You can decide for yourself how your desktop elements will look.
There are several requirements for the image. It should be:
- Square.
- In .ICO format.
- Suitable size (16x16, 32x32, 48x48 or 256x256).
- Go to Start - Run.
- In the window that opens, enter “regedit” without quotes and click OK. The Registry Editor will appear.

- Click File - Export.
- Come up with a name for backup copy and indicate where to save it. If something goes wrong, you can restore them all.
Now start changing icons.
- In the registry, open the folder “HKEY_LOCAL_MACHINE”
- Go to "SOFTWARE".
- Then in Microsoft\Windows\CurrentVersion\Explorer.
- Right-click on Explorer.
- Item “Create - Section”.
- Name it "Shell Icons". If such a directory is already in the list, open it.
- On the right side of the window, call context menu and select "New - Stock Option".
- Write type 3 (three).
- Right-click on the newly created parameter “3” (“Three”).
- “Change” item.
- In the “Values” section, enter the path to the icon along with the file name and extension.
- If you have a 64-bit system, open the HKEY_LOCAL_MACHINE\SOFTWARE folder again.
- But this time go to Wow6432Node\Microsoft\Windows\CurrentVersion\explorer
- And repeat all the steps described above.
- Restart your computer and evaluate new look icons
Edit the registry only if you are well versed in this matter. Get one parameter mixed up and errors will occur.
If you don't like the way folders and shortcuts look, you can change their icons. You only need pictures of a certain format. This way you will make a beautiful desktop.
How tired of these standard icons on labels and folders! In this article I will tell you how to diversify your desktop and change icons on folders and shortcuts. I will perform various operations in the operating room Windows system 8. In Windows 7 you can do the same.
Changing the shortcut icon
1. In order to change the shortcut icon, you need to right-click on the shortcut. Select “Properties” from the drop-down menu.
2. In the “Shortcut” tab, click “Change icon”.

3. A window with many icons opened. Select the one you like best and click “OK”.

1. Right-click on the folder and select “Properties”.

2. Go to the “Settings” tab.

3. Click “Change icon”.


Changing the Recycle Bin and Computer icon
1. Go to the “Control Panel”. See below for how to do this in Windows 8.
 Click on the “Menu” button

2. Select “Design and Personalization”.
 Open “Design and Personalization”
 3. Then “Personalization”.
 Among the list we need “Personalization”
  On the left click “Change desktop icons”
 5. Now select Recycle Bin or My Computer and click “Change Icon”.
 Select a computer, a recycle bin, or something else. Click “Change icon”
 6. Select the icon that you like and click “OK”.

If you want to change the file icon from exe extension, then you can download the “Resource Tuner” or “Restorator” program. But it's better to make a shortcut this file and carry out all the operations that we did above.
That's it. This way you can change the icons on your computer!