How to connect to a virtual private network (VPN). Installing your VPN on VPS hosting from scratch
Roskomnadzor was in earnest. The department blocks websites and services. The other day I got to Telegram messenger. Roskomnadzor also plans to completely block VPN services or force them to cooperate.
In short, goodbye to anonymity? No matter how it is!
While discussing the issue of blocking with editor-in-chief Nikita Goryainov and my colleague Artem Bausov, we started thinking about creating our own VPN. In the wild 2000s, we all dabbled in online shooters and had to create our own server at the dawn of our acquaintance with computers.
Now the situation was more acute than ever. In Russia, active blocking of everything that is objectionable to Roskomnadzor continues, in Ukraine it is having its own fun. Mail.ru, Yandex and a dozen very useful resources without unnecessary dancing, residents are not allowed.
Well, we are for democracy, aren’t we? In this material, I will try to tell you as simply and in detail as possible how to make your own VPN server for a ridiculous 75 rubles per month.
Why your own VPN?

In the App Store and Google Play dozens of services that allow you to bypass blocking. But almost all VPNs do not perform well. The speed is incredibly slow, the advertising makes you sick, and you have to reconnect almost every 10-15 minutes.
In addition, when you use a public VPN (and a free one at that), you have absolutely no idea where your traffic goes and what happens to it on the remote servers of yet another fly-by-night service.
Life is easier and safer with your VPN. And the 70 rubles you have to pay monthly for your VPN is a guarantee of your safety.
Creating a cloud server

Don't be afraid of these words. It's not that scary. Even if you are far from network settings, protocols and are afraid of IP addresses, I will try to outline the procedure in as much detail as possible and illustrate each step.
Well, let's go!
ArubaCloud is our everything
There are dozens of cloud server options online. But we need “cheap and cheerful”, right? One of these is Italian cloud server ArubaCloud.
What's good about it? The minimum cost is 1 euro (75 rubles) per month of servicing a remote server. What is meant by remote server?
Imagine an old 1-core computer with 1 GB of RAM and 20 GB hard drive. And for just 75 rubles, such a computer is given to you to be torn to pieces remotely.
Here are the characteristics of that same budget car:

But, believe me, for our tasks and deploying our own VPN server, this power is quite enough.
Let's get started
Register on ArubaCloud
Step 2. We launch the utility and carry out simple settings.
First you choose New and fill out the appropriate fields as described in the screenshot below.

Connection Name: put any name here. Just name your connection.
PC Name: The IP address that is specified in the server settings immediately after its creation (step 4 of these instructions).
User Name: In SSH this is exactly vdesktop. You indicate exactly that. The password is the one specified in the administrator password.
You start the connection and after a couple of seconds you see the desktop of the Ubuntu Virtual Desktop operating system.

The final step remains - creating your own VPN.
Creating your own VPN server
This setup takes just a few steps. You are only one command away from your own VPN server in the terminal.
Step 1. In the lower left corner, tap on the icon (a la the Start menu in Windows). Select System Tools -> LXTerminal. In the terminal that opens, enter the following command (be careful):
wget https://git.io/vpnsetup -O vpnsetup.sh && sudo sh vpnsetup.sh
Note: the command specifies -O (the English letter "O", not zero).

Press Enter and wait a couple of minutes for the installation to complete.
Step 2. At the end you will receive a message with all the details of your own VPN server. BE SURE TO SAVE this data, write it down and copy it to several secret places so you don’t have to look for it later.

That's it, the VPN server is running. Now you can safely connect it to any device.
Turn on your VPN on iPhone
In order for a settings item with VPN to appear on your iPhone, install any mobile VPN application from the App Store. It is only needed to activate the menu item.

After installing the VPN app, open Settings -> VPN and, having created your own VPN, enter the following data.
ADDITION:Name: Any VPN name you decide
Type: IPsec Xauth PSK (or IPsec)
Server address: here is the IP address of your cloud server
IPSec ID: leave it blank
IPSec Shared Key: specify the IPsec PSK password from the terminal
Username: Username from the terminal (usually vpnuser)
Password: Password from terminal
For reasons that are not entirely clear, many users are faced with a situation where they connect to the VPN, but the Internet refuses to work.
In this case, run the command in the terminal:
sudo nano /etc/ipsec.conf
Replace sha2-truncbug=yes on sha2-truncbug=no and reboot Linux.
You can give your VPN server login details to your relatives and friends. No one except your family and selected people will have access to it. As a bonus, you get a remote server. If you wish, you can deploy file storage there or run services that are not too demanding on system resources.
Please note that the task here is not to explain everything thoroughly and technically correctly, the task is to explain it “on the fingers” so that even novice users can understand. I hope it worked out. If you have questions, ask them in the comments.
The essence of how a VPN server works is as follows:. For example, you want to go to the website yandex.ru. More precisely, connect to a server with IP 77.88.21.11 (residents of the eastern regions of Russia may be sent to a server with a different IP, but that’s not the point). When working without a VPN, your computer sends a packet (you could say a request) directly to the server with the address 77.88.21.11 and receives a response from it. When working via a VPN, your computer sends a packet to the VPN server, the VPN server sends the exact same packet to 77.88.21.11, 77.88.21.11 sends a response to the VPN server (because it was the VPN server that originally sent the request), and the VPN server sends this packet to your computer.
What do we have? Requests to the address 77.88.21.11 are sent not by your computer, but by the VPN; accordingly, the server 77.88.21.11 records the IP address of the VPN server, and not your computer.
One possible reason to use a VPN is need to hide your IP address.
Other uses – need to change traffic route. Let's take an example from life. The author of this article lives in the city of Orel (Central Russia) and wants to connect to the yunpan.360.cn server located in Beijing. The author uses (or rather, used at that time) the services of the Beeline Internet provider. As shown by the tracert yunpan.360.cn command entered in the command line Windows line, outgoing Internet traffic to this Chinese server goes through the United States. The trace does not show how the traffic goes back, but judging by the ping, it follows approximately the same route. Below is a screenshot from VisualRoute 2010.
This routing is due to the fact that Beeline did not pay backbone Internet providers for a more direct channel to China.
With this route, large packet losses occur, the speed is low, and the ping is huge.
What to do? Use a VPN. This is a VPN server to which we have a direct route, and from which there is a direct route to yunpan.360.cn. I (the author of the article) searched for a very long time acceptable solution and eventually found him. Was rented virtual server(what this is, we will discuss later) in Krasnoyarsk (immediately imagine where the city of Krasnoyarsk is located) from the hosting provider. Tracing to the server showed that the traffic was traveling across Russia, the ping was 95 ms (I had mobile LTE (4G) Internet, on wired internet ping will be 5-10 ms lower).
Ping– this is the delay of the Internet signal. The delay for the passage of Internet traffic in both directions (round trip) is measured. Measure delay in one direction only standard means is impossible, because your computer sends a request to the pinged server and records the time it takes for the response to arrive.
In traces, the ping to each point (to each point of the route, otherwise called a hop-hop) is also shown for traffic in both directions.
It often happens that in different sides the route is different.
Next, a trace was made from the Krasnoyarsk server to yunpan.360.cn. Ping is around 150 ms. The tracing showed that traffic from the Krasnoyarsk server to the Chinese one goes through direct peering (internetwork interaction) between the Transtelecom and China Telecom providers.
Here is this very trace (made from Linux):
tracepath yunpan.360.cn
1?: pmtu 1500
1: srx.optibit.ru 0.361ms
1: srx.optibit.ru 0.381ms
2: border-r4.g-service.ru 0.392ms
3: kyk02.transtelecom.net 0.855ms asymm 5
4: 10.25.27.5 112.987ms asymm 8
5: ChinaTelecom-gw.transtelecom.net 125.707ms asymm 7
6: 202.97.58.113 119.092ms asymm 7
7: 202.97.53.161 120.842ms asymm 8
8: no reply
9: 220.181.70.138 122.342ms asymm 10
10: 223.202.72.53 116.530ms asymm 11
11: 223.202.73.86 134.029ms asymm 12
12: no reply
What do we see? The Krasnoyarsk server is hosted by optibit.ru (hosting is a service for placing and renting server capacity) and is connected to the Internet provider “Igra-Service” (g-service.ru). “Igra-Service”, in turn, sends traffic to yunpan.360.cn through the large Russian backbone provider “Transtelecom” (for which it pays him money). TTK directs traffic through its direct connection to the network of the Chinese backbone provider China Telecom, the ChinaTelecom-gw.transtelecom.net hop domain tells us this.
Let's remember what our problem was. Our traffic to that Chinese server went through the USA, the speed was low. What have I done? I installed a VPN on this Krasnoyarsk server. And configured my computer to work through this VPN server. What happened? Now the traffic to yunpan.360.cn did not go along the old Orel-Moscow-USA-China route, but like this:
first to the VPN server – Orel-Krasnoyarsk,
then from the VPN server to Beijing - Krasnoyarsk-Beijing.
Did you get the point? We have changed our route. What did it give? The speed of the outgoing connection from me to yunpan.360.cn has increased. Ping has been reduced. The result was achieved.
How to determine your route? For beginners, the easiest way to do this is to use the VisualRoute program, which can be found on the Internet in both licensed and hacked forms.
You need to run this program and set the following settings:

It will turn out like this:
Using this table you will see which countries the traffic passes through. Once again, I draw your attention to the fact that the trace shows the route of outgoing traffic only (that is, traffic from your computer to the server). Route to reverse side Only a trace made from the server to your computer can show. VisualRoute has a small glitch: it often shows Australia(?) as a country when it cannot determine the real geoposition of the node.
VPN– Virtual private network – a virtual private network is, one might say, your own network on top of the Internet, all traffic within which is encrypted. You can study this technology in detail. To explain it very simply, then:
- your computer and VPN server connect over the Internet
- all traffic between you and the VPN server is encrypted
- The VPN server sends it to the destination
- your IP is hidden and the IP address of the VPN server is visible instead
It is recommended to use a VPN when working through free (or simply someone else's) WiFi, since it is possible to intercept all traffic passing through the WiFi router. And when using a VPN, all traffic will be encrypted. Moreover, if you go to yandex.ru, vk.com and google.ru without a VPN, then connections to yandex.ru, vk.com and google.ru will be recorded at the level of the router and your Internet provider. When using a VPN, all connections go to the VPN server address.
There are many paid services VPN. Their advantages include only ease of use. Disadvantages include high cost and lack of 100% confidentiality (you can write a lot, but what actually happens on the VPN server, whether traffic is intercepted, cannot be guaranteed). The inability to change the IP address in a couple of clicks should also be considered a disadvantage of paid services.
Let's compare the cost of our self-configured solution and paid VPN services. The latter cost around 300 rubles. per month. Our solution will cost $0.007 per hour. If we don’t use VPN right now, we don’t pay. If used for 2 hours every day for 30 days, this pleasure will cost us 30-50 rubles.
We will do the following:
- We rent a server for VPN.
- Let's set up a VPN on it.
- We will use them and pay only for every hour of real using a VPN.
Step #1. Server rental.
No, we will not rent a full-fledged server. We rent virtual server – VPS(virtual private server). In many cases, hosting websites on the Internet or for other purposes (including organizing a VPN) does not require large server capacities, but you need to customize the server operating system. Several operating systems cannot run simultaneously on one computer (including a server, because it is the same computer, only usually more powerful). What should I do? Virtual machines come to the rescue. This technology allows you to run an operating system within an operating system, which is called virtualization. In the case of servers, analogues of virtual machines are also created - virtual servers.
There are several common virtualization technologies. The most common are OpenVZ, KVM, Xen. Roughly speaking, Xen and KVM create their own “hardware imitation”, their own OS, etc. for each virtual machine. In the case of OpenVZ, a common OS kernel is used, as a result of which some functions (for example, making changes to the OS kernel) become unavailable, or they can be enabled or disabled only for all VPS at once. VPS on Xen and KVM, as a rule, are more stable in operation, but the difference is significant only for major projects, for which server fault tolerance is critical.
VPS on OpenVZ is always cheaper, since one virtual server requires fewer resources. Due to the lower price, we will turn our attention to VPS based on OpenVZ.
Attention! Some hosting companies (companies that provide server rental services) deliberately block VPN operation on OpenVZ-based servers! Therefore, before renting such a server, you need to check with the support service (from good hosting it should respond within 15 minutes, an hour maximum) whether the VPN will work.
To work on a personal VPN server, a minimum configuration is enough - 256 MB of RAM and a 0.5-1 GHz processor. However, not all hosting providers provide VPS with 256 MB of RAM: many have a minimum tariff of 512 MB of RAM. Such a VPS will be more than enough for us.
What other criteria for choosing a VPS exist? As you already understand, Internet traffic will constantly “walk” from you to the VPS and back. Therefore, main canals must have sufficient throughput in both directions. In other words, the speed of the Internet connection between your computer and the VPS must be sufficient to perform the tasks you require. For everyday comfortable work, 15 Mbit/s is enough, and if you are going to download torrents via VPN, then you may need all 100 Mbit/s. But! If you and the VPS are on the networks of different Internet providers (especially in different cities), it is unlikely that the backbone networks will “stretch” more than 70 Mbit/s within Russia (or your country) and more than 50 Mbit/s with servers in Europe.
Most hosting services require monthly payments. It is worth noting right away that the price range is very large with approximately the same quality. We will use services with an hourly rate: $0.007 per hour of our server’s work. Thus, if we use VPN for 2 hours every day, then we will pay about 30 rubles per month. Agree, this is not 350 rubles/month for a paid VPN service!
First of all, you need to go to the website and register:

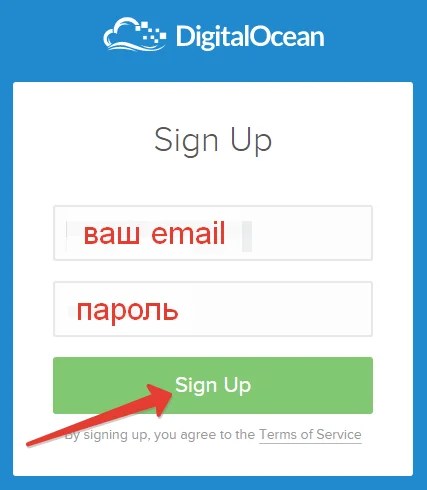

Next, a page will open on which you need to enter your bank card details. Without this, the system will not work and will not allow you to take advantage of the bonus 10 dollars (more on that later). You can specify any data, the system will “eat” fake data.
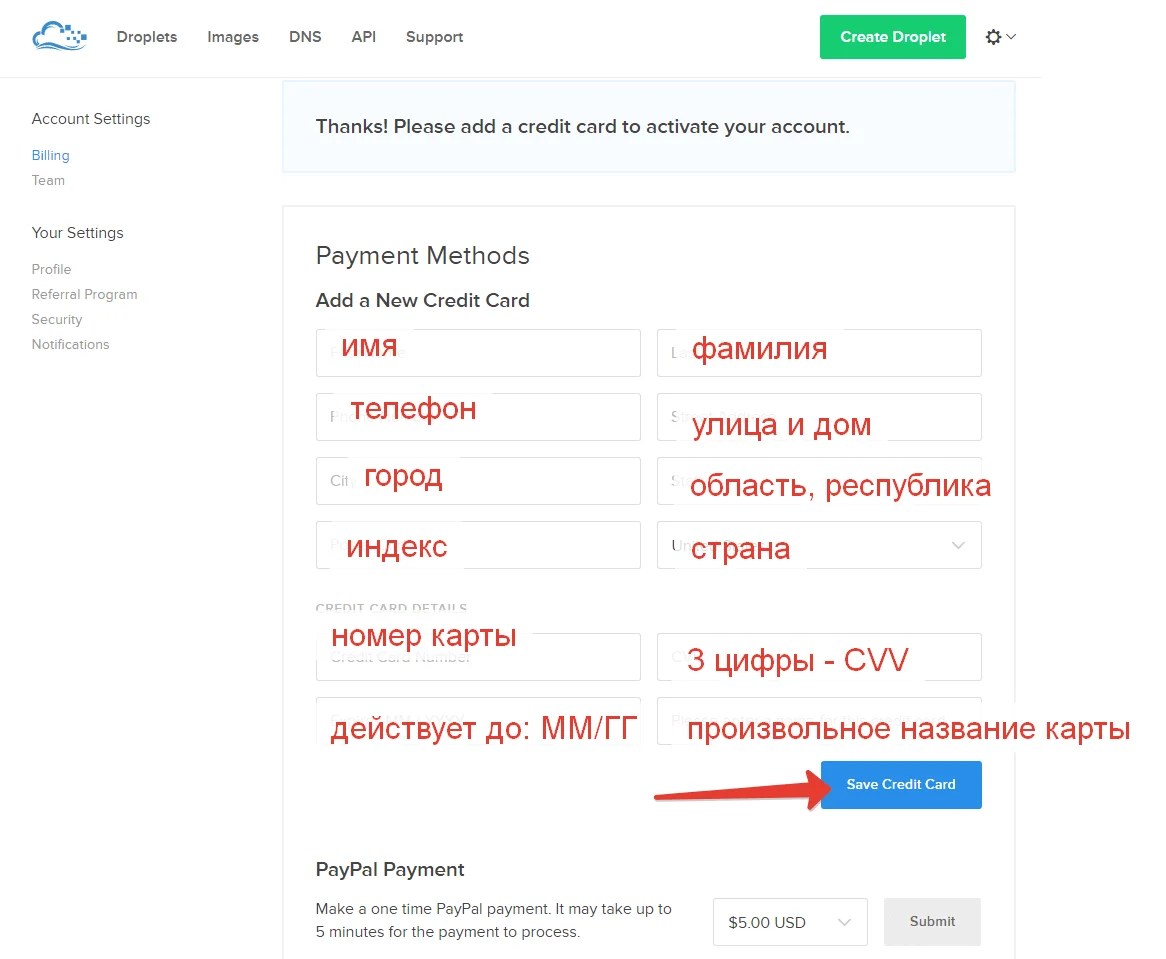
In this case, an amount of several rubles may be blocked on your card, which will then be returned. Charges from your card will only be based on the fact of using the servers.
What to do if you don’t have a bank card? Get yourself one, it automatically gives you a virtual card, the balance of which is equal to the balance of your wallet. You can top up your wallet almost anywhere, see.

However, if you enter your Qiwi card details into DigitalOcean, the system will spit it out, citing the fact that DigitalOcean does not work with prepaid and virtual cards. In this case, you need to top up your balance by $5 via PayPal system, paying with a Qiwi card.

After all this, on the same page in your DigitalOcean personal account, enter the promo code DROPLET10, which credits us with 10 dollars, which we can fully use on the servers without fear of additional charges from our card.

Ready! Now let's move on to creating a VPS. Watch the video tutorial:
When creating a server, choose Ubuntu OS version 14.04, and not any newer one, incl. do not select 16.04.
|
Server location |
Domain for ping |
|
|
Frankfurt, Germany |
http://speedtest-fra1.digitalocean.com/ |
speedtest-fra1.digitalocean.com |
|
Amsterdam 1, Netherlands |
http://speedtest-ams1.digitalocean.com/ |
speedtest-ams1.digitalocean.com |
|
Amsterdam-2 |
http://speedtest-ams2.digitalocean.com/ |
speedtest-ams2.digitalocean.com |
|
New York-1, USA |
http://speedtest-ny1.digitalocean.com/ |
speedtest-ny1.digitalocean.com |
|
New York-2 |
http://speedtest-ny2.digitalocean.com/ |
speedtest-ny2.digitalocean.com |
|
New York-3 |
http://speedtest-ny3.digitalocean.com/ |
speedtest-ny3.digitalocean.com |
|
San Francisco, USA |
http://speedtest-sfo1.digitalocean.com/ |
speedtest-sfo1.digitalocean.com |
|
London, UK |
http://speedtest-lon1.digitalocean.com/ |
speedtest-lon1.digitalocean.com |
|
Singapore |
http://speedtest-sgp1.digitalocean.com/ |
Speedtest-sgp1.digitalocean.com |
Note. For most residents of Russia and the CIS countries, Amsterdam or Frankfurt will be suitable (ping to Frankfurt in most cases will be slightly less than to Amsterdam). I recommend that residents of the Russian Far East test Singapore and compare the performance with European servers.
The location of servers abroad will allow you to use a VPN to bypass government bans on visiting certain sites (if this is relevant to you).
DigitalOcean includes 1 terabyte (1024 GB) of traffic in the price (see). For most people this will be enough. Other hosting providers have formally unlimited traffic, but it becomes unprofitable for them when the threshold of 1-2 TB/month is reached.
That's it, we ordered VPS. Congratulations. Now it's time to move on to setting it up.
Step #2. Setting up a VPN.
Don't be intimidated, the process of setting up your own VPN is as easy as two-twos!
In the video tutorial above, we connected to our server using Putty. Now let's continue.
Copy and paste (by right-clicking the mouse, as we did in the video tutorial) the command:
Now copy and paste the following into the file editing window that opens:
Press Ctrl+O, then Enter.
Press Ctrl+X.
Copy and paste the command:
Enter 1 and press Enter. We are waiting. According to the system requests, enter the desired login and press Enter. Same with the password. For the questions “[Y]/[N]”, enter Y and press Enter. After completing the setup, our login and password and server IP address will be shown.
Ready! VPN is configured!
Now open the “Network and Sharing Center” shared access»Windows:
Select the settings for a new connection:

Select “Connect to a workplace”:


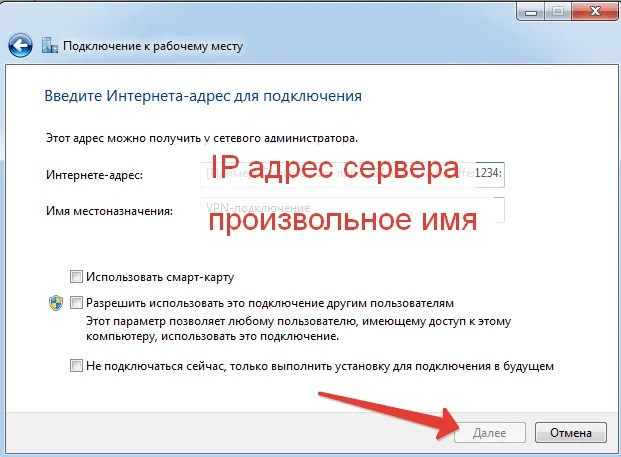
We're waiting a little. We now work via VPN! To make sure of this, go to and make sure that our IP address shown to us matches the IP address of our VPS.
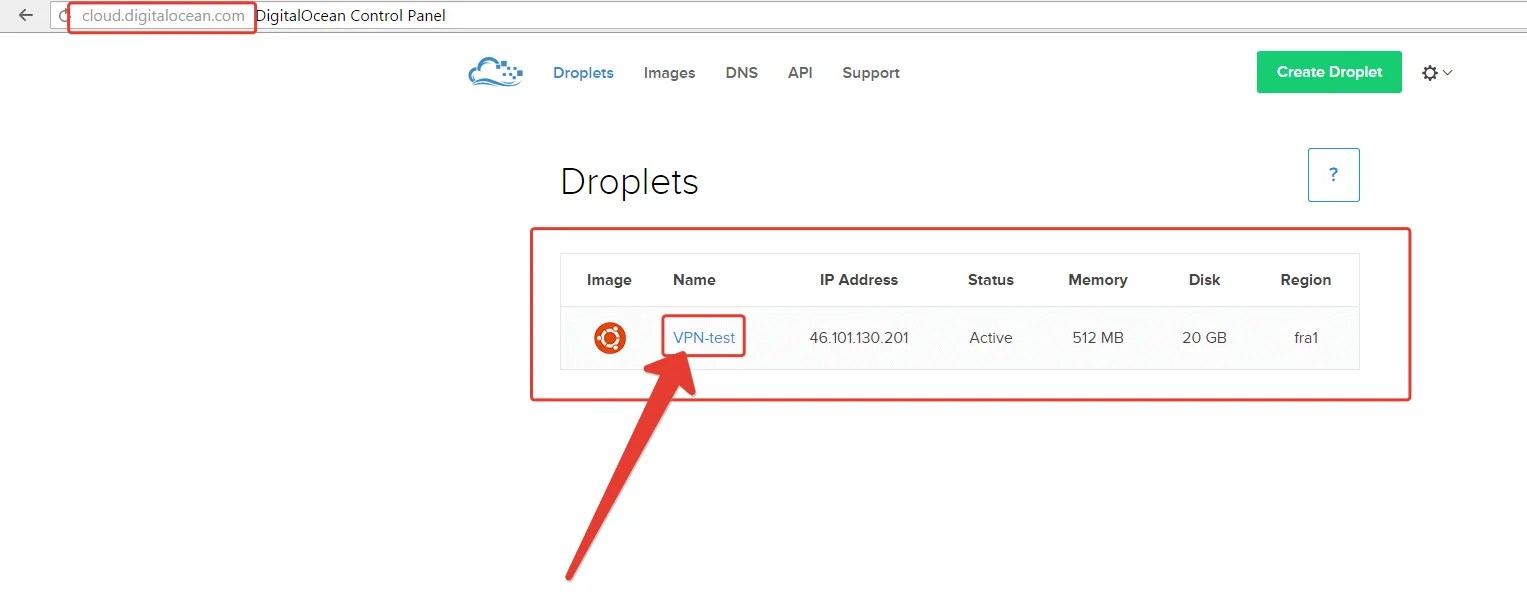
Now attention! Through personal account DigitalOcean we can turn off our VPS (droplet in DigitalOcean terminology), however, even the server in the off state is charged cash By standard tariff. So we'll do backup copy our server, we'll delete it, and when we need VPN again, we'll restore it from a backup!
Let's move on to server management (the DigitalOcean control panel is located at cloud.digitalocean.com, you can enter it through the Sign In button on the main page of digitalocean.com in the upper right corner).
We need to create a backup (snapshot) of our VPS. But to do this, you first need to turn it off.
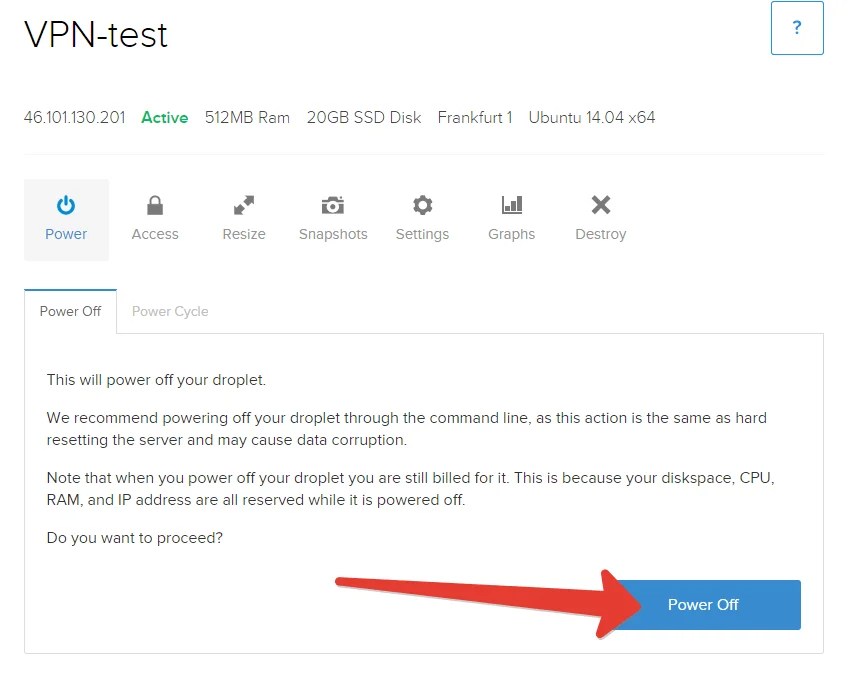
We wait about a minute until the server turns off. Then go to the Snapshots section, enter a custom name for the snapshot and create it:

For each gigabyte of “weight” of our VPS, 2 cents will be charged when creating a snapshot. Creating a backup (snapshot) will take a few minutes.
Now we delete the server:

All! No more money will be debited from us.
What to do when you need a VPN again
We need to create a new VPS from the backup we made before.
Click “create droplet”:
Now, as before, enter any server name in Latin letters without spaces, select the first minimum tariff, region must be the same, the same as the one in which we previously had a server.
Just below, click on the name of the photo we took (it was gray, but should turn blue):
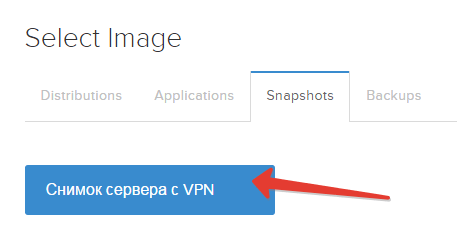
...and click the big green “Create droplet” button.
We wait about a minute.
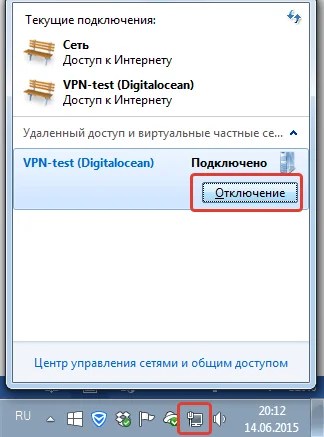
Let's see if the IP address of our server matches the previous one. If yes, then in Windows we simply resume the previously created connection:

If not, then right-click on the name of our connection and change the IP address to a new one:
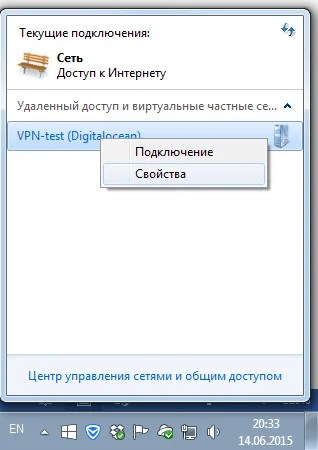
Enter the new IP and click “OK”:

Attention! Now, to turn off the VPN, we don’t need to make a backup copy, we just delete the server right away, and next time we’ll restore everything from the old snapshot. It is not necessary to shut down the server before deleting. Just in case, this is the procedure in the screenshots:
We removed the VPS while not using the VPN. Now let’s restore it from the old snapshot:
Again we check whether the old IP is still there and continue working.
On the same server (or another one) you can raise your personal proxy, for example, to the 3proxy software base, but this is not the topic of this article.
Found a typo? Press Ctrl + Enter
Greetings! And straight to the point. What is a VPN server for? It is mainly used to change the IP address and country in order to bypass various site blocking at work and at home. In addition, a VPN connection helps to encrypt the traffic and thus ensures the security of the transmitted data.
For example, using public Wi-Fi, all data transmitted through the network can be “hijacked”. Theoretically, these could be any files, but usually they steal passwords from wallets, mail, Skype, and anything else. In this article we will configure own VPN server, it's not difficult. Despite the volume of the text, the main action occupies a small part, and the rest is buns. The article also contains a video.
There are a lot of small ones on the Internet, from free to very paid ones. Disadvantages of free VPN services:
- limited in speed
- instability (everything is fine, then it’s terribly slow)
- traffic restrictions (up to several Gigabytes per month)
- Free period restrictions
- periodically you need to look for other services
- It’s not a fact that the transmitted data will be safe; you shouldn’t hope for anonymity at all, I would say.
Disadvantages of paid ones:
- the desired country or city is not always available
- hackneyed IP addresses (used by hundreds of clients), also applies to free ones
- there is simply a scam without a refund, for example, the traffic is not unlimited, some servers do not work or are too slow
There are also advantages of VPN services - ease of use and relative cheapness.
Own VPN server on VPS/VDS hosting
So, if you need a specific country or city, or you need a lot of traffic that VPN services do not provide, or a guarantee of security, then it makes sense to bother setting up a personal VPN server. Typically this requires in-depth knowledge system administration servers. But I tried to explain everything simply so that even a teapot could understand it)
This method also has disadvantages:
- there is only one IP address to which you can “transfer”, but there are additional ones for a fee
- non-trivial setup for the first time
- paid
Read to the end, and I will show you how to use your VPS server to bypass blocks without setting up a VPN on it.
What is a VPS/VDS server?
There are countless hosting providers on the Internet. All of them allow you to host your websites with them. The most popular service is virtual hosting. A more advanced one is a dedicated virtual server - VPS (VDS is the same thing). On a VPS you can host websites, set up a VPN server, mail server, game server - whatever!
You need to know that VPS servers come in several types: OpenVZ, Xen and KVM. For the VPN server to work you need KVM. The server type is indicated in the hosting plans. OpenVZ and Xen are also sometimes suitable, but you need to write to the hosting technical support and ask if the “TUN” module is connected. Without going into details about what it is for, just asking. If not, can they enable it. It also doesn't hurt to ask if the VPN itself will work (even on KVM), because... some companies cover this possibility. Oh yes, operating system servers – Debian, Ubuntu or CentOS (generally Linux-like). Server power doesn't matter.
Setting up a VPN server
I have a KVM VPS server at my disposal. Everything works here right away, you don’t need to write anywhere.
- When ordering a service, you can choose the simplest tariff plan “Micro”
- All sites open even on servers in Russia
- There is a free trial period of 7 days
- Technical support helps
- For my visitors, when you enter the promotional code: itlike60 - you will receive a real 60% discount on your first payment.

“Hostname” enter any or the name of your site (if you will in the future). “OS Template” select “Ubuntu 14.04 64bit” or any of Ubuntu, Debian, CentOS:

The operating system can then be changed if suddenly something does not work out.
After payment, you will receive an email with login details for the control panel and a Root password for setting up the server. And also the IP address of the server, and this will be your IP address when we install a VPN and connect to it from a computer


Click the “Manage” button and get into the administration window:

We don't need to touch anything here. The only thing that may be needed is to reinstall the operating system - the “Reinstall” button, more on that later.
Now we need to connect to the server to send commands to it. For this we will use free program Putty.
Unpack the archive with the program and run the file
putty.org.ru\PuTTY PORTABLE\ PuTTY_portable.exe
In the “Host Name” field we paste the IP address of the server that came in the letter, you can also copy it from the control panel:

and click “Connect”. If a window like this pops up, then click “Yes”:

A black console window should appear in front of us ( command line). This is where we will give commands. But first you need to log in. To do this, enter “root” in the “login” field

Then copy the root password from the letter and paste it into the “password” field. To paste here from the clipboard, you just need to right-click once on the console window. However, the password is not printed on the screen, it feels like nothing happened. Everything is fine, press “Enter”. Lines with information about the system should appear. If you wrote some error, check everything again. Also, the console will not wait long while you look for the root password. If by that time an error occurs, then launch Putty again.
Installing and running the main script
We are already at the finish line in setting up our own VPN server. There are many instructions on the Internet on how to install a server, but they all require the knowledge of a system administrator, because small nuances are overlooked. To the delight of all dummies, there is a universal script “OpenVPN road warrior” that will do all the work itself. We only need to give the command to download and run it.
So, copy this line and paste it into the console window with the right button and press “Enter”:
wget https://git.io/vpn -O openvpn-install.sh && bash openvpn-install.sh

All sorts of lines will flash through and, if the script has been successfully downloaded and launched, a dialogue with us will begin with the VPN server setup wizard:

The script finds the expected value for each parameter and offers to agree with it, i.e. Press “Enter” or enter your value.
- The first parameter is "IP address". The script should offer the same IP of the VPS server. This should be the case in 99.9% of cases, but if for some reason this is not the case, then correct it to the correct address.
- Second - protocol UDP or TCP. Leave the default UDP.
- Let's move on "Port: 1194"- we agree.
- "What DNS do you want to use with the VPN?"— select “Google”, i.e. Enter the number “2” instead of one, Enter. If Google is blocked, then we leave it as default.
- "Client name"— username. You can create access for different users. By default “client” - we agree.
- "Press any key..."— press “Enter” and wait a few minutes until everything is installed and configured.
In general, the creation of a VPN server is now complete, it’s time to reap the benefits. During the installation process, the script created a file with settings for our computer. In order for us to use the server, this file must be downloaded. To do this, insert into the command line:
cat ~/client.ovpn

The contents of the “client.ovpn” file will be displayed on the screen. Now you need to carefully copy it to the clipboard. Scroll up until you enter the command, select with the mouse all the lines except the very last one (for new commands), i.e. the last highlighted line will be “ " To copy the selection to the clipboard, press “Ctrl-V”.
Now on a computer in Windows 7/8/10, open Notepad and paste the copied text into it. Save the file on your desktop under the name “client.ovpn”.
If you plan to give access to the server to other people, then it is better to create for them separate files, for example vasya.ovpn. To do this, simply run the script again and now select the 1st item - creating a new user.
Client installation for Windows 7/8/10/XP and Android
Congratulations, we are at the finish line! Now all that remains is to install a free program that will connect to our VPN server. It's called "OpenVPN".
Download the version for Windows and install it, no need to run it.

If during the installation process all sorts of windows pop up, we agree with everything.
To connect to the server, right-click on the “client.ovpn” file on the desktop and select “Start OpenVPN on this config file”:

A black window will appear indicating the connection initialization process. If everything went well, then the last line should be something like:

A window may also pop up with a question like new network, then select “Public Network”.
You can check, go to the website 2ip.ru and look at your IP, it must match the IP of the VPS server:

The server console window can now be safely closed. And to close the VPN connection and return the old IP, you need to close the OpenVPN window.
To connect next time, just right-click the “client.ovpn” file from the desktop, you don’t need to do anything else.
With a phone It’s even simpler, you need to install the OpenVPN application through the playmarket, download the client.ovpn file into memory, select it in the application and connect to our VPN server.
What if something went wrong
If you feel that because of your mistake, everything is now going wrong, then you can reinstall the operating system on the hosting. To do this, click “Reinstall” in the control panel (see screenshot of the panel) and select a new operating system (or the same one):

Press the “Reinstall” button and wait 10 minutes. A new Root password will also be issued, do not lose it!

Connection errors
Most problems arise at the stage of connecting to the server in the OpenVPN program, especially in Windows 8/10. The black window may contain errors, for example:
- FlushIpNetTable failed on interface
- All TAP-Win32 adapters on this system are currently in use
- CreateFile failed on TAP device
- DNS failed..
In this case, the first thing to do is to give the program administrator rights and, accordingly, log into the system with administrator rights. Let's go to "C:\Program Files\OpenVPN\bin\", right-click on the file openvpn.exe -> properties. On the “Compatibility” tab, check the “Run this program as an administrator” checkbox. Now everything should work.
More treatment options:
- remove the program and reinstall as administrator
- disable the “Routing and Remote Access” service via “Control Panel -> Administration -> Services”
- try reinstalling from or here
- remove all VPN programs and gadgets from other paid and free services
You can find out whether the problem is with your computer or laptop if you install the OpenVPN application on your phone or tablet through the playmarket, upload the client.ovpn file to it and connect to our VPN server. If this doesn’t work, then you need to look for the reason on the server and write to support.
If everything works, the sites are stuck and open intermittently
Pay attention to the messages in the black window to see if there are repeated lines “read from TUN/TAP ... (code=234)”

and also to the message somewhere in the middle “WARNING: ‘tun-mtu’ is used inconsistently, local...”:
In this case, open the client.ovpn file in Notepad and in the new very first line write:
tun-mtu ‘server value’
server value is the number indicated at the end of the line in the text “remote=’tun-mtu 1500′”. Substitute your meaning! In the end it should look like this:

This is done because for some reason the MTU value on the computer and on the VPS server are different. We leave the .ovpn file for the smartphone untouched!
We allow traffic through a proxy without any settings at all
You can use our VPS/VDS server as a Proxy Server. To do this, we do everything as before until we click the “Connect” button in the Putty program. There is no need to open the console and run the script. Go to the “SSH->Tunnel” tab, set Source Port: 3128

Oops, I finished the article later, here I have Putty in English, but the essence is the same.
If it writes the error “You need to specify a destination address in the form host.name:port”, then switch to “Dynamic” instead of “Local”.
On the “Connection” tab, in the “Seconds between keepalives...” field, set it to 100 seconds, this is necessary so that the connection does not break due to downtime. Now let’s connect - click “Open” and enter your login/password. Next, go to the network settings in the browser and register the proxy server there. In chrome it's “Settings->Search for settings->write ‘proxy’->Proxy server settings.” We do everything as in the screenshot:

Now all sites will work through our server, but only in the browser and some programs. Other programs will not see the proxy and will work directly. In each program, in the connection settings, if provided, you need to specify the address, port and proxy type: Socks4/5. Or install OpenVPN and don't use a proxy.
How to allow only certain sites through a proxy
Install the extension for Google Chrome or Mozilla Firefox, called . In the settings you need to add our proxy server:


On the “URL Patterns” tab we add masks for sites that should be opened through our server. The site mask is its name with asterisks on the sides.

That's it, now the added site will go through a proxy, and all others will go directly. If you click on the extension icon, you can choose to allow all sites through it or none at all.
Shortcut for automatic connection
You can connect Putty to a proxy with one click. To do this, before connecting, you need to enter the server login in the “Connection->Data” section, the one that usually root


Now you need to create a shortcut on the desktop in which you specify the following parameters:

“C:\Program Files\PuTTY\putty.exe” -load myvpn -pw server_password
Where myvpn is the name of the saved session. That's it, there is only one detail left - remove the Putty window from the taskbar to the system tray. You need to download a modification of the utility and replace the exe file. Now in the settings tab Behavior a corresponding check mark will appear, but you don’t have to do this.
Electronic communications are improving every year, and information exchange increasingly high demands are placed on speed, security and quality of data processing.
And here we will look at a VPN connection in detail: what it is, why a VPN tunnel is needed, and how to use a VPN connection.
This material is a kind of introductory word to a series of articles where we will tell you how to create a vpn on various operating systems.
VPN connection what is it?
So, a virtual private network vpn is a technology that provides a secure (closed from external access) connection of a logical network over a private or public one in the presence of high-speed Internet.
This network connection computers (geographically distant from each other at a considerable distance) use a “point-to-point” connection (in other words, “computer-to-computer”).
Scientifically, this connection method is called a VPN tunnel (or tunnel protocol). You can connect to such a tunnel if you have a computer with any operating system that has an integrated VPN client that can “forward” virtual ports using the TCP/IP protocol to another network.
What is a VPN for?
The main benefit of a vpn is that negotiaters need a connectivity platform that not only scales quickly, but also (primarily) ensures data confidentiality, data integrity, and authentication.
The diagram clearly shows the use of VPN networks.
Rules for connections over a secure channel must first be written on the server and router.
How VPN works
When a connection occurs via VPN, the message header contains information about the IP address of the VPN server and the remote route.
Encapsulated data passing over a common or public network, it is impossible to intercept because all information is encrypted.
The VPN encryption stage is implemented on the sender's side, and the recipient's data is decrypted using the message header (if there is a shared encryption key).
After correct decoding messages between two networks, a VPN connection is established, which also allows you to work in a public network (for example, exchange data with a client 93.88.190.5).
Regarding information security, the Internet is extremely unprotected network, and a VPN network with OpenVPN, L2TP / IPSec, PPTP, PPPoE protocols is completely secure and in a safe way data transfer.
Why do you need a VPN channel?

VPN tunneling is used:
Inside corporate network;
To unite remote offices, as well as small branches;
For digital telephony services with a wide range of telecommunications services;
To access external IT resources;
For building and implementing video conferences.
Why do you need a VPN?
VPN connection is required for:
Anonymous work on the Internet;
Downloading applications when the IP address is located in another regional zone of the country;
Safe work in a corporate environment using communications;
Simplicity and convenience of connection setup;
Ensuring high connection speed without interruptions;
Creating a secure channel without hacker attacks.
How to use VPN?
Examples of how VPN works can be given endlessly. So, on any computer on the corporate network, when installing a protected vpn connections you can use mail to check messages, publish materials from anywhere in the country, or download files from torrent networks.
VPN: what is it on your phone?
Access via VPN on a phone (iPhone or any other Android device) allows you to maintain anonymity when using the Internet in public places, as well as prevent traffic interception and device hacking.
A VPN client installed on any OS allows you to bypass many of the provider’s settings and rules (if the provider has set any restrictions).
Which VPN to choose for your phone?
Mobile phones and smartphones running Android OS can use applications from Google Playmarket:
- - vpnRoot, droidVPN,
- - tor browser for surfing networks, aka orbot
- - InBrowser, orfox (firefox+tor),
- - SuperVPN Free VPN Client
- - OpenVPN Connect
- - TunnelBear VPN
- - Hideman VPN
Most of these programs serve for the convenience of “hot” system setup, placement of launch shortcuts, anonymous surfing Internet, selecting the type of connection encryption.
But the main tasks of using a VPN on your phone are checking corporate mail, creating video conferences with several participants, as well as holding meetings outside the organization (for example, when an employee is on a business trip).
What is VPN on iPhone?
Let's look at which VPN to choose and how to connect it to your iPhone in more detail.
Depending on the type of network supported, when you first start the VPN configuration on your iPhone, you can select the following protocols: L2TP, PPTP and Cisco IPSec (in addition, you can “make” a VPN connection using third-party applications).
All of the above protocols support encryption keys, user identification using a password and certification are carried out.
Among additional functions When setting up a VPN profile on an iPhone, you can note: RSA security, encryption level, and authorization rules for connecting to the server.
For iPhone phone from appstore worth choosing:
- - a free Tunnelbear application with which you can connect to VPN servers in any country.
- - OpenVPN connect is one of the best VPN clients. Here, to launch the application, you must first import RSA keys via iTunes into your phone.
- - Cloak is a shareware application, since for some time the product can be “used” for free, but to use the program after the demo period has expired, you will have to buy it.
VPN creation: selection and configuration of equipment
For corporate communications in large organizations or combining offices remote from each other, they use hardware equipment that can support continuous, secure work on the network.

To implement VPN technologies, the role of a network gateway can be: Unix servers, Windows servers, network router and the network gateway on which the VPN is installed.
A server or device used to create a VPN network for an enterprise or vpn channel between remote offices, must perform complex technical tasks and provide a full range of services to users both on workstations and on mobile devices.
Any router or VPN router must provide reliable operation on the network without freezes. And the built-in VPN function allows you to change the network configuration for working at home, in an organization or in a remote office.
Setting up VPN on a router
In general, setting up a VPN on a router is done using the router’s web interface. On “classic” devices, to organize a VPN, you need to go to the “settings” or “network settings” section, where you select the VPN section, specify the protocol type, enter the settings for your subnet address, mask and specify the range of IP addresses for users.
In addition, to secure the connection, you will need to specify encoding algorithms, authentication methods, generate agreement keys, and specify DNS server WINS. In the “Gateway” parameters you need to specify the gateway IP address (your own IP) and fill in the data on all network adapters.
If there are several routers on the network, you need to fill out the VPN routing table for all devices in the VPN tunnel.
Here is a list of hardware equipment used to build VPN networks:
Dlink routers: DIR-320, DIR-620, DSR-1000 with new firmware or Router D-Link DI808HV.
Routers Cisco PIX 501, Cisco 871-SEC-K9
Linksys Rv082 router with support for about 50 VPN tunnels
Netgear router DG834G and routers models FVS318G, FVS318N, FVS336G, SRX5308
Mikrotik router with OpenVPN function. Example RouterBoard RB/2011L-IN Mikrotik
VPN equipment RVPN S-Terra or VPN Gate
ASUS routers models RT-N66U, RT-N16 and RT N-10
ZyXel routers ZyWALL 5, ZyWALL P1, ZyWALL USG
They have become commonplace. True, no one really thinks about what is behind the concept like “VPN, setup, use, etc.” Most users prefer not to get into the jungle of computer terminology and use standard templates. But in vain. From knowledge about such connections, you can derive a lot of benefits, for example, increase traffic or connection speed, etc. Let's look at what a connection to a virtual network actually is, using the example of interaction between operational Windows systems on a desktop computer terminal and Android on a mobile device.
What is VPN
Let's start with the fact that VPN setup is impossible without general principle understanding the essence of the connection being created or used.
If you explain in simple words, in such a network there is necessarily a so-called router (the same router), which provides computers or mobile devices trying to connect to existing network, standard additional IP addresses for access to LAN or the Internet.
In this case, a virtual network in which there is an activated VPN connection setting accepts any device connected to it and is assigned a unique internal IP address. The range of such addresses in the usual standard is from zero to the value 255.
What’s most interesting is that even when accessing the Internet, the external IP address of the device from which the request is made is not so easy to determine. There are several reasons for this, which will be discussed below.
The simplest VPN setup for Android
Almost all virtual networks using a wireless connection like Wi-Fi work on the same principle - assigning free IP addresses from the available range. It is not surprising that any mobile device can easily be connected to them (but only if it supports the appropriate connection protocols).

However, today any smartphones or tablets based on the Android OS have in their functionality the option of connecting the same Wi-Fi. The network is detected automatically if the device is within its coverage area. The only thing you may need is to enter a password. The so-called “shared” ones do not require a password at all.

IN in this case You need to go to the main settings on your smartphone or tablet and activate the Wi-Fi connection. The system itself will determine the presence of radio modules at a distance of 100-300 meters from the device (it all depends on the model of the distribution router). Once the network is identified, a menu will be displayed with all available connections and their blocking indication. If the network has an icon padlock, it is password protected (however, this will be indicated initially in the message). If you know the password, enter it.
On networks public use, where login using a password is not provided, and it’s even simpler. Has the network been determined? All. Click on connection and use it. As is already clear, VPN configuration in this case is not required at all. Another thing is when to use Windows settings or another operating system (even mobile) to create a connection or assign the status of a VPN distribution server to a computer terminal or laptop.
Creation on Windows
With "OS" Windows family not everything is as simple as most users think. Of course, automatic recognition of a network or connection via Wi-Fi, ADSL or even direct connection through network card They produce Ethernet (subject to availability installed equipment). The question is different: if the distributor is not a router, but a laptop or desktop computer how to get out of this situation?
Basic parameters
Here you will have to delve into the VPN settings. Windows as an operating system is considered first.

First you need to pay attention not even to the settings of the system itself, but to its accompanying components. True, when creating a connection or using it to the maximum, you will have to configure some protocols such as TCP/IP (IPv4, IPv6).
If the provider does not provide such services in automatic mode, you will have to make settings indicating previously obtained parameters. For example, when connecting automatically, the fields in the Internet browser properties for filling will be inactive (there will be a dot on the item “Obtain an IP address automatically”). That is why you do not have to enter the values of the subnet mask, gateway, DNS or WINS servers manually (especially for proxy servers).
Router settings
Regardless of whether the VPN is configured on an ASUS laptop or terminal (or any other device), access to the network is still common.
To do it correctly, you need to go to its own menu. This can be done using any Internet browser, provided that the router is directly connected to a computer or laptop.

In the address field, enter the value 192.168.1.1 (this corresponds to most models), after which you should activate the enable function (using the router parameters in advanced mode). Typically this line looks like WLAN Connection Type.
Using VPN Clients
VPN clients are quite specific programs that work like anonymous proxy servers that hide the true IP address of the user's computer when accessing the Internet. local network or on the Internet.

Actually, the use of programs of this type is reduced to almost complete automation. The VPN setting in this case, in general, is not important, since the application itself redirects requests from one server (mirror) to another.
True, you will have to tinker a little with setting up such a client, especially if you want to make the maximum number of available connections in your home virtual network. Here you have to choose between software products. And it should be noted that some applications, even the smallest in size, sometimes surpass the commercial products of many well-known brands, for which you also have to pay (by the way, a lot of money).
What about TCP/IP?
It goes without saying that almost all of the above settings affect the TCP/IP protocol to one degree or another. Today nothing better has been invented for comfort. Even remote anonymous proxy servers or local storage data still uses these settings. But you need to be careful with him.

It is best to contact your provider or system administrator. But one thing must be clearly remembered: even when setting the values manually, as a rule, the subnet mask has the sequence 255.255.255.0 (it can change), and all IP addresses begin with the values 192.168.0.X (the last letter can have from one to three characters ).
Conclusion
However, these are all subtleties computer technology. The same VPN client for Android can provide communication between multiple smart devices. But the biggest snag is whether it’s worth using such a connection on a mobile gadget.
If you noticed, we didn’t go into too much technical detail. This is rather a descriptive instruction about general concepts. But even that simple example, I think, will help, so to speak, to understand the very essence of the issue. Moreover, with a clear understanding of it, the whole problem will be reduced only to the system settings, which will not affect a specific user in any way.
But here you need to be very careful. Actually, for those who don’t know what it is VPN connection, it won't do much. For more advanced users it is worth telling what to create virtual network using native Windows OS tools is not recommended. You can, of course, use the initial settings, however, as practice shows, it is better to have some kind of reserve additional client, which will always be like an ace in the hole.