How to enter engineering mode android. Login to the Android engineering menu
Not all mobile devices reproduce sound equally loudly - for some, the ringing sound of the call is too quiet, while for others, the sound switched to headphones exceeds all permissible limits. How to cope with this imbalance and even out the sound? Is it possible to do this without visiting service center? Let's figure it out.
Any gadgets running Android OS have such a flexible control system that they can be changed beyond recognition - customized, thereby opening up a wide range of hidden possibilities, and customize any functionality of the system, including sounds. Not all basic assemblies are ideal; sometimes the sound reproduction of the device’s speakers does not work correctly - in some applications it can reach the maximum value, while in others it is barely audible. You can adjust the speakers in the most in various ways– both standard and using a menu of special settings or applications.
Available in all devices standard key to control the sound - it is usually located on the side panel. By clicking on it you can install required parameter. But if this does not suit you, then you can do this from the main settings menu. Here you can make settings for any application, set a ringtone for a particular contact.
To change standard sound, you need to do this:
- Open the main settings menu and go to the section "Melodies and Sound";
- In the right corner, click on the gear icon - you will find yourself in the desired settings section;
- Set the desired sound parameters.
This will result in the same pitch for all apps and calls. But if you need to change specific values, for example, for incoming voice calls or messages, you need to do this in the “Sound Profile” section in each of the desired applications.
Through the functionality of the engineering menu
This method is suitable for advanced users who, in case of failure, will be able to return everything standard settings back. But! Each model has its own commands to call this special menu settings:
- For models from Samsung: *#*#8255#*#* or *#*#4636#*#* ;
- For gadgets from NTS: *#*#3424#*#* or *#*#4636#*#* or *#*#8255#*#* ;
- Combination for devices manufactured by Sony: *#*#7378423#*#*
- For devices manufactured by Fly, Alcatel, Philips: *#*#3646633#*#* ;
- And for gadgets from the manufacturer Huawei, the combination will be: *#*#2846579#*#* ;
- For devices on MTK: *#*#54298#*#* or *#*#3646633#*#*.
After dialing and pressing the dial button, you are taken to the engineering menu, where you can adjust the necessary parameters.


There are other parameters, but it’s better not to touch them at all:
- Debug Info – system information about possible debugging;
- Speech Logger – setting up conversation recording, if you activate this position, then in the root folder you can find a file something like this: Wed_Jun_2014__07_02_23.vm, indicating the date and time of recording;
- Audio logger – is responsible for searching for recorded conversations.
Each of these modes has its own fine settings, and to understand what’s what, here is a standard list of sound adjustments Type:
- Sip – will allow you to regulate calls, for example, via Skype;
- The Mic button is responsible for adjusting microphone response;
- Sph – will allow you to set the desired parameter for the conversation dynamics, that is, the one that is brought to the ear;
- Sph2 – this parameter is not available on all devices, but if it is, then it can be used to configure the second earpiece;
- Sid - it’s better not to touch this line - otherwise during a conversation you can only hear yourself, and not your interlocutor;
- Media – this adjusts the sound of multimedia files, for example, video;
- Ring – the ability to set the desired volume level for incoming calls;
- FMR - is responsible for the pitch of the sound in the Radio application.
There are several settings to set the desired sound - from level 0 to level 6. With each press, the level increases, and in order to save the set value, it is erased from the cell and a new one is written, which you see during setup. But! Observe the range: it can range from 0 to 255, and the lower the number, the lower the sound will be reproduced. After making changes, click on the Set button - it is located on the same line as the cell being changed, and exit the settings by pressing the dial button.
Tips: before changing the default settings, write down all the values on a piece of paper - this may come in handy if you overdo it and set the wrong parameter, for example, too low playback sounds.
Examples
For many users, when recording video, the sound is incorrect, that is, either too quiet or loud. To fix this, go to the engineering menu by typing the command for your smartphone (see above):
- Go to the line LoudSpeaker Mode (loudspeaker settings);
- Set the microphone sensitivity to mic.
- Here you can set the level item to, for example, the value 240. Save the changes with the Set button and exit the menu. You should press this button after each change made, do not forget about it!
Using special software
If you don't want to bother with fine adjustments devices, you can use special applications. You can find a lot of them both in the Google store and on the Internet. What is noteworthy is that the sound can be increased by about a third, and the speakers will work absolutely normally, without wheezing or straining.
Utilities are recognized as the most popular, and for setting low frequencies best fit .
But the Android OS version must be higher than 2.3, otherwise they will not be able to perform their functions.
Everything is very simple, the software works on the same principle - an equalizer appears on the screen, where you can make the desired sound adjustments.
Now you know how to increase the volume on Android or, if necessary, adjust the sound and sensitivity of the speakers.
Why do you need rooting? Android devices and what opportunities it provides are known to a fairly large number of users, which cannot be said about the hidden advanced hardware settings menu, also called the engineering menu. Few people know about these settings, and even fewer owners. mobile devices know how to use them. What is the Android engineering menu and why is it needed?
Engineering Android menu– this is nothing more than a special subroutine intended for testing by developers operating system and device sensors. The interface of this program is represented by a set of options that allow you to change the hardware configuration of your mobile device. With its help, you can get comprehensive information about the hardware of the gadget, test the processor, RAM and physical flash memory, modes wireless connection, configure camera settings, display, microphone, speakers and much more.
Entering the engineering menu
All this, of course, is good, but here’s how to enter the engineering menu if Android interface there is no corresponding option? Entering the advanced hardware settings menu is done using a special code entered in the dial line phone number. The menu should open immediately after entering the last character of the combination, but in some cases you may need to press the call button.
There is nothing complicated in the procedure itself, however, it should be taken into account that for different models mobile gadgets there are their own codes. Below we have provided a list of codes for the most popular manufacturers.
Engineering menu codes in Android are universal, however, they correct work on phones with “left” firmware is not guaranteed. To access hardware Android settings can also be used special programs, For example, "Engineering MTK menu» or "Mobileuncle MTK Tools» .

Such applications are especially useful on tablets whose firmware does not provide a dialer. The interface and set of available options in these programs are somewhat different, however, understanding them will not be difficult.
Whatever method you use, you need to exercise maximum caution when working with the engineering menu. Before starting work, it is strongly recommended that you write down all the initial parameter values so that you can restore the settings. It is unacceptable to experiment with the engineering menu just to find out what comes out of it, as you can render your device unusable!
To obtain a list of engineering codes for specific model phone can be used special application Secret Codes, available on Google Play. On some mobile device models, full access to the engineering menu may require superuser rights (root).
What you can change using the menu
You know how to get to the engineering menu, now let's find out what settings can be made using it. The possibilities are more than wide. The menu subroutine supports changing the speaker volume level and microphone sensitivity, built-in camera settings, audio parameters, GPS modules, Bluetooth and Wi-Fi, disconnect unused frequencies to save battery power. You can also test the key components of your device and external card memory, configure I/O operations, define exact temperature processor and battery, level of harmful electromagnetic radiation.
Another useful function is to gain access to recovery mode - an analogue of BIOS on computers, which in turn contains a whole set of settings. Recovery mode features include resetting the device to factory settings, updating the firmware, creating a backup copy of the operating system, gaining root access, and deleting sensitive user data. It is not possible to list all the engineering menu options in one article; the more sensors and components there are in a phone or tablet, the more extensive it will be.
Increasing phone volume through the engineering menu
Now let’s demonstrate how to work with hardware settings using the example of one of the most popular operations and learn how to increase the volume on Android through the engineering menu. So, go to the menu using Mobileuncle MTK Tools or by entering the “magic” code, then find and open the Audio subsection. If you entered the menu through the Mobileuncle Tools program, this subsection will be located in the senior section Engineer Mode, in other cases it is usually located on the Hardware Testing tab.

In under Audio section The following options will be available to you:
- Normal Mode normal mode, which works when a headset is not connected to the device.
- Headset Mode – headset mode that turns on when headphones or speakers are connected to the smartphone.
- LoudSpeaker Mode – loudspeaker mode. Activated when turned on speakerphone provided that there is no headset connected to the device.
- Headset_LoudSpeaker Mode – loudspeaker mode with a connected headset. The same as the previous one, but with headphones or speakers connected.
- Speech Enhancement - this mode is activated when talking on the phone without using the speakerphone.

There may be other settings in the section, for example, Debug Info and Speech Logger, but it is better not to touch them. Select the mode for which you want to change the volume level (let it be Normal Mode), select Type in the list that opens and indicate for which function we will change the volume. The following functions may be available:
- Ring – adjust the volume for incoming calls;
- Media – adjust the speaker volume when playing multimedia;
- Sip- sound settings for Internet calls;
- Sph – sound settings conversational dynamics;
- Sph2 – sound settings of the second speaker (this option may not be available);
- Mic – change the microphone sensitivity;
- FMR – FM radio volume settings;
- Sid – it is better not to touch this parameter, otherwise problems with the interlocutor’s voice may occur.
Having selected a function, scroll through the current list, set the desired Value (from 0 to 255) and click to apply the new Set settings.

To change the volume level, you can also use preset templates - the Level option. Most phones have seven levels, from 0 to 6. It is advisable not to touch the Max Vol setting, just as you should not set it too high. high values for Value, otherwise the sound in the speakers will start to wheeze. Other modes in the Audio subsection are configured in a similar way.
Some smartphone and tablet models require a reboot for the new settings to take effect.
Reset settings
And the last thing we’ll look at today is resetting the engineering menu parameters to factory values. It may be needed if, after making changes, the device begins to work incorrectly. There are several reset methods. If the system boots normally, go to the settings and open the “Backup and Reset” subsection.


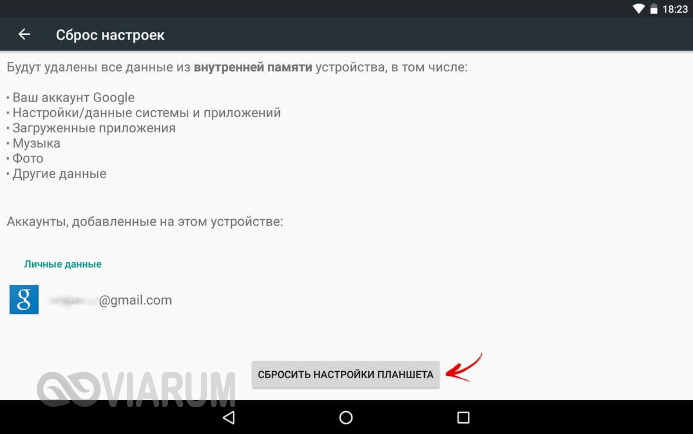
You can also reset the engineering menu by entering a special service code in the dialer. Usually it is *2767*3855#, *#*#7780#*#* or *#*#7378423#*#*, but your phone model may require a different code.
Another option is to use the recovery mode mentioned above. To get into it, use one of these combinations:
- Power button + volume down.
- Power button + volume up.
- Power button + Home button + Volume down/up.
- Power button + volume up + volume down.
In the list of options that opens, select “wipe data/factory reset” → “Yes – delete all user data” → “reboot” system now" The device will reboot and the settings will be reset.


There is another way to reset the engineering menu settings, but it requires superuser rights. Using any file manager with root rights support, go to the system root directory, and then delete all or part of the contents of the folder data/nvram/apcfg/aprdcl and reboot.

Files in a folder aprdcl they are responsible for the engineering menu settings. It is not necessary to delete all files at once. If you mess up, say, your audio settings, all you need to do to restore the original settings is delete files that have an audio string element in their names. And one more thing. Regardless of the reset method, always do backup copy your personal data and applications, as they may all be lost.
Access to the engineering menu of your Android smartphone is additional features gadget control.
In addition, this is a real opportunity to change "unchangeable settings", enable functions that are blocked but designed by the developer, and really improve (or ruin if ineptly interfered with) your gadget.
Engineering menu - what is it?
Engineering menu and hidden settings were present in the very first phones!
This gave and continues to give developers the opportunity to customize and test gadgets in the most unusual modes.
True, most are developed for smartphones and tablets based on MediaTek processor.
Do not forget that when incorrect operation applications can cause problems much greater than the problem of getting into the engineering menu, so be careful.
In addition, it is not a fact that the first application you choose will work correctly on your smartphone.
So you'll likely have to download and install several options before you find the one that works for you.
What parameters are available for configuration in the engineering menu
Of course, at different smartphones Menu designs and functions may vary.
Therefore, when you get to this function, you may find slightly different options and menu items on different phones.
Therefore, for example, the device has Qualcomm Snapdragon the possibilities will be quite meager and everything will be limited to just viewing various parameters and testing them.
At the same time, smartphones based on MediaTek will have much wider capabilities.
However, remember that these settings are hidden by the developer for a reason.
When changing them, you must be aware of what you are doing, otherwise it may end badly for your gadget.
Important! Make it a rule to never change settings that you do not know the meaning of or are not sure how it will affect the operation of the device. Otherwise, you risk ruining your mood for a long time.
Information you can get from the menu
Basic data available on any type of smartphone:
Phone IMEI – personal identification (unique) number of the device.
Phone number– sometimes not specified;
Net– your operator;
Roaming– are you in roaming?
Network information– whether you are being contacted and whether the network is turned on;
Call forwarding– is it used on at the moment;
Network type, network index;
Signal volume.
Your location coordinates.
There is also a section “about the battery”, it will contain the following data:
1 State– whether the battery is currently charging or not.
2 Charge level– in percentage charge/discharge ratio.
4 Battery Type– production technology
5 Time elapsed since last charge.
In addition to this information, the engineering menu may contain much more various useful data, depending on the type of menu provided by the developers.
Testing a smartphone using Engineering Mode capabilities
It often happens that with all the right visible settings The phone is not functioning properly.
The speed of the processes does not correspond to the stated parameters, the volume of used RAM less than it should be, failures to operate or install valid applications, and lack of proper functionality are detected.
And the standard user menu does not provide any way to detect the cause of such problems.
The engineering menu just makes it possible to conduct in-depth testing of the system and the device itself for hidden malfunctions or incorrect set parameters.
The following modes are available:
1 General (Automatic Test)– this test will test every parameter of the smartphone;
2 Report– a full test report is displayed;
3 Testing of all functional modules, processor, memory cards and SIM cards, vibration, speakers, microphone, connectors - literally everything the phone is loaded with can be checked for adequate operation.
4 Screen tests– parameters such as brightness, clarity, sensitivity, response speed, compliance with visualization and touchscreen;
5 Testing work gyroscope, cameras, accelerometer, flash, and much more.
This is what testing mode looks like.
To open it, you need to go to the appropriate section (most often “Testing” or something like that).

This is only a small part of what the engineering menu can provide for testing, and as you would expect, different phones will have different tools for testing and the items of the tested objects will differ.
However, the benefits of such opportunities cannot be overestimated.
Such testing can help you understand whether changing settings will help solve a particular problem, or needed.
Or maybe the problem is at the level physical breakdown, and it makes sense, for example, to replace the part.
A similar test would also be useful when purchasing a used device.
Thus, you can immediately detect modules that are not working or have errors and understand whether the gadget is worth buying or not.
Let's look at examples of using the mode.
Companies that create Android smartphones, including Lenovo, implement and use an engineering menu to test their devices.
In Lenovo, the engineering menu (Engineer Mode) contains various settings and gadget testing options that are not available ordinary users. But now, having downloaded a special application from the Play Market, or knowing a special USSD command, any user can go there.
The engineering menu is a special special application that is hidden from the eyes of the average user and is used by developers to test and set the necessary parameters. It allows specialists to check the operation of various sensors and adjust the operation of system elements.
If you decide to enter the “holy of holies” of developers, then when working with the technical menu of the Android OS, be extremely careful: an error when changing functions can lead to various malfunctions in the operation of the device.

How to enter the menu?
Don’t know how to access the engineering menu on Lenovo? To log in, you must enter numbers, as with standard dialing of a telephone number. After this, you will need to dial a certain combination consisting of signs and numbers. It is necessary to take into account that this combination is different for each smartphone creator. In addition, it also depends on the planned adjustments in the Lenovo menu.
Combinations to launch Engineering Mode
For Lenovo smartphones operating on the MediaTek chipset (as well as for gadgets from other Chinese manufacturers), to get to the technical menu, you need to enter one of the combinations:
- *#*#3646633#*#*;
- *#*#54298#*#*.

If any of the above special codes do not work, then you should use third party applications, you can even download them on the Play Market. It is best to use applications such as Shortcut Master, Mobileuncle Tools in such situations.
Video “How to work in Engineering Mode”
We suggest watching the video before taking any action yourself.
Please note that Engineer Mode does not function on certain models smartphones running Android 5.1 Lollipop. In addition, it is not valid when using the Cyanogenmod firmware.
When you reboot into Android 4.4.2, the changes made in the special application are subsequently reset.
Mobileuncle Tools program
The functionality of this application is almost the same as that of the engineering menu, called by a special code, with the only difference that here the user is given the opportunity not only to familiarize himself with data about the memory, sensor and display of the device, but also to update the firmware and improve GPS.
To work with this program you need root rights(Ruth).

Shortcut Master utility
This program was created specifically to delete, search, create. It does not contain functions for entering Engineer Mode. However, through it you can get acquainted with the list of secret special commands operating on the device. After clicking on the team name, the command “ Execute" This is a very comfortable way of working; you don’t need to do any extra steps.
To view the list of available codes, in the Shortcut Master program you should call up the auxiliary menu by clicking on the item “ Secret Code Explorer».

Root rights to access the engineering menu
To enter Engineer Mode in certain versions of Android, you must have special root rights. You can obtain these rights through special programs such as UniversalAndRoot, Farmroot and others.
To access the gadget via Farmroot, you should:
- Install and launch the application;
- If the program supports installing root rights on your device, then a list of available actions will appear on the display, including "Get root". Click on this item;
- Select one pre-installation method for obtaining rights;
- The installation will begin;
- After the installation is complete, a message will appear indicating that root access has been established.

What can you customize in the menu?
In Engineer Mode, the settings of existing cameras, sound, and recovery mode are often adjusted. In this case, you need to be extremely careful, because the names of items in various device models can differ significantly.
Adjusting sound parameters in the engineering menu
If the ring volume level of your gadget is not acceptable for you, find a section in the engineering menu called "Audio" and go to "LaudSpeaker Mode". There click on "Ring". Change the existing signal values - in the section "Max" increase the value "Vol"(limit value - 200). Click on the key "Set".

To enhance the tone of the speaker, see section "Audio" choose "Normal Mode" and go to "Sph". Set the signal values from minimum 100 to maximum 150.
In order to increase the sensitivity of the microphone, you should go through "Audio - Normal mode - Mic". At each level, the same microphone sensitivity indicators are set. Click on "Set", reboot and check if the other person can now hear you better than before.
Disabling unused frequencies
Modern smartphones are very “gluttonous” and quickly consume battery power to ensure the functioning of applications. Using Engineer Mode, you can significantly increase the battery life.

Gadgets are capable of scanning GSM frequencies - 1900/850 MHz, 1800/900 MHz. The last pair operates on the territory of our state, which means that there is no need to scan the network at other frequencies. For an unnecessary pair, the signal can be deactivated so that less battery power is consumed.
In the engineering menu, go to "Band Mode". Deactivate frequencies that you do not use by unchecking GSM850 and PCS1900. If the device supports a pair of SIM cards, then you should open the SIM2 and SIM 1 sections in turn, and then carry out the specified actions in each of them. To save the new settings, click on "Set".
Camera
By default, Android smartphones are able to save photos in JPEG. But most photographers prefer to take photos and process the material in RAW for greater editing capabilities. The technical menu allows you to select the optimal photo format.

In the engineering menu you should find the section "Camera" and select the type of image there. In addition, in the camera menu you can increase the size of photos, set the ISO value, activate shooting in HDR format to increase the detail of images, and set the frame rate for videos. After changing each of the parameters, you should save the new settings by clicking on "Set".
Recovery Mode
Recovery mode is an analogue of Bios on a PC. It makes it possible to control the device without logging in. There are the following recovery options:
- Removing personal information from the system;
- Creating backup copies of the operating system;
- Access to root rights;
- Firmware update;
- Reset existing settings to initial ones.

In recovery mode, you shouldn't take actions unless you have confidence in what they can ultimately lead to. Certain commands can cause significant harm to the system and device.
A beginner who bought a smartphone or tablet based on the operating system Android systems, after a while he feels the need to reconfigure something in it or adjust it more precisely. Entering the Android engineering menu is simple: you just need to know the special commands.
The hidden engineering menu in Android devices allows you to manage system settings of your smartphone or tablet that are not available in the standard menu. For example, they allow you to increase the speaker volume during calls, forcefully select the frequency range of the network being used, enable a photo or video format that is not in the main camera settings, etc.
Parameters configured in the engineering menu
Using the engineering menu you can access functions such as:
- speaker or headphone volume;
- improved speech recognition;
- microphone sensitivity;
- voice quality when making calls;
- forced cellular network selection mode: “GSM only”, “WCDMA only”, “LTE only” (some network modes may not be available in the standard settings);
- binding to one base station, frequency or channel number;
- choice of technology and cellular data speed;
- testing and overclocking the processor;
- enable/disable sleep mode;
- testing Wi-Fi and Bluetooth radio modules;
- auto switching 2G/3G/4G in sleep mode;
- camera test drive;
- changing the photo format (default is JPEG or PNG);
- fine-tuning the display brightness and its response to illumination;
- locking/unlocking auto answer settings for incoming calls;
- improved GPS performance;
- full reset, including factory formatting of the smartphone;
- testing and setting motion sensors;
- testing color rendering on the display;
- testing and setting up vibration alerts;
- backup of multimedia files;
- level determination harmful radiation(SAR) on a single device;
- FM radio settings and behavior.
Video: smartphone customization options through the engineering menu
Commands for accessing menus
Commands for accessing the engineering menu vary depending on the manufacturer. There are also general commands for all versions of Android, allowing you to configure individual device functions.
Main codes for entering the engineering menu
The commands you enter differ for different brands devices - select those that are suitable. It is not forbidden to check everything - commands that do not correspond to a specific manufacturer simply will not work.
Table: commands for accessing the engineering menu of various manufacturers
Google Commands for Android OS
Android Factory Service Codes Showing technical information information about the device are often not linked to the manufacturer. Basically, they are all built into Android by default. Command “numbering” range agreed upon by Google- as the creator of the Android operating system - with manufacturers of tablets and smartphones.
Table: Android factory service codes
| Parameter opened by typing code | Code to be dialed |
| Wi-Fi MAC address | *#*#232338#*#* |
| Information about the active WLAN network | *#*#232339#*#* |
| GPS check | *#*#1472365#*#*, *#*#1575#*#* |
| Bluetooth version | *#*#232331#*#* |
| Bluetooth MAC address | *#*#232337#*# |
| Loopback Batch Tests | *#*#0283#*#* |
| Touch screen version | *#*#2663#*#* (test *#*#2664#*#*) |
| Checking the motion sensor | *#*#0588#*#* |
| Checking the screen | *#*#0*#*#* |
| Checking the vibration alert and backlight | *#*#0842#*#* |
| Melody test | *#*#0673#*#* |
| RAM version | *#*#3264#*#* |
The most popular service codes of the engineering menu
The most popular codes, allowing you to change smartphone settings through the engineering menu, do not depend on the phone brand or Android version.
Table: service codes for changing phone settings
| Called parameter or setting | Service code |
| To know serial number IMEI | *#06# |
| Settings and information | *#*#4636#*#* |
| Android OS version | *#2222# |
| Erase all SMS messages | #*5376# |
| Smartphone and battery usage statistics | *#*#4636#*#* |
| Reset settings Google account and others system utilities without removing pre-installed software. However, applications stored on the memory card (SD) will remain unchanged. | *#*#7780#*#* |
| Reset settings and clear user files from internal memory, reinstalling the smartphone firmware. There is no confirmation prompt, but you can have time to remove the battery - and then restore files and settings from a backup using an application on your computer. | *2767*3855# |
| Information about the built-in camera and its settings. Firmware update. | *#*#34971539#*#* |
| Changing the mode of operation of the “End Call” button (“On/Off”). | **#*#7594#*#* |
| Show the file copy screen. You can back up all your data. | *#*#273283*255*663282*#*#* |
| Service mode - launching all kinds of checks (click on Menu), reconfiguring the smartphone in service mode. | *#*#197328640#*#* |
When using commands, keep the following in mind:
- By updating the camera firmware through the engineering menu, you can find out about the version of this firmware and the number of its updates - and also save this update to an image in the internal memory and on the SD card. It is not recommended to reflash the camera again - if it fails, you will simply ruin it;
- when resetting the Android system, deleting all user Google data A message will appear on the screen asking you to confirm the reset.
How to enter the engineering menu
To get to the engineering menu, follow these steps.
Video: how to open the engineering menu on Android
What to do if you can’t enter the menu
It happens that none of the commands intended for a specific brand of device is suitable - this is the manufacturer’s protection inexperienced users from not fully thought out actions. Some manufacturers after software debugging The engineering menu is completely removed from the smartphone, and all of the above commands simply do not work. For example, Samsung does this. Some of the commands entered can be harmful, such as software Android and the device itself.
Often, instead of general service teams more specific ones work. If, despite all your attempts to “reach out” to the engineering menu, none of the service codes work, you need special applications.
Install free application Mobileuncle Tools - it will differentiate between hardware and system settings. You may need to obtain Root access on Android. There are other applications: EngModeMtkShortcut, BetterCut, etc.
How to save settings
In order for the settings made using the Android engineering menu to be saved, you need to exit it correctly. While in any section of the engineering menu, use the on-screen “Back” key either in the menu itself, or press the cancel call button or the “Back” key under the display - it is indicated as a reversal arrow - to go to a higher level of the engineering menu.
It is not recommended to set the value of any setting and confirm it with the Set key, turn off or reboot the smartphone by pressing the power button, remove the battery from the device, etc. Exiting the engineering menu can involve pressing - sometimes holding for a few seconds - the same “Back” key below the display. When you exit the engineering menu, a message will appear on the smartphone screen asking you to save the settings you have made - confirm it. There are tips on some of the sections of the engineering menu:

The reason why the engineering menu still does not save the settings may be “raw” firmware. Find out which Android versions and builds are right for your device. If you have a branded smartphone with a version of Android that has preinstalled programs and components from Beeline, MTS, MegaFon or Tele2 - feel free to install a “custom” version, for example, the well-known CyanogenMod assembly. Any earlier - or, conversely, the most “fresh” - one may be suitable. Android version.
In some cases, it is impossible to enter the engineering menu without obtaining Root rights. The task is to make an Android smartphone “rooted”. In other words, get “superuser” capabilities on your smartphone, allowing you to take the smartphone under the clearest and most complete control. This is achieved in the following ways, use any of them.
- Install a custom (modified) version of Android on your smartphone. It already includes software component Superuser (“Superuser”), which provides access not only to the engineering menu, but also to system folder system.
- Download from Android Market any of the applications that perform hacking android without the help of a computer. Suitable here different programs: UniversalAndRoot, Unlock Root, z4root, Revolutionary, etc. Not all of them can help - you will have to test everything until it works.
- You can also try applications for Windows that perform all manipulations with Root access on a smartphone directly from the PC - for example, the VRoot program. You also need a USB-microUSB cable - it is impossible to hack Android on a smartphone via Wi-Fi.
After receiving Root privileges, the smartphone is ready to activate the engineering menu using third-party Android applications.
The more recent the version, the more settings in the engineering menu will be in Russian. In the most earlier versions Android (1.x, 2.x) all service settings were on English. Having learned a little technical English, you can easily remember the purpose of each of the settings and, if necessary, you can change them all in a few minutes.
The availability of the engineering menu - in whole or in part - is decided not by the Android version, but by the make and model of the smartphone. Try different combinations and programs, but don't get too carried away.
If you perform inept actions or forget the entered codes, there is a risk of turning your smartphone into a lifeless device, and only a service center will be able to restore it to you. And since if you “root” the device, you automatically lose the warranty.
Android engineering menu is one of the most useful tools“advanced” user, preventing him from wasting the hardware resource of his device and the resource of cellular and wireless networks wasted. And it doesn’t matter what version of Android you have - 2.2, 4.2.2, 4.4.2 KitKat, 5.1, 6.0 or another - the engineering menu codes are determined only by the manufacturer. By completely subjugating your smartphone or tablet, you will deprive it of the opportunity to “live its own life” not according to your schedule, but according to the script of the manufacturer itself, mobile operators and other intermediary companies, one way or another involved in the operation of mobile equipment in cellular networks. This is the shortest path to professionalism.