Simple ways to create a backup copy of your iPhone. iPhone Backup
Losing or breaking a smartphone is a problem associated not only with the inevitable financial expenses, but also with loss large quantity personal data. It is impossible to restore everything accumulated after the fact: the only way to resolve such a situation is to anticipate it.
The two most common ways to backup an iPhone are to use special functions iTunes and iCloud. Each of them has its own disadvantages and advantages.
What is not included in the saved data
- What's Not Included in iTunes. If you lose your phone, you will lose music from iTunes Store, applications from Apple Store, as well as music, videos and books downloaded from iTunes Help(if you don’t check one important box, see below). You will also have to say goodbye to touch settings ID, settings Apple Pay and data from the “Activity”, “Health” and “Keychain” programs.
- What's not included in iCloud. Data previously stored in the cloud, such as contacts, notes, calendars and information, will be lost. Also, as in the case above, you will have to say goodbye to the ID settings. All data not downloaded from the iTunes Store, Apple Store or IBooks Store will be lost.
However, in both cases, the basic data will be saved, and it is up to you to judge the best option.
Description of systems: features
- Maximum storage capacity (if purchased) paid subscription) is 2 TB. Most users get along just fine tariff plan for $1 (50 GB).
- Mandatory encryption is performed to increase security.
- To create and use backup copies, you only need access to Wi-Fi networks.
- To restore data, you do not need to connect to a computer.
- Saving in progress backup iPhone to computer(for some this is a plus, for others it is a minus).
- You can enable the encryption feature (optional).
- There is no need to pay for additional data (using free space on the hard drive).
Backup iPhone to iCloud

In the future, backups will be created automatically when the phone is charging and wi-fi is connected.
Restore from iCloud backup
To restore data on a new device, you just need to enter your Apple ID and password, after which the last backup saved in the cloud will valiantly migrate to your iPhone. If the device is already configured, you will need to erase all contents - this is the first and mandatory step. After this, follow the instructions that appear (for more details, see the article “”) for setting up until the “Programs and Data” screen appears; there you need to select “Recover from iCloud copies" Sign in and select the appropriate backup (note the date and size).
Perhaps during the copying process a window will appear asking you to install the latest iOS - complete it. Next you need to go to your account Apple ID, which will allow you to restore all purchased programs and materials. The duration of the procedure varies widely: recovery takes from five minutes to several hours.
Backup iPhone to iTunes
- Connect your mobile device to your computer, then open iTunes program and select your device.

- Next, on the tab review, activate the checkbox this computer.
 Then, to create a backup, click create a copy now.
 If you want to save your information from the Health, Activity programs, then select the “encrypt backup” option.
- And one more important point, to save all purchases (music, movies, applications, games), click file>devices>move purchases from iPhone.
 Once the copying is complete, you can see the result of the process in the Browse screen in iTunes.
Data recovery via iTunes
Please note the dating and size of the copies. Click "Restore" and wait for the data recovery procedure to complete.
Useful information
- In iCloud, you can partially create the saved data yourself; for example, if necessary, you can disable copying of programs that are not particularly important to you (go to the settings of your Apple account ID, select iCloud and in the list of programs that use iCloud, disable unnecessary ones.)
- If your iPhone is connected to power and to a Wi-Fi network, and its screen is locked, backups to iTunes are created automatically (if the item is enabled in the settings).
- If iTunes doesn't see your device, make sure you have the latest version of the software installed on your computer; in critical cases, try disconnecting all USB accessories other than the device.
A few words about alternative options and conclusion
The above methods, based on iTunes and iCloud services, are not the only options for copying information. There are a lot of programs focused on similar activities, but in fact they are in no way superior to the above options. That is why it seems quite natural to “discard” them: we did not analyze such utilities in detail.
In order to ensure maximum level reliability, it is recommended to create copies in both iCloud and iTunes - then you can be sure that the information will be saved.
We wish you good luck!
Even more interesting and useful in Telegram channel@proyabloko. Subscribe, it will be interesting!
Apple has always been famous for its devices. People are showing great interest in iPhones. These are advanced smartphones with different capabilities. Only Apple products require certain knowledge from their owners. Otherwise, you will not be able to work normally with the device. Today we will try to figure out how to backup an iPhone. What will it take? What advice and recommendations can help a person? Why do you need iPhone backups? And where can I find the relevant data? In reality, everything is simpler than it seems. And even an inexperienced owner of an Apple phone will be able to create a backup copy of their smartphone data.
What can you copy?
First, let's try to understand exactly what data a person can save when creating backup copies. Such documents themselves are needed to restore an iPhone at any time without losing user information and settings. Sometimes such documents are extremely useful.
When thinking about how to backup an iPhone, a person must understand that he will save almost all the information that is on mobile device. We can say with confidence that we will be able to restore:
- phone and account settings;
- notes;
- photographs and videos;
- music;
- calendar events;
- all browser settings and elements;
- messages and MMS;
- network settings;
- keychains;
- data about games and applications from the AppStore;
- all application parameters and settings;
- bookmarks in "Maps";
- books.
As a rule, not always listed elements can be restored. For example, one of the methods suggested below will not allow you to return music from iTunes, TouchID data, Apple settings Play. But otherwise, it will be possible to completely return the operating system to the desired state.

Recovery methods
How to backup iPhone? This is quite easy to do. Especially if you know what exactly the owner of an Apple device should do.
There are 3 possible scenarios in total. Restoration can be done:
- via iTunes;
- using iCloud;
- through third-party software (iMazing).
How exactly to proceed? Everyone decides this for themselves. It’s worth noting right away that a backup via iTunes will be more complete. Next we will look at all possible options.
Via iTunes
iPhone can be restored using iTunes. In this case, you will have to take into account that the backup copy will be saved on the computer’s hard drive. And recovery is only possible through a PC.
How to backup iPhone? To do this you will need:
- Download and install for yourself latest version iTunes.
- Launch the program.
- Connect your Apple phone to your computer via USB cable.
- Select the connected device from the program menu.
- Go to the "General" section.
- At the bottom of the right window, select "Create a copy now."
- Wait for the process to complete. If necessary, select the elements you want to copy.
Once the operation is completed, the person will be able to view the backup log in iTunes. With their help, it will be possible to restore the gadget in the future.
Using iCloud
Backup iPhone contacts and other information mobile phone can be done using the device itself. In this case, you will have to act through iCloud service. All recovery copies will be saved in the cloud service. Restoration will have to be carried out only through a mobile device.

To do this you will need:
- Create an AppleID profile. If you already have it, you will have to log in to the system.
- Go to "Settings" - iCloud.
- Enable on mobile Wi-Fi device and connect to the Internet.
- Click on
- Turn on the corresponding switch.
- Select "Create a backup copy".
- If necessary, select the data to be copied.
- Wait for the process to complete.
Carrying out such a procedure is not so difficult. But the proposed algorithm of actions is only possible if there is an Internet connection. Otherwise, the "Create a backup" button will be inactive.
Features of recovery via iCloud
Now it’s clear how to backup an iPhone. When restoring a mobile phone via iCloud, you will have to take into account that cloud service allows you to transfer 5 GB of data. This space is given to all users by default.
In addition, you can set a checkbox in the iCloud settings, after which data will be backed up when the device is connected to the network (while charging).
iMazing to help
You can implement the task through third party software. For example, using "IMazing". This application almost completely copies iTunes.
Creating backup copies of Apple devices comes down to the following manipulations:
- Connect the device to the PC via a USB cable.
- Install on your computer and launch iMazing.
- Go to the application settings and allow access to the iPhone.
- Open the main menu of the application and select "Create a copy".
- Specify the type of document to be created. It is better to choose "Standard". It is compatible with iTunes.
- Set the parameters for saving a copy and click on “Create”.
That's it. Just have to wait a few minutes. Usually the process does not take much time.

Data Search
Some people are wondering where the backup is located. copy iPhone. The answer to this question is not so simple. It all depends on how exactly the data was copied.
In the case of iTunes, you can find the relevant documents:
- in the BackUp folder, which is located in “Users” - for “Windows”;
- in Libraries/Application Support/MobileSync/BackUp - for MacOS.
If we are talking about iCloud, then all data will be located on the application server. Data transfer will be carried out along with authorization under a specific AppleID login.
iPhone is not only a device thanks to which we can freely make calls, write messages, surf the Internet or take photographs.
This is for real pocket computer, on which we store a lot of information and data about us, only this data we can easily lose.
Loss or iPhone theft can happen to us at any time. Although there are ways to track our device and delete data remotely, no one will return it to you. That's why it's good to make a backup.
Note! The step-by-step instructions below are suitable for all Apple devices: iPhone 5s, iPhone 6, iPhone 5, iPhone 7, iPhone 4s, iPhone 4, iPhone 6s, iPhone se....
Backup via iTunes
Creating a copy of our iPhone is a matter of several or tens of minutes, depending on the amount of content.
If you want to backup your iPhone locally on your computer, then the best way to do it is through iTunes app on OS X or Windows.
Using iTunes, you will not only install a game or listen to music, but also create an archive of data with the ability to quickly restore everything.
What you need to back up iPhone to Windows computer
Before you get started, you need to know what data will be archived.
These will be: photos, mail, contacts, calendars, reminders, safari, notes, passport, documents and data, and a bunch of other things. In addition, to make a copy, you will need:
- A computer with sufficient disk space to store data from the device.
- A cable that allows you to connect the device to a computer.
- iTunes is installed on your computer.
How to make a backup copy in iTunes on a Windows computer - step by step
Step one: connect your iPhone to your computer using a USB cable, and then launch iTunes.
Step two: find the iPhone-shaped icon in the program and click on it. The program will display us on the device screen.

Step three: find the “Backups” section. From the listed options, select this computer.
Step Four: Click the “Create a copy now” button.


Depending on capacity iPhone time can take up to several tens of minutes (usually less than ten).
In the section " Backup» you can restore an archival backup on your device.
Note! By default, iTunes writes the archive to disk C, but you can use command line change the path to drive d.
Encrypting a Backup in iTunes
Before or after creating an archive of your iPhone through iTunes, you can further protect it with encryption.
Encryption protects your data if for any reason you lose your computer or hard drive, on which the copy is located. How to do this?
We connect the iPhone to the computer using a USB cable, and then launch iTunes.

Now we enter and repeat the password, which we will later use to decrypt the archive.
Deleting an iTunes backup from your computer
If you want to delete an iPhone backup from of this computer, then this is very easy to do.
The first step is to enter iTunes settings and select the “Devices” tab. Then select a copy from the list and click the "Delete Backup" button.
iTunes displays all the backups we have made, allowing us to delete them, just remember this is the safety of our data."
A backup copy is also useful when changing an iPhone to a new one.
Backing up your iPhone is one of the best options protecting the data it contains.
This is useful not only when your phone is lost or stolen, but also when we change to a newer device or simply want to restore the previous version.
That's why it's worth remembering to back up periodically. There are many available on the Internet third party programs, But free tools, provided by Apple, is quite sufficient.
Using them also ensures compatibility and reduces the risk of data corruption. Good luck.
An iPhone backup is a collection of files with all the data stored on the device. Includes photos, documents, settings, contact list from phone book and other information important to the user. You can back up your iPhone in different ways, with or without a computer.
Creating a backup via iCloud
All users of Apple devices have access to 5 GB of free iCloud storage space. It can be used to backup data. To do this, just enable the appropriate option on your smartphone. Procedure:
- Start your iPhone and connect it to high-speed Wi-Fi, or activate mobile transmission data.
- Open the Settings menu and find the iCloud option here.
- If you are using an iPhone with the operating system iOS versions 10.3 and older, then you can get to the iCloud settings through the menu to manage your account settings.
- The “iCloud Backup” option will appear. Move the slider to the right to enable cloud backup Apple storage. A message will appear on the screen saying that when you connect the device to the PC, the backup copy of iTunes will not be created automatically.
- Wait until the iPhone turns on the backup function and transfers all important user information to the cloud. If necessary, charge your iPhone and lock the screen.
If the iPhone has been in use for a long time and a lot of information has accumulated on it, then the free space in iCloud (5 GB) may not be enough. Then the backup will not be created, a notification about this will appear on the screen. In this case, you can purchase a subscription and expand the space available in the cloud or use another method.
Features of backup via iCloud
All Apple devices By default, they create backups when connected to a charger (if the function is activated in the settings and the iPhone is connected to a wireless network). Other features:
- Media content that has been officially purchased or downloaded will not be copied. But it will be downloaded again from official stores ( App Store, iTunes Store, iBookStore and so on).
- To recover data from iCloud, just connect your iPhone to high-speed Wi-Fi, log in to your account Apple entry ID. You don't need a computer for this. Therefore, the method is convenient in cases where you urgently need to recover data from a lost or stolen iPhone.
- Notes, phonebook contacts, calendar and other information are saved automatically (even if backup is disabled).
If you wish, you can make a new backup manually. To do this, go to the iCloud settings and select “Create a copy now.” Information about the date the last copy was created will appear below.
If you store a large amount of information on your iPhone, then it is better to use iTunes to create backup copies. This is special software, available for free download from the official Apple website. Allows you to backup and restore data from Apple devices, as well as other operations. Procedure:
- Install and run the software on your computer (available for operating systems) Windows systems, OS X).
- Connect your iPhone to your PC using a USB cable and wait until the drivers are downloaded for the device.
- The iTunes home screen will display your connected device, select it.
- Go to the menu on the left. Here, find the “Settings” block and in the list of available ones, click “Browse”.
- A new window will appear on the right. Here in the “Backups” block, check the box next to “This computer” to .
- If you want to move files to iCloud via iTunes, then check the box next to the appropriate item. This will make copies of only important data.
- To set a password for the backup (you will need to enter it when restoring data), check the “Encrypt local copy” box. If the password is lost, you will not be able to use the copy.
- After that, click the “Create a copy now” button. The process of copying information and moving it to memory will begin. local computer or on Apple servers. You cannot turn off your iPhone before the data copying is complete.

When the copy is created, the iPhone can be disconnected. After this, the finished file can be used to restore user information on a new device. If you checked the encryption option, you will need to provide a password.
Since all backups created via iTunes are stored only in the PC memory, for greater security copy them to cloud storage or external storage.
Features of backup via iTunes
If in the process of creating a backup via iTunes, the user uses data encryption, then the following information will be copied along with the rest of the data:
- Medical data.
- Settings from wireless networks(which the user has saved) and passwords in the keychain.
- Browsing log via Safari browser.
By default, the backup is saved to the main disk (the one on which the operating system), but if desired, you can change it in the program settings before creating a backup.
Touch ID, Apple Pay, and media settings that are already in your iCloud library will not be copied to local disk computer when synchronizing via iTunes.
Difference between methods
Each method has its own advantages and disadvantages. Therefore, it is recommended to back up your data via both iCloud and iTunes. If this is not possible or you don’t think that the iPhone contains important information, then you can do it in one way. Let's look at the features of each in the table below:
| Maximum copy size | Data storage location | Ability to access files from a computer | Availability of Internet connection | Data copy speed | Data encryption | PC connection | Possibility of rollback to previous version iOS | |
| iTunes | Limited by computer capabilities | Local computer on Windows or OS X | Yes | Not required | Depends on the amount of information and PC characteristics | Turned on manually | Required | Eat |
| iCloud | 5 GB available for free | Apple Servers | If you have an Internet connection (via a browser) | Necessarily | Depends on the amount of information and Internet connection speed | Automatically | Not required | No |
Themselves uploaded to iPhone apps(licensed copies) are not copied when creating a backup via iCloud and iTunes, but they will be downloaded automatically through the App Store. The software does not save music, movies and other information, but through iTunes the information can be backed up and quickly transferred to the iPhone manually.
Data backup is available to all owners of iOS devices. If you have disabled backup creation in automatic mode, then be sure to synchronize the information via iTunes or iCloud manually. This way you can regain access to all files and documents stored in memory if your iPhone is lost or stolen.
And Apple developers have provided for this: any iPhone owner can use the function backup save and transfer important information to your PC hard drive. Initially, backup copies were created exclusively through the program iTunes, but now it has become possible to copy information to the “cloud” iCloud If you have a fast Wi-Fi connection, this method is even more convenient. The article will tell you how to create a backup copy of your iPhone using iTunes, Wi-Fi and one of the alternative file managers.
Apple technology is considered reliable, but it does not last forever. It’s easy to imagine the following situation: an iPhone that has served for years personal assistant in business, suddenly failed - it simply stopped turning on. You can go to the store and buy a new Apple gadget, but where can you get the information that was stored on the old one - phone numbers of business partners, suppliers, important notes? The answer is obvious: from backup. It is enough to connect new smartphone from your PC and download a copy - the information will be there.
The user should be aware that not all information is stored in the backup copy - it includes:
- All photographs.
- Telephone directory plus call history.
- Notes – contents of the application of the same name.
- SMS (including iMessage).
- Calendars and scheduled events.
- Safari information (such as bookmarks).
- Audio recordings made from a voice recorder.
- Desktop wallpaper.
- Settings for connecting the gadget to global network(VPN, wireless network access point).
- Application settings and achievements in games.
- Location of shortcuts on the screen.
Not included in the backup copy:
- Music and video.
- Games and mobile applications.
Ringtones are only saved in the iCloud backup.
Selecting information to back up due to weight- let's say telephone directory and notes take up little memory space, but are of undoubted value to the user. Movies and musical compositions They weigh a lot, but they can always be downloaded again, so adding them to a backup is not advisable.
Movies and music albums purchased from the iTunes Store, as well as those purchased from the App Store applications are assigned to a specific Apple ID, so you won’t have to buy this data a second time if the gadget is lost or broken.
How to make a backup via iTunes?
Through the program iTunes backup copies are created in this way:
Step 1. Connect your smartphone to your PC with a cable and open iTunes.
Step 2. Go to the device management menu by clicking on the button with the image of a smartphone.
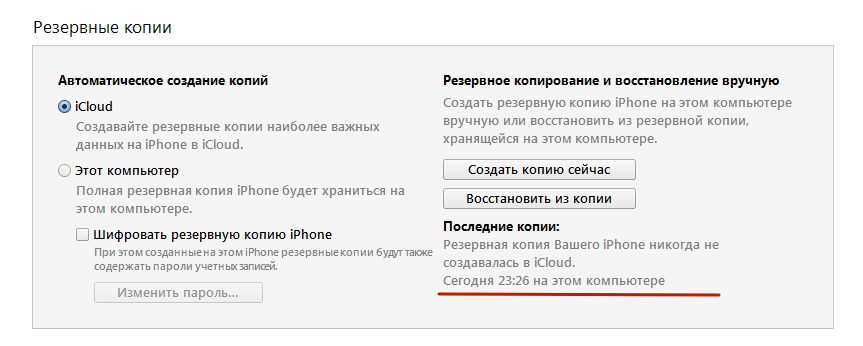
Step 3. Scroll down to the block " Backups"and decide where you want to save the copy - on a PC or iCloud.

Remember: in iCloud Only 5 GB of space is available to you for free. If you intend to make copies regularly for preventive purposes, it is better to select the storage location " This computer».
Step 4. Encrypt the copy if you think it is necessary - check the box next to “ Encrypt iPhone backup" and enter the password twice.

Then click " Set a password».
Step 5. Click " Create a copy now».

Step 6. iTunes will prompt you to transfer applications from the gadget to your media library. If you prefer the option " With copies of programs", then the process of creating a backup copy will take more time, however, in the future, download programs again you won't have to.

Step 7. Wait for all 4 synchronization steps to complete. After this you will see that in the field " Latest copies ” the current date and time are displayed, which means that the creation of the copy was successful.
Backups to personal computers are stored at the following addresses:
- On Mac - User/Libraries/Application Support/MobileSync/Backup/.
- On Windows 7/8 – Users/AppData/Roaming/Apple Computer/MobileSync/Backup/.
There is another way to create a backup copy - through the menu " File» select « Devices» — « Create a backup».

When using this method, copies are created simultaneously in iCloud and on your hard drive.
How to backup iPhone to iCloud?
To create a backup in iCloud no cable required and no PC at hand – just connect to Wi-Fi. The copy is made like this:
Step 1. IN " Settings"find the section " iCloud" and go into it.
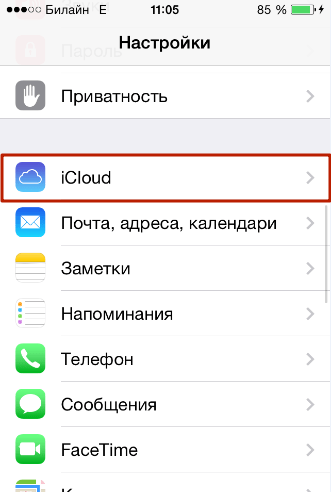
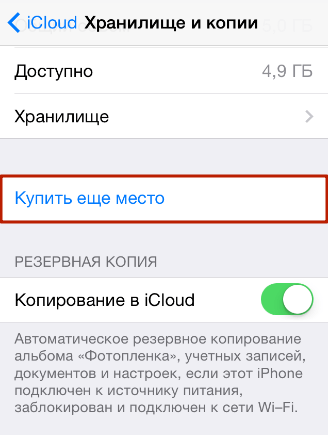
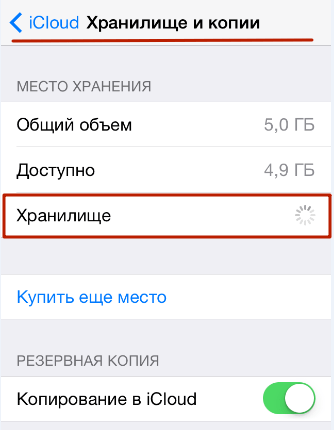
Step 2. Scroll down and go to the subsection " Storage and copies».

Step 3. Make sure that there is enough space for backup in the “cloud” - in the “ Place storage", there is an item " Available", where it is indicated how much free memory left.
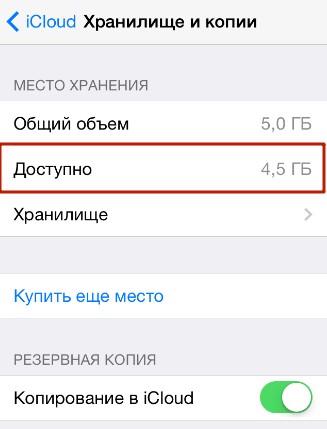
In our example, 4.5 GB of 5 GB are free.
Step 4. Find out approximately how much one of your backups weighs. To do this you need to go to the subsection " Storage" in the block " Storage location».

It can be seen that the weight of one copy is 485 MB; about 2 MB more iCloud spent on messenger and wallet data. Using simple calculations, we determine that there is enough space in the storage for about 9 more backup copies. We can also open a ready-made backup and analyze what type of data takes up the most memory.

In our copy, 482 of 485 MB are occupied by photographs. You should carefully “sort through” the album and leave only the most important pictures - then you will be able to significantly reduce the weight of one copy. You can completely exclude a photo from the backup copy - to do this, you need to toggle the slider next to “ Film» to the inactive position.

Step 5. If there is enough space in the “cloud”, in the block “ Backup"Activate the toggle switch opposite " Copy to iCloud».

Step 6. A confirmation window will appear - click " OK"; this will confirm that you want to start copying to iCloud.

Step 7. Click " Create a copy" and wait for the process to complete. Rejoice: the backup is ready and saved in the cloud!
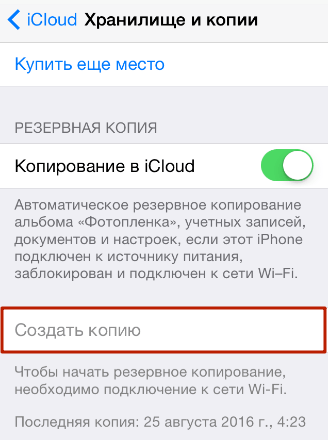
Field " Create copy" will be inactive if the iPhone is not connected to a wireless network.
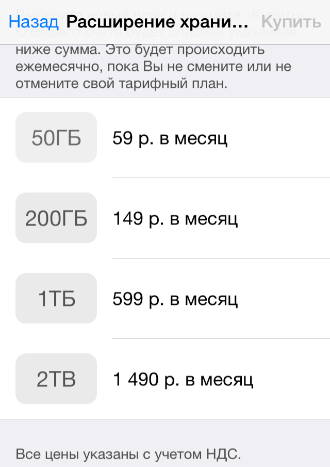
If there is not enough free space in iCloud you can purchase it here, in the subsection “ Storage and copies"via the button" Buy another seat».
The prices are very affordable: 50 GB will be available for just 59 rubles per month, and as much as 2 TB for 1,490 rubles - this is an abyss of information!
How to create a backup using the alternative file manager iTools?
Attitude towards iTunes from users Apple technology ambiguous: official program for transferring files regularly “pleases” with problems and “bugs” and, in addition, is quite difficult to master - newly minted iPhone owners, as a rule, tend to postpone acquaintance with iTunes"V long box" However, you still need to download data to the iPhone somehow - many users turn to alternative file managers, which are simpler software. Such programs can do everything that they can do. iTunes, including – create backup copies.
iTools– most convenient file manager for iPhone. Thanks to this program you can make backups completely free– for comparison iPhone Backup Extractor(another well-known copy utility) costs $25. Advantage iTools before iTunes is that iTools allows you to create backup copies of videos and music files. Download Russified iTools Can .
Backup via iTools done like this:
Step 1. Connect your iPhone to your PC with a cable and launch the utility.
Step 2. Go from the section " Device" to the section " Toolbox».
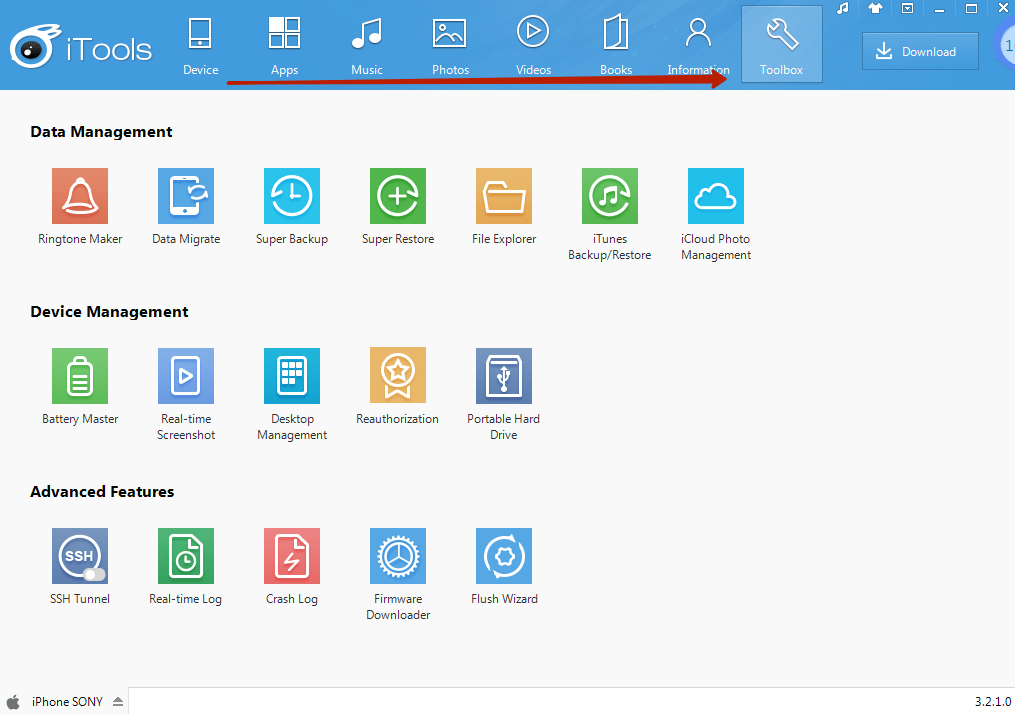
Step 3. In the block " Data Management» select the item « Super Backup».

Step 4. In the next window, determine what data you would like to see in the backup.
iTools doesn't copy files like, say, notes and browser data.
Check the box next to what you want, then click " Next».

Step 5. The next window will appear where you can determine the save path - this is done through the “ Browse" The default path is: D:iToolsBackup.
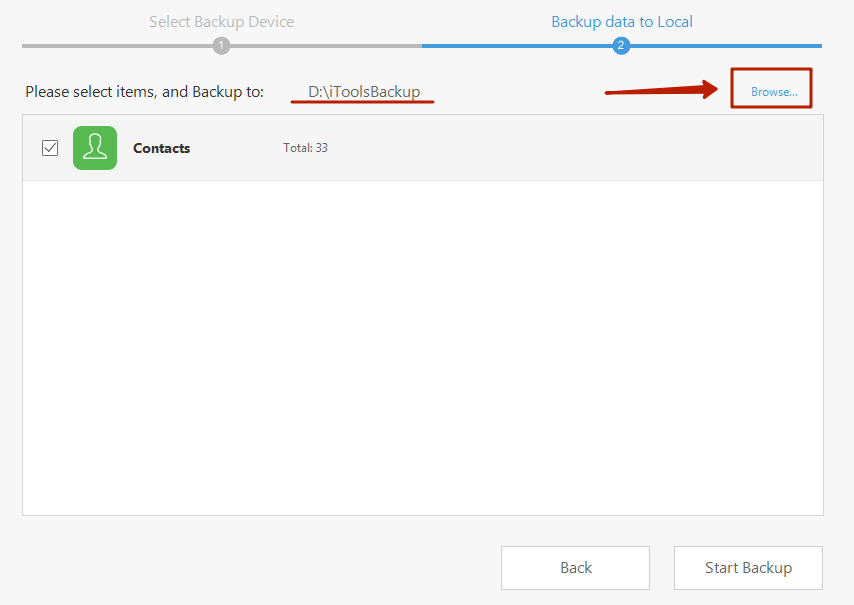
Step 6. Click " Start Backup" - this will start the backup process.

If the copy includes only " Contacts”(as in our case), then its creation will take no more than a second. When saving heavy files(video or music) will have to wait much longer. Signs of completion of the process are a value of 100% on the right and a check mark on the left.
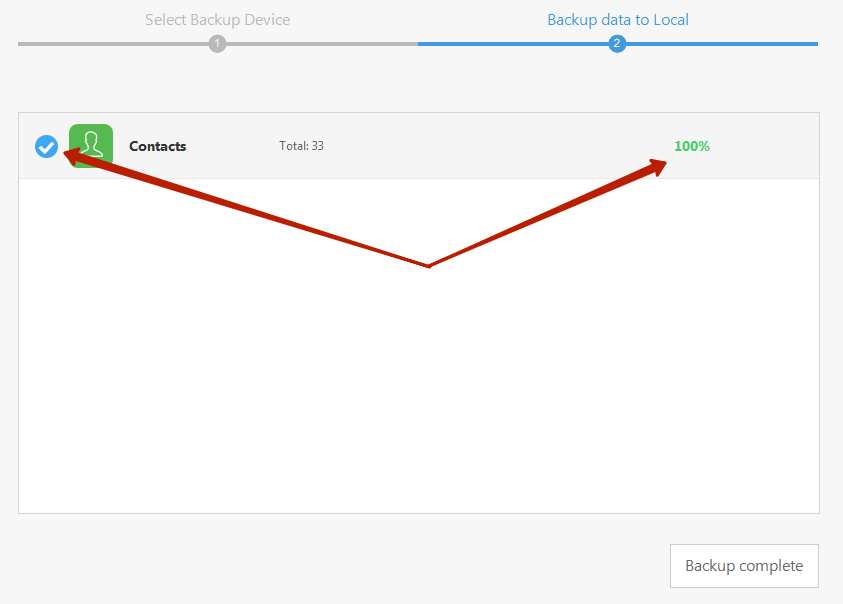
Step 7. Click " Backup complete» and find a copy in your PC memory.

If necessary, you can easily erase backups that are no longer relevant.
Erase copies from iCloud and PC
Delete copies made via iTunes, of course, you can by finding files on your hard drive, however, it’s easier to do this through the program itself.
Step 1. Go to the menu " Edit" and select " Settings» or click CTRL+, (comma).

Step 2. In the next window, go to " Devices».

You will see how many backup copies iTunes stored on the hard drive.
Step 3. Highlight unnecessary copy and click on " Delete backup».

Step 4. Confirm that you really want to erase the backup - click " Delete».

Copies will be deleted permanently - they will not be found in the trash!
Erase backup from iCloud can be done as follows:
Step 1. Follow the path " Settings» — « iCloud» — « Storage and copies" and go to " Storage».
Step 2. Go to " Properties» a copy that is no longer needed.

Step 3. On the next screen, scroll down and find " Delete copy" and click on it.

Step 4. Confirm that you want to delete backup data from iCloud and stop backing up.

After this you will notice that in your “cloud” free space increased significantly.
Why is a backup not created: possible problems?
When using software users rarely encounter problems when creating backups. If you cannot create a backup using iTunes, you need to take two measures: update iTunes to latest version(if some buttons are inactive) and check the status hard memory disk.
Backup to iCloud– on the contrary, the matter is very problematic. If the iPhone reports that copying is impossible, proceed as follows:
- Check if there is enough space in the cloud to create a backup.
- Check the quality Wi-Fi signal using other applications - for example, see how quickly pictures load " VKontakte" If the download is slow, you might want to look for a different Wi-Fi source.
- Log out of your account iCloud and come back again.
- Remove those contained in iCloud backups. How this is done has been described previously.
If there is still no result, reset the settings: follow the path “ Settings» — « Basic» — « Reset" and select " Reset all settings" You don’t have to worry about your personal data and content: after such a reset, they will remain where they were.
A big and inexplicable problem with saving data in iCloud is definitely present in iOS 9: backups are not created or deleted! Apple developers are aware of this problem and recommend that users update to at least iOS 9.3 - this is the only way to solve it.
Conclusion
The user must choose a data backup method based on his own needs and capabilities. Let's say, if a user wants to create a backup copy of his favorite movies, he has no other choice but to start mastering an alternative file manager iTools. If USB cable iPhone has long been torn and gone to scrap, the owner of the smartphone does not have to go for a new one - he can create a backup via Wi-Fi.
Each of the methods for creating an iPhone backup guarantees that the user will be able to “resurrect” the most important data, even though Apple developers emphasize in every possible way that a full copy is obtained only when used iTunes.