Creating a bootable ultra iso flash drive. How to make a bootable flash drive image
That's what he told how to create a bootable USB flash drive with Windows 7 V Windows program 7 USB/DVD Download Tool. This official program from Microsoft and it seems to work quite well. But a comment appeared that it was impossible to create a bootable USB flash drive with this program. Maybe so, anything can happen, so I’ll write another way in which you can create a bootable USB flash drive with Windows 7. And this time we will use good program Ultra ISO, I have already written about her more than once on the blog, in various articles.
I think that there is no need to tell us why such a bootable flash drive will be useful to us; if you are reading this article, then most likely you are interested in the question of how to create it, and not why it is needed.
In this way you can create a flash drive not only with Windows 7, but also Windows XP and Windows 8. What’s up, you can burn any image, any boot disk, for example Dr.Web LiveCD. Well, if you have already changed your mind about creating such a flash drive, then the image can be written to disk without any problems, I wrote about this in the article.
How to create a bootable USB flash drive with Windows 7?
We will need:
- UltraISO program. You can download it on the Internet in a couple of minutes, just type in search engine request “Download UltraISO”. After downloading, you need to install it. Installation is the most common, but if you don’t know how, then read the article. The program is paid, but when starting just select “Trial mode”. And if you want, you can buy it.
- A disk image with Windows 7, or any other image that you want to burn to a flash drive. This image must be in the format .iso, I hope you have already downloaded it.
- Flash drive size minimum 4 GB(this is for Windows 7, if you want to burn a small image, then 1 GB is enough). The flash drive will have to be formatted, and this will destroy all the files on it, so you need either blank flash drive, or copy all the information from it to your computer in advance.
If everything is ready, then let's begin.
Launch the program Ultra ISO(there should be a shortcut on the desktop and in the start menu). I will show the example of the English version, since I had a problem with the Russian one, all menu items are displayed in an incomprehensible font. But there’s nothing wrong with that, everything is clear and so.
The program has opened, now we need to select the .iso image of the boot disk, in our case with Windows 7. Click “File” and select “Open”.
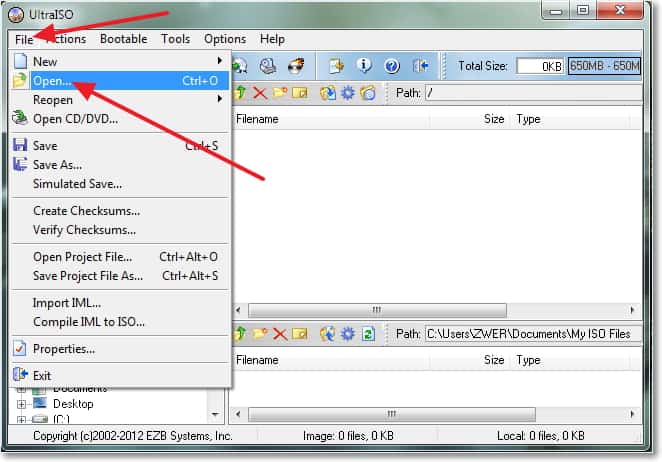
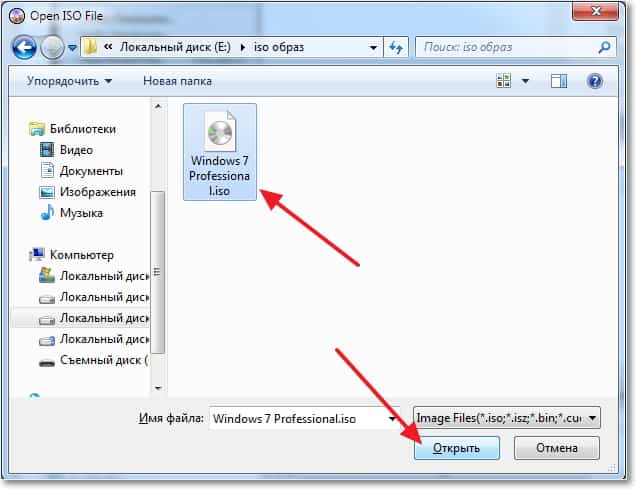
Find our image, select it and click “Open”.
Now our image is open in the UltraISO program, all that remains is to write it to a flash drive. Click and select “Write Disk Image...” hard drive…) .

A window will open in which we need to specify some settings. Look what's opposite “Write Method:”, the value has been set to “USB-HDD+”. And on the contrary “ Disk Drive” the flash drive we needed was selected.
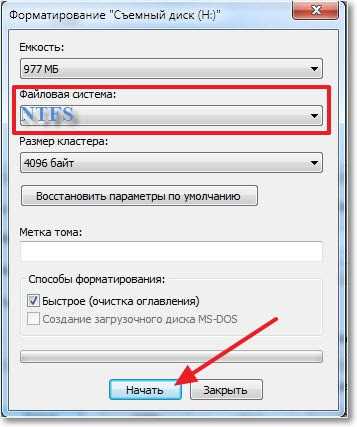
Now we still need to format the flash drive and we can start recording. Click the button “Format”. Don’t look at the fact that I have a 1 GB flash drive, I just don’t have a larger capacity at hand. You must have a flash drive of at least 4 GB.

A small window will appear in which we will format our flash drive.
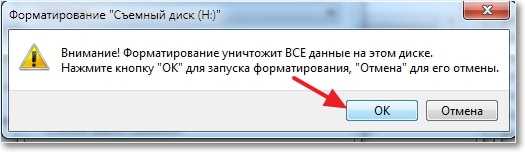
Formatting a flash drive will destroy all files on it. So save them to your computer in advance.
Only needed at point “File system” select NTFS, and click “Start”.
A warning will appear, click “Ok”.
 That's it, the flash drive is formatted. Closing the window “Format” by clicking on “Close”.
Development computer equipment and new technologies is moving towards a complete abandonment of CDs and DVD discs and the need to equip the computer with an optical drive. It is increasingly more convenient to boot Windows XP from a flash drive, and sometimes this is the only possible option. Owners of laptops, netbooks and tablets were the first to master this technology, and other users appreciated all the advantages of this method.
Creating a bootable USB flash drive is easy, but not everyone succeeds the first time. It's all about the little things and yet important nuances, which are simply overlooked as a matter of course.
Why create a bootable USB flash drive?
A bootable USB flash drive is necessary for convenient and quick installation not only the operating room Windows systems XP, but also any other program. The operating principle is the same as a boot disk, but the information is saved more compactly. And another important advantage is reliability. A flash drive cannot be damaged by a couple of scratches and you don’t have to store it so carefully or worry about letting someone use it.
Multiboot flash drive is a bootable USB flash drive that contains several installation programs under one shell. Before transferring the disk image to a flash drive, which was previously downloaded in finished form, it can be supplemented. You can also create a disk image yourself, where you can add all the necessary programs of your choice.
A Windows resuscitation disk can also be written to flash drives, which, if necessary, will allow you to start the system directly from a USB drive.
Not the easiest option, but very convenient when creating bootable flash drive use the UltraISO program.
Preliminary preparation for creating a bootable USB flash drive with Windows XP
To create a bootable USB flash drive with Windows we will need:
- The original boot disk image in ISO format
When creating your first bootable flash drive, it is better not to experiment, but to hone your actions on a ready-made and proven product.
Important: download the image of the selected Windows XP assembly with the activator.
- UltraISO program
This is a utility with which you can create a bootable USB flash drive, of course it is not the only one. The choice of such programs is quite wide, but everyone chooses according to their needs.
Important: When installing the program and running it, you must do this as an administrator. Right mouse button (not the usual one!) and select “run as administrator”.
- A work computer with an operating system already installed
There are important nuances here:
- If you are going to create a bootable USB flash drive with Windows 7 or Windows 8, then it is better to do this on a computer running the Windows 7 operating system.
- If you are using a computer with Windows XP, then to create a bootable USB flash drive with Windows 7 you need to install packages on your computer NET Framework 2.0 and Microsoft image Mastering API V2, which can be downloaded from the official website.
- If you are using Windows XP with a 32-bit system, and are going to create Windows 7 with a 64-bit system, then a more complex series of steps will be required, which does not guarantee a successful result. It is better to refuse this option.
- Regular USB flash drive, which you will make bootable
The volume of a clean (not necessarily new!) flash drive is at least 4 GB, but 8 GB is preferable for some Windows builds XP. To download mobile Windows versions XP a 256 MB flash drive is enough, but 512 MB is better.
Important: It is advisable (even necessary) to format the flash drive: file system FAT32 is suitable for Windows XP, FAT system 16 – for mobile version Windows XP.
After preparing everything you need, all that remains is to make sure of the following:
- The flash drive is working and the computer sees it.
- Not necessary, but it is advisable to go into the BIOS and check if the “USB 2.0 Controller” function is enabled.
- What for Windows boot XP you have one of the following options available.
Options for loading Windows XP onto a USB flash drive
To boot from a prepared disk image
Needed to create:
- Flash drive(min 4Gb);
- image Windows disk XP (ISO file);
- UltraISO program.
Step by step instructions:

To boot from a boot disk
Needed to create:
- Flash drive;
- Bootable CD with Windows XP;
- UltraISO program.
Step by step instructions:

To boot from the windows xp file folder
Needed to create:
- Flash drive;
- folder with windows xp files;
- UltraISO program.
Step by step instructions:

In order to check the flash drive, just disconnect it and reconnect it. If it appears with an icon saying what's on it boot files or operating system windows xp, then most likely everything is fine. You can try and run through bios windows xp from a flash drive, but this does not fully guarantee that everything will go perfectly during installation. If any hiccups occur during installation using a bootable USB flash drive, it should be formatted and rewritten.
Today we’ll look at the topic in more detail about... There are several ways to mount operating systems on a removable usb storage. Using programs (USB/DVD Download Tool , WinSetupFromUSB, Rufus) and command line(cmd).
In general, the concept of development suggests that the more time passes, the more information technology is developing more rapidly. It is becoming increasingly important to store information on removable media no larger size.
Let's figure out what the advantage is, for example, of a flash drive, external HDD compared to optical media – disk:
- compactness;
- reliability;
- ease of use;
- possibility of repeated use;
- recording more data.
What you need to create a bootable USB flash drive
- Download an image (file with the extension .iso) of the Windows 7c operating system from any available site. There shouldn't be any problems with this. If you don’t know what an image is, read the post about creating an image. Eat alternative option, create it yourself, but I think it makes no sense to waste time and effort.
- Availability of a flash drive of at least 4 GB, since Windows distribution 7 weighs about that much.
- ultraiso program. Don't be alarmed that it's paid. When you download and install, you will initially have access to trial version. This is quite enough to make a bootable USB flash drive for Windows 7 using ultraiso. If you wish, you can find a cracked version.
The first thing you need to do is format USB drive. Why is this necessary? Let's assume an 8GB flash drive that stores multiple files. Before you record windows image 7, it is necessary to structure the clusters. Formatting just removes everything unnecessary and prepares the drive for new entry files.
As you know, when buying a flash drive, the file system is FAT32. It is outdated, so it would be better to reformat it to NTFS. This system allows you to store files larger than 4 GB.
By default, formatting a flash drive in NTFS using Windows XP not available. You need to enable this option.
Connect the USB drive to the computer. Go to the "my computer" section. Find the flash drive and right-click on it. Select "properties" from the menu. We get to the “equipment” tab and select the required drive. Then click “properties”, “policy” tab and check “optimize for execution”.
After confirming the actions, you will be asked to restart your computer. When you launch the formatting window, NTFS will become available to you. For Windows 7, these steps do not need to be done.
How to format a flash drive to NTFS
IMPORTANT! Before starting the formatting procedure, copy all files to another media. This procedure deletes all files.
The most common method is formatting using standard windows capabilities 7. To do this, click “start” - “computer” and in the “devices with removable media” tab, find the future bootable USB flash drive.
IMPORTANT! Be careful, choose the device on which you plan to record Windows 7 using the ultraiso program.
Right-click on it and select the command called “format” from the menu.

Click start and wait for the formatting procedure to complete.

This completes the formatting of the flash drive. Now you can proceed to the next step.
After installing the ultraiso program, launch it, click on the button trial period. This is quite enough to burn a bootable USB flash drive.

The program will start, you will see it appearance. Quickly skim and look at the location of the main elements.
First you need to open the image itself with Windows 7. Click in top menu“file” – “open” or CTRL combination+ O. Select downloaded windows files 7 with iso extension.

Now that the image is open, move along the menu to the right, find the “bootstrapping” tab. Here you will need the menu item “burn hard disk image”.

- In Disk Drive, specify the bootable USB flash drive.
- Secondly, the second line automatically specifies the path to the file with Windows 7.
- On the opposite side of the recording method, be sure to check that the value is USB-HDD+.

By and large, when opening this window, there is practically no need to change anything, but still compare the parameters with those listed above in order to avoid unpleasant situations.
Note: The ultraiso program allows you to format a bootable USB flash drive. If you have not formatted the device, be sure to this procedure! The steps of the procedure are described above.
Press the treasured record button. Wait for the recording to finish.

That's all, lesson - how to make a bootable windows 7 flash drive using ultraiso finished. As you can see, there is nothing complicated. Now feel free to plug in the USB drive and . Choose to boot from a flash drive and enjoy the result of installing Windows 7.
In today's article I would like to address the issue correct creation A bootable USB flash drive from which you can install Windows. In general, there are quite a lot of ways to create it, but I will describe the most universal one, thanks to which you can install any OS: Windows XP, 7, 8, 8.1.
And so, perhaps, let's begin...
What do you need to create a bootable USB flash drive?
1) UltraISO program
Of. website: www.ezbsystems.com/ultraiso/
You can download the program from the official website, unregistered free version more than enough.
The program allows you to burn discs and flash drives from ISO images, edit these images, in general, a complete set that can be useful. I recommend you have it in your kit. compulsory programs for installation.
2) Installation image disk with the Windows OS you need
You can make this image yourself in the same UltraISO, or download it from some popular torrent tracker.
Important: the image must be created (downloaded) in ISO format. It's easier and faster to work with.
3) Clean flash drive
You will need a flash drive with a capacity of 1-2 GB (for Windows XP), and 4-8 GB (for Windows 7, 8).
When all this is available, you can start creating.
Creating a bootable USB flash drive
1) After launching the UltraISO program, click on “file/open...” and indicate the location of our ISO file(image installation disk with OS). By the way, to open the image, you can use the hotkeys Cntrl+O.

2) If the image was successfully opened (you will see file folders in the left column), you can start recording. Insert the flash drive into the USB connector (all necessary files copy from it) and press the function of recording a hard disk image. See screenshot below.

3) The main window will open in front of us, in which the basic parameters are set. Let's list them in order:
— Disk Drive: in this field, select the desired flash drive on which you will record the image;
— File image: this field specifies the location open image for the record (the one we opened in the very first step);
— Hide Boot Partition — select “no” (we won’t hide anything).
After setting the parameters, click on the “record” button.

If the flash drive has not been previously cleaned, the UltraISO program will warn you that all information on the media will be destroyed. We agree if everything was copied in advance.

After some time, the flash drive should be ready. On average, the process takes about 3-5 minutes. Mainly depends on the size of your image being written to the flash drive.
How to boot into Bios from a bootable USB flash drive.
You created a flash drive, inserted it into USB, rebooted your computer in hopes of starting Windows installation, but the same old operating system loads... What should I do?
You need to go into Bios and configure the settings and boot order. Those. it's possible that the computer isn't even looking for it boot records on your flash drive, immediately booting from your hard drive. Let's fix this now.
When the computer boots, pay attention to the very first window that appears after turning on. It usually always indicates a button to enter Bios settings(most often this is the Delete or F2 button).

For example, in the screenshot below, we need last line(where USB-HDD appears) move to the first place so that the computer first starts searching for boot data from the flash drive. Can be moved to second place hard drive(IDE HDD).

Then save the settings (F10 button - Save and Exit (in the screenshot above)) and restart the computer. If the flash drive was inserted into the USB, the OS should start loading and installing from it.
That's all about creating a bootable flash drive. I hope everything has been considered typical questions when recording it. All the best to everyone.
IN lately More and more questions arise about installing Windows from a flash drive. This is partly due to the increase in owners of netbooks and ultrabooks, which are not equipped DVD drives. Almost all the difficulty lies in creating a bootable USB flash drive. Therefore, this article will only discuss how to create a bootable USB flash drive. The image for a bootable flash drive can be anything: Windows XP, Windows 7, Ubuntu and any other image that you can create yourself.
Creating a bootable USB flash drive for Windows 7
I will show you how to make a bootable USB flash drive using the Windows 7 distribution as an example.
To do this you will need:
-UltraISO program (you need to download and install - use Yandex/Google search)
-an empty flash drive with a capacity of at least 4GB
-required disk image (for example, a file with *.iso extension).
First, prepare your flash drive, if it is not empty. Transfer the necessary data and format it (you can also format it later - in the program itself).
Run the program (as administrator) UltraISO and open required file image File -> Open”.

Insert the flash drive into the USB connector if it has not already been connected. Select from the menu “ Bootstrap -> Burn image of Hard disk”.

Now select your flash drive in the Disk Drive line in this window. The image file line already indicates the path to the image you selected/opened. The flash drive can be formatted by clicking on the “Format” button, if this has not been done previously. Click the “Record” button.

will appear information message that the data on your flash drive will be lost. Click “Yes”. If the message “ You must have administrator rights to perform the operation", then you will need to run the application as an administrator (Right click on the shortcut or UltraISO application -> Run as administrator).
If the launch is successful, the boot boot process should begin. Windows flash drives 7. Wait for the recording to finish. The creation of the bootable USB flash drive is complete. Now you can install Windows from a flash drive, similar to installing from a DVD.