How to write an iOS mobile application. How to make an iPhone app
- Programming language. What you need to know to write applications for iOS.
- Do you need a designer, interface developer, or someone else?
- Official part: developer certificate.
- Necessary equipment for comfortable development.
- The eternal question: AndroidOS or iOS?
- What needs to be done today?
- Creating a new project.
- Compilation. What is it and why is it needed?
- Run on the simulator.
- We print “Hello, world!”
- What standard views are there in iOS?
Programming language. What you need to know to write applications for iOS
Programming language(wikipedia.org) is a formal symbol system designed for recording computer programs. A programming language defines a set of lexical, syntactic and semantic rules that define appearance programs and actions that the performer (computer) will perform under its control.
Perhaps the question I asked in the title of this part is quite complex. I can answer it simply - Objective-C. If I stopped there, I would be wrong. I would say that Objective-C is minimum required. Recently there was a conference from Yandex - YET, at which one of the reports was devoted to what programming languages a developer should know. The answer was something like this: “He must learn new and new programming languages constantly, without stopping at any one in particular.”. I completely agree with this. By learning new programming languages, you learn new approaches and programming methods. Therefore, to write applications for iOS, you need to know Objective-C, but it is also advisable to know other programming languages so that your code is good, efficient, and flexible.
If you are not a programmer yet, then I advise you to start with the C language. Download the book by Kernighan and Ritchie ( or better yet, buy it) about the C language, read it, do everything that is suggested to you, and after that I would advise you to move on to Objective-C. If you already understand how to write programs, you are ready to easily answer the questions - “What are data types? What is a variable? What is a function or method? What is a link and a pointer? What's happened "include”?” , you know C or C++ or Java or C#, then you are ready to write your first application for iOS.
You also need to know the basics of OOP and design patterns. The list can probably be continued, but I’m hardly ready to claim a qualitative explanation of these concepts. Yes, unfortunately, Objective-C is not the language with which you can start your programmer journey. But if you like and want to create, then it’s time for you to run to the store, buy books and start your developer journey.
Do you need a designer, interface developer, or someone else?
Another, no less simple question. If you are a programmer and know how to write console programs and want to start writing applications for iOS, then initial stage you don't need such a person. If you have an iPhone || iPad || iPod touch If you're familiar with iOS, then you don't need a front-end developer. In general, Apple has such a document - HumanInterfaceGuidelines. IN this document describes where and what interface element should be used. Therefore, at the initial stage you can do without third parties. In general, the iOS SDK provides enough opportunities for painting the application interface, so drawing some buttons or multi-colored texts in PS, gradient fills and so on you won't have to. Later, we will create the first project, in which we will get acquainted with all the stages of creating the “Hello, World!” application.
However, you need to understand that when serious projects begin, applications that you want to publish in the AppStore, it will be more difficult for you without a designer and developer. The difficulty can manifest itself at different stages - either during application development, when you spend hours searching for the necessary image or sitting and creating in PS, or after you publish the application and start receiving comments from our beloved users who will complain about your poor design free application. I encountered similar problems at both stages. After receiving lousy comments on the AppStore, I wanted to abandon my application, which by the way is free, and forget about ungrateful users. However, the usefulness of the app itself to me, as well as many other users, made me swallow those angry comments and continue developing the app. About three months ago, I started developing an application together with a designer who tells me what to insert and where, what color to choose, where and what picture to draw, and this, I want to say, is quite convenient. Therefore, I still advise you to start using the services of designers at some point in order to receive good feedback from users. And remember - iOS device users want to see good application design, even if its functionality suffers.
Official part: developer certificate
You've probably already heard a lot about some kind of developer certificate. Now I will try to bring you up to date - why it is and whether you need it right now. A developer certificate is a file, just like any other certificate. This file is given to you by Apple after you go through all the stages of registration in the system. iOS (MacOS) Developer (Enterprise) Program.
What will having it give you? of this file and registration in one of the above programs? The answers to this question are overwhelming. Therefore, I will only say about the most important things (everything described below is given to you for exactly one year):
- testing your applications on your devices (although this seems to be hackable and can be done without a certificate)
- access to the developer forum on the Apple portal (although there is a community on StackOverflow.com, where you can find an answer to your question much more quickly)
- ability to download beta versions (and of course current ones) of iOS and Xcode
- ability to install beta iOS versions to your device
- ability to publish an application in the AppStore
- the ability to link up to 100 devices to your account, thereby allowing these devices to install beta versions of iOS, test your applications (not yet published in the AppStore) and much more illegal things
- the opportunity to show off to your friends that you are an official iOS application developer
If you decide that you need such a certificate, then be prepared to part with $100 ($300 for Enterprise), send a fax to the USA, enter your bank card(attention! Yours, exactly yours), well, finish reading this chapter.
So, let's go.
- Follow this link http://developer.apple.com/programs/ios/
- Click on Enroll Now
- We read the flood carefully and move on – Continue
- Here we have 4 points:?a. Do you want to create new apple ID for Apple Developer Program?b. Do you want to use an existing Apple ID?c. Are you already registered as a simple developer, and now you want to become an official developer with all the benefits described above? d. You are already a member of the iOS or Mac Developer Program and want to link another program to your account
- Friends, next you need to go through a couple of steps to fill out your personal information. I don’t remember exactly what’s there anymore. If you have any questions, ask in this topic, I will answer everything as best I can.
- You were given a link to a .pdf file that you need to fill out and fax to Apple.
- We print it and fill it out (very carefully and carefully).
- We send a fax to the Apple office in the USA. (Be careful that your fax does not fall into the wrong hands, because there you indicate the bank card number and CVV).
- We wait N number of days (weeks) for Apple to process your request.
- We receive a letter congratulating you on signing up for the program and losing a hundred bucks. Hooray!
After successfully completing the quest you will have access to http://developer.apple.com/membercenter/. Perhaps a review of that page either requires a separate article or requires a Google/Yandex search.
Well, friends, let's move on to the remaining issues on the agenda.
Necessary equipment for comfortable development
If you have seriously decided to start developing applications for iOS, then I highly recommend immediately purchasing a computer/laptop with MacOs. Most cheap option – Mac Mini, or anything used. If you are a student and are going to carry equipment with you - Macbook Air. If you have a lot of money and want a powerful all-purpose laptop - for gaming, complex computing tasks and programming - Macbook Pro. If you want to take desktop computer– iMac or Mac Mini. For development, any computer in any existing configuration will suit you. Screen size is at your discretion. I personally am now sitting in front of a Macbook 13” and a Mac Mini 17”. I'm happy with both displays. If so, you can always connect external monitor to the laptop.
Don't forget that sooner or later you will need an iPhone, iPod or iPad. You don’t have to rely only on the iOS simulator, which is distributed in the same package with Xcode. Always test release versions on devices. Or - look for testers (responsible and conscientious).
If you are not ready to spend so much money on new equipment, then you can try installing a Hackintosh on your computer.
The eternal question: Android or iOS?
It is possible that this question should have been asked at the very beginning, but it is still located at the end of this article. Are you sure you want to try yourself in the field? mobile development, but don’t know which mobile platform to choose? I can't answer this question for you. But I know one thing - if you want to develop applications for iOS, then you must love Apple products and the operating system iOS system and MacOs. You may ask - why is this? The answer is simple - you must love what you do, you must create. Only then will you be able to develop a truly cool and useful product. Only in this case will you enjoy learning Objective-C and iOS. I think this is very important. If you have similar feelings towards Apple products, then feel free to go into the field of iOS development. If you think - I know Java, but I don’t know Objective-C, but I like iOS more than AndroidOs - then choose iOS. No, but what did you expect me to start praising Android OS?
I also like the iOS sphere for its app store. Everything there is beautiful, correct, and there is very strict moderation of applications. The dump of applications that is now in Android OS is simply terrible, both for users and worthy developers.
What needs to be done today?
Today you must decide: when you start developing applications, will your current experience be enough to learnObjective– C, do you have the necessary equipment, and most importantly, the desire?
Hello, world.
Checking readiness
Let's move from theory to practice. For the practical lesson, you will need Xcode 4.2 with iOS SDK, preferably a developer certificate, knowledge of C, C++, Java or Objective-C (well, maybe knowledge of other languages will be suitable) and, finally, a desire to start writing applications for iOS. If you are missing something, for example, a developer certificate, then the article will still be relevant to you. In any case, it seems to me that every iOS device user should be interested in taking a look at the inner workings of application development.
Creating a new project
Let's go. Click on the Xcode icon. A window similar to this will open:
Select the item “Create a new Xcode project”. In the next window, select the project type. We need: “iOS – Application – Single View Application”.
Click Next. We will see a window with the following content:
Let me explain the input fields:
- Product Name – The name of the new project – you can enter anything, but I advise you to use names identical to mine, because I will periodically refer to them.
- Company Identifier - Your company identifier - you can fill it out as you wish.
- Bundle Identifier – a unique identifier for your application. This field can be edited later.
- Class Prefix – a prefix that will be assigned to the names of all classes that you create in the project. I left the field empty ( "XYZ"– this is just a hint).
- Device Family – on what types of devices the project can be installed. You can choose one of three options: “ iPad/ iPhone/ Universal“ . Their purpose is obvious. If you can't decide right now whether you need to create a universal app, you can choose any of the other options. This can be corrected at any stage life cycle BY.
- Use Storyboard – This is related to creating a user interface model. Added with iOS5, so that when using this horror, your application can only be installed on devices with iOS5 or higher.
- Use Automatic Reference Counting is a new feature of the Apple LLVM 3.0 compiler - it automatically (almost) manages memory (monitors leaks, zombies and other horrors). I would say that for a beginner - ideal option. BUT – 1) not everything there is so automatic, 2) do you trust the compiler more than yourself?, 3) I recommend managing memory manually.
- Include Unit Tests – connect unit testing to the project.
You will see a window for selecting a category where the project will be placed. I just want to warn you that a folder with the name of your project will be automatically created in the folder that you selected, that is, there is no need to create an additional folder for a specific project.
We do not check the “Create local git repository for this project” checkbox. It’s better to connect our project to the code repository later, if necessary.
Click “Create” and see a new window, the window of our workspace:
And so, we have created a project, some files have been generated, some windows are open.
Let's take a look at the files in navigation menu:
- files with the suffix “.h” are headers, where we will give descriptions of classes
- files with the suffix “.m” are implementation files, where we will implement the previously described classes
- files with the suffix “.xib” are files that describe the interface of a single application window
Compiling the project
Compilation -
- translation of a program into a language close to machine language and its subsequent assembly.
- translation of a program written in the source language into an object module (carried out by the compiler) and its subsequent assembly into a ready-to-use program module.
- translation of a program written in a source language and its subsequent assembly into a program in some machine-independent low-level interpreted code (as, for example, in the case of the Java language).
The compilation process consists of the following phases:
- Lexical analysis. In this phase, the sequence of characters in the source file is converted into a sequence of tokens.
- Syntactic (grammatical) analysis. The sequence of tokens is converted into a parse tree.
- Semantic analysis. The parse tree is processed to establish its semantics (meaning) - for example, binding identifiers to their definitions, data types, checking data type compatibility, determining the resulting data types of expressions, etc. The result is usually called "intermediate representation/code", and can be supplemented by a parse tree, a new tree, an abstract set of commands, or something else convenient for further processing.
- Optimization. Redundant commands are removed and the code is simplified (where possible) while preserving its meaning, that is, the algorithm it implements (including pre-calculated (that is, calculated at the translation phase) expressions, the results of which are practically constants). Optimization can be at different levels and stages - for example, on intermediate code or on final machine code.
- Code generation. From the intermediate representation, code in the target language is generated (including program linking).
More in simple language from me. The lexical analysis stage checks that all the characters in your source code are in the correct order and that related characters are in next stages will be considered as a single entity - a lexeme. At the parsing stage, it is checked that all tokens are located in in the right order, in the right places, in the right sequence. Finally, at the semantic analysis stage, data type matches are checked.
And so, when you click “Build project”, first a lexical analysis of your code is performed, if it is successful, then a parsing analysis, and then a semantic analysis. In Xcode, a certain lightweight process is always running that performs this function, thereby prompting the developer "on the fly". For example, if you did not put “;” or suddenly you equate int to a certain string of characters, then Xcode will underline the string with a red wavy line.
Running on a simulator
And so, let's try to launch our project, for which we have not yet written a single line of code personally.
To do this, let's look at the menu: Compilation scheme(she was assigned green in my screenshot). A diagram is a certain configuration of a project. Xcode generates it automatically. Click on the line to the right of the project name (device name); if the device is not connected, it will say “iOS Device”. You will see a drop-down list with the following content:
In this list we select where our project will be installed: it can be either your device or a simulator. If you have selected the universal application type, you will be able to select the simulator type: iPhone or iPad. You can also select a version for simulators operating system(it is important to test the project on all versions of iOS on which the application can be installed). Since we are talking about the minimum version of iOS, we should also mention how to determine its minimum version? It's simple - if you use methods (features) that were added in the iOS version, for example, 4.0 , then the bar for the minimum required operating system rises to 4.0 . Let's lower the bar to 4.0 With 5.0 . To do this, turn to the menu: “Deployment target” (highlighted in blue in my picture). Select from the drop-down list 4.0 . Now let's go back to the menu: Compilation scheme. Our list now looks like this:
Select “iPhone 4.0 Simulator”. And finally, click on the arrow under which it says “Run”. IN “Information board” we will see the compilation process. After everything comes together successfully, the iPhone simulator window will open:
Now let's quickly go over the capabilities of the simulator.
- You can simulate iPhone, iPhone Retina, iPad.
- Simulate different versions iOS.
- Take screenshots.
- Rotate screens (portrait and landscape modes)
- Shake
- Simulate low memory.
- Simulate a print server
- Geolocation location
- Multi-touch gestures (maximum 2 fingers)
- Other
All this can be accessed from the simulator program menu:
A few words about the simulator. Applications can only be installed on the simulator via Xcode; they can be removed directly from the simulator (as on real device), it supports multitasking. But it also has many limitations, for example, you cannot install a certificate in the local application certificate store. But the main drawback is that it SIMULATOR, not EMULATOR. That is, it just pretends that it is an iOS device, simply by drawing a similar interface (software level). But the emulator does exactly what the device will do (at the physical level). What conclusion should be drawn? Be sure to test on a real device. I have had cases when it works on the device, but not on the simulator, and vice versa.
We print “Hello, world!”
I hope everything is more or less clear up to this stage. If not, then during the development process you will begin to understand more deeply.
This chapter was written in memory of Dennis Ritchie creator of the programming languageCand key operating system developerUNIX, and also as co-author of the book “Programming LanguageC» .
The purpose of the chapter is to decorate our empty gray screen. Great, let's go. We return to Xcode, select “ViewController_iPhone.xib” in the navigation menu. Next, select “View” in the list that appears. On the right, select “Attributes Inspector”. Here's what the window looks like for me plus additional comments:
Now let's add a UILabel. UILabel is the name of a class in the iOS SDK that allows you to display non-editable text on the screen. In general, all classes that allow you to display something have the prefix UI: UIView, UITableView, UITextView, UIButton,…. In the “Available objects for display” window, look for a line named Label. Once we find it, we click on it and drag it to our current screen view.
The blue dotted lines will help you center/calibrate the relative position of the mark. And so, select Label in the list of displayed objects, if not already selected, and see the item in the properties: Text. Let's write “Hello, World!” there. and press Enter. Here we have the text of the label changed and shrunk. Let's fix this. IN property categories let's choose "ruler""Size Inspector". There are fields:
- x and y are the coordinates of the upper left corner of the label relative to the parent view, that is, the view where we placed the label - this is the View in our case.
- width and height – the width and height of the edited object, respectively.
You can try editing these values and observe the changes. You can also edit the position and size directly by moving the label (text) and pulling its frame by various “dots”.
Spend another 15-25 minutes playing around with the different properties in the different categories:
- Text alignment
- Font size
- Color, text shadow
- etc.
Subsequently, we will return to them and I will explain the purpose of certain fields.
What standard views are there in iOS?
In the previous paragraph, I touched on the names of some classes responsible for the interface. The console itself UI and stands for User Interface. Here I will give, perhaps not a complete, list of available view types. Firstly, all the classes described below inherit from UIView, i.e. have the same properties and methods. Secondly, you can always create your own custom view. List below:
1) UILabel – label – main purpose: displaying one or more non-editable lines of text.
2) UIButton – button – main purpose: a regular button, sends signals to objects, notifying that it has been clicked
3) UISegmentedControl – a button with segments – main purpose: a button with several active parts, you can determine which one was clicked
4) UITextField – text input field – main purpose: field for user input text
5) UISlider – slider – main purpose: a regular slider, helps to change any settings more intuitively
6) UISwitch – On/Off switch – main purpose: has two states – on or off, the purpose is obvious
7) UIActivityIndicatorView - activity indicator - main purpose: usually used to inform the user that the application is either downloading data or simply performing some calculations
8) UIProgressView – status (progress) indicator – main purpose: to display the state of completion of something
9) UIPageControl – switching between pages – main purpose: displaying the number of pages, displaying the current page
10) UIStepper (>= iOS 5) - +/- step controller - main purpose: also obvious
11) UITableView – table – main purpose: displaying a table is perhaps the most popular element
12) UITableViewCell – table cell – main purpose: displaying a row in a table, usually customizable
13) UIImageView – image – main purpose: displaying a picture or image
14) UITextView – text field (scrollable) – main purpose: displaying a large amount of text that can be scrolled.
15) UIWebView – web – main purpose: displaying a web page
16) UIMapView – maps – main purpose: map display
17) UIScrollView – scrollable view – main purpose: displaying several views that do not fit on one screen
18) UIDatePicker – date picker type – main purpose: ideal for entering a date
19) UIPickerView – drum selection type – main purpose: an alternative to the table when selecting an option
20) UIView – just a view – main purpose: obvious
21) UINavigationBar – navigation bar – main purpose: a panel in which the screen title and additional buttons management
22) UINavigationItem – UINavigationBar elements – main purpose: obvious
23) UIToolbar – toolbar – main purpose: displaying a panel on which buttons are placed to control the application
24) UIBarButtonItem – toolbar elements – main purpose: obvious
25) UIBarButtonItem (fixed and flexible space) – special toolbar elements – main purpose: change the distance between the buttons on the toolbar
26) UITabBar – tabbar – main purpose: helps switch between various unrelated screens
27) UITabBarItem – tabbar element – main purpose: obvious
iOS is the operating system that Apple smartphones run on. A proprietary platform is used to purchase games or applications digital shopping App Store. If the developer’s product turns out to be successful (will be in demand among users), then even for one program you can earn good money. On average, developers popular applications for iOS they earn several thousand dollars a month.
Creation process
The algorithm for creating a program or game has the same concept regardless of the platform, so it is extremely important to adhere to development rules. By skipping this or that step, the developer risks getting a failed project at the initial stage. Let's take a closer look at the algorithm for creating a digital product:
- Creating a product concept– the first stage, requiring analysis of trends in digital store App Store. When creating a project, the developer must clearly outline the target audience. For the analytical stage to be successful, look at which applications, programs, games, etc. are in top App Store. In addition, find out what is installed on the smartphones of your acquaintances, friends, and relatives.
- Technical base– first you need to learn the Objective-C language, which is used in writing programs for iOS. For novice programmers, it is recommended to familiarize yourself with the Pascal language and other languages: C, Java.
- Tools– development environment, special text editor and graphic editor.
- Creation and testing programs.
- Marketing promotion.
Step-by-step creation of the utility
Each user has the opportunity to independently create an application for iOS without additional financial investments or professional knowledge. There is a special XCode development environment that allows you to work directly on your phone. If you need to write mobile applications on a Windows computer, you will have to install special virtual machines. For example, VirtualBox and VMware. Let's take a closer look at the official method:
- Install on your smartphone XCode development environment. The add-on is located in the official OS App Store and has a free distribution system. If the program is installed on your phone, check it for updates.

- Once you've sorted out the preparatory settings, log into XCode. To create a new project, use the tab File. Next, a sub-item will open where you need to select commands New And Project.

- The next step in creating an iPhone application is choosing platform and thematic type future utility.

- Specify brief information
about the software being created.

- Next you need to press the key New Folder. A folder is created here where auxiliary files for the program will be stored.
- In the next window, uncheck the item and activate the command Create. Thanks to these manipulations, the user will be taken to the start work panel.

- Click on the button called storyboard. It is located on the right side of the interface. Drag an element with the name to the main field Label. Don't forget to add introductory text in the line Hello_world(any other text is possible).

- Be sure to come up with icon for the utility. Upload your icon to mapappicon.com.

- After a short processing of the request, indicate address email
, where they will send an archive with icons.

- Return to the XCode development environment. Now on the left side of the interface, find a section called xassets.
- Open the archive from the mail (where the icons were sent) and drag them into the window located in XCode.

- Select one of the device emulators, and then click on the command launch the program(the icon is indicated as a black triangle), turning on Mac Developer Mode.

- Repeat startup attempt waiting until iOS loads on the emulator.

- Make sure the utility works.

This way you can create your application from scratch.
Popular services for creating applications
We offer a selection of services that will help you make iOS applications yourself.
Apps Globus
The Apps Globus project is a universal application designer that is suitable for mobile operating systems. Android systems and iOS. Features a convenient user interface. Thanks to the built-in modules, significantly simplifies the development process. Apps Globus supports up to 60 built-in modules, including:

Apps Globus is distributed by paid subscription. Users who want to test the application can use the 5-day demo version. Monthly subscription is provided in three types: “ home page», « studio" And " business" The difference between subscriptions is the price and number of developed applications. There is also a version that requires a one-time payment of 20,000 rubles. In addition to unlimited use, it offers source codes and assistance in setting up the utility. 
App2b
The App2b project offers a multifunctional designer that can be used not only to create applications for iOS, but also for Android platforms. This constructor is used to create commercial or informational content. That is why the service has built-in template library For quick creation convenient application on one's own. 
Like other similar projects it is distributed by paid subscription. The main difference from other designers is the only payment method in the form of a one-time payment in the amount of 9,900 rubles.
The project is the only one free constructor for creating websites and applications. The program is a comprehensive solution for online business. Allows you to create unique pages, virtual stores, electronic magazines. A distinctive feature of the designer is lack of prepared templates. Instead, flexible tools that do not require programming knowledge are used. Because of this, any program created in New Digital Times looks like the author's work. 
The designer is a multimedia tool focused on creating business applications in various directions: information panels, online stores, restaurant menus, etc. For the convenience of users there are built-in templates for programs and synchronization with social networks and other popular services. 
Sold in several variations: for independent use And affiliate program. Distributed in two types of subscription: monthly and annual. In addition, on the site you can hire people to create programs. 
Every day the number of people dreaming of learning how to create programs is increasing. After collecting information on the Internet, the idea comes to them that the most promising is the development of applications for iOS, the operating system from Apple. In fact, dreaming is one thing, but programming is another. Create own application not easy. But it’s not prohibitively difficult either. What is needed for this?
Programming language
To write programs for a specific platform, you need to use a specific programming language. App development for iOS and Android is different. If you have a platform from Google, you need to choose Java language, then for iOS the choice is between Objective-C and Swift. For a long time, development for the iOS platform was carried out only using the Objective-C programming language. Even though it is many years old, it is still being developed and used by a large number of developers. But its downside is the high barrier to entry.
Since the most important source of profit Apple is its app store, employees are interested in more useful and interesting utilities. For this reason, a developer conference is regularly held to talk about changes in operating systems. In 2014, developers were shown newest language Swift programming, which is used to develop applications for iOS. Swift is easy to learn as it has a very simple syntax and is strongly typed. This language is very suitable for those who want to learn on their own.
What you need to get started

In addition to basic programming knowledge, you need to have the following:
- a computer or laptop with the OSX operating system on board;
- Xcode development environment, which is free.
This set allows you to run applications in a special simulator directly on your computer. But keep in mind that in the future you may need to pay $99 to get an annual subscription to the developer program. After payment you will be able to:
- run developed programs not in a simulator, but on real devices;
- place applications in App store Store;
- download new versions of the development environment and iOS.
In new versions of Xcode, a sandbox element called Playground has appeared. Here the developer can experiment with a new programming language.
Many people want to start writing programs, but they think it is extremely difficult. Of course, in order to become a professional, you need to have a lot of knowledge and vast experience behind you. But in order to create small application, there is no need to be a professional.
Where does the development of applications for iOS and Android begin? Learning happens by doing. Therefore, we must start with it. A lot of theory is not always good. After all, if a person reads ten from cover to cover, he will not. We need to act.
Playground
This sandbox is a wonderful environment for learning a programming language. What does she look like? The user enters a line program code and immediately sees the result of execution. Once it becomes clear that the written fragment works as it should, you can simply transfer it to the project. Using the sandbox, you can solve problems such as:
- mastering the syntax of a programming language;
- improving programming skills by experimenting with new APIs;
- performing simple arithmetic calculations;
- developing a new algorithm and monitoring its every step.
iOS app development: where to start

Theory is, of course, good, but, as mentioned earlier, practice is needed. In order to get acquainted with the sandbox, you need to launch the Xcode development environment. After launch, the user can see a window in which it is proposed to create a new project or launch Playground. We need a second point. Now you need to come up with a name and save the “sandbox” to any convenient location on your computer. By the way, developing applications for iOS on Windows is also possible, but then a large number of problems will need to be solved. This includes installing a pirated operating system and editing important files, and a lot of errors and crashes.
After saving, the very Playground that is needed will be launched.
At first glance, there is nothing interesting here. But as soon as you enter your code there, the appearance will immediately change.
To get started, you can try writing the following:
for var y = 0; y< 10; ++y {
println (“result: (z)”)
After this, the sandbox will change its appearance. The column on the right (results pane) shows the values for each row that are obtained after execution. Also in the right column you can enable the display of a time panel, which makes it possible to track changes in the selected expression over time. The console output with the text that would be output by the program is also displayed here.
Commenting code
Development of applications for iOS, as well as for other platforms, is not complete without comments, which are needed to make it easier for the developer to navigate the code. Comments are lines that are ignored during program execution. They can be either single-line or multi-line.
Variables

So, applications are written in a programming language. The basis of any language is variables. Developing applications for iOS and Android without using variables is impossible. As the name suggests, it is a container that holds a mutable value. Each variable must have a unique name and can contain both numeric and text values. In the Swift programming language, variables are defined using the words var and let. In the second case, the variable cannot be changed and must be initialized when declared. In the first case, the variable is initialized immediately before use.
Every variable has some type. These can be strings, floating point numbers (fractional), boolean values (true and false).
Output of results

The result of the program execution is output to the console. What is it? This is what allows the user to interact with the computer. Thus, the output console used to be called the monitor, and the input console was the keyboard. Now the meaning of the terms has changed a little. This is the name of a program window intended for input and output of commands. Developing applications for iOS often requires the output of some data. To do this, the Swift language provides the print and println commands. The first differs from the second in that it automatically starts on a new line.
Functions

Following basic concept in programming - functions. This is a certain sequence of actions that perform a specific task. Each function can take some values and also return a result. To use this construct, you must first declare it using the func keyword. It is followed by the name, as well as parentheses. If a value is to be returned, its type is indicated after the brackets. If there is no return value, then the type can be omitted or an “empty” type – void – can be specified. The parentheses contain the values that the function accepts. To call a function, specify its name and values for the arguments.
You can make sure that the parameter name is required when calling a function. To do this, it is framed with the “hash” symbol.
So you can write some useful features, which can, for example, calculate exchange rates and convert one unit of measurement to another. Every time you need to use them, you just need to call these functions, and not write the code again.
What now?

So, as can be seen from the above, developing applications for iOS with your own hands may well be within the capabilities of everyone. The main thing is to learn the basics of the programming language, become familiar with the development environment, and practice a lot and often. It is practice that makes significant progress. But what is described here is just the beginning. There will be a lot of interesting, complex, and exciting things to come in the world of programming. This will always help keep your brain in good shape, create something new and earn good money. After all, Apple technology is used all over the world. Therefore, your application can be appreciated by millions of people.
Without financial investments and special knowledge.
Here simple instructions, how to create a basic iOS application and try it on your device. Based on it, you can go further into the topic and create really useful programs.
Note for Windows users: to create applications for iOS you need to install OS X on virtual machine(VirtualBox, VMware). This process is by no means simple and requires separate instructions.
1. Go to the App Store and install the XCode development environment:

If you already have XCode, then you need to update it.
2. Launch xCode and select the menu item File -> New -> Project: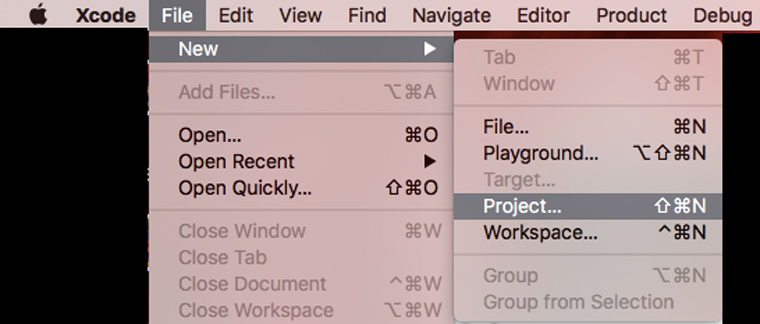
3. Select the platform and application type:

4. Provide information about the project. Please note that we have selected the "Universal" application type: 
5. Click on the button New Folder and indicate the name of the folder in which we will store the application files:

6. Uncheck the Create Git Repository checkbox and click the Create button. As a result, you should get to the start screen for working on the application: 
7. Click on the item Main.storyboard in the right menu, drag the element to the main field Label and add text to it Hello_world:

8. Now we need to make an icon for the application. We select a picture and upload it to mapappicon.com:

9. We wait for the web application to finish working and indicate your email address to receive the archive with icons:
![]()
10. Return to XCode and select section in the left menu Assets.xassets:
![]()
11. Open the archive from the mail and drag icons from there to the XCode workspace:
![]()
12. Select one of the device simulators, click on the application launch button (black triangle) and turn it on on your Mac Developer Mode:

13. We try to start again. We are waiting for iOS to load on the simulator:

14. Make sure the application is working:

We look at the finished application on the device
Now you can see how the application works on the device. Before following the instructions, make sure you have latest versions XCode and iOS.
1. Let's go to xCode -> Preferences -> Accounts and add your Apple ID:

2. Connect the iOS device to the computer:

3. Select the desired device in the list and click on the start button. We're waiting for a while.
4. If a message about security problems appears, then on the iOS device go to Settings -> Basic -> Device management and allow applications from the developer to run with your Apple ID:


5. Go to the desktop and find the new application icon:
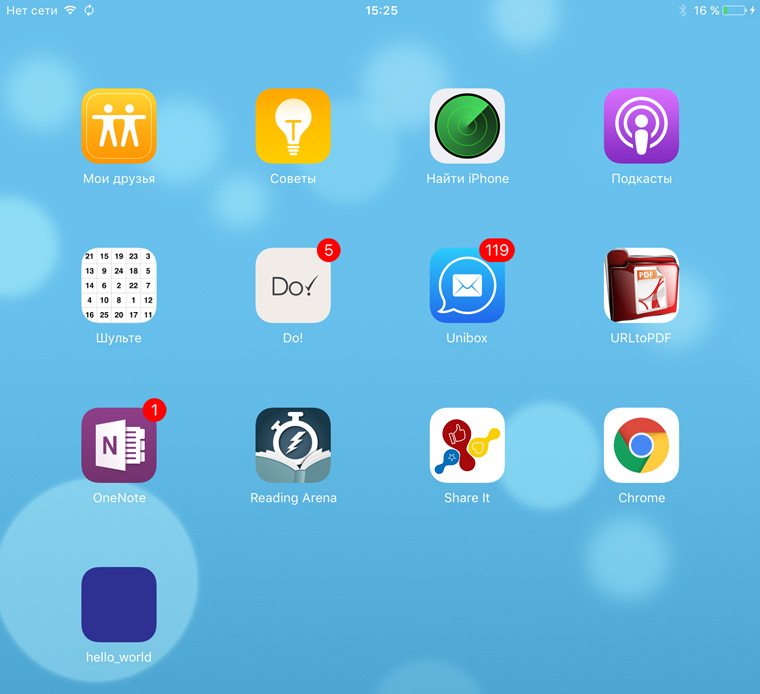
6. Launch:

7. Disconnect the device from the computer. Now the application can be used.
What to do if you want more?
Using scientific poking and Google, you can expand the above sequence of actions and create a more functional application. But you can only use it on your own devices.
After all, Apple places very high demands on applications. The App Store Review Guidelines include 29 points and more than a hundred sub-points. In order for an application to comply with them and be accepted for publication in the store, the developer requires a large amount of technical knowledge.
If you want to create high-quality iOS applications intended for mass use,
How to create an application for iOS - 6 steps + 10 tips for beginners.
Some people who want to start making money on the Internet do not know how to create an application forios.
However, it is not difficult to learn this by following the tips offered in the article.
Step-by-step creation of an application for iOS
You can learn how to develop games, nutrition and sports training diaries, and calendars during the development process.
All you need to do is just follow the instructions.
6 stages of creating an application for iOS:
Search for an idea.
Original new items, bright and unusual, are very popular.
Create something that you yourself would like to use. The emphasis should be on convenience and functionality.
Drawing up a plan and functionality.
When drawing up a plan, pay more attention to functional features.
If it's a game, create one personal account, the ability to count points, communicate between players.
If this is a diary, create an additional calendar function and reminders.
The main rule for creating new products is that they should not only be interesting, but also useful.
Selecting a tool.
When choosing a program to create a program, you need to pay special attention.
After all, what your game or diary for iOS will turn out depends on its functions.
Should try to do trial version to evaluate the capabilities of the platform.
Development.
Quickly creating applications often ends in failure - everything works incorrectly, but there is nothing interesting.
First, the shell is created - the appearance, colors and structure are selected.
Then it must be filled out following the instructions of the development program.
Name.
The title is what the user sees first.
It should hook, attract attention, interest and motivate you to purchase the application and install it on your mobile device.
Evaluation of the result.
After finishing work, you should try to look at final product through someone else's eyes.
Ask friends and family to test your work.
When thinking about how to create an application for iOS, take time to “nurturing” the idea.
It must mature, take shape and appear initially in the form of sketches on paper.
How to make an application for iOS without learning programming?
How to write an application forios for those who own a computer but do not understand programming methods?
In order to make a small program with minimal functionality, you don’t have to lock yourself in a library with dozens of volumes on programming, or sign up for expensive courses.
All you need to do is choose a convenient, functional platform, and, following the stages of development, make a calendar, game or calorie counter.
The best programs for creating for a beginner:
- My-apps.com
- AppsGeyser.com
It should be understood that creating an application for iOS without the use of programming skills is only possible if the development site is paid and offers great functionality.
To create a program using such a site, you just need to follow the instructions of the system.
How to write an iOS app using Xcode?
Those who are wondering about without any special skills can use the Xcode platform.
To get started with Xcode, you need to download it and install it on your mobile device.
You can download Xcode at: best-soft.org
Then you need to decide what you are going to create.
The Xcode system platform supports the creation of:
- Navigation programs
- Diaries with reminders
- Mini-directories.
Most often, the system offers a ready-made file with codes and an interface that is convenient to use for developing your own application.
You can add different functions simply by following the instructions in the windows.
Algorithm for creating a new project
- Launch Xcode from applications on your mobile device.
A welcome window will appear. - You need to exit it and run the “Create a new file” function.
- Choose a design.
- On the left side iOS programs you need to select the Application section.
- In the window that appears, enter the name of your future program.
- All changes made are saved.
To continue writing, you need to open the created document with the code from the file.
The Xcode platform is very beginner-friendly.
The system provides all the necessary tools, and in the windows that open, instructions and further development actions appear that you can immediately take.
Even those who do not know how to write codes can use the program and create something that will appeal to millions of Internet users.
Xcode allows you to choose any template of a ready-made program you like and change it at your own discretion.
To use files containing source code, you need to find the Single View template, and make sure that your project management is available in the navigation panel.
To continue creating a program based on the finished code, you need to select the Supporting directory and in the menu that opens - main.m.
The system will then automatically perform all necessary actions.
Concept for creating an application for ios
Before you start, you need to strictly decide where exactly you are going.
In other words, you should have a picture in your head of the finished application, the principles of its operation and functionality.
When developing a concept, attention should be paid to two main issues:
What is your target audience?
The type of application you create will largely depend on the range of users, their age and interests.
The game is best for children, and for girls - teenagers under the age of 18 - a girl's diary for the phone.
What is your purpose in creating a game or reference book?
To practice programming skills or earn money?
Considerable attention should also be paid to filling out the application for iOS.
Here you should be careful and avoid two extremes - an overly empty and overly filled platform.
Too much or too little information is equally harmful.
Pay attention to the presence of active functions.
The user must be able to interact with the system - make notes, set bookmarks.
Every novice developer can create a program no worse than a specialist.
With the current level of technology, programs themselves will write a game or a glider, but will not come up with an original, unique idea or name.
What those who want to know about writing an application for iOS on their own need to know:
- Spend time identifying the needs of your chosen user audience.
- Pay special attention to the relevance of the application.
- Avoid errors in the code, since they are almost impossible to fix, and users will leave a lot of unpleasant feedback in the comments.
- To do this, you need to create a business model and decide how the money will come in.
There are two ways: make the program paid, and charge money when downloading, or introduce advertising. - Make sure that the application is unique and you are not accused of plagiarism.
- Strive to create a program that will be supported by any operating system.
- Study the principles of application development, ask those who have been doing similar things for a long time.
- Don't overdo it with functionality.
One or two “chips” will be quite enough.
The user must understand the program, and not guess the principle of its operation. - If a project has received a lot of bad reviews, don’t abandon it, don’t get upset, but work on improving it.
Develop your skills. - Analyze games and applications.
Notice which ideas seem good and which ones are confusing.
If you want to create your own application without any programming knowledge,
then this video will tell you which service you can use to do this:
There are many simple answers to the question: how to make an application for ios.
By choosing the most convenient method for yourself, you can create an excellent game or reference book that will attract a large number of users and generate income.