How to assign mouse buttons. How to set up additional buttons on a regular and wireless mouse
How to change mouse settings. IN modern computers For many users, the computer mouse plays the main role in control. It's rare that anyone can work without it. How to choose a computer mouse? , I already told you about the Species computer mice, Same. It's time to talk about setting them up. We are not always satisfied with how the mouse works, but some people don’t even suspect that it can be customized. Now we’ll talk about how to change mouse settings.
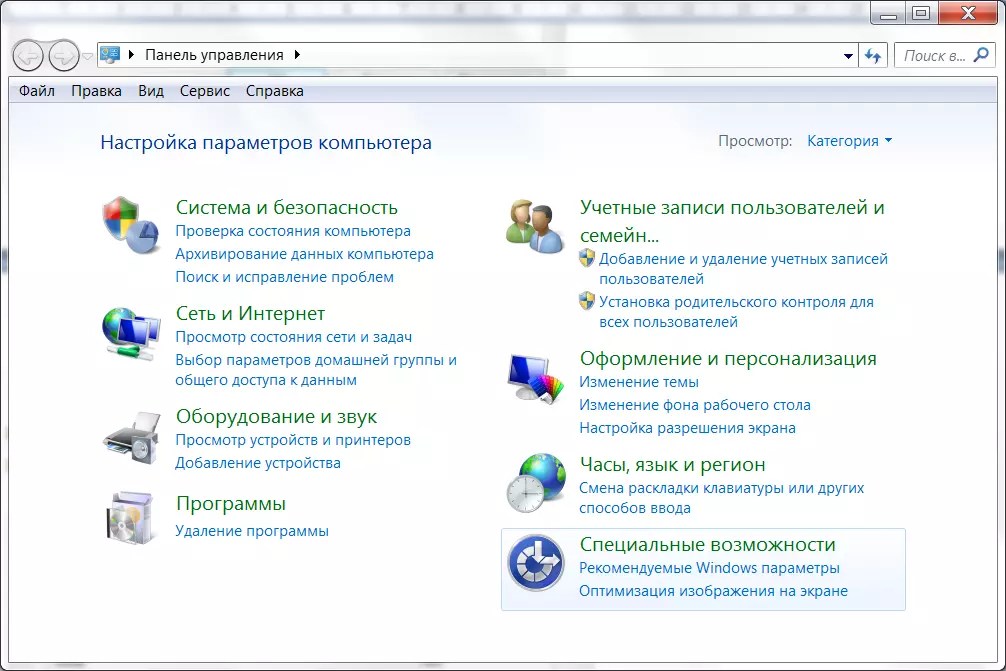
In order to get to the mouse settings in Windows 7, you need to go to the menu – Start – Control Panel . In the window Control panels in a small window Search at the top right write the word “ mouse" And a list of all your mouse settings will open on the left.
Settings computer mouse in Windows 7
In Windows XP you also need to call up the menu – Start - Control Panel . And in the window Control panels find the icon Mouse. Open this folder by double clicking and let's go to settings.

Setting up a computer mouse in Windows XP
Note
I will describe the mouse settings using Windows XP as an example, especially since they do not differ at all from the same settings in Windows 7.
The most important mouse setting is its sensitivity and setting up double-clicking the main button. Optimal settings depend on specific model and from the usual style of your work.
Mouse sensitivity is the response of the pointer to its displacement. See if you can move the pointer diagonally across the entire screen without lifting your wrist from the surface of the table, that is, moving only your fingers. If you can't do this, then you need to adjust the mouse sensitivity.
Adjusting mouse sensitivity
- Open the window Properties: Mouse (Start Panel controls - Mouse) .
- Go to the tab Pointer Options .
- Move the slider on the panel Moving in the required direction. When moving the slider to the right, the mouse will become even more sensitive, and to the left - less.
- Check the box to record Turn on increased accuracy pointer installation . Now your pointer will first move slowly and then speed up. This will be useful to you when working in graphic editors. In games, especially where you have to aim the weapon at the target, checking this box will only hinder you and slow down the player’s reaction.
- Very interesting panel Visibility. You can try setting the checkboxes to different functions, but these bells and whistles interfere with work. But it depends on who.

A very interesting Visibility panel in the mouse settings window.
Setting up a double click
- In the same window, go to the tab Mouse buttons .
- On the panel Double click speed Double-click on the yellow folder with the left mouse button. If your two clicks opened this folder, then everything is fine. If not, then set it up double click moving the slider Speed .

In the Double-Click Speed panel, left-click the yellow folder twice.
- If you are left-handed, you can change the assignment of the mouse buttons on the panel Button Configuration . Just check the box next to the entry Change button assignments . Don't forget to save your settings with the button Apply And OK .
- I don’t recommend installing sticky, otherwise any mouse click you make, especially when working with text editors, will cling and drag any object along with it.
How to change the mouse pointer
- Go to the tab Signposts .
- Open the dropdown list (click on the small black triangle on the right) in the panel Scheme .
- Select a scheme.
- Below in the settings also select the pointer type and click the button Apply .
- If all these schemes are tired of you or do not suit you, then click the button Default .
- Clicking the button Review, you can download many more cursors from system folder Cursors. You can download your cursors to the same folder (C:\WINDOWS\Cursors) and select them from there.

Open the drop-down list (click on the small black triangle on the right) in the Outline panel. Select a scheme.
On the tab Wheel there is no need to change anything. You can just experiment.

There is no need to change anything on the Wheel tab. You can just experiment.
On the tab Equipment You can see how your system detects your mouse.
This is how you can customize your computer mouse.
Write in the comments what incidents you had with the mouse and how you fixed it. Maybe this will be useful to someone.
Hello, dear readers of the blog site. I don't know if you have encountered such a problem as double or triple mouse button activation in one click, but it’s clear that such a problem exists and it often occurs among users, as evidenced by numerous posts on the forums. What can I say, I myself have repeatedly witnessed a situation where with one click of the left button 2-4 windows opened at once, instead of one, this was terribly annoying and interfered with work. And then I wondered how to fix a mouse without special tools.
And here’s what I managed to find out: on different sites they write that you need to resolder the microphone (switch - a button on the board that makes a click) from some non-working mouse, or put paper/insulating tape under the key and then, they say, the problem will go away. However, there is a way in which there is no need for a soldering iron or placing anything underneath, and repairing the mouse will take you no more than 10 minutes. The difficulty is that to implement this method you will have to disassemble the mouse, but the same thing will need to be done with other methods.
The body of any computer mouse is held together with screws, some of them may be located in such places that a quick inspection may simply not find them. As a rule, the screws are on the bottom, they hold the bottom of the mouse and its other parts together. Carefully turn everything out visible to the eye screws, then pull the body - if the bottom is still holding something, then you need to find hidden screws, I suggest looking for them, for example, under stickers or overlays. Be sure, before you begin to disassemble the mouse, disconnect it from the port to avoid any troubles.

There are different types of computer mice - gaming, office (regular), wireless, and so on, but they internal structure very similar. Regardless of how many buttons a mouse has, each of them will have its own microphone. What is noteworthy is that these mics are identical, which allows them to be replaced in the event of a breakdown. Even the scroll wheel has its own switch.

The switch itself consists of two parts, the lower part (base) is attached to the printed circuit board with contact pins using soldering, the upper part is the switch housing, which covers the internal part. Inside the switch there is a thin copper plate of a peculiar shape, when it bends under the influence of force - you can hear a click, the same “click” that all mouse buttons usually make. The problem lies precisely in the plate, but to get to it you will need to remove the switch housing.


It is best to do this with a thin screwdriver or something else that is convenient for you to work with. Carefully pry the microphone housing from the end, then do this along the entire perimeter of the switch. Be careful, as a result of opening the small plastic button (it is red in the image) may fall out; this is the part through which the force from your finger pressing is transmitted to the copper plate. The plate is supported on supports, which do not allow her to “walk” within the confines of the building. However, one of the ends of the plate is not firmly fixed, so in order to release the plate, you will have to move it a little to the side.
Great, now. The fact is that over time the metal sags (“gets tired”), and in a certain position the plate drops so close to the bottom contact that in a split second it makes several short circuits, as a result of which we can observe multiple openings of windows in Windows with one click, For example. It is necessary to turn the plate over, use a screwdriver or other object to slightly bend the “tail” upward, it is important not to overdo it, otherwise you can break the plate (copper is very thin).

Now you need to put the plate on the mounts, It is better to start installation with the moving side of the plate. I don’t argue that this is not so easy to do, because the part is very small, but with some skill everything should work out. But putting the plate back in place is only half the battle; you also need to install the mic housing back, fortunately it is secured with latches. Before installing the switch housing in place, insert a white (or any other color) button into it from the inside so that its narrow part faces up, after which you can snap the housing back.

Well, that's all, now all that remains is to put the mouse back together by tightening the screws at the joints. If you did everything correctly, then you don’t have to take your mouse for repair or run to the store for a new one. And if suddenly problems with the mouse recur, now you know what to do. In such a simple way, even You can adjust the hardness of the click, simply bending the plate to the desired distance. Personally, I like my mouse button clicks to be crisp, firm, and accompanied by a loud click.
This procedure can be repeated as many times as necessary until the lower part of the micrik falls apart; nevertheless, plastic cannot be called a material resistant to mechanical damage. Another option is to completely solder the microphone, for example from an old but working mouse. But firstly, it will take more time, and secondly, not everyone may have a soldering iron and solder at hand. In addition, you can try to order such switches from the Internet, and if something happens, rearrange the copper plates from there, it will be much cheaper than buying even the most simple mouse. Thank you.
Sometimes, for greater convenience when working, there is a need to configure the mouse buttons or, conversely, disable some of them.
Often, accidentally pressing the wheel can interfere or confuse you when working with a document, and sometimes problems even arise. All this can be solved by reconfiguring your gadget.
If your device has a standard set of keys, then its settings can be adjusted thanks to "Control Panels", and if it contains additional buttons, then it will be easier to do this using a special X-Mouse programs Button Control.
Now in more detail about both options.
Contents:
Standard setting
To begin, open the Start menu and go to "Toolbar", which allows you to change parameters and functionality Your computer.
Going to the section, select the item “Mouse”.

A window with gadget properties will open. It will be possible to change the assignment of the buttons - this function is intended for those who have a left-dominant hand.
It is worth noting that it is better for left-handers to purchase ones whose shape is symmetrical, then the exchange will be convenient.
It is also possible to adjust the double-click speed using a special scale, which is sometimes set in a completely unusual way.

Button properties and selection
If you go to the following tabs, you can familiarize yourself with other functions. So in “Indicators” you can change appearance“arrows” and completely customize it for yourself.
Some of the options even have animation, and in addition, you can remove or, on the contrary, enable the shadow from the cursor.

They will allow you to debug the speed of movement of the “arrow”, and will also provide several additional features: Show the pointer trail, hide it while typing, and indicate it when you click on Ctrl key.

Index Options tab
In the “Wheel” tab, it is easy to understand the scrolling of pages so that it corresponds to the user’s desires.
Vertical is familiar to everyone, and it will help you work more comfortably with text documents or will increase the convenience of spending time playing games.
In turn, horizontal scrolling, as a rule, is not present for everyone.
Most often used when viewing, the size of which is not always comparable to the expansion of the user’s screen.

Wheel tab
In “Equipment” all available information about connected gadgets.
The section includes a report on their status, the drivers they use, and some background information.

In addition to this method of making your own adjustments to the operation of the gadget, there is also another, which also starts with going to "Control Panel".
In it we select, and then the item "Change mouse settings".
Chapter Accessibility
IN open window we see a set of the most optimal settings, among which corrections relating to the color, size and shade of the cursor are highlighted in a separate block.
It is also possible to enable pointer control from and activate the window when you hover over it with the cursor.

Tab Make it easier to use the mouse
This information will help if the manipulator does not accommodate additional buttons; in this case, its settings are provided by the service center.
But if your gadget is significantly different from others, then a simple analysis of the properties will not do.
Computer mouse is an electronic manipulator designed to remote control operation of computer programs by activating a cursor that moves across the monitor screen following the movement of the mouse across the surface. For control, at least two keys and a wheel are installed on the mouse body, allowing you to scroll pages in the vertical direction.
Depending on the method of connecting to a computer, mice can be wired (connected using a flexible cable with a PS/2 or USB connector) and wireless.

The photo shows a wireless mouse. As you can see, it does not have a wire to connect to the computer. In wireless mice, information is exchanged using radio frequency. IN USB port computer, laptop or tablet, a transceiver is inserted, providing two-way communication between the mouse and the device via the air.
Wireless mice have the following disadvantages: - they are more expensive, heavier and require additional attention, since it is necessary to periodically replace dead batteries or charge the batteries.
Optical computer mice are very reliable and can last for many years. But over time they break, and you have to replace the mouse or repair it yourself, since repairing it in a workshop will cost more than the cost of a new one.
Wired mice fail, in the vast majority of cases, due to chafing of the wire at the point where it exits the case, and wireless mice due to the discharge of the battery, accumulator or failure of contact between its terminals or contacts in the container due to their oxidation. Over time, any mouse fails due to wear and tear on the buttons, usually the left one, which is the most frequently used. To repair the mouse, you need to disassemble it.
How to disassemble a computer mouse
In order to disassemble the mouse for repair, you need to unscrew the mounting screws from its bottom side. Usually there is one, but there may be several. In this mouse model, the halves of the body are fastened with one screw.

If the screws are not visually visible, then most likely they are covered with a label or hidden under the thrust bearings. You need to lightly press the label over the entire area. If, in any place, the label bends in the shape of a circle, then most likely there is a screw hidden there. This mouse has a screw hidden under a label that had to be partially peeled off.

In the model, for example, TECH X-701, the fastening is made using two screws, one of which is also hidden under the label. When I tried to peel off the label, it began to tear, so I had to unscrew the screw and make a hole in the label. The place where the label was pierced with a screwdriver in the photo below is indicated by a blue circle.

If the screws could not be found under the labels, then they are definitely sealed with thrust bearings. To gain access, you need to carefully remove the thrust bearings with a knife. Upon completion of the mouse repair, they will need to be glued in place, since without the pads it will slide worse on the mousepad.

After unscrewing the screws, you need to move the halves of the mouse body apart from the side of the unscrewed screw in different sides and remove top part, on which the buttons are located.

The mouse's printed circuit board is usually not fixed with screws and is installed with holes on plastic rods protruding from the case. But there are computer mice in which the printed circuit board is screwed to the case with small screws. If, when you try to remove the board, it does not give in, you need to find and unscrew all the screws that secure it. An example of this computer mouse TECH X-701, which is secured to the body with a screw that simultaneously fixes an additional printed circuit board side buttons.

To remove the board, you need to pry it from below, while simultaneously removing the wheel axis from the bearing retainers of the housing.

When disassembling the mouse, remember how the parts are located relative to each other. Pay special attention to the wheel ratchet spring (if there is one). It is similar to a clothespin spring, only small in size and can easily get lost. If you don’t like how the ratchet works when rotating the wheel, you can slightly bend the tip of the spring that comes into contact with the teeth of the wheel. The pressure will decrease and the wheel will rotate more smoothly.
When disassembling and repairing the mouse, you need to be careful not to let your hands touch the surfaces of the optical prism and other optical elements. If you accidentally touch it and traces of sweat and grease remain on the surface, you must remove them with a cloth soaked in a special composition for wiping optical parts. Under no circumstances should any solvents be used for cleaning. If you don’t have a special wipe at hand, simply wipe off any traces of dirt with a soft, clean cloth.
Wireless mouse repair
The main reason for complete inoperability wireless mice are dead batteries (accumulators) or poor contact of their terminals with electrical diagram mice. Since the lasers of many mouse models operate in the light range, to determine the condition of the batteries, just turn on the mouse and look at it from below. If a red glow is emitted, the batteries are good. Otherwise, repairs must begin by checking the batteries and the quality of their contact with the electrical circuit of the mouse.

In order to get to the batteries, you need, for example, like in this mouse, to press the “Open” button, after which the battery compartment cover will release and it will open.

If the mouse's laser operates in an invisible area, then you can only check the condition of the power supply by replacing or measuring the voltage at the battery terminals.

In a mouse that has been in use for a long time, the contacts on both the battery terminals and the contacts in the mouse may oxidize. In this case, they need to be inspected and, if oxides are found, remove them with a rag soaked in alcohol or simply wipe thoroughly until they shine. It is not advisable to remove oxide from the mouse contacts with sandpaper, since the thin protective galvanic coating will be removed from them.
Like a wired mouse
repair a frayed wire
If, when working with the mouse, the cursor begins to move spontaneously, jump to any place on the monitor screen, or freeze, then we can say with greater certainty that the integrity of the wire at the point where it exits the housing has been compromised. It’s easy to check, you need to press the wire against the body and if the functionality is temporarily restored, then it’s definitely a problem with the wire.

If, upon inspection of the wire at the point where it exits the computer mouse body, physical damage is detected, then the reason for the malfunction is obvious. Here is an example of such damage. The photo shows that the double outer shell of the wire is damaged, and some of the tinsel-type conductors are frayed.

If you have soldering skills with a soldering iron, it is not difficult to repair a computer mouse with a frayed wire, doubling its service life. The repair consists of removing the damaged section of the wire and sealing the newly prepared ends of the surviving part of the conductors into the printed circuit board.
How to repair a frayed mouse wire by soldering
The wire connecting the computer mouse to the connector comes in two types - made of ordinary thin stranded copper wire and tinsel-type wire. Tinsel type wire is more elastic, therefore it has high bending resistance and lasts longer.
Entering the mouse body, the wire runs along and connects to printed circuit board. There are two types of connections: a detachable connection or a press-fit connection into a block that is soldered into the board. The photo shows a block soldered from a printed circuit board with conductors pressed into it.

Regardless of the method of connecting the wires to the mouse’s printed circuit board, in order to know how to solder during repairs, you need to photograph or sketch what color wire is connected to which contact. Then unsolder the connector from the board (it’s better not to disconnect it, it’s easier to unsolder) or the block. There is no international standard for the color scheme of wires for mice, and each manufacturer chooses the color of the wires at their own discretion. I had to repair many computer mice and everywhere the wires from the same connector pins came in different colors. Obviously, this is due to the fact that the mouse is considered a consumable item, and repairing it after completion warranty period manufacturers do not provide.
After desoldering the old wires from the mouse circuit board, you need to clear the solder holes to seal the new wires. This work can be easily done with a toothpick or a sharpened match. It is enough to heat the solder at the location of the hole on the side of the printed conductors of the board and insert the tip of a toothpick into it, remove the soldering iron, and when the solder hardens, remove the toothpick. The hole will be free for installing a conductor into it.

To prepare the wires for installation, it is necessary to cut off a 15-20 mm long piece of wire coming out of the mouse body that has become unusable. Remove the insulation from the wires and tin the ends of the conductors with solder. You need to tin the wires by placing them on a wooden stand, while rotating them in one direction so that the tinned ends of the wires are round in shape. Otherwise, it will be impossible to insert them into the holes on the printed circuit board.
Insert the wires into the mouse circuit board according to the sketched color scheme and solder with a soldering iron.

Wires of the tinsel type cannot be tinned using ordinary rosin flux, since the tinsel ribbon conductors are covered with a layer of insulating varnish. Acid flux cannot be used as it will saturate the inner strand of the tinsel wire and eventually destroy the conductors. The best flux in in this case is an aspirin tablet.

All that remains is to insert the tinned ends of the wires into the holes of the printed circuit board and solder them with solder.

Sometimes there are mice in which the printed circuit board is double-sided with holes for wires of very small diameter, and it is very difficult to free them from solder. In this case, you can simply solder the conductors to the contact pads. Since physical stress is not applied to the wires when the mouse is operating, the connection is quite reliable.

Now you can install the printed circuit board into the base of the case and secure it with a screw, lay the wire and close it with the top cover. When installing the cover with buttons, you need to make sure that the wire does not get under the pushers of the buttons, between the mating protrusions of the housing and does not touch other moving parts. Before assembling the mouse, be sure to remove dust and hairs that long term quite a lot of use is stuffed through the gap between the wheel and the body. The repair is completed and the computer mouse is ready for use again.
How to repair a frayed mouse wire by twisting it
It’s safer than soldering to repair a wire, but not everyone knows how to solder, and even if they do, they don’t always have a soldering iron at hand. You can successfully restore the operation of the mouse without a soldering iron by twisting the wires. The mouse is disassembled and a section of the frayed wire is cut out.


The conductors are carefully removed from the cut wire sheath. The wire sheath is not cut, it will still serve.

The length of the conductors is adjusted so that when twisting, the twisting points are shifted relative to each other by 8 mm and the ends of the conductors are stripped of insulation to a length of 5-8 mm.

The ends of conductors of the same color are twisted tightly together.

The resulting twists are bent along the conductors, and the conductors are tucked into one of the previously cut wire sheaths. When refueling, you need to pay attention so that the twists do not touch each other.


A couple of turns of insulation will prevent the twists from accidentally touching the parts on the mouse board and will give the connection sufficient mechanical strength.

All that remains is to insert the wire connector into the mating part on the mouse’s printed circuit board and lay the wire in the case.

Close the top cover, tighten the screws and you can start working on the computer. The wire repaired in this way will last another period. Sometimes system unit They are installed far from the workplace, and the mouse wire is not long enough to work without tension. Using the technologies proposed above, you can successfully extend the wire to the required length by taking the wire from an old mouse. Since there is no single color standard for wires, you must first determine by calling which color wire is connected to which number in the connector.
To increase the service life of the mouse, it is necessary to ensure that the wire at the point where it exits the mouse body does not bend too much when manipulating it.
If the mouse wheel becomes difficult to rotate
Sometimes, when you rotate the mouse wheel, the scrolling of pages occurs jerkily or does not move to one side. One of the reasons is the ingress of dust and hairs between the photosensor and the photoreceiver of the wheel optocoupler. Dirt enters the mouse body through the gap between its body and the wheel and sticks to the wheel axles, as they are coated with lubricant to improve gliding.

After removing the dust and hairs, the functionality of the mouse wheel was restored.
Mouse button repair
If when you press the left or right mouse button the reaction does not always occur or does not occur at all, then there may be two reasons. The button is worn out at the point of contact with the microswitch pusher or its failure. In order to understand the reason, it is enough to disassemble the mouse and inspect the place of the button in contact with the pusher. If there is a millimeter deepening, then perhaps this is the reason.
When you press your finger on the pusher of a working button, you should hear a clear and loud click. If the sound is dull, then it may be the switch. To check, you need to connect the mouse with the top half removed to a working computer and press the microswitch pushers with your finger. If it works normally, then it will be enough to eliminate the wear on the button with any in an accessible way, for example by melting plastic, a drop of epoxy resin. If the problem is with the microswitch, you will have to replace it.

The vast majority of mice use microswitches standard sizes. The microswitch is designed and operates as follows. Three brass plates of complex configuration are pressed into the plastic case, which end with pins for sealing into a printed circuit board. The left (pictured) plate is the midpoint of the switch. An additional thin brass plate with a U-shaped hole is fixed on it in a spacer.
The left side of the thin brass plate engages the protrusion on the left side of the left contact plate, and the right, curved arc, engages the right protrusion of the left contact plate. The thin flat plate is installed in such a way that its right end always pushes up, and it contacts the right thick plate, which has an L-shape.
When you press the button, the button pusher transmits force to the thin plate, it moves downward, away from top contact and comes into contact with the lower one, the output of which is in the middle of the button. After the pressure ceases, the thin plate returns to the upper starting position and connects the outer contacts of the microswitch again. Thus, when the button is not pressed, the outer contacts coming out from the bottom of the button are connected to each other, and when pressed, the left and middle ones are connected to each other.

Over time, the metal accumulates fatigue, the arc-shaped spring is deformed and partially loses its springing properties. This is where the button stops working. You can try to repair the microswitch by disassembling it, removing the arcuate spring and straightening it a little. But having a supply of old mice, I didn’t have to resort to such repairs. Although the buttons on keyboards were repaired many times at the dawn of computers, each button in them worked on the same principle as microswitches in mice.
Therefore, if you have an old ball-type one lying around, it would be more advisable to remove the microswitch from it to replace the faulty one. It is best to solder the one that is installed under the wheel. It is rarely used and is generally in good working order.
If there is no wheel, then take the microswitch of the right button. Before unsoldering the microswitch, pay attention to how it is installed. In microswitches, the pins are located symmetrically and it is easy to make mistakes during installation. If there is no old mouse, then it is permissible to swap the microswitches in the mouse being repaired, from under the left button to the one installed under the wheel. And if the situation is completely hopeless, then you will have to start repairing the microswitch.
A computer mouse is a manipulator that allows you to point at various objects on the computer screen and carry out the necessary actions with them.
When the mouse is moved across a table or other surface, the mouse pointer (cursor) simultaneously moves on the computer screen.
Rice. 1. Computer mouse
To perform some action, for example, launch a program on which the mouse pointer is installed, the user presses one or another mouse button.
Simple, regular mice have two buttons (left and right, as shown in Figure 1) and a wheel. Some exotic mice have more than 40 buttons and not just one wheel, but two.
Computer Mouse Concepts
| Term | What does it mean |
|---|---|
| Mouse pointer | An icon that moves on the screen when you move the mouse. This icon can take different type, see Fig. for details. 2. |
| Click (or click) the mouse | Click or click the mouse - this means that you need to: 1) place the mouse pointer on some object, 2) click on the left mouse button and 3) let her go. |
| Double click (click) with the mouse | 1) Place the mouse pointer on the desired object on the screen and, 2) without moving the mouse, quickly click the left mouse button twice, 3) then let her go. |
| Drag with mouse | 1) Place the mouse pointer on the desired object on the screen, 2) click on the left mouse button and, 3) keep this button pressed and move the mouse to a new position, 4) after which you can release the mouse button. |
Different mouse pointer shapes

Rice. 2 Different shapes mouse pointers. Depends on the actions that the user applies to different objects
For example, the “Change vertical dimensions” pointer means that when it looks like the one in the table in Fig. 2, you can change the size by holding down the left mouse button.
About the left and right mouse buttons
The left mouse button is the main one. It is used:
- to select objects and click on them,
- to select the cursor position in the edited object (for example, in text),
- and also for moving objects.
The right mouse button is auxiliary.
If you hover the mouse pointer over an object and right-click, then the screen will usually display context menu– a list of actions that can be performed with the selected object.
The context menu will be different for different objects. That is why it is called contextual, because its content depends on a specific object.
If you are left-handed and it is more convenient for you to use your right hand when operating the mouse, then in the mouse settings (“Start” - “Control Panel” - “Mouse”) you can change the assignments of the left and right mouse buttons. To do this, just in the “Mouse” window, “Buttons” tab, check the box next to the option “Swap the functions of the left and right buttons of a USB mouse” (Fig. 3).

Rice. 3 How to change mouse buttons
This mode of changing the assignments of the left and right mouse buttons, as a temporary one, can also be recommended to those PC users whose PC has failed (broken) for some reason. left button mice. Until the mouse is repaired or replaced, you can then use the right button as if it were the left button.
Key points for those who have just started using a mouse
1) The computer has no eyes or hands. Therefore, the computer needs to indicate what exactly you are going to work with. Don't forget to select the desired object.
If the object is not previously selected, then it is useless to press, for example, the Ctrl+C hotkeys to copy. If nothing is selected, then what should the computer copy?!
2) When moving the mouse, do not lift it from the table (or other surface).
3) If the mouse pointer disappears from the screen (or ), you just need to move the mouse and the mouse pointer will immediately appear on the screen.
4) Clicking with the left mouse button is performed very often, so usually everywhere they write simply “clicking the mouse button” without the adjective “left”.
Enough theory, let's move on to practice.
Exercises for computer literacy
1) Select an object on the desktop.
Clue. Hover your mouse over the Trash icon. Click (click) on it once with the left mouse button. What's happening?
The correct answer is that the Trash icon simply darkened, and that’s it.
2) Highlight the Trash icon. Now deselect the icon (deselect it).
How to deselect an icon? To do this, click (click) the left mouse button on empty space Desktop.
3) Move the Trash icon on your desktop.
Left-click on the Trash. Without releasing the button, slowly move the Trash icon left and right, up and down. Release the mouse button where you see fit. With your help, the Trash icon has moved to a new location.
4) Launch some program on the Desktop.
Clue. Double-click (click) with the left mouse button on the program, more precisely, on the program icon.
If that doesn’t work, you can right-click on the program once. A context menu will appear in which you should click on the “Open” option.
P.S. On computer literacy you can also read:
Receive the latest articles on computer literacy directly to your mailbox
.
Already more 3,000 subscribers