A program to remove a password from Windows 7. A simple way to reset an account password for any version of Windows
Our forgetfulness often plays various unpleasant jokes on us. Forgetting a password for a program or for Windows is a completely common thing and happens to literally every second user. Especially with those of them who write down passwords not in a notebook, but on pieces of paper scattered everywhere, or even rely on their powerful and bottomless memory. And who is not familiar with the situation when the password for an account is forgotten? network resource- on some Facebook or Vkontakte.
Imagine that in this situation, valuable data or simply carefully organized software environment operating system Windows. Who wants to reinstall Windows and reinstall all the programs? There are no such individuals in nature. The decision, in in this case, performs . We will talk specifically about Windows 7, since approximately the same password reset procedures are valid for the G8. And these, whatever you say, are the most popular operating systems installed on the computers of hundreds of millions of users.
To begin with, we will discuss the most simple procedure reset using boot Windows image on a CD (like the common “LiveCD”) or bootable USB flash drive, similar in functionality. We also need a minimal understanding of the command line. Using these means we will try to remove existing password on behalf of the administrator. In conclusion, we will offer for consideration some other options for user action in the event of a forgotten password.
At the preparation stage
Preparing to reset your password in Windows 7 will involve one tricky procedure: we will change system program Sticky keys on the command processor.
The command processor - the file cmd.exe - is exactly that system utility, which is responsible for providing the command line interface. To launch the console, you need to run this file. Replacing the sticky utility with a command one Windows console 7, we will be able to manage the process of entering and changing the password.
Please note that we will need a proprietary installer of the “seven”, which includes administrator functions, such as “System Restore”. Some stripped-down versions of installation disks and flash drives do not contain administrator functionality. So, let's begin our preparatory steps for the reset:

copy c:\windows\system32\sethc.exe c:\
- Thus, we copy the keystroke handler to the root of the “C:” drive, that is, we create backup copy handler, which we need to remove and replace with the cmd.exe file. We do the replacement according to the command:
copy c:\windows\system32\cmd.exe c:\windows\system32\sethc.exe
That's all the system administrator's preparations for resetting the password on Windows 7. The reset itself will be described in the next section.
We are struggling with authentication in the system
To remove authentication from the system, proceed as follows:
- Remove from the system bootable media and log in through the normal Windows boot procedure.
- When logging in, we will be asked to enter the password of the administrator or other registered user of the system.
- Instead, press the Shift key five times. This will launch the command processor, which will allow us to remove forgotten password. In order to reset it and remove all information about previous authentication, type the following command:
net user Username New password
As you can see, it also allows you to remove the old username and assign a new one to it.
- Everything is ready, you can log in with new credentials.
 This seems to be the easiest way to reset your credentials using the console. All that remains is to “plant” the file sethc.exe that we moved in its place. Copy it back to the C:\Windows\System32 folder. There are alternatives to this procedure, which can be found here: http://www.3dnews.ru/623507.
Lazesoft Recover My Password - reset program Win password dows 10. Download reset program Windows password you can from the official website. How to use the Windows password reset program:
After all manipulations, the system will reboot. This program is suitable for resetting Windows password from a flash drive and disk.
This method is suitable for those who have foreseen the situation in advance and are considering the option of having to reset the Windows password from a flash drive. Since for this method you need to log into your account and prepare a flash drive, or as it is called in the operating system - “Windows 10 Password Reset Disk”. Reset Windows 10 password via USB flash drive (via Windows 10 password reset disk):

As a result, the flash drive will be ready for resetting the Windows 10 password. The file userkey.psw, which is necessary for the reset, will be written to it.
To reset a password from a flash drive in Windows, connect it to your PC. When logging in, if you enter wrong password, you will see a new item below the input field. With this item you can activate the reset. Click on it and follow the instructions.
Resetting your computer password in Windows 10 or other versions is necessary when you have forgotten your password but do not want to reinstall the system. How to reset your password on Windows 10 or 8:
- It is necessary to restructure the Sticky Keys function to display a command line
- Enter the combination that changes the password in Windows to reset the Windows password
In Windows, since XP, there is such interesting feature- sticky keys, it turns on if you press five times in a row Shift key. After sound signal A window will appear in which we will talk about sticking.

Do you know other methods on how to reset a password on a computer running Windows 10 or 8?
In order to reset your password in Windows 8 and 8.1, you need to boot your computer from installation disk or flash drive. When your computer is booted, select desired language and click Next. How to reset your password on Windows 8 and 8.1:
- Press Shift+F10 keys. A command prompt will open
- Save the file that triggers sticking, to do this, enter the command copy D:\windows\system32\sethc.exe D:\
- Enter the following command: copy D:\windows\system32\cmd.exe
- When the console asks for confirmation, enter the appropriate key (Y or N) and press Enter
- Close command line and restart your computer
After the computer boots, when entering your password, press the Shift key 5 times. If you did everything correctly, the command line should appear. To reset your password in Windows 8, you need to enter in the command line: net user Administrator 123456.
Let's decipher the command:
- net user - password change command
- Administrator is a required user
- 123456 - new password
Don't forget to restore the Sticky Keys launch file. To do this, boot from the installation disk again, open a command prompt and run the following command: copy D:\sethc.exe D:\windows\system32\sethc.exe.
And agree with the replacement. Done, now you can restart your computer and work peacefully.
In Windows 8, 7 and 10, you can protect your account. This way no stranger will enter there. But what if you forgot your password? Or did you purchase a computer that already has an account? In Win, you cannot restore your account using email. The code will not be sent via SMS. But there is no need to format the disk. Resetting Windows 7 password via USB flash drive is the solution to the problem.
If you forgot your Windows password, no problem.
- Suitable for this UltraISO program. You can use another utility if you wish.
- Find it online and download it. The application is paid. But there is a trial version.
- Insert the drive.
- Launch the program.
- "File - Open". Select ISO file.
- Go to the “Boot” menu and click on “Burn Hard Disk Image”.
- In the "DiskDrive" section, select USB storage device.
- Next, you can format it if you haven’t done so before. The flash drive must be in
- "FAT32".
- Click on “Record”. The system will warn you that all data from the drive will be deleted. Confirm the action.
- Wait while the files are copied.
Replacing files
To remove a Windows 10, 8 or 7 password, enter recovery mode, and through it, enter the command line.

- Set in BIOS external storage to boot priority.
- Once launched, the installation wizard will open.
- Select a language.
- Click on "System Restore". Do not click on "Install".
- A list of OSes will appear. Mark the one for which you cannot remember the code.
- In recovery options, click on “Command Prompt”. Now you see white font on a black background.
- Create a backup copy of “Utilman.exe” - enter “copy [System drive]:\Windows\system32\sethc.exe [System drive]:\File”. The file will be copied to the "File" folder.
- Now replace it with “copy [System-drive]:\Windows\System32\cmd.exe [System-drive]:\Windows\System32\Utilman.exe”.
- The system will ask you to confirm the action. Write "Y" if you agree.
- Once the file has copied, click Reboot and remove the drive.
- In BIOS, return to the previous settings. Now you can start the OS.
Reset
- When you log in to your account, open " Accessibility"(button below left).
- But the command line will start.
- To reset your Windows password, enter “net user [Username] [New Code].” If there is a space in the name or cipher, enclose it in quotation marks.
- If you want to remove the code, put two quotes without any characters between them.
- Restart your computer again and calmly log into your account.
- Return the "Utilman.exe" file. Boot from the flash drive again, open recovery mode and command prompt. Write in it “move [System drive]:\File\Utilman.exe [System drive]:\Windows\System32\Utilman.exe”
If you cannot log into your Win account, this does not mean that you have lost all user data. In Windows XP, 7, 8, 10, resetting a password from a flash drive is a very simple task. Although this has its downsides. It turns out that anyone can log into the account. Protect your personal information in several ways - not just with the code in your account.
Friends, hello everyone! In this article we will talk about how to reset the password on Windows 7 via a flash drive, as well as on the 8th and XP versions of this operating system. And fortunately, this procedure turned out to be quite simple and unpretentious.
After all, the method discussed in this article is not standard, where you need to know special operators and enter them correctly using . Here one free program and a neighbor's computer will be used.
The first thing you need to do is download a utility called Recover My Password from the official website at this link. It is with its help that it will be created to reset the Win 7 password. Fortunately, it is small in size:

Then, of course, we install and launch. In the window that opens, click on the only one big button in the center:

The next step is to select the version of the operating system on which the password will be reset. But we won’t change anything; the default setting will allow us to do this on everything Windows family except for the 10th:

After that, select the desired flash drive:

A message appears indicating that all data on the USB storage device will be deleted. We agree with this:

As a result, the process of writing files will start, so you will need to wait a little. When it’s finished, select the “Finish” button at the bottom:

Okay, now let's see how much space the program needs to create such a flash drive for resetting the password? And as it turned out, quite a bit:

Now all that remains is to set it in BIOS and try to use our wonderful program in practice. Well, so be it. We boot from it and select the item indicated in the picture below:

At the next step, we check whether the “Reset” option is indicated in the line Windows Password" and click the "Next" button below:

The program will ask about non-commercial purposes of use. Let's say "Yes":

Then the version of the installed operating system will be automatically detected Windows systems:

And here it is, the final stage. A list will open in which you should select the name of the administrator account where you need to reset the password. After that, click “Next”:

Well, that's it, it's done. All that remains is to restart the computer and log in calmly. So now we can safely say that you know how to reset your Windows 7 password.
But, unfortunately, this trick didn’t work on Win 10. I couldn't this program master this system. But if you know such a program, then write about it in the comments to the article. And in conclusion, as always, an interesting video.
Due to numerous requests from readers, I decided to write a detailed and simple instructions, how to reset the password for a user account in any Windows versions: 10, 8.1, 8, 7, XP.
So, you turned on the computer, and the system asks you to enter a password to log in. You enter the user's password, but it does not match: the “invalid password” error appears. What to do if no password is suitable, but you need to log in? There is a solution - you can reset your password using special program, recorded on a bootable USB flash drive. Now I’ll tell you how to create such a flash drive. 
You will need to briefly use any others computer. To do this, you can contact a relative, friend, neighbor, maybe you have a computer at work - I think this is not a problem now.
So, we sit down at another computer or laptop. Insert any flash drive into it:

Download free program to reset Windows passwords – . You can download it from the official website (or from my Yandex.Disk): 
Run the downloaded file lsrmphdsetup.exe:Install the program as usual: i.e. We agree with everything and press the ““ button in all windows. Next" In the last installation window, click the “ Finish” – the program will start automatically and its shortcut will be created on the desktop: 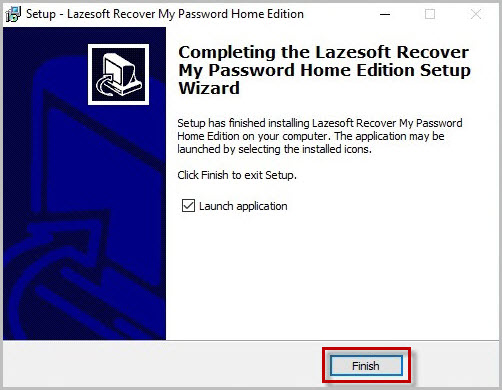
In the start window, click the button Burn Bootable CD/USB Disk Now!(“Burn bootable CD/ USB disk right now"): 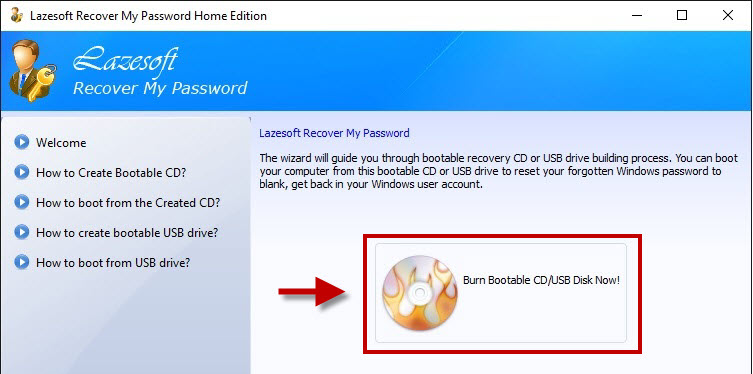
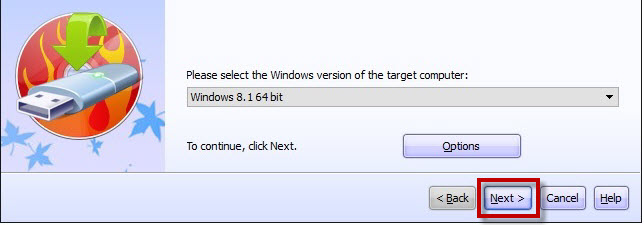
In the next window select Windows version, which is installed on the computer where we will then reset the password. Not on the list Windows 10, but it’s not scary: if you have a “ten”, then choose here Windows 8.1 with your bit depth.
By the way, on one of the forums I saw a message that you can create a bootable USB flash drive with Windows 8.1 64-bit, and it will be suitable for resetting the password on any version of Windows (I checked on Windows 10 64-bit and on Windows 7 64-bit - so and is): 
After you have chosen the required version Windows - press the button Next”:
In the next window, place a marker on the item USB Flash
and select the letter of our flash drive (it is already inserted into the computer). In my case, the letter of the flash drive: F.
Then press the button “ Start”: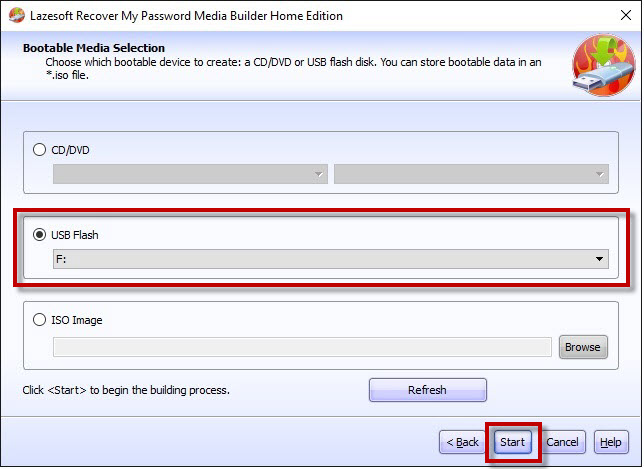
The program will take some time to load necessary components from the Microsoft website:

After this the program will ask: “ Should you format your USB drive now?“All files, if they are on the flash drive, will be deleted. Press the button “ Yes”:
Now we wait until the bootable USB flash drive is created:


At the end of the process, press the button “ Finish”:
 All! The bootable USB flash drive with the password reset program is ready. We take it out and take it to our computer.
Insert the bootable USB flash drive into your computer. And now comes the most important, and at the same time, the most difficult moment for those who will be doing this for the first time. We need configure the computer to boot from our flash drive .
Those who know how to boot a computer from a flash drive can go straight to the end of this article. For those who don’t know how to boot from a flash drive, I’ll try to explain as clearly as possible:
============================================================================================
In order to “force” the computer to boot differently than usual (i.e. with hard drive), and from the device we need (in our case – from a flash drive) – we need to enable specific setting V Bios computer.
To get into this very Bios, we must immediately after turning on the computer press a certain key on the keyboard (and press not just once, but many, many times until we see the Bios on the screen).
On different computers On laptops this key is different:
- The most commonly used key is Delete(or Del ).
- You can also often call up the BIOS using the key F2(and on some laptops Fn+F2 ).
- Keys are used less frequently Esc, F1, F6 and others.
In general, immediately after you press the Power button on your computer or laptop, do not wait until it starts Windows boot, and immediately start pressing the key many times Delete on the keyboard. After a few seconds (5-10) you should see Bios.
If nothing like this appears, and your Windows starts loading as usual, then we don’t wait for anything else: we reboot our computer again (you can directly Reset button) and try to press another key many times - F2.
If you don’t get into the BIOS again, reboot the computer again and try pressing the next key - Esc. After F6 etc. But hopefully you won't have to experiment for so long: in the vast majority of cases, either the Delete or F2 key works.
By the way, a hint about which key to load the BIOS usually flashes at the bottom of the screen immediately after turning on the computer. But for some reason no one looks at her, or does not have time to look at her.
On different computers Bios different, and it looks different for everyone.
For example, on my computer it looks like this: 
On another computer it will be like this: 
On the third computer it’s like this:  That is, I say this because it is almost impossible to write separate instructions for each Bios.
The main thing that anyone who needs to configure booting from a flash drive should know: in the BIOS (no matter how it looks like for you) you need to find the section where the word is present Boot(from English “Loading”). By using the arrows on the keyboard to navigate to this section, we put it in first place in the list boot devices flash drive.
In Bios, the flash drive may be displayed with its own name (for example, Transcend), or as USB-HDD; There are other options. One thing is important: it must be selected as the first device from which the computer will boot.
Usually the flash drive is “raised” to first place using the arrows on the keyboard, or the keys +/- , or F5/F6.
Having set the setting we need in the BIOS, we must leave it, not forgetting to save changes made. To do this you need to go to the section Exit(it’s usually the last one) – and there select the item “ Save and Exit” (“Save and Exit”). And then confirm once again that we are leaving by clicking “ Yes”.
That's all: if you did everything correctly, the computer will reboot and loading will work already from the flash drive (press the Delete key again, or F2, or something else - no need!).
Many people don’t even want to bother creating a bootable flash drive with any software, because... They are afraid that they still won’t be able to configure the computer to boot from it. I tried to describe this entire process of booting from a flash drive in as much detail as possible. If you have mastered this text, I hope it has become at least a little clearer and now all that remains is to practice.
===============================================================================================================
So, I created a bootable USB flash drive on another computer with a password reset program. I insert this flash drive into my computer and turn it on.
Immediately I press the key many, many times Delete on the keyboard. After a few seconds I get into Bios.
Using the arrows on the keyboard, I go to the section Boot(although in my Bios you can work with the mouse - in older versions of Bios this will not work).
Here my first device now is hard drive
(ACHI PO: WDC WD50...): 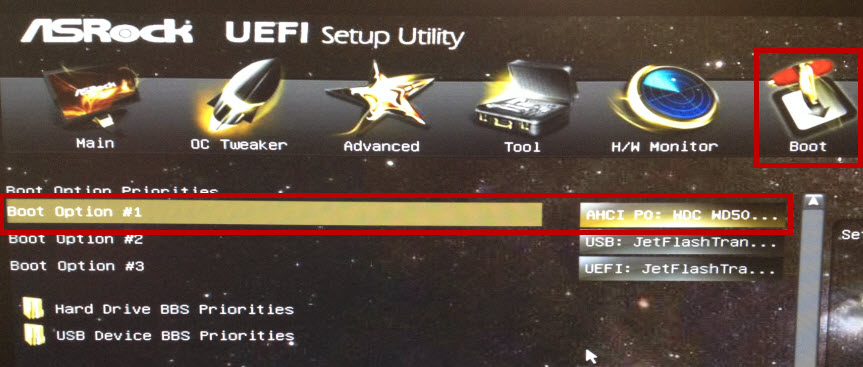 I select this line using the arrow on the keyboard and press the key Enter. A list of devices from which you can boot opens. In my case, this is a hard drive and my flash drive (it is listed here twice). We raise to the first place in the list - flash drive(if there is a choice: USB or UEFI, then choose UEFI). We do this using the arrows on the keyboard or keys +/-
, or F5/F6:
I select this line using the arrow on the keyboard and press the key Enter. A list of devices from which you can boot opens. In my case, this is a hard drive and my flash drive (it is listed here twice). We raise to the first place in the list - flash drive(if there is a choice: USB or UEFI, then choose UEFI). We do this using the arrows on the keyboard or keys +/-
, or F5/F6:
Now the flash drive is in first place in the list of boot devices: 
Now we exit here, saving the changes. To do this, move the arrow on the keyboard to last section Exit. Select the line Save Changes and Exit- press the key Enter:
Then select Yes:
After a while, a menu opens in which, using the key Enter we select an item Lazesoft Live CD:
Wait while it downloads: 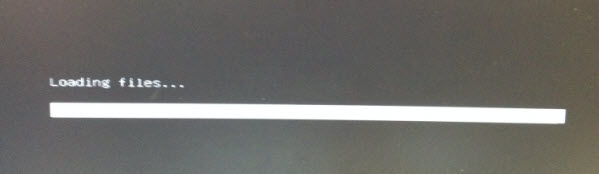
In the next window, check that the item is selected Reset Windows Password(“Reset Windows Password”) and press the button Next:
A window will pop up with a message about non-commercial use of the program - click Yes:
Click again Next:
In the next window highlight the username, whose password will be reset and click Next:
Click on the button RESET/UNLOCK:
The password has been successfully reset - click OK. Then Finish:
We go to “ Start” and press Reboot Computer(“Restart computer”): 
Click OK:
After the computer restarts, we can login to windows without password!
