A program to control monitor brightness. f.lux program for automatically adjusting monitor brightness
I've been using it for a long time great program so that your eyes don’t get tired of the monitor in the evening. The program automatically adjusts the brightness of the monitor screen.
Have you noticed how unpleasant the eerie blue glow of your monitor is at night?
Or you suddenly woke up at night and decided to write down a great idea, and you probably remember how unpleasant this blinding light of the monitor is. In general, working a lot is harmful, but in order not to overexert yourself, there is a program that will monitor the time you work.
Of course, during the day, computer or laptop screens look good, because they are designed to be used during the day in daylight. But at 9pm, 10pm, or 3am, you probably don't want to look at the sun.
Free program F.lux
F.lux fixes this. It adapts the color of your computer or laptop display to the time of day, warm color at night, and how sunlight during the day. That is, it adjusts the brightness of the monitor to the time of day. It's like lamps daylight and warm light.
Watch the video, it is in English, but I think you will understand and at the same time appreciate the capabilities of the program. The program itself is shown from 0:30.
When the sun goes down the program gradually starts to decrease color temperature so that the eyes are more comfortable, and in the morning it returns the color temperature, or in other words, brightness, back again.
How the program works.
For the program to work correctly, you just need to tell the program where you are. And then the program will do everything automatically by adjusting the screen brightness.
There is a program for Windows, Mac, iPhone/iPad and Linux Ubuntu
 It's easy to set up. In the settings you simply indicate, for example, your city. You copy the latitude and longitude coordinates, and then it will do everything automatically.

Where to download and how to install for Windows and Mac?
For Windows and Mac version you can tell right from the site.
How to install f.lux on Ubuntu/Mint?
To install on Ubuntu with a graphical interface, you need to do the following ()
sudo add-apt-repository ppa:kilian/f.lux
sudo apt-get update
sudo apt-get install fluxgui
If you have a different Linux or does not work in graphical interface. We do this:
wget -c https://justgetflux.com/linux/xflux64.tgz
or for 32bit wget -c https://justgetflux.com/linux/xflux-pre.tgz
tar -xvzf xflux64.tgz
rm -rf xflux64.tgz
sudo cp xflux /usr/bin/
sudo chmod 755 /usr/bin/xflux
And run xflux -l 59.93, 30.31
These are the coordinates for St. Petersburg
Don't forget to add it to autorun
©
Alexey Pruslin especially for the site
When using the material it is required active link to the source.
If you liked the article and blog, p write in social networks for new articles.
A laptop display uses more power than other components, so lowering the brightness will help extend battery life, and a dim or bright display can cause eye discomfort when working on a PC. To make your work comfortable, let's look at how to adjust the screen brightness on a laptop in Windows 7, 8, 10.
Laptop models vary, so brightness settings may differ from the recommendations outlined in the article. The material describes general steps applicable to manufacturers such as Acer, Asus, Hp, Samsung, Lenovo and others. There are enough ways to change the screen brightness, both standard and using third-party software. Let's look at all the methods in more detail.
Adjust brightness using a keyboard shortcut
Modern laptop models support changing the screen brightness with a keyboard shortcut, which makes it much easier this process. You need to hold down the Fn function button (located at the bottom of the keyboard near the left Ctrl, Win button), then press the up or right arrow keys to increase brightness, down or left to decrease. Keys F1 to F12 can also be used in combination with Fn.
All combinations depend on the model, the most common ones are shown above. Typically, the buttons used with Fn have a symbol that resembles a sun. The picture below shows the keyboard Acer laptop, where the combination Fn+ right arrow will make the screen brighter, Fn+ left arrow dimmer. If you can't find the sun symbol on your keyboard, check your laptop's manual to see if it has hotkeys assigned to change brightness.
Changing brightness through power settings
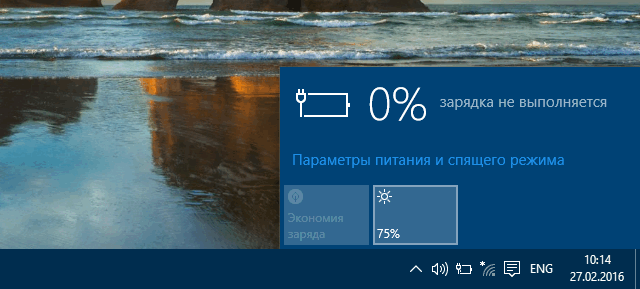
If your PC does not have a button combination assigned, or you need to fine-tune the screen brightness on your laptop in Windows 7, 8, 10, use the power options. Click on the battery status icon in the tray, then click on the “adjust screen brightness” link.
If there is no battery status icon in the tray, then launch the panel Windows management, specify the "small icons" view. Among the items, find “power” and click it.

At the bottom of the window, move the slider to a comfortable position. The changes will be immediately applied and saved.

To produce detailed setup screen brightness in Windows 7, 8, 10, click the “set up power plan” link next to the selected plan (see screenshot above). Move the sliders to set the brightness of the plan for battery and network mode. I also recommend setting up a sleeper Windows mode to save energy. Be sure to click the “save changes” button.

You can also change the screen brightness on your laptop by clicking on the link for additional power settings (see the picture above). Expand “screen”, then “screen brightness”. Next, select “from the network”, “from battery” and set the percentage. I also recommend setting up the laptop's hibernation mode. After changes, click OK.

Additional ways to change brightness
Go to Control Panel, select Large Icons view, and look for the Windows Mobility Center item. In the seven you can quickly launch it by pressing the Win + X key combination. Next, you just need to move the slider in the desired direction.

You can adjust the brightness of your laptop screen in Windows 8 through the settings panel. To call it, press Win + I. Next, click the brightness icon and adjust the slider. To call similar settings In Windows 10, click on the Action Center on the taskbar and adjust the settings.

Programs for increasing and decreasing screen brightness
There is a huge amount of software that allows you to adjust the screen brightness on a laptop. Many programs, in addition to adjusting brightness, allow you to change screen resolution, contrast, color scheme and other parameters. Such applications include:
- iBrightnessTray
- Display-Tuner
- Display Resolution Manager
- Many others
For example, let's look at a simple iBrightnessTray program that does not require installation. Download the archive with the application here, unpack it to a convenient place. Next, launch it, after which the iBrightnessTray icon will appear in the tray. Often the icon ends up in the hidden icons area, so you need to move the iBrightnessTray icon to a visible place on the taskbar (see the picture below).
Left-click on the icon, then move the slider and adjust the screen brightness. When you click on Screen Saver, the screen saver is activated, and when you click on the monitor icon, the screen turns off, which saves battery power.

Right-click the icon to open the menu, check Auto Start so that the program automatically starts when you turn on the laptop. Change Screen Saver function calls the change window screen saver, Exit turns off iBrightnessTray, other functions are described above.

Problems and solutions
After changing the brightness of the laptop, these settings are automatically saved. If the settings are not saved after rebooting the laptop, it is likely that they are being overridden in the power options. Go to the settings of the selected power plan and carefully set the values you define.
If you notice that the brightness level itself changes, then the automatic brightness adjustment option is probably enabled. To disable it go to additional options power plan, then turn off adaptive brightness and click OK.

Often, video drivers cause problems with brightness. Problems usually occur after updating video drivers. To solve the problem, do the following:
- Open Device Manager.
- Find the “monitor” device and expand it.
- Remove all monitors shown.
- Next, update the hardware configuration to detect the monitor and install the driver for it.
This article is about how to adjust the brightness of your computer screen automatically and manually. To ensure that everything is clearly visible on the screen, you can manually increase the brightness if you are in a bright room, or, say, outdoors in bright sunshine. Or when you are in a dark room, the opposite is true - you can reduce the brightness so that your eyes do not strain. This will also help save energy and, accordingly, the laptop battery charge.
Besides manual change brightness, you can have Windows automatically adjust the screen brightness based on your computer's power connection, battery charge level, or by using the ambient light sensor found in many modern devices.
Manually adjusting the brightness of a laptop or tablet screen
On laptops, you can quickly increase or decrease the brightness using a keyboard shortcut. You can find them among function keys f1 - f12, which are located above the number keys. Find a key that has an icon corresponding to brightness, often a sun or something similar, and press it.
Because these keys are multifunction keys, you may have to press them in combination with the Fn key (hold) at the bottom left of the keyboard.
If you don’t have such keys on your keyboard, or you’re using a tablet, you can adjust the screen brightness right inside Windows.
In Windows 10, click on the battery icon in the notification area and click on the corresponding tile, which will change the brightness by 25% with each click. You can do the same by opening the notification center on the taskbar, or swipe from the right edge if you have a tablet.
You can also find this option in the Windows 10 system settings. To do this, open Settings through the Start menu, select System and then Display in the left menu. There you will find a slider with which you can change the brightness level.

In Windows 7 and 8, this option is located in the "Power Options" section of the "Hardware and Sound" section in the Control Panel. At the bottom of the window you will see a “Screen Brightness” adjustment slider.

You'll also find this option in Windows Mobility Center. Right-click the Start menu and select Mobility Center (Windows 10 and 8.1). On Windows 7, press the Win + X key combination.

Monitor screen brightness
Everything we have discussed above is mainly applicable to laptops, tablets and all-in-one computers. However, if you are using a desktop PC or even a laptop/tablet with a monitor connected to it, you will have to adjust the brightness in the monitor itself. In addition, you will not be able to set automatic adjustment.
Since the menus and settings of each monitor model are different, I cannot give you step by step instructions how it's done. However, you can figure it out yourself by picking up the user manual (the book or leaflet that came with the monitor) or even without it. To do this, you just need to open and understand the menu and settings of the monitor by clicking on the buttons, which are usually located in the monitor itself next to the power button. In some monitors they may be located on the back side.
You can also increase or decrease the screen brightness using third party programs such as Screen Bright or Display Tuner, although these will not work with all monitors.
Automatic brightness change:
1) Depending on the power supply connection
In laptops or tablets you can install automatic change brightness level depending on how the device is connected to the power supply. For example, you can set the brightness to maximum level when you connect to a power outlet, and on low when food is coming from battery. Windows will change the brightness automatically.
To do this, open Control Panel > Hardware and Sound > Power Options and select “Adjust power plan settings.” Here you can adjust the screen brightness for both modes: “On battery” and “On mains”.

2) Depending on the battery charge level
You can set the display backlight to automatically adjust based on the battery level of your laptop or tablet. In Windows 10, this is called “Battery Saver”, which is located in: Settings > System, where you need to find and click the “Battery Saver Options” link.
In the window that appears, make sure that the option “Automatically enable battery saving when the battery level is lower” is enabled and set the percentage to the value you need (by default, the option will take effect at 20% battery charge). Unfortunately there is no way to set a precise (automatic) brightness level, use the battery icon in the taskbar or others instead manual methods, given above.

3) Depending on lighting conditions
Many modern devices have an ambient light sensor that adapts the screen brightness to the external light conditions, automatically increasing the brightness when you are in a bright area, and vice versa - decreasing when you are in low-light conditions.
Some users find it convenient, while others think it’s the opposite. In any case, you can always disable or enable this option by going to: Control Panel > Hardware and Sound > Power Options > Configure power plan (current scheme, of course). Next, select “Change advanced power settings,” then expand “Display” and then “Turn on adaptive brightness.” Here you will see two options that allow you to adapt the brightness based on the ambient light for the two schemes.

Users of the Windows 7 operating system often encounter a problem screen brightness settings. To fix this problem, we will take everything apart available methods display brightness settings in Windows 7. Adjusting the screen backlight is a fairly simple process that even a novice user can handle. After familiarizing yourself with the material, you will be able adjust the brightness yourself laptop or desktop computer.
Adjusting brightness using standard Windows 7 tools
To set the brightness of a laptop or all-in-one PC standard means sevens, the first thing you should do is go to Control panels. You can go to the Control Panel through the menu " Start"or type in the program " Execute» control command
After launch Control panels you need to go to the "" section.

You can now increase or decrease the screen backlight. To do this, set the slider " Screen brightness» to a position that matches your monitor backlight preferences.

You can also go to settings power plan and exhibit brightness, in which the laptop will operate on battery power or mains power.

Changing screen lighting settings using the video card driver
One more in an interesting way The display illumination change is adjustable using video card drivers. For our example, we will consider a driver from the company Nvidia. To open the video card driver settings, you need to right-click on empty space Desktop. A context menu should appear.
In this menu, select the item “ NVIDIA Control Panel"(this may be different for another video card), after which the video card driver settings panel will open.

Now in this panel you need to go to the menu “ Video\Adjust color settings for video».

In the color adjustment menu, go to the “ 2. How to make color adjustments" and set the switch " WITH NVIDIA settings " By selecting these parameters, you will be able to adjust four properties, including display brightness. To increase or decrease the brightness of the display, drag the slider to plus or minus and you will see how the screen backlight changes.
Video card manufacturers also have such programs that regulate screen lighting using the video adapter driver. Intel And AMD.
Also on the Internet you can find many programs that adjust the display backlight. All such programs work by accessing the video adapter driver. That is, in essence, they do what you can do in the control panel of the video card (in our case Nvidia). The most interesting of all such programs is F.lux. Her main feature is automatic adjustment of display backlight, which depends on the time of day.
An example of adjusting the laptop backlight using the Fn key
For example, we will use a Lenovo s110 netbook with operating Windows system 7.
It uses the Fn modifier key in combination with the ← and → cursor keys to adjust the backlight. To increase the backlight Lenovo laptop s110, you must use the key combination Fn + → . To lower the backlight you need to use the combination Fn + ←.
 As you raise or lower the backlight, you will see how the value of the graphic indicator changes. The program is responsible for this indicator Hotkey Features.

As you can see, increase or decrease the laptop screen lighting settings using the " Fn", quite simply. You can use this example on other laptops, since the principles of using modifier keys are the same.
Particularly on laptops SAMSUNG NP350 keyboard shortcuts:
- to increase brightness - Fn + F3;
- to decrease - Fn + F2.
Manually adjusting the monitor backlight
For users desktop computers Screen lighting settings can be adjusted on the display itself. For example, we will use a monitor LG Flatron W1943SS. To adjust the lighting, you need to go to its menu. To do this, press the MENU key on the monitor control panel.

After this, press the AUTO/SET key. A brightness adjustment window should open where you can change it.

I would also like to note that the monitor settings do not depend on what OS or driver is installed. They are regulated exclusively in the monitor. Each monitor from different manufacturer has its own parameters manual settings . You can find out the details of adjusting the screen lighting parameters of a particular monitor in the manual, which is included with the sale or can be downloaded from electronic form on the manufacturer's website.
Let's sum it up
This material shows that even a novice PC user can increase and decrease the brightness of the display in Windows 7. And we hope that our material will help you learn how to change the brightness of your computer monitor.
Video on the topic
All people want to sit and work at a monitor that displays well, especially if it accurately conveys all the color shades and details of the image, both in light and in shadow. It is in order to configure the monitor in this state that special calibrators are needed - hardware programs that use certain metric sensors and software. They are recommended for use when professional work with color shades.
Program for calibrating monitors from Samsung and other manufacturers
However, calibrators are not cheap, and only computer specialists can use them. For ordinary users Special programs have been created that help configure the display using a natural indicator - the human eye. Such a monitor calibration program uses certain test images and parameters and functions of the video card, transferring to the operator the task of monitoring the accuracy and correctness of the adjustment.
The most commonly adjusted functions are brightness, contrast, and gamma settings. The last parameter is responsible for the screen’s response to the set values for image color and its intensity. For the most part, the standard gamma coefficient adopted for the Windows system is 2.2.
Where does calibration of a laptop and PC monitor begin?
Setting up the display begins with arranging the workplace. Its external lighting should be constant and directional. The main thing is that the light does not shine into the operator’s eyes and does not create glare on the display.
Great importance is paid to the color of lighting. Most experts recommend ordinary lamps or fluorescent lamps. Even such a detail as the behind-the-screen background should be equipped with calm tones to ensure uniform illumination and color neutrality that does not irritate the eyes.
In addition, laptop monitor calibration should take place on a warm monitor, which allows the backlight parameters to stabilize. To do this, according to some research data, it needs to be kept on for 0.5-1.5 hours. In this case, all various modifiers, especially those responsible for brightness and contrast, all image quality enhancers, must be turned off.
Many experts advise paying close attention to the displays of laptops and monitors that support the TN + Film matrix, since the picture quality on these screens depends on the angle of inclination.
When calibrating such a monitor, the display angle must be constant, otherwise all the adjustment work will be in vain. After all, even a small change in the viewing angle of the image greatly changes the test picture.

Setup process
Monitor calibration at home is done using special programs, which are based on changing the image settings by the capabilities of the monitor and software equipment, while simultaneously monitoring the result of changes according to appearance test pictures. Such patterns have a mesh or lattice appearance. The user, by making changes to the brightness, contrast and gamma settings, tries to achieve complete merging of image areas with the background.
However, it is worth keeping in mind that calibrating a monitor at home is a labor-intensive process for human vision, especially when using color substrates. For high-quality and accurate adjustments, you will need to spend a lot of time in front of the computer display. At this time, the eyes may get a “defocus” effect, so it is strictly recommended to periodically give the eyes a rest during the calibration process. But still, vision can only give a subjective assessment, which means the result of the adjustment will also be subjective.

As practical research has shown, thoughtless and ignorant actions to set up a video system, during which a program is used to calibrate a laptop monitor or personal computer, often only lead to a deterioration in the quality of the depicted picture. It is necessary to have a full understanding of exactly what, how and why changes in the settings will be made. If there is no such understanding, then it is better to leave all the factory settings, especially for displays that already have a decent amount of work experience.
Now we will look at popular and famous programs, helping to carry out high-quality work on changing display parameters.

Atrise Software LUTCurve App
Most experts agree that this utility is best program to calibrate the monitor. It has a wide range of functions for customizing screens. True, in order to make the most of its capabilities, you need to carefully study the instructions, which are written in English. For example, in the program description, owners of laptops and TN-matrix monitors are strongly recommended to maintain a constant viewing angle on the display.
On the first page of the program are written basic parameters arrange the workplace before setting up the display and find the rules for setting the system profile and colors. The application supports sRGB color space. and gamma are set at 6500 K. The utility can work in a multi-monitor configuration, producing fine tuning any device.
Calibration program monitor Atrise Software LUTCurve in its work relies on the maximum sensitivity of the human eye to gray color. That’s why all test pictures are made in neutral colors.
But the program also has its drawback - it lacks a hardware sensor. Its settings are based on the factory brightness settings that are set by the manufacturer in the display settings. But very often this method gives negative results, especially on old or used monitors that have already lost these settings. The advantage of this utility is the ability to adjust the gamma by three elements at all 256 points. However, setting parameters using this data is a task for a patient person who has a lot of time at his disposal, and this method leaves a lot of subjective perception.

Eberhard Werle QuickGamma utility
This program is for calibrating monitor colors and adjusting gamma to 2.2. The set of functions and instructions are minimal. More full information settings can be found in the “Help” menu. There are also links to the applications necessary for the program to work.
The test picture is made in the form of horizontal columns. Calibration occurs on the principle of orienting the degree of their fusion with background. This is hard on the eyes, especially if the picture takes on the color component from RGB substrates.

Program TFT Test 1.52
This application has a set of 12 pictures for adjustments and comparisons of displays. The utility contains sample data to check screen resolution, accuracy and geometry. Calibration program TFT monitor Test 1.52 with its gray and color, linear and circular smooth saturation gradients allows you to compare the quality of brightness and contrast calibration and the quality of halftone reproduction. To monitor performance, the program has two built-in tests for the response speed of display elements.
PassMark Software MonitorTest
This monitor calibration program contains 13 test images that are designed for adjusting plain and LCD displays. These test pictures allow the professional, using the monitor's tools, to adjust the gamma parameters so that the displayed picture detail appears correctly over a wide range of brightness.
The only drawback of the application is that it does not have tools; all changes are made only through the monitor’s “menu”.
It must be recalled that testing the performance of LCD screen and electronic display components involves a number of contrasting objects that simultaneously move with at different speeds. But, according to experts, the frequency of movement is designed for old models of monitors, for new ones modern models this frequency is no longer sufficient for testing.

Bottom line
There are many programs for setting up monitors, but each of them requires the user to have the ability and knowledge to use it. As already mentioned in the article, if a person does not know how to use the tools of calibration utilities, then it is better to leave the factory settings alone. Well, if you still need to make color corrections, especially on old, worn-out monitors, and you don’t have enough knowledge on how to do this, then it’s better to contact specialists who will carry out the calibration safely and harmlessly. All of the programs described above and those that were not included in the review of this article are intended to work at a professional level. Not every user can customize their display using these applications.