Create a bootable Windows 10 USB flash drive from iso. Errors when writing a Windows installation flash drive. Installation Media Creation Tool - Basic utility for reinstalling the system
Many computer users are aware of the growing popularity of the newfangled OS and would like to get to know it better. Microsoft gives everyone the opportunity to try it at work. There are several installation methods, but in this review we’ll talk about how to burn Windows 10 to a USB flash drive to make it bootable. Despite the fact that there are many such methods, none of them is anything complicated.
Why do you need a flash drive if you can carry out the whole operation the old fashioned way: download a system image, burn it to a DVD and install a new operating system from it.
But most modern laptops and netbooks are not equipped with a DVD drive. Then what to do, the answer is simple - use a removable drive. This method has a number of advantages:
- there is no need for a DVD drive;
- speed of data deployment is higher;
- the ability to install the OS on all modern devices;
- compactness of the carrier;
- The volume of stored data exceeds the capacity of a standard DVD disc;
- can be used as a regular flash drive.
In addition, many manufacturers supply the necessary software along with the flash drive to make it bootable.
Which flash drive to buy. If you intend to use it as boot disk with OS or Live CD, then expensive as well as fast portable device no need. The data will be written once, and any reading speed is enough for Windows installations 10 per USB. A volume of 4–8 GB is enough to fit not only the OS image, but also auxiliary programs. And transfer Windows ISO image 10 per USB device is possible in different ways.
Copying files from an image to storage media
This method is suitable for computers that have motherboard configured for UEFI boot. In the last 2-3 years this has been possible for many motherboards.
You need a Windows 10 ISO image and a FAT32 flash drive. All that remains is to transfer the system image to this drive.
And a program like . will help reveal this data.

Allows you to see all image files.

Now all content can be copied and then transferred as is to the drive.
If the laptop on which the new software shell is installed supports UEFI mode, then there should be no problems starting the installation of the new Windows 10 OS.
Russian version Rufus works well for all machines with regular BIOS that do not have UEFI. It will also help create bootable USB flash drive with Windows 10. The program belongs to the category of lightweight utilities. Its weight is about a megabyte. But, nevertheless, it is well suited for these purposes.
After starting the program, the user will see the window shown below.

Let's look at its points in more detail:


We can add to the above that this program is one of the fastest in its category.
Microsoft utility
The official Microsoft website makes it possible to upgrade to version 10 using a proprietary utility, which can be downloaded there.
With its help it is possible to move from previous version OS for ten, and write a bootable flash drive for Windows 10. The future OS media must be prepared in advance, that is, formatted in FAT32.
Let's look at how this utility works:

But now the process of downloading files and forming the installation flash drive itself will begin.

All you have to do is be patient and wait for the process to complete. The better the Internet channel, the faster the time will pass for downloading a large amount of data (about 4 GB).

Then you have a choice:
- immediately start the update process with the “setup.exe” file;
- perform a clean installation.

Necessary addition to the above:
- Software from Windows developers is successfully used for versions: 10 Pro, 10 Home and 10 Home Single Language. But update Windows 10 versions Enterprise type or Education will not work because the program does not support them.
- It will also not be possible to update systems 7 and 8.1 corporate editions.
- It is also impossible to upgrade from Vista or XP to version 10 in this way.
- If updated licensed Windows from installation media to tens, then a product key is not required for activation.
Windows USB/DVD Download Tool
Just like the program Windows USB/DVD Download Tool was available on the Microsoft website and was considered official for the transition to Windows 7. But the corporation stopped openly distributing exactly this software on its website due to numerous requests for use open source access. At the same time, they admitted that this program was developed by third-party programmers, and it was they who were to blame for this incident.
Despite the fact that this utility is no longer on the official website, it can be found and downloaded from third-party resources.
Let's look at how to use it to create a bootable flash drive with Windows 10:

The end of the process will be notified by the message: “Bootable USB device created successfully". Now you can install Windows 10 on your computer from this drive.
Belongs to the category of programs that do not require installation. Just unpack from the archive the required version x32 or x64 and run it.
Let's look at the process of creating a bootable USB flash drive using this program.
In general, in addition to this function, the program’s capabilities are expanded by three additional tools, which also make it possible to create boot drive and for other operating systems. In principle, you can start all processes at once and make a multiboot flash device.
But in in this case we are interested in the possibility of downloading a Windows 10 image. The process consists of the following steps step by step:
- Select the desired USB drive. It must be remembered that all data from it will be erased.
- Place a check mark next to the line “ Autoformat it with FBinst" This will automatically format the flash card into the desired partition.
- Let's check the box which process we are going to activate. And in the same window, in the field where it says “for Windows Vista, 7, 8", we show the path to the image with Windows 10.
- Click the Go button.
- All that remains is to agree with the two pop-up messages and wait for the process to complete.

When copying files from your computer to storage media, the program may seem to freeze. Calm down. You just need to be patient and wait for the application to finish.
Conclusion
We tried to show how to write in different ways Windows image 10 per flash drive. The review contains both proprietary utilities from Microsoft and others free apps to create an installation USB drive with the original image of dozens. Now you have the opportunity to both update your OS and restore the existing one.
Video on the topic
New Windows version, which, as we know, will be the last, received a number of advantages over its predecessors. It has new functionality, it has become more convenient to work with and it has simply become more beautiful. However, as you know, to install Windows 10 you need the Internet and a special bootloader, but not everyone can afford to download several gigabytes (about 8) of data. This is why you can create a bootable USB flash drive or boot disk with Windows 10 so that the files are always with you.
UltraISO is a program for working with virtual drives, disks and images. The program has very extensive functionality, and it is rightfully considered one of the best in its field. This is where we will make our bootable Windows 10 USB flash drive.
How to create a bootable USB flash drive or disk with Windows 10 in UltraISO
To create a bootable USB flash drive or disk, Windows 10 must first be downloaded to a media creation tool.

Now we launch what we just downloaded and follow the installer’s instructions. In each new window, click “Next”.

After this, you must select “Create installation media for another computer” and click the “Next” button again.

In the next window, select the architecture and language of your future operating system. If you can’t change anything, then simply uncheck “Use recommended settings for this computer”


After that, specify the path for your ISO file and click “Save”.

After this it will begin Windows boot 10 and saving it to an ISO file. All you have to do is wait until all the files are downloaded.

Now, after Windows 10 has successfully loaded and saved to an ISO file, we need to open the downloaded file in the UltraISO program.

After that, select the “Bootboot” menu item and click on “Burn image hard drive» to create a bootable USB flash drive.

Select your media in the window that appears (1) and click Write (2). Agree with everything that pops up and then just wait for the recording to complete. During recording, the error “You need to have administrator rights” may pop up. In this case, you need to look at the following article:

If you want to create a bootable Windows disk 10, then instead of "Burn hard disk image" you should select "Burn CD image" from the toolbar.

In the window that appears, select the desired drive (1) and click “Burn” (2). After this, we wait for the recording to complete.
Of course, in addition to creating a bootable Windows flash drives 10, you can also create a bootable USB flash drive for Windows 7, which you can read about in the article at the link below:
With these simple steps we can create a bootable disk or bootable USB flash drive for Windows 10. Microsoft understood that not everyone will have access to the Internet, and specially provided for the creation of an ISO image, so this is quite simple to do.
With the release new version Windows, the developers have presented users with a special proprietary utility with which we can create a bootable USB flash drive for Windows 10. This utility is called Windows 10 Installation Media Creation Tool.
Pay attention! Using this utility, you can install only the original image of Windows 10 Professional or Home versions and for one language. At the same time, the created flash drive is suitable if you have a license key for this product or you have previously updated old version Windows to the last, then when logging in account Microsoft system will be activated automatically.
Let's proceed directly to the installation. Download Windows 10 Installation Media Creation Tool from the official website. Pay attention to the bit size of the program; you need the same version as the one you currently have Windows installed (32 or 64 bit).
After launch, proprietary utility will ask you what you want to do:
- Update this computer;
- Create a bootable USB flash drive for Windows 10;
Since we need a flash drive with the system, we choose the second option.
Next, the following program window will open, in which you and I will need to select the language of the Windows to be installed, Windows edition 10 (Pro or Home) and architecture (32 or 64 bit) and click the “Next” button. 
To complete the settings, you and I need to specify the media on which Windows 10 will be written. Select the “USB flash memory device” item. After clicking the “Next” button, the program will download Windows distribution 10 from the official website and write it to a flash drive. 
At the end of this procedure, you will have a ready-made bootable flash drive, with which you can, as well as restore it after.
This method is not suitable for all computers. Prerequisite– with UEFI software support ( in simple words The board must support EFI boot).
Advice! As a rule this function I support almost all modern motherboards.
In order to create a bootable USB flash drive for Windows 10 using this method, you and I will need a downloaded ISO image of the system, as well as a flash drive formatted in the FAT32 file system (this is required).
In order to write an image to a flash drive, you need to follow these steps:

As you can see, we are slowly but surely moving on to consider how to create a bootable Windows 10 USB flash drive using third party programs. This method is suitable for all those who, for some reason, were unable to use the previous two methods.
Rufus – special program, which will allow you to make a bootable USB flash drive in a couple of mouse clicks. By the way, the program is completely Russified and is suitable for all users.
To make a bootable USB with Rufus, you just need to specify the path to USB storage in the "Device" line. 
Specify what the program needs to do. In our case, “Create a boot disk.” Specify the path to the ISO image and click the “Start” button. After this, the program will format the flash drive and write the image. Upon completion of the process, you will have a ready-made bootable USB flash ka.
As you probably already guessed from the name of the item, you can create a bootable Windows 10 USB flash drive using another popular program– UltraISO. This program designed to work with disk images. Therefore, it is just ideal for our purposes.
The UltraISO program is paid, but, like most programs, it has trial version, which is enough for us to create a bootable USB flash drive.
In order to create a bootable Windows 10 USB flash drive from an iso image using UltraISO help You and I need to complete the following steps:

How to create a bootable USB flash drive in UltraISO will be described in more detail in a separate article.
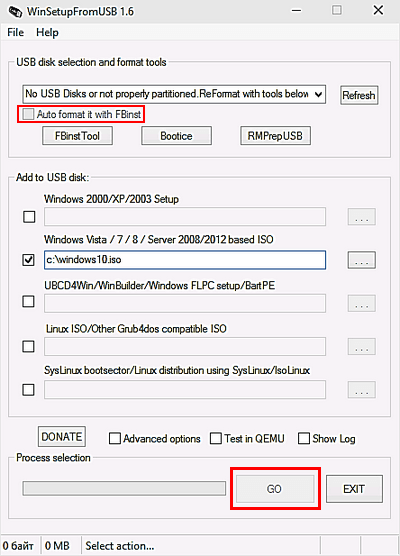
WinSetupFromUSB is a small special program for creating bootable USB flash drives with Windows. It is perfect for creating a USB flash drive with Windows 10.
Setting up the program before recording is quite simple. 
- We will need to indicate where it is located installation image operating system on the hard drive;
- You will need to select the USB flash drive on which the system will be recorded and check the “Auto format it with FBinst” checkbox. After the settings have been completed, click the “Go” button.
Conclusion.
In this article, we looked at how to create a bootable USB flash drive for Windows 10. As you can see, you won’t have to create a bootable USB flash drive. a lot of work and any user can cope with this task. You will need an operating room image Windows systems 10 and a program for writing an image to a flash drive. After this, all you have to do is install the operating system on your computer, but that’s a topic for another article. It is advisable to keep such a flash drive always at hand, as it will help you not only when restoring the system after serious failures, but also for performing clean install systems.
In this article, we will look at two ways to create a bootable Windows 10 USB flash drive that will be suitable for you to install, restore or reinstall the operating system. I note that the bootable USB flash drive is on at the moment is the most popular and convenient media for installing Windows 10, because... compared to DVD disc provides much greater speed of the process.
Method 1: Create a bootable Windows 10 USB flash drive using the official Media Creation Tool from Microsoft
This official way creating a bootable USB flash drives. It's not the fastest, but it's the most correct. When using this method you will create a bootable USB flash drive containing Windows 10 latest build with almost all the latest updates.
Click on the button Download the tool now. This will start downloading the file:
2. Run the downloaded file. Wait for the program to start (about a minute). Then click Accept.
3. Select Create installation media... and click Next:

4. Select the language that is convenient for you, OS edition (home or professional), bit depth (in most cases it makes sense to choose 64-bit) and click Next:

When choosing an edition, remember that you must have the appropriate Home or Pro edition license. For example, if you upgraded Windows 8.1 to Windows 10 at one time and received Pro version, then select Pro. If you had the Home edition on the computer where you want to install (or reinstall) the OS, then Pro will not be activated for you.
5. Select USB flash memory device, connect the flash drive to the USB port and press Next:

Important note! If you want to create several bootable flash drives with “ten”, then at this stage you better select the ISO file item. In this case, the program will save the Windows 10 image to your computer and you can then burn it to different media using another method, which I described in the next paragraph. This procedure will take much less time than if you create each bootable USB drive in the utility Media Creation Tool from Microsoft.
6. The flash drive must be determined in the section Removable media . Click on the button Next to start the process of creating an installation flash drive:

When the preparation of the Windows 10 bootable USB flash drive is completed, you will see the following window:

Method 2: Create a bootable Windows 10 USB flash drive from an existing .iso image
If you have already downloaded an iso image, you can also create a bootable one Windows flash drive 10. I will note what to use this method only makes sense if the downloaded image is fresh. You should not write the old ISO onto a USB flash drive, because... After installation, you will wait a long time for updates and may even have to restart your computer several times.
So, to record an existing Windows ISO images 10 to a flash drive, follow these steps:
1. Connect the USB flash drive.
2. Launch the UltraISO program.
3. Open the disk image:


5. Click Write down and wait for the process to finish:

Let me remind you once again: the first official method is preferable, because using it you will always have the most latest version Windows 10 with (almost) all updates at the time of media creation.
Good day!
To install Windows, many users are increasingly resorting to flash drives. This is understandable, because installing an OS using a flash drive has a number of advantages:
- Files are copied from it faster, which means the installation will be completed in less time;
- You can put the flash drive in any of your pockets and always have it at hand;
- it can be connected to a laptop, PC, netbook - to any device with a USB port (and many modern laptops do not have a CD/DVD drive at all...).
In this article I will look at several current methods creating a boot boot (it is also sometimes called installation) flash drives with Windows 10.
Advice!
Method 1: Through a tool from Microsoft
Pros: suitable even for those who do not have an ISO image with Windows (we will officially download it); normal Windows without hard-wired problems; you can simply update your old OS (without a classic reinstallation); official method from Microsoft.
Minus: you need a fast and good Internet channel to Microsoft servers.
We are talking, of course, about the instrument - . To download this utility, you need to go to the official website of the program.
Microsoft Media Creation Tool
Brief description: special a utility from Microsoft that allows you to download an ISO image from an official site. company server and create using it bootable media(flash drives, external drives etc.). The tool is intended for Windows 10 OS only.
After downloading and launching the program, you will first be asked to accept license agreement(I won’t cite it here). If you accept, then you need to do the following:

Basically, there is nothing more to comment here: now you either have an ISO image with Windows 10 - and you can burn it to a DVD (or on a flash drive, I’ll talk about this later in the article), or you already have a bootable USB flash drive (it all depends on what you chose in step 3, see description above).
In general, in my opinion, this tool from Microsoft is very convenient and effective for preparing installation media (what was missing for so long before...).
Help!
You might find this article useful on how to burn an ISO image to a USB flash drive. - (there are a couple more ways listed there).
Method 2: Using Rufus utility (BIOS, UEFI)
To run the program, you need an ISO image (for example, the one we created in the previous step).
Utility for work - Rufus
![]()
One of best utilities for recording bootable USB flash drives. Despite its small size, the utility is very multifunctional. The most important thing: allows you to write flash drives both for classic installation (from under BIOS) and on new PCs with UEFI support. For “contrast”, I will consider both options.
How to create a bootable USB flash drive in Rufus (Important! All data on the flash drive will be deleted when performing this task) :
- insert the flash drive into the USB port and run the program as administrator (just right-click on the utility icon and select it from context menu) ;
- Device: specify a USB drive (special attention - if you have several flash drives/disks connected to your PC);
- Partition layout and system interface type: MBR for computers with BIOS or UEFI-CSM; (if for UEFI - indicate GPT for UEFI computers);
- File system: NTFS (for UEFI - FAT 32);
- Cluster size: 4096/8192 bytes (default);
- New volume label: custom field;
- Quick formatting – Yes;
Create an extended label and device icon – Yes; - Create a boot disk - ISO image. Click the button and specify the path to the Windows 10 image(for UEFI, specify the Windows 10 64-bit image). Check the option Standard installation Windows;
- The last step is pressing the button "Start", the program will ask you again about formatting the media. We just agree and wait for the operation to complete (all setup steps are shown in the screenshots below).


Method 3: Using UltraISO
Ultra ISO
![]()
One of best programs for working with ISO images: allows you to create them, write them to flash drives and CD/DVD discs, edit them, change them, extract files from them, etc. In general, an indispensable tool if you work with ISO images...
To create an installation flash drive in UltraISO, you need to do the following (we'll look at it step by step).
1) First you need to download and install UltraISO (this is standard, I don’t consider it), and run the program as administrator (to do this, right-click on the program icon and select this option in the context menu)!

2) Then you need to open the ISO image - click File/open, or you can press a combination of buttons Ctrl+O .

Opening an ISO image // UltraISO
2) If the image opened and there are no errors, then click menu (see screenshot below).

Write down image of a tough UltraISO disk
3) In the next step you need to set the basic recording settings:
- disk drive - specify the letter of the flash drive (Attention! If you have 2-3 flash drives connected to your PC, you can easily make a mistake. All information from the flash drive will be deleted during the recording process!);
- recording method: USB-HDD+ (if the flash drive won’t boot into anything, try specifying the option USB-HDD no pros/cons);
- then click the button "Record" .

Recording Settings // Ultra ISO
4) Actually, all you have to do is wait until the information is written to the flash drive. The recording time depends on the speed of your USB port, the ISO image (the number and size of files on it), and the PC load.

The recording is completed successfully - the installation flash drive is ready!
Method 4: Direct recording to a flash drive
Important! Such a flash drive will only work on modern computers/laptops with UEFI support (if you created a flash drive using this material, but the computer does not see it, most likely you do not have UEFI, but BIOS. Just rewrite it using the first three programs/methods: Microsoft Media Creation Tool, UltraISO, Rufus).
Great free archiver, which supports dozens of formats: 7z, rar, zip, etc. It can extract files from an ISO image (which is what is needed for this task).
Probably the most famous archivist in Russia. In general, it is in no way inferior to the first, and also allows you to extract files from ISO.
1) First you need to format the USB flash drive. To do this, go to "This computer", right-click on the flash drive and select "Format" (as in the screenshot below).

2) File system specify FAT 32! It is also recommended to do quick formatting(clearing table of contents).
Important! All data from the flash drive will be deleted when formatted.

Note: To do this, simply right-click on ISO image and in the context menu select 7-Zip/open (as in the screenshot below).

4) Then simply extract all the files from the image to your flash drive. For this purpose in 7-Zip click the button "Extract", and then select your drive. In general, everything is quite simple. Similar actions will be carried out in WinRar.

After all the files have been extracted to the flash drive, you can proceed.
That's all, good luck and quick installation Windows 10