Recovering data from a locked ssd. Deleting and recovering deleted files from a USB drive or external SSD drive
In those days when mechanical hard drives with spinning platters were the standard, you could just give your old hard drive to a friend, hear “Thank you”, and that was the end of it. With modern solid-state drives, things are not so simple.
In many cases, used SSDs are no longer as fast as new ones, although they are still faster than the latest hard drives. The most big problem when selling SSDs after a long period of use, it comes from the inconvenient characteristic of NAND flash memory: previously written cells must be erased before new data can be written to them. If an SSD is forced to reuse cells to store data instead of using new ones, performance drops sharply.
To avoid this problem with NAND flash memory, modern SSD controllers use a number of techniques, including creating additional volumes that users cannot use - a technique known as over-provisioning. There is also a command called TRIM, which tells the SSD when blocks of memory are no longer needed and can be merged and erased.
Sounds good, doesn't it? But there is one problem.
Not all garbage collection (as the erasing of used cells and merging data in NAND memory is called) is created equal. The build can be inconsistent, and some older operating systems—Windows XP in particular—don't even support the TRIM command. Thus, the most frequently used NAND cells may remain on the SSD longer than you suspect.
In Windows 7 and 8, users don't have to worry about all this. The performance of modern SSDs should not noticeably deteriorate for many years, perhaps longer. But there are several scenarios where these idle cells can hit SSD performance, such as long-term use in an environment without TRIM support (for example, in XP), after the disk is almost full and large amounts of data have been deleted, or simply by changing partitions and formatting.
Yes, simply deleting files, changing partitions and formatting the drive does not work the same as on an HDD. These operations occur at a higher level than those where garbage collection occurs. In fact, due to the complete lack of utilities that perform a full garbage collection, there is only one way to return an actively used SSD to a pristine state so that it becomes as good as new - the ATA secure erase command.
Secure erase
The feature, built into every ATA-based drive (SSD and HDD) since 2001, erases everything on the drive and marks the cells as empty, restoring any modern SSD to factory performance.
Once upon a time, it was possible to trigger secure erase only through utilities command line, such as HDparam in Linux or HDDerase in DOS, developed at the University of California at San Diego. But now many SSD and HDD manufacturers provide free utilities, such as OCZ's ToolBox, Samsung's Magician, or Seagate SeaTools, providing the ability to securely erase.
Although the command itself is standard, many utilities only work with drives from their own company. If the manufacturer does not provide a secure erase command, you can use the DriveErase utility included with Parted Magic.
Additionally, secure erase is not routine maintenance for most users. If you're using Windows 7 or 8, you don't need to apply it unless you need to clean up the disk. If you're using XP, only perform secure erase when you really notice a drop in performance. Evidence of this is short-term hangs of the interface or freezes when saving files.
Here's how to recover your SSD step by step.
If you have data on your drive that you want to save, run backup to another medium. If we are talking only about files, you can simply drag them onto a flash drive or external hard disk, or use a backup program.
If you have a working operating system that you would like to keep, you will need to use a disk imaging program such as Acronis True Image or R-Drive Image, which copies everything. Do not use Windows System Recovery if you are restoring data to a different drive. It will not recover smaller drives, and sometimes struggles even with similarly sized drives that have enough free space.
Before you begin, disable all other drives and boot from your flash drive to perform the erase procedure to avoid accidentally overwriting the wrong drive. Parted Magic is an excellent choice because the program works as a bootable flash drive. If unplugging your other drives seems like a daunting task, make sure you select correct disk, which needs to be erased. Secure erase is irreversible.
Now run the secure erase feature. Exact method depends on the program. A guide to erasing using Parted Magic is easy to find online. Some SSDs use an advanced version of secure erase by default, which even removes service data.
The secure erase process will take only a few minutes on a modern SSD. On hard drives it can take several hours.
Once the process is complete, partition and format the drive if you intend to use it again. Parted Magic provides a convenient full-fledged editor to perform this task, but you can use the utility Windows Drive Management (Control Panel > System and Security > Administration > Creating and Format Hard Disk Partitions) to solve the same problem. Most often, users create a single partition and format it in NTFS.
You can then return the copied data back to the blank disk and enjoy high speed performance.
SSD disk recovery is hot topic. There are many myths and misconceptions around SSD drives generally. Users are confused as to whether they can recover files from SSD drive A. We will try to resolve these issues and clarify the situation. But first, let's look at how SSD drives compare to traditional mechanical storage devices.
Yes, SSDs destroy deleted data
As you know, the contents of a file deleted from a hard drive, USB flash drive or SD card will not be available for use, but it will not be completely erased either. The operating system simply marks a file entry in the file system to declare blocks of information accessible. From this point on, the operating system can store other data in these data blocks; however, the system will not wipe, erase, or intentionally overwrite their contents until it has approved one or more blocks to store another file. This mechanism is exactly the reason why we can use a data recovery tool to recover deleted files.
SSD drives work on a different principle. In solid-state media, information can only be written to empty NAND memory cells. In order to write anything to a flash cell, the controller must first erase the contents of that cell. Although this already slows down the device, it is only part of the problem. Because the capacity of a physical NAND cell is typically much larger than the minimum data write block size (or disk sector as declared by the operating system), writing to non-empty blocks involves a three-step effort. When writing to a non-empty data block, SSD controller must read the contents of the cell NAND memory, change its contents in the disk cache, erase the cell, and then write the changed contents back. This extremely slows down the write operation.
To avoid slowdown, SSD manufacturers have used a combination of smart technologies such as background garbage collection and physical address mapping. These technologies allow an SSD drive to use different physical NAND cells to receive data, giving that cell the same logical address as the modified cell. The contents of the original cell are treated as "garbage" and are cleared (trimmed) in the background.
So what happens when you delete a file from an SSD? The operating system tells the SSD controller that a specific flash cell is becoming empty by sending a "TRIM" command to the SSD drive. Once the drive receives the Delete command, it knows that some blocks of data can no longer be used. The disk then erases the contents of these data blocks in the background without further notice. This mechanism makes it impossible to recover deleted files from an SSD drive.

Useful articles

When is SSD recovery possible?
Wait, didn't we just say that recovering deleted files from SSD is impossible due to background trimming, remapping and garbage collection? In fact, the TRIM command request is sent to the SSD controller and is not always fulfilled! IN operating system Windows, the TRIM command is executed only when the following conditions are met:
- The SSD drive is connected via a SATA channel (or M.2 or a similar interface).
USB, FireWire and Ethernet SSD drives are never removed. - The SSD drive is formatted with the NTFS file system.
FAT32, exFAT, and other file systems are not supported by the Windows TRIM mechanism. - You are running Windows 7, 8 or 10. More early versions Windows does not support TRIM.
- The file system is fine. If you encounter a corrupted file system
or partition table failure, you will lose access to files and folders,
but the TRIM command will not run.
If any of the conditions are not met, the TRIM operation will not start and you can still recover data from the SSD drive. To recover data, download and run the program Starus Partition Recovery. Select your SSD drive and start the scanning process to search for available files and folders. After the scan is completed, select the files you want to recover, select the target device to save the recovered data and click the "Save" button. Your data will be extracted from the SSD and stored safely in a new location.
Despite the significant difference between the type of drives in question and conventional hard drives and other types of storage media, the same applications for data recovery can be used. If the hardware was damaged, then specialized equipment and utilities will be required for resuscitation.
Faults preventing data from being read
Today, all faults that do not allow reading the data present on the media of the type in question can be divided into several main categories:
Physical damage includes failure of the main components:
- connectors for connecting an interface;
- failure of the physical memory controller chip;
- failure of board components;
- failure of the entire printed circuit board.
Damage of this kind can be caused as a result of both mechanical and electrical influence. In this case, repairs to restore access to the information located on the drive are quite complex and require specialized skills. Sometimes, when the controller is destroyed, it becomes simply impossible to access the content.
Logical damage to the media (its file system) may be a consequence of erroneous erasure of information or formatting. Also, this kind of situation occurs due to malfunction any specialized applications. This kind of situation can be resolved quite simply - with the help of specialized utilities.

On disk drives The type in question contains sections used by the controller to perform its functions. If for some reason they are damaged and become inoperable, then in order to resuscitate them it is necessary to transfer the device to a specialized authorized service center. Such damage is not as complex as a controller failure, but is just as dangerous.
Recovery in case of damage to the controller
The type of process in question always consists of two main stages:
- hardware;
- software
Disassembling the device and subsequent steps
Disassembling the device of this type is carried out in several stages:
- the case is removed from the personal computer (laptop or desktop - it doesn’t matter);
- using a suitable screwdriver (Phillips or slotted), unscrew all connecting bolts;
- a special opening tool (or a regular plastic card) is used to separate the housing.
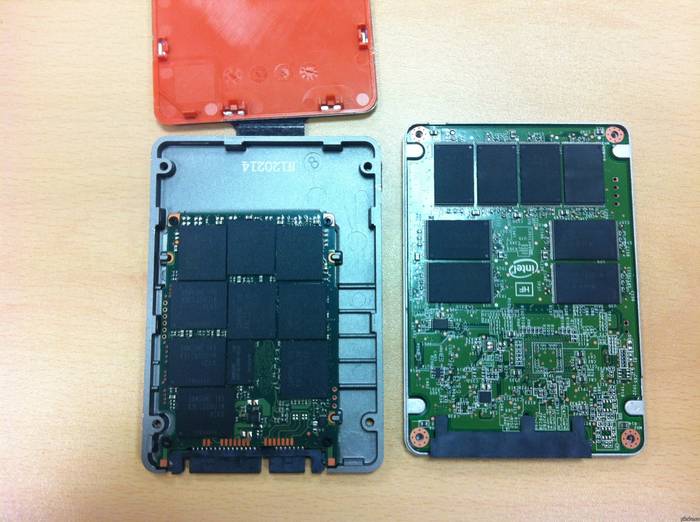
After opening, you need to use a specialized soldering hair dryer to desolder all the microcircuits. Next, you should use a device that allows you to read directly from these electronic components- NANDFlashReader. This programmer is usually equipped with special utilities for reading.

Reading data from the chip
To work with data on a chip soldered from a printed circuit board, you can use the following applications:
- PC-3000 Flash;
- Flash Extractor.
To recover data usingPC-3000 Flashyou need to do the following:
- after launching, in the left window, right-click on the required microcircuit;
- in the context menu that opens, select “read chip”;
- set reading parameters in the corresponding window and auto-analysis parameters;
- The image is being assembled, all data is located on the right side of the window;
- select everything you need and right-click again - select “Save” (or press “F2”).

In some particularly complex cases, using the auto-analysis function is simply impossible. In such situations, it is best to contact professionals who specialize in problems of this type. Since otherwise there is a high probability of damage to the contents of the chip without the subsequent possibility of gaining access to the data.
Another quite powerful application for working with memory chips SSD drives– FlashExtractor. It was initially developed to work with the circuits of conventional flash cards, but later began to be used to work with the components of the disks in question.
Data recovery process fromSSDdisk:
- we connect a special reader with a circuit installed in it to a personal computer via USB;
- run the file Flash Drive Information Extractor(usbflashinfoGetFlashInfo.exe);
- on the function panel you need to click on the “Get information” button;
- select the destination where all saved content will be saved;
- Click on “Extract”.

After the process is completed, all data to be restored will be copied to the appropriate directory. After which the user can use them at his own discretion.
With a working controller
It is much easier to resuscitate data when the controller is fully operational, and the necessary content was lost due to erroneous erasing or formatting. In such situations, there is no need to disassemble the disk itself, as well as solder it. Thus, the required amount of time and complexity of work are significantly reduced.
For data resuscitation in this case, the following applications are perfect:
- DMDE;
- Hetman Partition Recovery;
- Advanced Disk Recovery.
All of the above applications give quite high percentage success. Their use will allow you to recover data even if the device is formatted.
DMDE
To start the application recovery processDMDE, you need to do the following:
- launch the application from the directory where it is installed;
- after startup, a window will appear in which you will need to make a choice desired device(select SSD drive);
- Click on the “Start” button (a green triangle is drawn on it).

You must first look in the program settings at the destination where all information is saved. It is important to ensure that the amount of free space on the partition you select as the destination is sufficient to copy all the required volume.
HetmanPartitionRecovery
An application called HetmanPartitionRecovery is also great for resuscitating data on an SSD drive.
To carry out this process, you need to do the following:
- launch the application;
- in the left part of the work area, select the disk with which you need to work and select it;
- Open the “File” menu and select “Scan”.

After the scan is completed, all detected files will be indicated in the form of shortcuts or a table on the right side of the screen. To restore them, select the necessary objects, then click open context menu right-click and select the second item from the top “Restore”. The data recovery process will take place automatically.
AdvancedDiskRecovery
The AdvancedDiskRecovery interface is not much different from the workspace of similar utilities. After launch, the user will see a standard workspace on the screen.
To begin the resuscitation process, you must do the following:
- Select a device on the left side of the screen;
- open the “Options” menu and click on the “Scanning” item;
- on the right side of the screen the available objects to be resuscitated will be indicated;
- Select the necessary files and folders and click the “Save” button (at the bottom right of the screen).

Despite all their reliability, SSD-type media sometimes fail. Also, users themselves are often the main cause of data loss (they accidentally delete files or format the device). Although there are some difficulties, there is almost always a chance to recover lost information.
Greetings to all Khabrovsk residents!
I propose today to talk a little about data recovery from faulty SSDs drives. But first, before we get acquainted with the technology for saving precious kilo-mega- and gigabytes, please pay attention to the diagram below. On it we tried to place the most popular models SSDs according to the probability of successful data recovery from them.
As you might guess, drives located in the green zone usually have the fewest problems (provided the engineer has the necessary tools, of course). And drives from the red zone can cause a lot of suffering to both their owners and restoration engineers. If such SSDs fail, the chances of getting back lost data are currently too small. If your SSD is located in or near the red zone, then I would advise making a backup before each brushing of your teeth.
Those who have already made a backup today, welcome to cat.
A small caveat should be made here. Some companies can do a little more, some a little less. The results illustrated in the chart represent an industry average as of 2015.
Today, there are two common approaches to recovering data from faulty SSDs.
Approach #1. Reading dumps of NAND flash chips
Solving the problem, as they say, head-on. The logic is simple. User data is stored on NAND chips flash memory. The drive is faulty, but what if the chips themselves are fine? In the vast majority of cases this is true, the microcircuits are operational. Some of the data stored on them may be damaged, but the chips themselves function normally. Then you can unsolder each chip from the drive’s printed circuit board and read its contents using a programmer. And then try to assemble a logical image of the drive from the received files. This approach is currently used in usb data recovery flash drives and various memory cards. I’ll say right away that this is not a rewarding job.Difficulties may arise even at the reading stage. Microcircuits NAND flash memories are produced in different packages, and for a specific microcircuit the programmer may not be included the required adapter. For such cases, the kit usually includes some kind of universal adapter for soldering. The engineer is forced, using thin wires and a soldering iron, to connect the required legs of the microcircuit to the corresponding contacts of the adapter. The task is completely solvable, but requires direct hands, certain skills and time. I’m not very familiar with a soldering iron myself, so this kind of work commands respect.

Let's also not forget that in an SSD there will most likely be 8 or 16 such chips, and each one will have to be unsoldered and counted. And the process of reading a microcircuit itself cannot be called fast either.
Well, then all that remains is to assemble an image from the received dumps and it’s done! But this is where the fun begins. I will not go into details, I will describe only the main tasks that the engineer and the software he uses must solve.
Bit errors
The nature of NAND flash memory chips is such that errors are bound to appear in the stored data. Individual memory cells begin to be read incorrectly, and consistently incorrectly. And this is considered the norm until the number of errors within a certain range exceeds a certain threshold. Correction codes (ECC) are used to combat bit errors. When saving user data, the drive first divides the data block into several ranges and adds some redundant data to each range, which makes it possible to detect and correct possible errors. The number of errors that can be corrected is determined by the power of the code.The higher the code power, the longer the sequence of assigned bytes. The process of calculating and adding the mentioned sequence is called encoding, and correcting bit errors is called decoding. The encoding and decoding circuits are usually implemented in hardware within the drive controller. When executing a read command, the drive, along with other operations, also performs bit error correction. The same decoding procedure must be performed with the resulting dump files. To do this, you need to determine the parameters of the code used.
Memory chip page format
The unit of reading and writing for memory chips is a unit called a page. For modern chips, the page size is approximately 8 KB or 4 KB. Moreover, this value is not a power of two, but a little more. That is, inside the page you can place 4 or 8 KB of user data and something else. The drives use this redundant part to store correction codes and some service data. Typically a page is divided into several ranges. Each range consists of a user data area (UA) and a service data area (SA). The latter stores correction codes inside itself that protect this range.All pages have the same format, and for successful recovery it is necessary to determine which byte ranges correspond to user data and which are service data.
Scrambling VS Encryption
Most modern SSDs do not store user data in clear text; instead, it is pre-scrambled or encrypted. The difference between these two concepts is quite arbitrary. Scrambling is some kind of reversible transformation. The main task of this transformation is to obtain from the source data something similar to a random sequence of bits. This conversion is not crypto-secure. Knowledge of the conversion algorithm allows you to easily obtain the original data. In the case of encryption, knowing the algorithm alone does not give anything. You also need to know the decryption key. Therefore, if the drive uses hardware data encryption and you do not know the encryption parameters, then you will not be able to recover the data from the read dumps. It's better not to even start this task. Fortunately, most manufacturers honestly admit that they use encryption.Moreover, marketers managed to turn this criminal (from the point of view of data recovery) functionality into an option that supposedly gives a competitive advantage over other drives. And it would be okay if there were separate models for the paranoid, in which the protection against unauthorized access would be well done. But now, apparently, the time has come when the lack of encryption is considered bad manners.
In the case of scrambling, things are not so sad. In drives, it is implemented as a bitwise XOR operation (addition modulo 2, excluding “OR”), performed on the original data and some generated sequence of bits (XOR pattern).
This operation is often denoted by the symbol ⊕.
Because
Then, to obtain the original data, it is necessary to perform a bitwise addition of the read buffer and the XOR pattern:
(X ⊕ Key) ⊕ Key = X ⊕ (Key ⊕ Key) = X ⊕ 0 = X
It remains to determine the XOR pattern. In the simplest case, the same XOR pattern is used for all pages. Sometimes the drive generates a long pattern, say 256 pages long, then each of the first 256 pages of the chip is added with its own piece of the pattern, and this is repeated for the next groups of 256 pages. But there are more complicated cases. When each page individually generates its own pattern based on some law. In such cases, among other things, you still need to try to unravel this law, which, to put it mildly, is not easy.
Build the image
After all the preliminary transformations have been completed (correcting bit errors, eliminating scrambling, determining the page format and, possibly, some others), the final stage is assembling the image. Due to the fact that the number of rewrite cycles for chip cells is limited, drives are forced to use wear leveling mechanisms to extend the life of the chips. The consequence of this is that user data is not stored sequentially, but is scattered chaotically within the chips. Obviously, the drive needs to somehow remember where it saved the current block of data. To do this, it uses special tables and lists, which are also stored on memory chips. The set of these structures is usually called a translator. It would be more accurate to say that a translator is a kind of abstraction that is responsible for converting logical addresses (sector numbers) into physical ones (chip and page).Accordingly, in order to assemble a logical image of the drive, you need to understand the format and purpose of all translator structures, and also know how to find them. Some of the structures are quite voluminous, so the drive does not store it entirely in one place, but it also ends up scattered in pieces throughout different pages. In such cases, there must be a structure that describes this distribution. It turns out to be a kind of translator for a translator. They usually stop there, but you can go even further.
This approach to data recovery makes it possible to completely emulate the operation of the drive at a low level. This explains the pros and cons of this approach.
Cons:
- Labor intensity. Since we are completely emulating the drive, we will have to do all the dirty work for it.
- Risk of failure. If it is not possible to solve at least one of the assigned tasks, then there can be no talk of restoration. And there are many options: the inability to read microcircuits because the programmer does not support them; unknown correction codes; unknown XOR pattern; encryption; unknown translator
- Risk of ruining the drive even more. In addition to shaking hands, the risk is the heating of the memory chips itself. For worn-out chips, this may result in additional bit errors.
- Time and cost of work
- Wide range of tasks. All that is needed from the drive is working memory chips. It doesn't matter what condition the other elements are in.
Approach #2. Technological mode
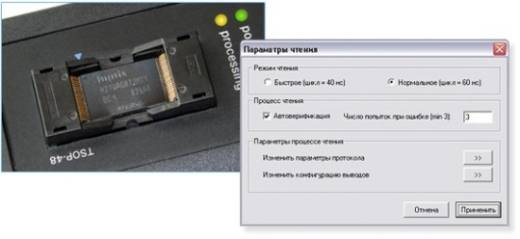
Very often, SSD developers, in addition to implementing the operation of the drive according to the specification, also provide it with additional functionality that allows you to test the operation of individual drive subsystems and change a number of configuration parameters. Commands to the drive that allow this to be done are usually called technological. They also turn out to be very useful when working with faulty drives whose damage is of a software nature.As mentioned above, over time, bit errors inevitably appear in memory chips. So, according to statistics, the cause of SSD failure in most cases is the appearance of uncorrectable bit errors in service structures. That is, on physical level all elements work fine. But the SSD cannot be initialized correctly because one of the service structures is damaged. This is the situation different models SSD is treated differently. Some SSDs go into emergency mode, in which the functionality of the drive is significantly reduced; in particular, the drive returns an error to any read or write commands. Often, in order to somehow signal a breakdown, the drive changes some of its passport data. For example, the Intel 320 series returns a string with an error code instead of its serial number. The most common faults are from the “BAD_CTX %error code%” series.
In such situations, knowledge of technology teams comes in very handy. Using them, you can analyze all service structures, also read the internal logs of the drive and try to find out what went wrong during the initialization process. In fact, most likely, this is why techno-commands were added, so that the manufacturer would have the opportunity to find out the reason for the failure of their drives and try to improve something in their operation. Having determined the cause of the malfunction, you can try to eliminate it and bring the drive back to life. But all this requires truly in-depth knowledge of the device architecture. Under the architecture here I am to a greater extent I understand the drive’s firmware and the service data it operates on. Only the developers themselves have this level of knowledge. Therefore, if you are not one of them, then you either must have comprehensive documentation for the drive, or you will have to spend a fair amount of hours studying this model. It’s clear that developers are in no hurry to share their work and there is no such documentation in the public domain. Frankly speaking, I doubt that such documentation exists at all.
Currently, there are too many SSD manufacturers, and new models appear too often, and there is no time for detailed study. Therefore, a slightly different approach is practiced.
Among the technological commands, the commands that allow you to read pages of memory chips are very useful. Thus, you can read entire dumps through SATA interface drive without opening the SSD case. In this case, the drive itself acts as a programmer for NAND flash memory chips. In principle, such actions should not even violate the terms of the warranty on the drive.
Often the processors for techno-commands for reading memory chips are implemented in such a way that it is possible to leave bit error correction, and sometimes data decryption, on the drive side. Which, in turn, greatly facilitates the data recovery process. In fact, all that remains is to figure out the translation mechanisms and, one might say, the solution is ready.
In words, it’s over, it all just sounds. But developing such solutions takes a lot of man-hours. As a result, we are adding just one SSD model to support.
But the data recovery process itself is greatly simplified! Having such a utility, all that remains is to connect the drive to the computer and run this utility, which, using techno-commands and analysis of service structures, will build a logical image. All that remains is the analysis of partitions and file systems. Which can also be a difficult task. But in most cases, the built image allows you to restore most of the user data without much difficulty.
Cons:
- Complexity and cost of development. Quite a few companies can afford to maintain their own development department and conduct this kind of research.
- Solutions are individual.
- Limited range of tasks. This approach is not applicable to all drives. The SSD must be physically intact. Also, it is rare, but still happens, that damage to some service structures excludes the possibility of restoring user data.
- Simplicity.
- In some cases, it allows you to bypass encryption. In fact, the approach to data recovery using technological commands is currently the only known way to recover data from some drives that use hardware data encryption.
Conclusion
In war, all means are good. But personally, I prefer the second approach as a more subtle tool. And the most promising, since the increasingly widespread use of hardware encryption eliminates the possibility of restoring information from “raw” chip dumps. However, the first approach also has its own niche of problems. By and large, these are the tasks that cannot be solved using the technological functions of the drive. First of all, these are drives with a hardware malfunction, and there is no way to determine the damaged element, or the nature of the damage excludes repair. And it is recommended to get down to business only if you already have successful experience in recovering information from a similar SSD model, or if you have information about the solution. You need to know what you will encounter: whether encryption or scrambling is used, what XOR pattern is most likely used, whether the translator format is known (is there an image collector). Otherwise, the chances of success are low, at least it will not be possible to quickly solve the problem. In addition, heating negatively affects worn-out memory chips, as a result of which additional bit errors may appear, which, in turn, can bring their own fly in the ointment in the future.That's all for now. Take care of yourself! And may backup protect your data!
SSD Recovery | When good memory gets into unpleasant situations
This time we contacted the Flashback Data laboratory, whose employees work on all types of data storage devices, but have special experience in working with flash memory. Representatives from Flashback Data agreed to show us what efforts a top-notch laboratory would take to save our precious flash memory.
SSD Recovery | Reading range
In its early days, Flashback primarily focused on replacing faulty chips, but over time this became increasingly difficult to do as manufacturers began using different components at different stages of production in the same model. Some devices now have encryption, which makes data recovery even more difficult. In this case, Flashback needed to be able to read memory directly, which in turn meant having an incredible number of ways to read chips from such a wide variety of flash memory available.
Note that when Flashback refers to "encryption", this state is typically unknown to the user. For example, around 2006, SanDisk began encrypting data on all of its drives, as Flashback co-founder and vice president Russell Chozick told us. As with automatic hard drive encryption, the controller encrypts all data stored in flash memory. Since there is no password to lock the encryption, the data is decrypted and retrieved from the media. So if the circuit board is damaged, Flashback employees try to move the controller and memory chips to a new device. “If the controller burns out, it is almost impossible to get the data back, since it contains information about how exactly the data needs to be decrypted. If you cannot work with the controller, you are faced with a big problem.”

SSD Recovery | Types of Flash Memory
These dark gray TSOP48 chips have been typical components of USB flash drives and SSD/SD/CF memory cards for many years, but recently they have opened the way for other chips as well. The bottommost sample in the picture shows the back of the TLGA chip and you can see that there are no pins on the side and the modules are located on the back side. Such chips are common for all types of flash memory and work in e.g. the latest smartphones iPhone.
During the rebuild process, Flashback employees insert TSOP48 chips into the readers, but the TLGAs must also be soldered. Obviously, the processes of analyzing and restoring information are much more complicated. So, with the introduction of more compact flash memory into smartphones, the old “monolithic” formats seem simpler in comparison.

LaCie SD cards and USB devices also have monolithic chips. While most memory cards have separate controller and memory chips, a monolithic chip combines both components into one tiny module. Obviously, malfunctions of such devices can occur for any of a variety of reasons. If the controller stops working, technicians can still access the data through other means instead of using pins to connect to a card reader, smartphone or camera. In the photo, you can see how the device's casing has been partially removed, as technicians need to remove some of the soldered black coating in order to find certain points for connection to the logic analyzer. Once all the points have been identified, the card will be connected as shown in the following pictures.
To remove some of the coating, Flashback employees use surprisingly simple tools: sanding paste and a polishing wheel. Chemicals can be used to achieve this goal, but we were told that it is better to use a slow and thorough polishing process. Very thin contacts can easily be damaged during the grinding process. We initially asked to connect a LaCie drive, but then abandoned the idea after learning that such a job could take a technician all day.

SSD Recovery | Common mistakes flash drives
We've seen photos of damaged hard drives, most of which were damaged due to the head colliding with tracks in the magnetic media. Almost all SSD and flash memory damage that Flashback detects is invisible. In rare cases, you may see a burn mark on the circuit board, but in general, broken controllers and burnt fuses leave no visible marks. As a result, specialists have to work for a long time testing each resistor. In comparison, disconnecting the connector, as shown in the photo, is a piece of cake for repair specialists.

SSD Recovery | What about wear and tear?
We have previously written about the constant race between two processes - improving reading algorithms as capacity increases and reducing lithography, which is reminiscent of a tug of war. In particular, we are concerned that flash and SSD drives that have been in use for several years may show signs of wear and tear.
Fortunately, we are told that most of the SSD drives that arrive at the Flashback laboratory are not even a year old, so the NAND memory does not wear out. In fact, cases of actual wear and tear are extremely rare. Although with USB flash drives (especially older models with less advanced alignment algorithms), wear is a little more common. Reading from the chips works fine, but when checking the information, a lot of ECC errors occur, and no data can be retrieved. The presence of four red dots (further in the pictures) indicates problems with ECC. On the contrary, major wear problems will be marked with four green dots.
There were also cases when specialists carried out an analysis, took out the chip, cleaned the lamella and put everything back in place, exacerbating the problem with reading the data, which now required more time. So wear and tear can indeed be regarded as a real danger, but there is no talk of any crisis here, although many might think about it.

SSD Recovery | Heat it up
Chips must be removed from the circuit board using a special soldering jig, and one of the main tools for this step is hot air. The picture shows how specialists remove the TLGA chip from a USB device. They control the temperature and air pressure, heating the device enough to melt the solder points. Such soldering stations also contain soldering irons, welding flux, ohmmeters and other diagnostic devices. Some of these stations occupy Flashback's main laboratory, which measures approximately 465 square meters.

SSD Recovery | Deleting memory
This SSD's controller is burned out, so Flashback's technicians carefully remove the memory chips, each of which is hand-numbered for tracking and easy data collection.
“Sometimes we never find out which components have failed,” says the company’s vice president. “We just know that this type of drive has a firmware glitch, or this error is most typical for it, so for us to work we need to remove the chips. Our clients are constantly in a hurry, so in many cases it is not possible to determine the exact reason why it burned out, but we know that the reading process will not work through the controller here, but it is not encrypted, so we have to. disconnect the chips, read them, and then restore them.

SSD Recovery | Disconnecting chips
Flash drives and SSDs aren't the only devices that experience heat. The Flashback service receives a constant stream of cell phones, such as this one HTC Evo who was drowned in the pool. Services for recovering information from flash memory cost hundreds and thousands of dollars, so it becomes obvious that this phone was not given away to restore children's cartoons. Some of these phones are said to contain recent photographs of deceased friends or loved ones. Devices related to criminal investigations are regularly supplied, and if a criminal can destroy evidence, roughly speaking, underfoot, then valuable information can be obtained from an intact flash memory for an investigation.
The HTC Evo smartphone is now two years old. New devices, such as the Samsung Galaxy and some others from HTC, often support eMMC technology, which contains a controller built into the memory module, just like an SD memory card. In this case, the recovery process can become even simpler.

SSD Recovery | Hard drive vs flash memory
In the so-called service area hard drive contains information that allows him to “communicate” with himself. To transfer data into read/write processes, it is necessary to provide information about where the bad sectors are located, how many magnetic heads there are, which of them are enabled and which are disabled, and so on. Such information is located on the platters in a special zone, which is separated from the disk space reserved for recording user data.
In the case of flash memory, manufacturers also leave space for such a zone, which contains all the information about error correction codes, the presence of errors in sectors, the location of these sectors, and so on.
While a hard drive consists primarily of 512-byte sectors, flash memory typically uses 528-byte sectors, with 512 bytes dedicated to memory and another 16 to the aforementioned service area. In SSD drives, the sector size of 512 bytes is converted to a user-accessible sector size. But when Flashback reads the raw data, experts get information from both areas. The data is mixed, dumped into one pile and at the same time alternated. When specialists need to display available information, all its elements extracted from the service area must be removed.

SSD Recovery | Closer inspection
Sometimes specialists need to carry out a very thorough visual inspection chips and their fragile insides. The best tool Vision Engineering's Mantis microscope is considered for this type of work, and although it costs about $2,000, it helps restorers examine the design in 3D (using two light paths passing through one lens) at twenty-fold magnification. A more natural and comfortable experience with Mantis helps to detect problems that might not be noticeable using conventional microscopes. It also becomes an assistant during soldering work, during disassembly and repair.

SSD Recovery | Scanning stations
Once the chips are connected in such a way that they can be read external devices, Flashback employees place them in self-assembled configurations to read the data. They are quite simple, although they have special systems that allow you to view different sectors, control operating time, and so on. If reading is slower than usual, it is possible to move to other uncorrupted sectors to get the available information as quickly as possible.
“We can move forward and backward,” says the company’s vice president. “We can have the device scan the MFT file table and display only the selected data instead of receiving free space, so that the work can be completed very quickly. Sometimes you have to deal with a device that continues to fail even during the recovery process, sometimes there are clients who need to get one or two out as soon as possible important file in a short time."

SSD Recovery | Mount selection
To connect chips to reading systems, Flashback uses a bewildering array of special mounts. In the picture you can see the type of adapter that was used to work with TSOP48 chips and a TLGA reader. Inside these adapters, each pin of the connector touches a pin on the memory chip. The adapter is screwed into the board for subsequent connection to the TSOP connector. At the bottom there is a USB interface for communication with scanning systems.

SSD Recovery | Data mix
Remember that memory chip that was removed from HTC phone? We may see it again, now with readout wires. The circuit boards were custom made to connect to a USB device. Holes in each corner help secure the chip to the board. Together with the TSOP adapter shown above, each of its pins touches one pin on the memory chip. But in such a mix, all chip lamellas are open, so specialists can do unsoldering instead of connecting to the connector. Since there are many monolithic chips and connectors, the Flashback needs to connect to specific points and solder them to the chip.
This is an eight-bit chip, as evidenced by the eight wires that are connected to the circuit board. In a 16-bit chip there would be twice as many of them.

SSD Recovery | Reading process for several hours
When connecting monolithic chips, a similar approach is used. Different devices different wires are needed, but the approach remains the same - each connection performs its own function. For example, in the upper right corner, 3.3 V power is supplied through the contact. Looking at this process, you begin to realize how time-consuming it takes to simply extract data from the chips.

SSD Recovery | Welcome to the world of chaos
Let's see what data recovery specialists work with. Here you can see the contents of the raw raw data from the SSD's Master Boot Record. Data is mixed using algorithms used by controllers to optimize read and write speeds, level out wear, and so on.
“When we read the chips, we received a whole bunch of raw data,” says the company’s vice president. “For example, here the memory chip has a 528-byte sector, where 512 bytes are used for data, and another 16 are used for storing information about this data and error correction "We call this area a service area. When we first look at this hexadecimal data set, we need to find the data structures we know about to figure out their location."

SSD Recovery | FAT under a microscope
Shown here file system FAT16 and boot sector
"Home boot record(MBR) is usually marked in sector 0, says Chozik. “Now it’s not there, but we can find it and determine the known data structure.” We know where it is located, how far it is from the boot sector, and so on. This can be seen in the following picture. This process is similar to collecting evidence. We find MBR, boot sector and FAT. Now we see structures that are familiar to us, and we must think about how to move them back together.
Chozik notes that sometimes experts fail to find any of these structures, usually because of the algorithm included with the device. Some algorithms invert all data bits. If such an approach is discovered, then specialists know how to carry out the reverse process. Some algorithms will touch each byte instead of an entire sector, so each byte will be located on a different memory chip. This requires a byte-by-byte rejoin rather than a whole sector rejoin. Some algorithms will use ciphers that further complicate the process. For a process performed by a computer, recovery is quite often done manually.

SSD Recovery | Joint return
Let's take a closer look at the data in the sector where information is scattered across several memory chips. You can see what the first part of each sector looks like.
In the hexadecimal number system, the designations are arranged in the following order: 0, 1, 2, 3, 4, 5, 6, 7, 8, 9, A, B, C, D, E, F, 10, 11, 12, 13, 14, 15, 16, 17, 18, 19, 1A, 1B, 1C and so on. On chip #1 you can see that the order is broken twice - first between the values 09 and 0E, and then between 11 and 16. What happens to the corresponding data? The answer is on chip #2.

SSD Recovery | In order
Specialists need to reunite these separated 2112 bytes (4 sectors of 528 bytes), and when this happens, the result will look the same as in the picture below.
Now imagine that there are 64 memory dumps that need to be merged. Why 64? Because a separate chip can have more than one dump, but, for example, four at once. So take 16 chips (for example, on an SSD drive), multiply their number by four - you will get the total number of dumps (exactly 64).

SSD Recovery | Before and after
It may be hard to imagine what all this byte-level fluctuation actually looks like at the macro level. An empty cell in a table (or a damaged file) cannot fully reflect the entire situation.
This picture from Flashback illustrates this. In some examples, the header and some of the data are intact, so they may appear close together but be jumbled, resulting in image artifacts.
Taking a corrupted JPEG file, technicians use ECC correction and block movement to reorder the data and remove bit errors that were processed by the controller. They are also re-sequenced and clear the service area of collected data to ensure a clean, uninterrupted flow of data.

SSD Recovery | End result
After several hours of repairs and various manipulations, even using algorithms that help automate data collection, Flashback employees provide the data in the form of files and folders. Everything is in order. The pressing question remains whether the data has been fully recovered and whether it corresponds to its original form.
This can be partially checked using file headers. SD memory cards and similar storage devices typically contain a ton of images that are easy to visually check for errors. ECC errors in separate files It is quite easy to detect - with other file types it can be more difficult. Utilities are able to tell specialists using the header that the file has been disinfected, but they may not note the bad sector, which is clearly visible to the observer.
“For most clients, we focus on practicality,” notes the company's vice president. “We ask what they need to get and test the files if they ask for it. If it turns out that we cannot restore the directory structure, we we have to do this using the file header. This is like a “raw” recovery, where we do not get file names. We will pull out the data, and we will get even more than people expect, since we can also restore it. deleted information. Sometimes we see that the FAT table is completely damaged, and then we have to proceed with this type of recovery."

SSD Recovery | What's more important?
In one of the articles about data recovery, one of the readers noted in the comments that essentially anyone could get into this business and that Flashback operates on a different level compared to more well-known services. Proof of this fact can be found in the results and client list, which includes a wide range of commercial and government organizations.
According to Chozik, Flashback's leading experts have more than 15 years of experience in the data recovery industry. The company has invested hundreds and thousands of dollars in equipment and parts to carry out these processes.
“It’s very difficult to learn this business on your own,” he says. “It took years for the R&D department to reach the heights that we have achieved. Our company is not as small as it seems: we are almost 465 square meters in size, and us installed high level security. There is also four-level biometric control with round-the-clock surveillance. The laboratory uses a grounded floor with copper wires to combat static, so there is no risk of electrical damage. We have a special area protected by bars to store data that is used as evidence in investigations. Also, special clean workstations with laminar air flow (Class 10 and Class 100 levels) are designed for hard drives. The forensic laboratory is the only private ASCLD laboratory with international accreditation (ISO 17025)."

SSD Recovery | Not so small
The Flashback data recovery lab consists of three rooms. Large space The first one is filled with computers, soldering stations, devices for restoration, visualization and firmware. There are also servers for data storage and similar tasks. In another room there are thousands of hard drives, different firmware versions and a lot of different devices stored in case you need them PCB, internal read/write heads or anything else. It is worth noting that it is really clean here and there is forced air circulation for working with hard drives.
Another level of security is maintained in the so-called forensic area, which has already been discussed, and the cage in which the relevant drives are stored is fixed to the floor and equipped with motion sensors.
But this is not the most important thing in the article: it introduces you to the processes that occur behind the scenes of large companies involved in data recovery. Restoring is not just a plug-and-copy process, the amount of work seems simply prohibitive. Of course, we all hope to never become clients of such services, but if we suddenly have to use the services, then this is the data recovery process that your devices will be forced to go through.
