Where to find mail on Android. How to create an email on your phone: step-by-step plan
Articles and Lifehacks
Understand, how to set up mail on android, not difficult at all. By following the step-by-step instructions outlined in this article, you will be able to do this completely independently, no less than installing it.
Setting up electronic mailbox on a device under Android control, occurs through an email program that can be found in the list of those already installed on Android programs. It is indicated by a postal envelope icon. Setting up your email inbox starts with finding this icon. Next, you need to follow the step-by-step instructions below, as with.
Step by step instructions how to set up mail on android
Step #1. Launching the mail program.
Launch your email program by clicking on the email icon.
Step #2. Setting up a username and password.
In the “E-mail” line, write down the full desired address of your future email in the following form: “[email protected]”).
In the “Password” line, enter a combination of characters that will serve as the login password to the mailbox you created. It is desirable that, in addition to Latin letters (uppercase and lowercase), it contains numbers and other characters that can be “represented” using the keyboard.
Step #3. Setting up your incoming mail server.
In the "Select account type" window you will be presented with three options:
- IMAP;
- POP3;
- Exchange.
Let's consider one of them. Let's say you chose the "POP3" protocol. You will need to follow the following directions:
- in the completed “Username” field, nothing needs to be changed;
- hidden by symbols The “******” entry in the “Password” field will also not need to be changed;
- in the “POP3 Server” field you will need to enter “pop.mail.ru”;
- in the “Port” field, from the proposed options, it is best to select a protected one – “995”;
- in the “Security Type” field, select an entry with six in Latin letters and a slash between them: SSL/TLS;
- in the “Delete messages from the server” field, it is advisable to select “never” - this means that the messages you receive will be saved on the mail.ru server;
- click “Next”.
Step #4. Setting up the outgoing message server for your mail.
- the “SMTP” field must be filled with the entry “smtp.mail.ru”;
- field “Port” - numbers 465;
- in the “Security Type” field, select six Latin letters with a slash between them: SSL/TLS;
- in the “Username” and “Password” fields leave everything as it is, you don’t need to change anything;
- click “Next”.
If you correctly understood how to set up mail on Android and followed the instructions, then your device should be ready to receive and send email messages.
Creating and setting up email is a very trivial task and should not cause any difficulties, but users nevertheless continue to ask questions. Many of them have only recently acquired gadgets and are experiencing difficulties even in such seemingly basic tasks. E-mail on mobile phone has become an integral part of modern life business man. The purpose of this material is to explain to newcomers to the Internet how to create an email on their phone and use it in the future.
Postal services
First, you need to decide which of the hundreds you want to register with. Among the popular ones are Gmail, Yandex iCloud.com. All of the above have the same operating principle, without any special features.
The first thing you need to do is register your own mailbox. To do this, you need to visit the official website of one of the mail services (it can be Google or Yandex, at your discretion) and go through a simple registration procedure.
In most cases, you will be required to provide the following information:
- First and last name.
- Login (name of your mailbox).
- Password.
- Mobile phone number.
This basic set, it is possible that you will be asked to enter a spare box or information about your website, you may have to enter a special code to verify that you are a human.
Once you fill out all the specified forms, you can breathe out - the box is ready.

How to create an email on an iOS phone?
The next step in setting up your mail is connecting it to your phone. If you own an iOS-based smartphone (gadgets from Apple), then they probably registered already at the time of the first activation. If so, then you already have your iCloud mailbox set up and ready to go. You can easily receive a letter from your phone. If this does not happen or you want to connect a different address, you will have to do it manually. To do this:
- Go to “Settings > Mail, contacts, calendar > Add account.”
- We look for the provider you need in the list, for example Google.
- We enter the registration data and wait for the mailbox to connect.
If the list of providers does not contain what you need:
- Scroll down and select “Other > Add Mailbox.”
- Enter your registration details (your name, postal address and password).
- On the next screen, enter your IMAP information. Let's look at the example of Yandex:
- In the subcategory “Incoming mail server” enter imap.yandex.ru;
- In the subcategory “Outgoing mail server” enter smtp.yandex.ru
These details may vary depending on where the box was registered. In most cases, it will be enough to replace yandex with the name of your email service.

How to create an email on an Android mobile phone
In the case of Android, the principle is the same. After purchasing a new device and registering, you will receive an account Google entry, and with it the postal Gmail account. Therefore those who have passed this procedure, may no longer think about how to create an email on their phone. If you prefer manual setting or want to connect a mailbox other than Gmail, then first:
- Find the Mail app on your device.
- Click “Add a new account” (if you are offered IMAP and POP3, feel free to select IMAP).
- On next page provide registration details:
- your mailbox address;
- password;
- IMAP and SMTP server data;
- port, information about which can be found on the official website of the mail provider in the “Help” section (for Yandex this is 993 for IMAP and 465 for SMTP).

Using third party email clients
The simplest and quick method When setting up mail, there will be a special download that will help you both create an email on your phone for free and use it to the fullest.
To find one, just visit one of the application stores, in the case of iOS it’s AppStore, in the case of Android it’s Google Play. In both of them you can find ones created for specific providers.
In most cases, these programs are designed as simply as possible and are ready to work from the moment they are launched. In addition, this option is perfect for those who do not yet have their own mailbox and are just about to start one.
Here we will see how to set up electronic mail E-mail on a Nokia phone on different phones and smartphones. On most Nokia phones E-mail settings similar and may differ slightly. In order to start receiving or sending email via phone or Nokia smartphone without using additional programs You need to configure your email in your messages. I also want to say that in order to start setting up email on your phone, you should already have a working email through which you will send and receive mail. If you do not have an E-mail email, then you can open it for free in a couple of minutes, for example on mail.ru.
1) Email settings on nokia n82 and similar ones. Now let's move on to the mail settings on Nokia phone . In the menu, look for the message item, then click mailbox, an inscription like more than one mailbox is not defined? select yes the inscription will appear on the display The setup wizard allows you to set up mailboxes we confirm the start, select POP3 and then enter the email address in the example, I enter admin@site, confirm with the next button and configure the incoming mail server pop.site, confirm further and enter the outgoing mail server smtp.site, confirm next, select an access point to connect to the Internet and confirm further and enter the name of the mailbox, for example telefoniy, and confirm. Now let's move on to the access settings for the created mailbox, such as username and password. We select messages in the phone menu, mailbox, I open telefoniy and select in functions email settings next will appear incoming email And outgoing email in them we set up the username and password of your existing mail, since when receiving and transmitting mail Email phone will verify this data. In my example, the username is admin@site and my password in your case is your email address and its password. If your mail is on mail.ru, then it roughly looks like this [email protected] and everywhere in the settings you specify the type of incoming mail server pop.mail.ru, outgoing mail server smtp.mail.ru.
2) Email settings on nokia c3-01 and similar ones. Open messages further in the menu set up mail read the agreement, if you agree, accept the agreement and confirm. The page for selecting email services should now load. Select the postal service where your mailbox is located. Using the example, I will select mail.ru, a window will open to select a domain, select mail.ru, then in the form fill in the email address of the type [email protected] Below we fill in the password for the mail and click on login. If you entered your email address and password correctly, your email is ready to go. Now you can view email on your phone at any time, as well as send email messages from your phone. If your mail is not located on mail.ru, then select in the menu with postal services the postal service where your mailbox is located. If the list does not contain the mail service where your mailbox is located, select another and fill in your email address and password.
3) Email settings on nokia 2700 and the like. In the menu, select messages next e-mail the inscription should appear Do you have an email address that you would like to use? choose to let a message appear enter your email address: enter. Using the example, I enter admin@site, confirm ok. Now the phone will ask you to go online to search for parameters, confirm, but not finding it, it will ask you to enter manual configuration parameters, confirm. Enter the name of the mailbox, for example telefoniy your name followed by the email address in my example admin@site. Next, select the item Registration details and select a user name to log in, enter admin@site, and you enter your email, then enter your password and password again. Let's move on to point incoming mail settings and select the server when entering. POP3 and enter type pop .site . Now let's move on to the point outgoing mail settings (SMTP) and there we choose outgoing mail server (SMTP) enter smtp.site, then in the same paragraph enter the user name admin@site and you enter your email and enter the password and password again. That's it, your email is now on Nokia phone 2700 ready.
- Reviews, comments and questions on the topic email settings E-mail on phones and Nokia smartphones you can add below, I hope this article helped you.
- Please help me useful tips with users and troubleshooting methods.
- Thank you for your responsiveness, help and useful advice!!!
Add a review, question or answer on the topic of how to set up E-mail on Nokia phones..
05-01-2019
01 o'clock 07 min.
Message:
Kod
05-12-2018
20 o'clock 57 min.
Message:
I can't set up my email. Help
01-04-2018
06 o'clock 53 min.
Message:
Help me set up E-mail on Nokia C5-00i. The Settings Wizard does not work. You have to do it manually... Thank you.
26-12-2017
2 p.m. 24 min.
Message:
Hello
18-10-2017
08 o'clock 32 min.
Message:
How to create mail on your phone
13-06-2017
07 o'clock 04 min.
Message:
Nokia 5530 I configure everything correctly, incoming works, outgoing does not
16-12-2016
2 p.m. 18 min.
Message:
Please help me set up mail.ru mail on Nokia 72. I do everything according to the instructions, but mail is not sent or received. Thank you.
26-10-2016
12 o'clock 38 min.
Message:
e-mail
02-09-2016
15 o'clock 46 min.
Message:
Menga e-mailmga kegan smsla kere qande ochsam boladi telim x2 02
23-08-2016
00 o'clock 37 min.
Message:
How to set up E-mail on Nokia ah302
15-07-2016
02 o'clock 08 min.
Message:
my phone nokia205 forgot password code errors did not understand help me please
16-02-2016
13 o'clock 09 min.
Message:
Thank you!!! I set up Mail.ru, but Yandex doesn’t want to - it says: “invalid certificate” or “missing certificate”
30-01-2016
07 o'clock 01 min.
Message:
the server does not connect mail to Nokia 5230. what is wrong
07-01-2016
21 o'clock 08 min.
Message:
Set up mail
03-01-2016
11 o'clock 32 min.
Message:
Renew password
21-11-2015
19 o'clock 14 min.
Message:
How to set up email on nokia x2-00
09-11-2015
06 o'clock 23 min.
Message:
Hello.. I have tel. Nokia 2700 classic, the mailbox was configured, then when logging in, the message “The server does not support authentication mode. Check the settings.” I contacted the support service and a painful correspondence began with her - what, yes, how? I sent them all the telephone settings, at their request, and that’s it, silently, for about a week now. Now, I found your tips and started trying to tune in. I restored the factory settings, erased the box and parameters and... everything new several times. Suddenly the “configuration wizard” popped up and issued “Invalid certificate...”. This happened recently with the app. "Agent with mail and ICQ" - The agent with mail worked, and ICQ - "Invalid certificate...". The support service suggested installing 2014 on the phone and downloading previous versions of the application - everywhere the result was “Invalid certificate...”. In general, after all this brainwashing, they reported that no one had made settings for the bodies. will not work on the Java platform. They are “squeezing out” the owners of these phones. Will you have to apply to the relevant authorities to protect your rights?
27-10-2015
17 o'clock 00 min.
Message:
When setting account Nokia XL mail does not “open the letter” after entering the password and the server. What to do?
29-08-2015
6 p.m. 16 min.
Message:
Did you create the correct address?
27-06-2015
03 o'clock 03 min.
Message:
registration
07-06-2015
11 o'clock 54 min.
Message:
I didn’t realize how much I owed
12-04-2015
19 o'clock 05 min.
Message:
If everything is configured correctly, then yes. Any user can check your email from your phone if you save your password.
12-04-2015
17 o'clock 44 min.
Message:
It turns out that logging into mail is still possible without a password? I mean, anyone who picks up your phone can read your email? Or have I not done something yet?
20-03-2015
09 o'clock 41 min.
Message:
Early, in what sense do you find out the email address? If you don’t have an email address, you just need to create one on mail.ru.
20-03-2015
09 o'clock 25 min.
Message:
how can I find out my email address
09-01-2015
20 o'clock 25 min.
Message:
I can’t log in to Odnoklassniki, supposedly my login doesn’t exist
04-12-2014
6 p.m. 13 min.
Message:
This means that something was not configured correctly. You need to carefully look again at every little detail when entering; maybe there is a space somewhere or something that is not noticeable at first glance. Previously, I myself had such problems when I wanted to automatically receive letters from mail.ru because of some little thing in the mail settings it didn’t work for a long time, after numerous attempts I still managed to set it up correctly, now I no longer worry about email on my phone, I check my mail through phone browser.
03-12-2014
17 o'clock 20 min.
Message:
Yes, the Internet works.
02-12-2014
20 o'clock 17 min.
Message:
Maybe there are problems with the Internet? Do you access the Internet from your phone?
02-12-2014
19 o'clock 23 min.
Message:
Can't connect to your mailbox. I click connect and it supposedly starts connecting, but nothing happens. It can connect for hours. Nokia Express Music 5220 phone.
Our man won’t go into his pocket for a word, but for mail he will. No, we are not talking about an envelope with a letter taken out of a box and stuffed into a pocket, but about a smartphone, which is our personal “postman” in a modern version.
Many people think that Android phones allow, which is tied to Google account, and iPhones only work with a mailbox that is associated with an Apple ID. And that other email accounts require additional programs. In fact, gadgets have enough capabilities for everything. Let's talk about how to set up email on your phone to receive emails from all your accounts in one mailbox - built into the system.
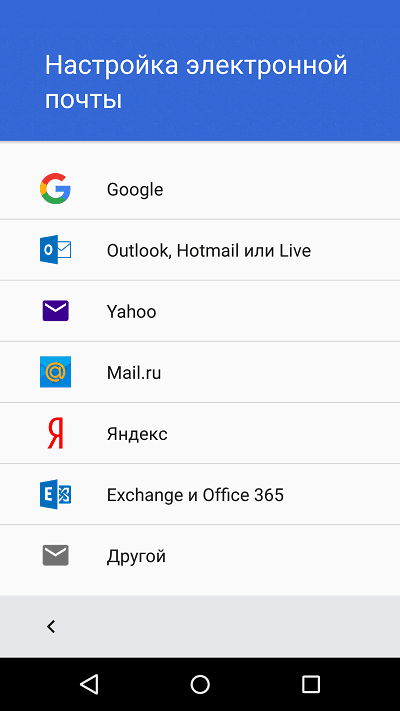
Setting up mail in the Gmail app on Android
Adding and setting up a new account
Mail client " Gmail", pre-installed on Android phones, can be used to assemble letters from various mail services, except those that do not support third-party applications, such as the highly secure ProtonMail and Tutanota. By default, it collects emails only addressed to the Google account associated with the device.
To connect another email account to the Gmail client, do the following:
- Launch the application. If anyone doesn’t know, his label is a white envelope with a red letter “M”.
- Tap the hamburger button and open side menu. To access the account management section, tap the triangle circled in the screenshot.

- Select " +Add account».

- Select the mail service you want to connect. For example, if domain name server where your mailbox is located, yandex.ru or ya.ru, select Yandex; if gmail.com, choose Google, etc. If the required service not in the list, your choice is " Another». Next steps Let's look at the last option as an example.
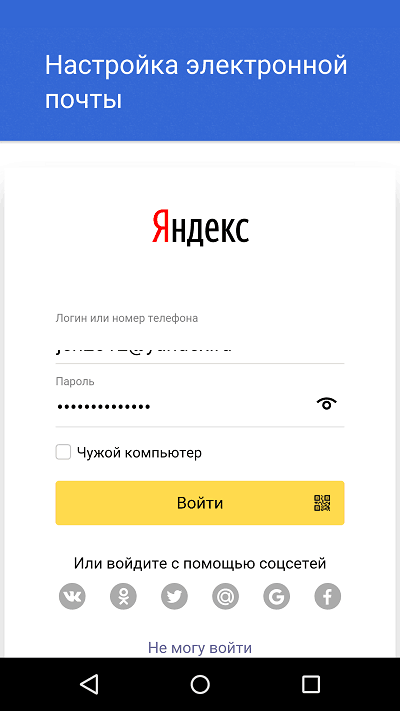
- Enter your email address. To set it to default settings, click " Next" If you want to specify your settings, tap the " Manually».

- If you choose manual setup, the program will ask you to specify one of three account type options. For personal mail these are POP3 or IMAP protocols (you can find out what to choose from the user manual of your mail service). For mail at corporate server– Exchange, unless otherwise used.

- Enter your login or full mailbox address and password again to log in.
- On next stage specify the incoming message server. If the program does not detect it itself, you will have to once again refer to the manual of your mail service.

- Next, enter the address of the outgoing message server and, if desired, enable automatic login into the system. Then you won’t have to enter a password every time you access your mailbox.

- The basic setup is almost complete. The only thing left to do is to allow or disable program synchronization with mail server. If allowed, set the synchronization frequency (15 minutes by default), and also enable or disable notification of new emails and auto-downloading of attachments when the phone is connected to a Wi-Fi network.

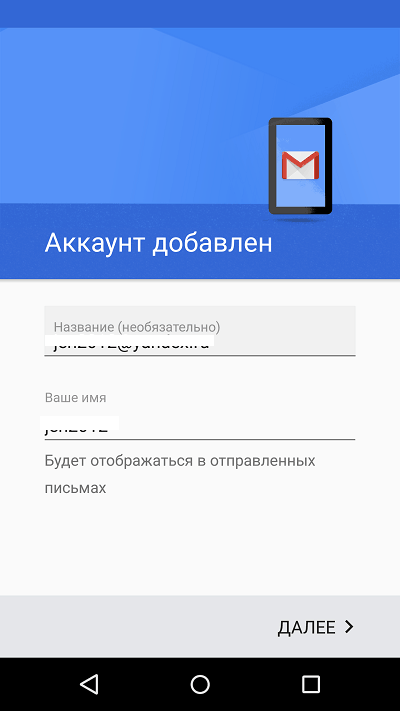
- Account added. As a final step, you can change your name, which will be displayed in the emails you send. By default, the account login is specified instead of the name.
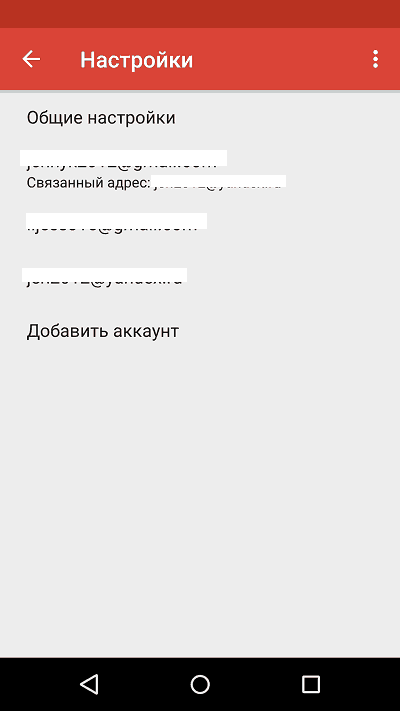
You can finish here, but if you want to configure new box more subtly, open the side menu in the application again, scroll down and tap the button Settings».

Select the account you want to edit.
The following parameters are available for change:
- Account name ( email address).
- Your name (by default, this is your account name).
- Signature in the letter.
- Linking an address to another Gmail account.
- Request to display images in emails (if your Internet connection is slow or is charged based on traffic volume, it is better to enable it).
- Synchronization with the mail server and its frequency ( high frequency synchronization increases the amount of traffic and speeds up the drainage of the phone's battery).
- Automatic downloading of files attached to emails when connected to Wi-Fi.
- Notifications about new letters.
- Sorting incoming correspondence by category (unsorted letters, social networks, forums, promotions and notifications). Not supported by all email services.
- Automatic response to incoming emails. Not supported by all email services.
- Automatic substitution of quick answers. Not supported by all email services.
- Select a ringtone to notify you of an incoming message.
- Adding shortcuts.
- Vibrating alarm to notify you that a letter has been received.
- Incoming and outgoing mail servers (user name, address, port and encryption type), etc.

In exactly the same way, accounts for other mail services are added to Gmail. There are no restrictions on quantity. It is usually not necessary to use manual settings, as described above, except for connecting corporate or some exotic mail accounts. In other cases, the application chooses optimal parameters default.
How to change and delete your Gmail account
By default, Gmail only displays correspondence from one account—the currently active one. To check another person's mail, you need to make it active.
All connected accounts are displayed in the top field of the main application menu (hidden behind the “hamburger” button). To switch between them, just touch the desired shortcut. And to simultaneously download messages from all your mail, select “ All boxes».

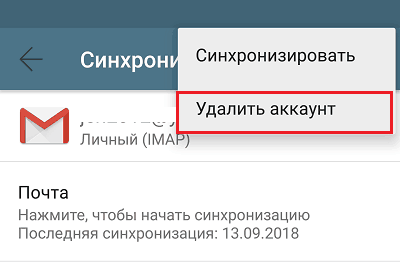
To delete an account from the Gmail application, click the triangle button in the main menu and open “ Account management».

Next, select the email service and account you want to delete. On the next screen, highlight again required address and go to the menu hidden behind the “three dots” button (top right). Tap " Delete account».
Setting up mail on iPhone and iPad
Connect and set up your account
Adding and setting mail account on mobile devices Apple is no more labor intensive than Android, but, in my opinion, less intuitive. And they are executed not in the mail section, but in “ Accounts and passwords».
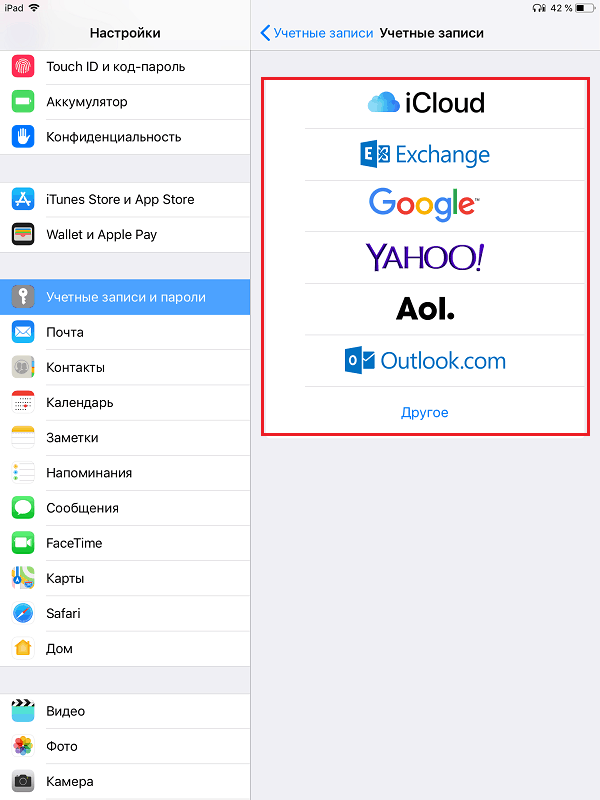
To use a different email account on your iPhone or iPad than the one linked to your Apple ID, do the following:
- In the list, tap " Accounts» point « Add».

- Select the mail service where your mailbox is registered. If it is not in the list of suggestions, click " Other».
- Next, select the section “ Mail" And " New account».

- Enter your account information: username (by default the email account login is entered), email address, password and description (the latter by default matches the mailbox address). Tap the button Next».

- In the next window - IMAP, check " Mail" Paragraph " Notes» It is not necessary to mark. Save the setting.
- Next, if you think the settings are sufficient, click “ Ready" A new account will be added. If you want to edit settings that are not displayed in this window, click " Additionally».

In the section " Additionally» contains the following options:
- Behavior of boxes. Allows you to assign or change the roles of some folders - drafts, sent, archived and deleted messages.
- The place to move unnecessary letters is to the trash or archive box.
- Frequency of emptying the recycle bin (complete destruction of deleted messages). The default is one week.
- Options for receiving incoming mail: use SSL encryption, select an authentication method, IMAP server port number, and IMAP path prefix.
- Whether to use S/MIME encryption. Disabled by default, supported by most but not all email services.

After closing the settings window, you will be taken to the newly created account section. By the way, there is also a button to delete it.

Now the mail program built into the system will receive letters, including from this mailbox.
Setting up the mail application
The parameters of the built-in mail program are configured, as you probably already guessed, through the section “ Mail».
The following is collected here:
- Application integration with Siri and search system.
- Ways to notify about incoming correspondence (ringtone and sticker). You can assign individual notification settings to each mailbox.
- Message list display: number of rows to display when viewed, labels, swipe options (right, left, adding a flag, etc.), flag style and color.
- Actions when reading a message (request confirmation for deleting a message, uploading pictures).
- Sorting and processing of correspondence: grouping by topic, collapsing read letters, location of the last message (top or bottom), completing topics (showing a chain of letters that make up one topic, even if they have been moved to other folders).
- Options created message: sending a copy of the letter to yourself, marking addresses, indenting when inserting a quote, signatures - general or separate for each account and the default account from which new letters will be sent.

As you can see, the email program on Apple phones and tablets allows you to completely configure it to suit your own needs. Not everyone can boast of such functionality. third party application. Another plus in the collection of mailers built into the system - both on Android and Apple - is the absence of advertising, which almost everyone is stuffed with free analogues. So both programs are quite good.
Enjoy it for your health!
Also on the site:
How to set up email on your phone for Android and iOS updated: September 13, 2018 by: Johnny Mnemonic
Tablets and smartphones are no longer luxury items, but modern tools used in everyday life and making it easier for users. Almost every adult or child has them and is used for both work and entertainment. Devices are running different systems, but Android OS is especially popular all over the world. The first thing after purchasing a device is that the user begins to install necessary software. An important point when initial settings is the email setup. Despite the emergence of other, more advanced methods of communication, the use of email services is still relevant, in particular, a mailbox is often required when registering on various resources.
Method for setting up mail on Android.
Choice mail application depends on the user's personal preferences. Installed by default on most Android devices Gmail client from Google, in this case you don’t have to download another one, and when you create an account you get the opportunity to use all Google services, including Google Drive, where you can store various types of information up to 15 GB for free. If you don’t like products from Good Corporation, you can choose equally popular and convenient Yandex(the service also offers the possibility, as well as many different interesting tools), Mail.ru or any other that suits your taste.
Before you create an email on your tablet, you need to download and install special application. IN Play Market All the best official ones are present, so there will be no problems with this. You can choose any one you like based on interface, functionality and other characteristics. For one mail, it is enough to select a specialized utility for the Android OS from the application store, tailored specifically for the mailer you use. If you have several mailboxes, it is advisable to download a universal email client, for example, MyMail, K9Mail, Aqua Mail or any other; they are present in abundance in the Play Market. With this option, you will have the opportunity to receive letters from all those mail services where you are registered. Let's look at how to create one on a tablet running Android using popular services as an example.

If you already have an account for any service, it will be enough to download and install the client and simply log in after launching it; if not, then you can create a mailbox in a matter of minutes. Setting up email on Android devices It is no different in complexity, the principle of operation is similar for all mail service utilities. To create a mailbox, you will need to select the “Create a new account” option in the menu and enter the appropriate data in the form fields. As a rule, the application independently determines the necessary settings and connects to the service, but if this does not happen, mail transfer parameters will be required.
It's easy to do, all input data is provided postal service. Using the POP3 protocol to transport mail, the client delivers messages to devices without synchronization with the service; all mail changes will be made only in the application, while on the server the data will remain as is. When installing a protocol IMAP mail is synchronized, that is, all manipulations with letters in the application are reflected on the server.
The Yandex client on Android is convenient, creative design and easy to navigate, for maximum comfort users have a swipe action system. It is also possible to add additional accounts. After installing the client from the Play Market on the device (the process occurs automatically after clicking the corresponding button on the store page), the user needs to log in or register. If the application does not determine the settings on its own, you will have to configure it manually. The procedure may also be necessary if you use universal client. You just need to select the installation manually, specify the type the required protocol and fill in the server fields for incoming and outgoing letters.
Basic settings of Yandex mail on Android using protocols:
- Incoming messages.
- For POP3 protocol:
- We register the address: pop.yandex.ru;
- For the connection security item, select: SSL/TLS;
- Connection port: 995;
- For IMAP protocol:
- In the Address column we write: imap.yandex.ru;
- Connection security: SSL/TLS;
- Connection port: 99
- Outgoing messages (SMTP server).
- We register the address: smtp.yandex.ru;
- Connection security: SSL/TLS;
- Connection port: 46
The login and password fields are filled out individually; this is your Yandex account data. From the moment the setup is completed, the mail will begin to fully function.

One of the most popular email services, Mail.ru, is as easy to set up as Yandex. You can use both a native client and a universal one, in this . As in the previous case, install the utility from the store, select manual configuration and enter the required data in the fields. Setting up Mail.ru mail on Android devices is done in the same way, only the server addresses will be different, for incoming messages - pop. mail.ru (POP3 protocol) or imap.mail.ru (IMAP protocol), for outgoing – smtp.mail.ru. The remaining settings, port and security type will be the same as in the case of Yandex. Next, you can configure the synchronization parameters with the My.mail.ru service, the frequency of checking letters and other details, and also enter the name in the appropriate field that will appear in the “from whom” column when sending messages.

Google's mail app is almost always already installed on Android, so you're unlikely to need to install it. If you do not yet have an account, you will need to register, where you will be asked to enter your credentials. It is possible to add other accounts, for which in the settings you should select the appropriate option from the list mail clients select the one you need, and then enter your credentials. After such manipulations, mail from other mailboxes will be available in Gmail.
All email clients perform automatic setup email from Google. The incoming mail server will be imap.gmail.com, and the outgoing mail server will be smtp.gmail.com. At the same time Gmail settings can be changed. By default, the IMAP protocol is used, but as a result of synchronization, battery costs, traffic consumption increase, and some devices even have heating problems. If you want to switch to POP3, you can do this by going to Mail Settings, where in the “Forwarding and POP/IMAP” section, check the boxes next to the items “Enable POP for emails received from now on” and “Disable IMAP”.
Gmail users can also use interesting utility Inbox from Google, which includes many useful tools and equipped with the function of reading and deleting messages by swiping right and left. The client has more original design And a large number capabilities, available for download from the Play Market.

The Rambler.ru service has also enjoyed considerable popularity for many years. Setting up Rambler mail on Android devices is similar to the Yandex and Mail.ru services described above. We select the POP3 or IMAP protocol for incoming letters, register the addresses pop.rambler.ru (port 995, SSL) or imap.rambler.ru (port 993, SSL), respectively, for outgoing ones - smtp.rambler.ru (gjhn 465, SSL) . The settings are suitable for any client and domain offered by the service. Before use third party utility It’s important to go to the “menu” in the mailbox settings Mail programs", where to check the box indicating what you plan to use third party clients to receive mail.

Server information is always present in the help section of each postal service, therefore, if you chose another option, you can find information to fill out the settings directly on the service.
As you can see, there is nothing complicated about filling out these protocols for email clients yourself; they are all configured in the same way, so now you can choose any email client for yourself, and even if the application does not detect the settings, you can always configure the connection manually. All you need to guarantee the functioning of mail on your Android is correct setting and working internet.