How to create a bootable USB flash drive using Rufus. How to Create a Bootable USB Using Rufus
Hello. Rufus for Windows is a free, useful, easy-to-use utility for creating a bootable ISO flash drives images of Windows 8.1 - 7, 10. We present to your attention instructions for Rufus in Russian, no translation needed, with visual examples in the form of pictures.
A little of your attention and you will easily master and understand how to create bootloader Windows flash drive 7 — 8.1 , you'll definitely figure it out how to install windows without disk, even without experience. The utility is intuitive and does not require unnecessary movements - even a schoolchild can figure out how to use the Rufus program primary classes. Loaded? Buckle up? Let's go!
So, to create bootable flash drive Windows we need to do a few simple preparatory operations. Firstly, we need a program capable of unpacking archives, I recommend using an archiver WinRAR, supports up to 20 different formats, knows how to work with ISO image mi. Second an indispensable utility will become Rufus.
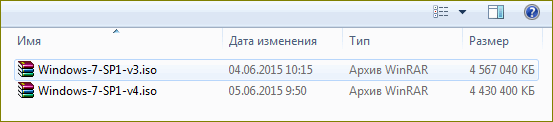
Thirdly, to create a bootable flash drive, we need a high-quality Windows.iso image. For those who, for various reasons, cannot sculpt an image - there is a scratch on the disk, it is broken optical drive, I bought a laptop with installed operating system, there is no disk drive, I suggest downloading a ready-made one, quality and performance have been checked.
Create a folder for Rufus programs, it is advisable to use in the title latin letters (English language). Right-click on the downloaded archive with the utility, left-click on “Extract files”, in the window that opens, specify the path to the created folder. The preparation is complete.
Instructions - bootable USB flash drive Windows 8.1-7 Rufus, how to use.
We got to the instructions, which means the time was not wasted, the preparation was successful, the only thing left is to learn how to create a bootable USB flash drive for Windows 8.1 - Win 7 using Rufus. Insert the flash drive into USB connector 2.0, portable important information to your hard drive, run the file Rufus-2.2.exe, and start using it. In the program window that opens, we make the necessary adjustments:
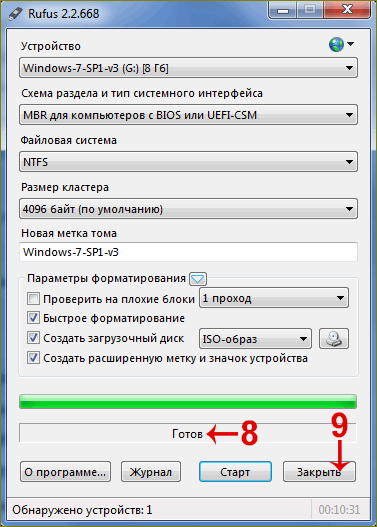
1. “Device” - here you should see the volume and name of your flash drive, in 99.9% of cases it will be detected automatically, click on the triangle on the right to check. I erased the volume label on mine - it showed up as No Label.
2. “Partition scheme and interface type” - in most cases, the most popular is “MBR for computers with BIOS or UEFI” - we select it. If you use hard drive with a capacity of more than 2 TB - “GPT for computers with UEFI” will help you.
3. " File system» - if your Windows image has a capacity of more than 4GB, choose - NTFS, less than 4GB - you can use FAT32.
4. “Cluster size” - leave unchanged - 4096 bytes.
5. “ISO image” - click on the drive icon, an explorer window opens, select the required operating system image, Rufus did an excellent job with both Win 8.1 and Win 7. P.S. OS installation was successful - verified.
6. “New volume label” - if you wish, using the English layout, set a name that is understandable to you.
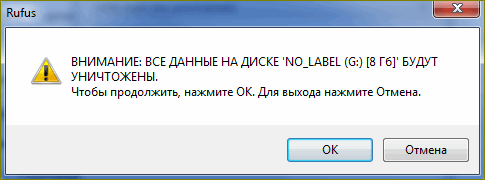
7. With a quick glance, we check whether you have chosen everything correctly, firmly and confidently press the “Start” button all the way. A standard warning will pop up, click “OK”, and carefreely lean back in your chair.
Rufus is one of the most quick programs, but a lot will depend on the speed characteristics of your drive. You have at least 5 minutes to drink some tea while the utility is running - don’t fiddle with the computer, let it finish what it started without errors.
8-9. We wait for the word “Ready” to appear. Click on the “Close” button, the Rufus bootable flash drive is ready for use.
How to install Windows without a disk - installing the OS from a flash drive.
Just to be sure, we install the flash drive into the USB 2.0 connector and reboot the PC. At the beginning of the boot (the moment the motherboard logo appears), press “F2” or “Delete”, depending on BIOS version. According to the same reason Boot the sector may also differ, we find “ Advanced BIOS Features" - let's go.
Move to the “BootSeq & FloppySetup” section, open “ Hard Disk Boot Priority", here is a list of drives installed in your computer. Created by you installation flash drive Windows is somewhere in last place. In order for the system to start booting from it, you need to use the keyboard arrows (down-up) to lower the selected area (select a flash drive), then use the “+” key to move it up to the top of the list, press “save” (F10). The computer reboots - installing the operating system Windows systems has begun.
How to install Windows without BIOS disk– UEFI.
BIOS interface UEFI - the principle is the same - we find the Boot sector, also known as Boot (now you can use the mouse), go in and see “Fixed Boot Order”, and under it there is a lot of “Boot Option” - sequence system boot. Select “Boot Option #1” and click - here is the SSD or hard drive from which the OS starts loading. In the menu that opens, select the inscription starting with “USB Key: + the name of your flash drive" We look at the keyboard - press “F10”, after the reboot the installation of the OS from the flash drive will begin.
Important! If you use a modified ISO image containing several versions of Rus+Eng from Starter to Ultimate 32-64bit, do not miss the pre-boot menu at the beginning - select the required bit depth and version. Also, don’t miss - after copying the image files (100%), the computer will reboot - enter the BIOS and return the hard drive back to first place. “F10” - reboot - installation will continue.
That’s all, you have a Rufus bootable USB flash drive, I’m sure the instructions helped you understand how to create a bootable USB flash drive for Windows 8.1 - 7 and you will definitely achieve a successful installation. Don't forget to say thank you and tell your friends. Good luck!
Best wishes
Denker.
In today's article we will look at how to use Rufus. This program designed to create bootable flash drives with Windows. With its help, we can write the downloaded ISO image of the operating system onto a flash drive and then install the system on the computer, restore its operation after serious failures, or use it to solve other problems. Rufus supports all versions of Windows starting from Windows XP. The main advantage of this program, according to the developers, is that it can create a bootable USB flash drive with Windows or Linux is faster than its other analogues, and the program is free.
Since Rufus is completely free utility, then I recommend downloading it from the official website of the developers.
As the creators assure, the program will be useful to us in following cases, When
- need from installation ISO image(Windows, Linux, UEFI, etc.);
- you need to work on a computer that does not have an installed operating system;
- you need to flash the BIOS;
- you need to run a low-level utility.
As you can see, the developers themselves are pushing us to acquire such a wonderful program in our arsenal. I would also like to draw your attention to the fact that the program has a very small weight, less than 1 MB, thus it will not take up space on any media.
There are two versions of Rufus:
- regular version, requires installation on a computer;
- Portable version, i.e. portable, it does not need to be installed, but it will be enough to launch the downloaded distribution kit.
In order to download the program you can go to the official website: http://rufus.akeo.ie
In the browser window that opens, scroll down the page and under the “Download” field, click on the link and download the version you like.
Another plus is that the developers’ website is entirely in Russian. This way we don't have to look for the page translation.
How to use Rufus? Setup before launch!
After we have downloaded the program distribution, let's figure out how to use Rufus. To do this, run the utility, if you see that the program has an English interface, then click the icon globe, which is on the right top corner and select Russian language. 
In order to start setting up the program, you need to connect USB flash drive. As soon as it is installed on the system, the program will immediately detect it. 
Pay attention! If several removable drives are connected to the computer, then select the one on which the image will be written. Otherwise, you may lose data from the flash drive if you select it incorrectly.
After you have dealt with the media, you can go to the settings ISO recording image.
In the “Partition scheme and system interface type” field, the following options are available to us:

As you can see, the Rufus program supports creating a bootable USB flash drive for different motherboards with BIOS and UEFI.
If you don’t know which option to choose, then select the first item – “MBR for computers with BIOS or UEFI”, as it will be suitable in most cases for almost all computers.
The next item that can be configured in the program is “File system type”, which will be on .
Pay attention! If the downloaded Windows ISO image is more than 4 GB, then you need to select the NTFS file system.
In general, the following file system types are available for the drive:
- FAT32;
- NTFS;
- exFAT.
This item can be left by default, then the program will make changes, if necessary, independently. We also leave the “Cluster size” item unchanged.
In the “New volume label” field, you can enter the name that will be assigned to the created bootable flash drive. It is advisable to provide a clear name.
At the end of the setup, you need to indicate to the system that we will burn an ISO image and by clicking on the button in the form of a disk, indicate the path to the image. 
If you don't have the most current Windows image 10, then read the article from the official website.
To begin the process of writing an image to a flash drive, click the “Start” button.
Recording to USB Windows To Go using Rufus.
If you use the Rufus program on Windows 10 or 8, then you may have noticed the “Windows To Go” item. By checking this box, you can write images to a flash drive Windows systems Enterprise – Windows To Go, this image can be launched directly from a flash drive. 
Pay attention! For this purpose you will need USB drive large capacity: from 32 GB and above. Also, not all flash drives are suitable, but only those recommended by Microsoft. If you need exactly this version of the operating system. Able to run without installation, Rufus will help you create it.
The process of recording an image in Rufus.
Since you and I have figured out a little how to use Rufus, let's look at the process of recording the image itself. After we have completed all the program settings and are ready to start the process, click the “Start” button.
The program will display a message warning that all data on the flash drive will be deleted. Accordingly, if there is nothing important on it, then click the “Ok” button, otherwise cancel the process. 
After the start, the process of writing the ISO image to the media will begin. You just have to wait a while. By the way, the timer that counts down the remaining time is located in the lower right corner. 
After the recording is completed, close the program window and open “My Computer” and see that we have a disk with Windows 10. I recorded this image on my flash drive, you may have a different name. This is our created bootable USB flash drive.  Now you can insert it into any computer and reinstall the system. By the way,
Question that the program helps you answer Rufus - how to create a bootable USB flash drive for Windows 7.
It occurs quite often among those users who may need to install a new operating system using a USB drive.
Rufus Features
The main difference between the Rufus program and most analogues is the ability to simple and quick recording bootable usb drive not only for computers with BIOS, but also for devices with a newer interface - UEFI.
In addition, using a flash drive created in the application, you can install Windows 7 (and other OS) on disks with both MBR and GPT partition styles (the latter option is used on hard drives larger than 1 TB), and without special problems create an installation drive for operating systems on Linux based, disks for system or password recovery, and even a flash drive key.
The same steps are performed in WinSetupFromUSB program, but it will take more time.

Features of work
In addition to the fact that the Rufus program provides the creation installation disk with Windows 7 and most other operating systems, its features include:
- work even on computers without an installed operating system;
- no installation required, which is not possible, for example, when using local account on a work computer;
- the ability to identify problem sectors on flash drives, format and restore such drives that Windows cannot always handle;
- approximately twice the speed of writing information to other applications compared to other applications boot disk;
- There is only one menu screen, making it impossible to select unnecessary item. Although, due to this simplicity, the application is not capable of creating multiboot disks.
Using the program
The program interface is quite simple and understandable even for regular user. And in order to start creating a bootable USB flash drive with Windows 7 using it, just insert the USB drive into the appropriate connector and launch Rufus.
- Devices. Here you need to check which USB drive Windows 7 is installed on. Basically, the installation drive is detected automatically, however, if another device is selected in the window, you should select the one you need from the list (Fig. 2).
- Section diagram (Fig. 3). For most computers, MBR is suitable for devices with BIOS or UEFI. However for hard drives sizes larger than 2 TB should use the GPT option. Opportunity to work with UEFI interface makes it possible to install any modern operating system using a flash drive using full mode EFI (extensible firmware interface with more correct hardware initialization).
- File system (Fig. 4). NTFS is usually chosen here, since the average operating system image is larger than 4 GB in size. But, if the distribution takes up less space, you can set the value to FAT32. The section with cluster sizes can be skipped, leaving the default value.


Advice: To fully support GPT and UEFI you will need to use Windows Vista versions or later. So create a bootable one for these modes Windows disk 7, for example, with using Windows XP (which also supports Rufus) will not work.
ISO image. When you click on the triangle next to this item, a window should open in which you should find and select a disk image with Windows 7.

New volume label. Only the English layout should be used here. The name is chosen at the discretion of the user. If you do not change it, the bootable USB flash drive will be called the same as before.

After checking whether all items are selected correctly, taking into account the characteristics of your hard drive, you should click on the “Start” button and confirm your actions to create bootable media by clicking "OK".
After some time (from 5 to 20 minutes, depending on the size of the image and system, the parameters of the flash drive and USB input), the application will complete its work and display a message indicating that it is ready.
Using the created media
After the system is recorded on a flash drive, the drive can be used to install the Windows 7 operating system. However, before this you should not only install the drive in the appropriate slot, but also configure the system BIOS.
To call it, you usually need to press one of the function keys(F1 or F2) during the system boot process. And to install a flash drive as the first one to be checked for system files disk perform the following steps:
- find and open the Advanced menu BIOS Features;
- go to the BootSeq & FloppySetup;
- open Hard Disk Boot Priority, selecting a USB drive (already connected to the computer) from the list of connected devices;
- save the changes made (F10);
- reboot the computer.

The steps to boot a flash drive on a computer with a UEFI interface are practically no different from systems with a BIOS. The difference lies in the use of the mouse and the menu names. First, the user must open the Fixed Boot Order item, then Boot Option #1 and select a USB flash drive from the list that appears after clicking. After saving (the same F10 command as for the BIOS), the computer is rebooted and booting from the media begins.

Conclusions
Using a useful and simple program makes it possible to get a bootable disk without spending much more time on it than formatting a regular flash drive. At the same time, it is important to download a reliable and efficient Windows distribution 7, otherwise even an application that recorded it well will not help install the system from a USB drive.