How to install a second Windows 7. How to install two (or more) versions of Windows
How to install 2 (two) operating systems on one computer? Windows XP + Windows 7
Windows XP + Windows 7, or how to install two systems on one computer
Latest operating system from Microsoft Windows 7 has gained many fans and detractors alike. But she left almost no one indifferent. At the same time, almost everyone who dealt with it at first had to deal with various problems due to incompatibility of programs, and many had a desire to return to the “good old” XP. But also with new system not everyone is in a hurry to leave. And therefore, many users feel the need to have two operating systems on one computer at once, so that they can use them in turn, switching between them as needed. But since Windows 7 is a new system, sometimes some difficulties arise when trying to create a multiboot configuration (and you still need to know how to do this correctly). And if you are one of those users who, after installing Windows 7, still need XP, then this article is for you...
ATTENTION!!!
Let's start right away with a warning. If you have any data stored on your hard drive that needs to be backed up, further instructions, in the parts related to re-partitioning the disk, you will need to make minor adjustments, since they are designed for a blank hard drive that does not contain any information or stores data that can be deleted. If the existing information needs to be saved, then we EXTREMELY recommend that you take care of repartitioning your hard drive BEFORE starting installation operating systems. And use any advanced third party programs, For example, Acronis Disk Director Suite (paid program). Or use some Live-CD with Linux (for example, Ubuntu) - almost all of them have the GParted program (free, more powerful than the utility from Acronis, but often works more slowly). In any of these programs you need to create two empty MAIN partitions formatted in NTFS. These partitions should be at the beginning of the disk (on the left in graphic card V specified programs), and the partition with the data that needs to be saved should be moved to the right - closer to the end of the disk. We will install operating systems into these 2 partitions - they will become, respectively, drives C and D. And then during installation you DO NOT need to touch them - neither repartition nor format - just install each of the operating systems in the partition prepared for it.
Well, now the installation itself.
Configuring the order of checking boot devices
Let's go to BIOS settings to section Advanced and look for the item Boot Device Priority. Here you need to install first boot device(First Device) drive optical disks, and the second - hard drive. This is necessary so that when you reboot you can start the computer with boot disk and get into its menu. Save the configuration by clicking Save & Exit mostly BIOS menu(or by pressing F10 followed by answering the question with a key Y).
If you have BIOS version slightly different, you will have to look for the desired section by analogy. Focus on the word \"Boot\" (\"Download\").
ATTENTION
BIOS is absolutely NOT designed for \" crazy hands\". Therefore, you should not touch anything there without a clear understanding of what you are doing! This is exactly the case when it is better to think seven times and break once.
You can skip the first point if your computer, when rebooting, can itself read a disk that has long been forgotten in the drive. This can usually be determined if Windows startup The disk in the drive begins to spin up on its own.
We start the installation of Windows XP
Looking ahead, I will say that first we will install Windows XP. Not the other way around, but XP first! Therefore we insert installation disk with this operating system, and reboot the computer. If suddenly, when loading, we see an inscription of white letters, something like \”Press any key to boot from CD...\”, then, without hesitation, we immediately press any key on the keyboard. This is how we will boot from this installation disc. While the inscription is on, you will have 5 seconds to press any key. If you don’t have time, the computer will start from the hard drive, and the XP installation will not start. You'll have to reboot again.
Each system has its own personal section
As mentioned above, before installation, you need to select two partitions on your computer’s hard drive. While navigating through the installer dialog boxes, you will be asked to select a partition to install the operating system. Let's ignore this and create partitions ourselves, first deleting all the old partitions by pressing the D key, and then in their place we will create new ones by pressing the C key and specifying the size of the first partition we need (in megabytes). This will be partition C. Next, we are left with an unallocated area of the disk - select it and press the C key again, and without delving into the details of the events, immediately press ENTER (since we don’t need to change the size of the second partition). This way we get partition D. Although, if the size of the hard drive is quite large, then it makes sense to allocate a certain volume for drive D, and leave all the remaining space unallocated - you will deal with it later, creating partitions on it according to your needs.
ATTENTION
The above procedures are intended for a blank hard drive with no data on it, since when partitions are deleted, all information will disappear. If there is data on the hard drive that needs to be saved, then these movements CANNOT be carried out. Go back to the beginning of the article and create, as described there, two clean main partitions using special programs and only then proceed to install operating systems, without repartitioning or formatting anything, but simply install each OS into the partition prepared for it.
Installing Windows XP on partition D
After all the manipulations with the partitions hard drive Let's proceed with the installation itself, specifying partition D as the location for Windows XP. Exactly this way, and not otherwise, so that in the future there will be no problems with choosing and loading the desired operating system. After this, we complete the installation as usual.
Please note
We installed Windows XP on drive D. It will be located there and will work from it, but its boot files, that is, the files that launch it, will still be located on drive C. And if drive C is formatted or in some way damaged (along with these boot files), you will no longer be able to boot Windows XP. Although the system itself may be in perfect order, there will be nothing to start it with.
Boot Windows files XP is:
Ntldr
Boot.ini
NTDetect.com
They are located in the root directory of drive C (hidden files, service files - turn on their display). You can copy them to a safe place, and if you suddenly need them, they will be easy to restore from backup copy and manually return it to drive C, thus restoring it again loading Windows XP.
Next up Windows installation 7
After Windows XP established, it's time to approach Windows 7. We proceed by analogy with the previous operating system - insert the installation disk Windows 7, restart the computer and press any button when the message appears (most likely: \”Press any key to boot from CD…\”).
Selecting a partition for installation
Now select partition C and install Windows 7 into it.
DO NOT FORMAT!!!
All! We have a multiboot configuration ready.
Now, when you turn on or restart your computer, two lines will appear on your screen, the first one is \” Previous version of Windows” and the second - \” Windows 7" You can select any of them using the arrow keys on your keyboard and press ENTER- the selected operating system will start loading. If you don’t press anything for 30 seconds, the default system will start - if you haven’t changed anything, then this will be Windows 7.
If you want to change the default operating system or delay time, then go to Windows 7, then button Start => Control Panel => System => Additional options system (left) => \"Settings\" button in the \"Boot and Recovery\" section.
Most often on the Internet you can find instructions on how you can install Windows 7, 8 or 10 as a second system when Windows XP is already installed on your computer. This is a relatively simple task that even an inexperienced user can handle, since a newer operating system always retains the bootloader of the old one and automatically creates a menu in which the user can choose when booting which system to boot - the new one or the previous one. In this article we will look at the opposite situation - when Windows 7, 8, 10 is installed on the computer, and the user wants to install Windows XP in parallel. The piquancy of the situation is that after installing Windows XP, the previously installed Windows 10/8/7 will stop loading and its bootloader will have to be restored.
Installing Windows XP as a second system after Windows 7/8.1/10
If you have a desktop computer, then it would be even better to use an SSD for modern Windows 7/8.1, and a classic hard drive for XP. In this case, you can temporarily disable the SSD with Windows 7-10 so as not to accidentally erase anything from it, calmly install XP and then proceed to configure the boot order.
METHOD 1. Installing Windows XP with a connected hard drive with Windows 7/8.1/10 or installing Windows XP on another partition of the same physical disk
This is a common situation that most users face. In addition, this method is suitable for non- experienced users, which have several physical drives, but do not want or cannot disconnect the hard drive with Windows 7/8.1.
Attention! This method not suitable for SSD. If you want to install XP and 7/8.1 on solid state drive, you will need to first prepare the disk for XP using the Alignment Tool, then install XP, and only then can you install Windows 7/8.1.
Step 1 Prepare the partition for the second operating system.
Create a partition on your hard drive where you will subsequently install XP. If you need to partition your disk or redistribute space between existing partitions, use free program MiniTool Partition Wizard Home (Download from the official website).
Important! Prepare sections EXCLUSIVELY on Windows 7/8.1/10 BEFORE installing XP! We strongly DO NOT recommend partitioning the disk in the XP installer! All you have to do in the XP installer regarding partitions is select the partition you want and quickly format it!
Let's say you have three partitions on your disk:
- Bootable (capacity 100MB for Windows 7 or 350MB for Windows 8/10)
- System, where Windows 7/8./10 is installed.
For Windows XP, you create a fourth partition. Where it will be placed and from which section to cut off the area is up to you. Of course, it is more logical to arrange the sections like this:
- Bootable
- System, where Windows 7/8/8.1 is installed.
- Windows XP installation section
- Disk with user data.
Although you will format the partition in Windows XP Setup, you can format it in Windows 7/8/10 so that you can set a label. And the label will help you not to make a mistake in choosing the right partition in the XP installation program.
Step 2 Install Windows XP
Boot from the installation CD or bootable USB flash drive and install Windows XP on the prepared partition. Be extremely careful when choosing a section. Be guided by its size.
Select a section and click Enter:

Select an item Format partition to NTFS system(quick):

Further steps for installing Windows XP do not differ from its usual installation as the only operating system.
After installation is complete, download XP and install everything necessary drivers devices. Set up your network and internet (if necessary).
Step 3 Restore the bootloader of the first operating system and add an entry for the second previous generation system to it
A. Preparatory stage. Downloading support software
Click Register bottom of the page:

To download, just like it on behalf of your Facebook account or subscribe by email:

The program requires Microsoft .NET 2.0 SP2 Framework. You can download from the Microsoft website http://www.microsoft.com/ru-RU/download/details.aspx?id=1639:
- Install Microsoft .Net 2.0 SP2 Framework.
- Install EasyBCD.
B. Restoring the Windows 7/8/10 bootloader
During XP installation Windows boot loader 7/8/10 got lost. Therefore, the first thing we need to do is restore it.
Launch EasyBCD.
- Go to section BCD installation.
- Select the partition where the Windows 7\8 boot loader was located before installing XP.
In most cases, this is the very first partition, 100MB in size for Windows 7 or 350MB if your first system was Windows 8\8.1. - Select bootloader type - Windows Vista/7/8 in MBR
- Click the button Rewrite MBR

After this, the Windows XP bootloader will be erased, and a new type of bootloader will be installed in its place.
Restart your computer. Now, instead of XP, your copy of Windows 7/10.
Now our task is to add a second entry to the bootloader - to boot XP.
B. Adding XP boot entry to Windows 7/8/10 boot loader
Install EasyBCD in the same way again - now on Windows 7/8/10.
Launch EasyBCD.
- Click Add entry
- Select OS type Windows NT/2k/XP/2k3
- Select a system name.
This is the name that will appear in the menu when loading. We recommend removing the word Microsoft. - Click the button Add:

Now go to the section Current settings and check that the second boot entry is added:

After this you can click the button Edit boot menu, select the time for displaying the menu with a choice of operating systems at boot and rename the OS names. If you make changes, don't forget to click the button at the end Save:

METHOD 2. Installing Windows XP when the hard drive with Windows 7/8.1/10 is disconnected
This method, as we wrote above, is more suitable for desktop computers and only some laptops where it is possible to connect multiple data storage devices. The advantages of this method:- You don't risk accidentally erasing already installed Windows 7/8.1/10 during XP installation.
- If you disconnect any of the physical disks, you will be able to boot from the remaining disk because this method places the boot loaders on different physical disks. You may only need to adjust the boot order in the BIOS.
Step 1 Turn off your computer. Disconnect the data cable from the hard drive on which Windows 7/8.1/10 is installed
Step 2 Turn on your computer and install XP on the remaining hard drive. in the usual way- as if this Windows will be the only one. Install all necessary drivers.
Step 3 Turn off the computer and connect the hard drive with Windows 7/8.1/10 back to the previous SATA port.
Step 4 Download Windows 7/8/10.
If you haven't changed the boot priority in the BIOS, by default you should boot from the same drive into your old Windows 7/8/8.1.
A.Installing software for editing bootloaders
Install Microsoft program.Net Framework 2.0 SP2 and EasyBCD (described in Method 1).
Now the only thing we need to do is add an entry to the Windows 7/8/8.1 bootloader about XP installed on another drive.
B.Adding the Windows XP boot entry to the Windows 7/8.1/10 bootloader
Follow these steps:
- go to the tab Add entry;
- select OS Windows;
- select type Windows XP;
- specify the desired system name in the OS selection menu;
- click the button Add to add.
After this, restart your computer, select Windows XP from the menu and make sure that it boots from its hard drive.
Today I decided to prepare a short article in which I will talk about how to remove one Windows system from a computer on which you have installed two operating systems, for example, Windows 8 and Windows 7. I have already written an article on how to do this correctly. This article can be considered a small addition.
It is clear that if you installed two operating systems on your computer, for example, in order to test Windows 8, then sooner or later you will want to remove one of the systems. Either leave the new eight and remove Windows 7, or vice versa, remove Windows 8.
I don't see much point in having two systems on a computer. Although, now hard drives such a volume that you can put ten of them :) But, for example, on mine SSD drive at 120 GB, this is not very correct. Therefore, when you have already checked everything and made your decision, the question arises, how to remove Windows 7 or Windows 8. Now I will write how I did it.
You probably already thought that there is something complicated here, you formatted the partition with an unnecessary system, and that’s all. But not everything is so simple, the bootloader still remains intact. You also need to remove the system from the boot menu. There is nothing difficult about this, I’ll demonstrate it now.
Completely remove Windows (if two systems are installed)
It is best to remove it from the system that you decided to leave. I don't know how important this is, but it's better to do it this way.
For example, I decided to leave Windows 8, and I will show you how to remove Windows 7.
This means that in this case, we carry out all actions from the figure eight. First, let's make our system, which we decided to keep, the main one (it should load by default), and then remove the system we don’t need from the download.
Go to your desktop and press the keys Win+R. In the Run window, enter the command msconfig, and press OK.
 In the new window, go to the tab, select the operating system that we want to keep (in our case, this is Windows 8), and press the button Use as default (opposite OS, the corresponding status “Default OS” should appear).
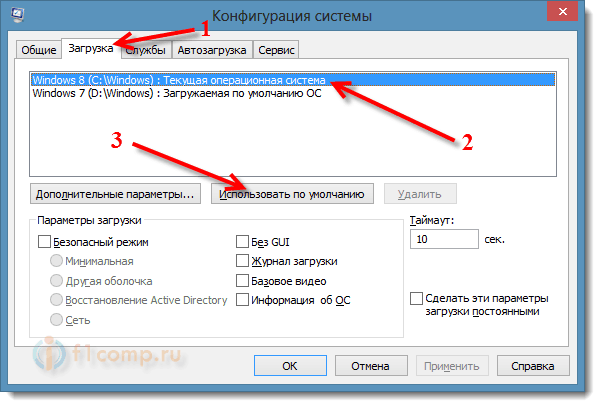
Now, select the system that we want to delete (in our case, this is WIndows 7), and press the button Delete.

A window will appear, I advise you to select .

The computer will reboot, and without the ability to select an operating system, the system that we left should immediately boot. In our case, this is Windows 8.
What to do with files from the old system?
Yes, all that remains is to deal with the partition that previously contained the operating system. The easiest way is to format it and store files on it.
Just be careful when formatting the partition. Check its contents, there should be folders there: Program Files, Windows, Users, etc. And this cannot be drive C, it will have a different letter.
Attention! Formatting will delete all information on local disk. If we consider our case specifically, all information that was stored on the local drive C will be deleted (desktop, folder my documents, my photos, etc.), on the operating system we want to remove.

Second way.
You can delete the partition and free space, which will appear after its removal, add to the already existing section. I don’t know how much of a necessary procedure this is, because it’s much easier to just leave this section for storing files.
But, if you decide to remove it completely, then this can be done standard means Disk management, which I wrote about in this article ““. Do not pay attention that the article was written for Windows 7, on eight, everything is exactly the same.
In Disk Management, right-click on the partition you want to delete and select Delete volume...“.
Then, right-click on the partition to which you want to add memory from the deleted partition and select Extend volume. Follow the instructions, everything is simple.
Afterword
Here is a proven way to remove an operating system if you have two or even more of them on your computer. I think that there should not be any problems. The main thing is to be careful not to delete something wrong or format a section with valuable information.
If anything, ask your questions in the comments, I will try to help. Share information, perhaps you did this procedure differently. Best wishes!
Also on the site:
How to remove one Windows operating system from a computer if two systems are installed? updated: February 6, 2018 by: admin
Dear friends, today I want to tell you about one computer. No, this time virtual machine we won't need it. In one of the articles on this site I wrote how to create additional logical drives on the computer, that is. For those who haven’t read it yet, take a look at this article, it will come in handy today. Of course, we will install additional operating systems, each on its own disk (partition, new volume).
And so you can immediately create, for example, on drive “D”, three more additional partitions. This is exactly what I did so as not to get confused during the installation of operating systems. allocated for one additional section 35 GB, for another 30 GB, for a third 25 GB. Why different volume? I assigned a planned role to each system, let’s say a system on a 25 GB disk is intended only for games, I even deleted almost everything on it system programs, the drivers installed on it are only those that are used by games, there are a minimum of programs in startup. You can create sections and read how exactly to do this on this site - the admin explained everything clearly.
There are no tricks to installing multiple operating systems. Everything is done in the same way as when installing one system, that is, when installing the OS, select a partition, format it (or not format it). Enter the computer name (I gave each system different names). The system is installed. It remains only to add a few little things... You can switch from system to system only by turning it off and on, or rebooting the computer. When you turn on your computer, you will see a black screen with your installed systems Windows 7 or windows XP or other versions.

Also, in addition to various Windows options 7, you can install on others Windows partitions XP (if you install XP, you need to install XP first, and then Win 7), Mac OS, OS/2 Warp, Linux, etc...
The system that you installed first in this list will be the last one, the one that was installed last in the list will be first. You can navigate through these labels using the arrow keys. Which system do you need now, highlight it, press "Enter". If you want the boot to always occur from the operating system you have chosen, do the following.
Open the Start menu --> Computer --> Properties --> Advanced system settings, select the "Advanced" tab. Click on the "Options" button.

In the “Boot and Recovery” window, click on the arrow and select the operating system that will boot by default, that is, the boot will always occur from the system that you have chosen.

Naturally, each system will have its own registry. On each system you need to configure your own system recovery, on each you need to install drivers and antivirus, each you need to activate, install the updates you need.
Which system are you on? at the moment, it will call itself drive “C” by changing the letters of other drives, except for drive “D”, its letter will remain unchanged. Probably there is no point in installing on all systems identical programs. I have 80% of the programs installed on drive “D”, so that if necessary, I could use one or another program without switching between systems, I copied shortcuts from the desktop to other systems.
I just opened the disks with other systems, users -> administrator -> desktop and dragged the shortcuts there with the mouse. Almost all programs began to work on other systems after that. Well, that's all, now you know how to install two, three, or four operating systems on one computer. Good luck everyone!
Well, that’s all, now you know, it’s easy and simple. Good luck everyone!!!
Good day everyone!
Most modern laptops come with Windows 10 (8) pre-installed. But from experience I can say that many users (still) like and feel comfortable working in Windows 7 (some people don’t run the old software in Windows 10, others don’t like the design of the new OS, others have problems with fonts, drivers, etc.).
But in order to run Windows 7 on a laptop, it is not necessary to format the disk, delete everything on it, etc. You can do it differently - install Windows 7 as a second OS to the existing Windows 10 (for example). This is done quite simply, although many have difficulties. In this article I will show with an example how to install a second Windows 7 OS to Windows 10 on a laptop with GPT disk(under UEFI). So, let's start to figure it out in order...
How to make two from one disk partition (we make a partition for installing a second Windows)
In most cases (I don’t know why), all new laptops (and computers) come with one partition - on which Windows is installed. Firstly, this partitioning method is not very convenient (especially in emergency cases when you need to change the OS); secondly, if you want to install a second OS, there will be nowhere to do it...
The task in this subsection of the article is simple: without deleting data on the partition with pre-installed Windows 10 (8), make another partition of 40-50GB (for example) from the free space for installing Windows 7 on it.
In principle, there is nothing complicated here, especially since you can get by with built-in Windows utilities. Let's consider all the actions in order.
1) Open the utility “ Disk management" - it is in any Windows versions: 7, 8, 10. The easiest way to do this is to press the buttons Win+R and enter the command, press ENTER.

2) Select your disk partition that contains free space(in the screenshot below I have 2 sections; on a new laptop there will most likely be 1). So, select this section, right-click on it and in context menu click "" (i.e. we will reduce it due to the free space on it).

3) Next, enter the size of the compressed space in MB (for Windows 7 I recommend a partition of 30-50GB minimum, i.e. at least 30,000 MB, see screenshot below). Those. In essence, we are now entering the size of the disk on which we will subsequently install Windows.

4) Actually, after a couple of minutes you will see that the free space (the size of which we indicated) was separated from the disk and became unmarked (in disk management - such areas are marked in black).
Now right-click on this unallocated area and create a simple volume there.

5) Next you will need to specify file system(choose NTFS) and specify the drive letter (you can specify any one that is not yet on the system). I think it’s not worth illustrating all these steps here; just click the “next” button a couple of times.
Then your disk will be ready and you can write other files to it, including installing another OS.
Important! Also for splitting one hard section disk into 2-3 parts, you can use special utilities. Be careful, not all of them crash your hard drive without damaging your files! I talked about one of the programs (which does not format the disk and does not delete your data on it during such an operation) in this article:
Creating a bootable UEFI USB flash drive with Windows 7
By the way, you can find out what partitioning is on your disk (MBR or GPT) in this article: . The settings you need to set when creating bootable media depend on the layout of your disk!
For this matter, I suggest using one of the most convenient and simple recording utilities bootable flash drives. We are talking about the Rufus utility.
![]()
A very small (by the way, free) utility for creating bootable media. Using it is extremely simple: just download, run, specify the image and set the settings. Next - she will do everything herself! Just ideal and good example for utilities of this kind...
Let's move on to the recording settings (in order):
- device: enter the flash drive here. to which the file will be written ISO image with Windows 7 (a flash drive will need a minimum of 4 GB, preferably 8 GB);
- Partition scheme: GPT for computers with UEFI interface(This important setting, otherwise the installation will not be able to start!);
- File system: FAT32;
- further indicate boot image file with Windows 7 OS (check the settings so that they are not reset. Some parameters may change after specifying the ISO image);
- Press the start button and wait for the recording process to finish.

Setting up the laptop BIOS (disabling Secure Boot)
The fact is that if you plan to install Windows 7 on a second system, this cannot be done unless you disable Secure boot in Laptop BIOS.
Secure boot is a UEFI feature that prevents unauthorized operating systems and software from starting when the computer is turned on and running. Those. roughly speaking, it protects against everything unfamiliar, for example, viruses...
In different Secure laptops Boot is disabled in different ways (there are laptops where it cannot be disabled at all!). Let's consider the issue in more detail.
1) First you need to enter the BIOS. For this, the following keys are most often used: F2, F10, Delete. Every laptop manufacturer (and even laptops from the same model range), the buttons are different! The login button must be pressed several times immediately after turning on the device.
Remark! Buttons to enter BIOS for different PCs, laptops:
2) When you enter the BIOS, look for BOOT section. In it you need to do the following (using the example of a Dell laptop):
- Boot List Option - UEFI;
- Secure Boot - Disabled (disabled! Without this, you won’t be able to install Windows 7);
- Load Legacy Option Rom - Enabled (support for loading older OS);
- The rest can be left as is, by default;
- Pressing the F10 button (Save and Exit) means saving and exiting (at the bottom of the screen you will see the buttons you need to press).

Secure Boot is disabled.
Remark! You can read more about disabling Secure Boot in this article (several different laptops are discussed there):
Starting the Windows 7 installation
If the flash drive is recorded and inserted into the USB 2.0 port ( USB port 3.0 is marked in blue, be careful), the BIOS is configured, then you can start installing Windows 7...
1) Reboot (turn on) the laptop and press the boot media selection button (Call Boot Menu). IN different laptops these buttons are different. For example, on HP laptops you can press ESC (or F10) to Dell laptops- F12. In general, there is nothing complicated here, you can even experimentally find the most common buttons: ESC, F2, F10, F12...
Remark! Hotkeys for call Boot Menu in laptops from different manufacturers:
By the way, choose bootable media You can also do it in the BIOS (see the previous part of the article) by setting the queue correctly.
The screenshot below shows what such a menu looks like. When it appears, select the created one bootable USB flash drive(see screenshot below).

2) Next launch normal installation Windows 7: a welcome window, a window with a license (you need to confirm), a choice of installation type (choose for advanced users) and, finally, a window appears with the choice of the disk on which to install the OS. In principle, there should be no errors at this step - you need to select the disk partition that we prepared in advance and click “next”.

Where to install Windows 7.
Remark! If there are errors like “This partition cannot be installed because... it’s MBR…” - I recommend reading this article:
3) Then you just have to wait until the files are copied to the laptop’s hard drive, prepared, updated, etc.

4) By the way, if after the files are copied (screenshot above) and the laptop is rebooted, you will see the error “File: \Windows\System32\Winload.efi”, etc. (screenshot below) - it means you haven’t turned off Secure Boot and Windows cannot continue the installation...
After disabling Secure Boot (see how this is done, see above in the article) there will be no such error and Windows will continue installation as normal.

Error related to Secure Boot - not disabled!
Selecting the default system, setting the timeout
After installing the second Windows systems- when you turn on your computer, you will see a boot manager that will display all the available OSes on your computer to let you choose what to boot (screenshot below).
In principle, this could be the end of the article - but the default parameters are too inconvenient. Firstly, this screen appears for 30 seconds each time. (5 are enough to choose!), secondly, as a rule, each user wants to designate which system to boot by default. Actually, that’s what we’ll do now...

To set the time and select the default system, go to the panel Windows management at: Control Panel/System and Security/System(I set these parameters in Windows 7, but in Windows 8/10 - this is done in the same way!).
When the “System” window opens, there will be a link on the left side “ Advanced System Settings"- it needs to be opened (screenshot below).

Control Panel/System and Security/System/Add. parameters

Next, you can select the operating system that boots by default, as well as whether to display the list of OSes, and how long to display it. (screenshot below). In general, you set the parameters for yourself, save them and restart the laptop.

PS
This concludes the modest mission of this article. Results: the laptop has 2 OS installed, both work, when you turn it on you have 6 seconds to choose what to load. Windows 7 is used for a couple of old applications that refused to work in Windows 10 (although it could be done with virtual machines:)), and Windows 10 for everything else. Both operating systems see all disks in the system, you can work with the same files, etc.