The adb program will display a list of devices currently connected to the computer. Manual ADB driver installation
APP OVERVIEW
Adb Run - convenient program, which allows you to quickly and clearly manage the main tools and commands of ADB for Android.
Surely many of the users of our site have heard about ADB at least once; it is possible that some users even used the main functionality of this program (console). To make life easier for newbies and experienced users An interesting program called Adb Run was released. What kind of program this is and where exactly it can be useful, you will learn from today's review.
The first thing you should pay attention to is the need to enable USB debugging on your device, otherwise the program simply will not function.
The point of this program is to automate familiar actions by simplifying them by entering numbers through a special console, which is offered by the author of the Adb Run program.
The screenshot shows that at the time of writing the review, the program consists of 16 main points, each of which is responsible for performing a particular action. So that you don’t have any unnecessary questions, we will briefly describe each of the points and tell you exactly what they are needed for. As a control, you need to use the numeric keyboard layout and the “Enter” key to confirm the selected action.
Overview of the main functions (items) of Adb Run
1.Device attached? – a command that allows you to check whether the at the moment smartphone/tablet to computer (first enable USB debugging).

2. Move – the command responsible for moving files from an Android smartphone/tablet to a PC and vice versa. This item contains an additional menu with a selection of the necessary parameters and a separate item for returning to the main menu.

3. Install Android App to Device – a command designed to install applications on your Android device. There are items for: copying the application to a specific folder on the device; instant installation of the application; installation on a memory card; reinstallation with preservation of information; reinstallation with saving information and moving it to a memory card and mass installation several applications at once.

4. Reboot Devices – reboot the device into several available modes with the possibility of further selection.
Reboot – normal device reboot;
Reboot Fast (only Rooted) – fast reboot(only for devices with superuser rights);
Reboot Bootloader– reboot into bootloader;
Reboot Download (for Samsung) – reboot into the bootloader (for Samsung devices);
Reboot Recovery – reboot to the recovery menu;
Fastboot Reboot to Normal Mode – quick reboot to normal mode;
Fastboot Reboot to Bootloader – quick reboot to the bootloader;
Go to Fastboot – switch to fast boot mode, also called “sleep mode”.

5. Fastboot basic commands allowing you to flash an Android smartphone/tablet using fastboot mode.

6. Unlock Gesture Key / Pin Key - one of the most useful items that allows you to unlock a forgotten graphic key on Android and also unlock Pin codes.

7.Manual Command and Unlock Bootloader– an item that allows you to manually enter ADB commands you know and work with them. In addition, there are pre-prepared commands for selection.

8. Check for update program Adb Run - instant check for availability new version Adb Run programs.

9. Install Bootanimation.zip – fast and easy way to change/install the boot animation of your Android device.

10. Memory and Partitions – detailed information about memory blocks and available partitions of your Android device.

11. Run Script – a menu item that allows you to automate the execution of certain scripts in bat format. The bat format files themselves must be placed in the following path: C:\adb\runscr\*.bat.
12. Backup quick creation and restore backup data/applications from your Android device.

13. Odex system *.apk and *.jar – Odexization system files firmware with certain parameters to choose from.

14. Screenshot/Record – an item that allows you to instantly create/view screenshots and record video from the screen of your device with further saving on your PC. There are a number of settings for recording duration and video bitrate.

15. Root Android– information on obtaining Root rights for all devices running Android.
16. Download Android Driver – a page with all the necessary drivers for your device.
At the moment, these are all the functions presented in the program. According to the developer, the functionality is constantly increasing, and new functions will certainly appear in the latest versions of Adb Run.
Below you will find instructions that allow you to do various interesting things yourself with your Android smartphone/tablet.
Instructions: How to control Android from a PC on Windows:
What to do if you accidentally dropped and broke the display of your Android device, and the data stored on it is extremely important to you?!
Despite the wide variety of shockproof cases and protective films/glasses for Android smartphones and tablets, it sometimes happens that the screen breaks after a fall and does not respond to pressure. The cost of repairs is not always cheap, especially modern models smartphones, and as luck would have it, you needed data stored on your smartphone? It doesn’t matter, we will tell you in detail about the main methods that will help you “pull out” all the essentials without any costs or trips to the service center.
We would like to warn you right away that this article is suitable for users whose device does not respond to presses, but still displays information on the display.
Method one (simple):
If you don’t know what Root rights are and have never installed them on your device in your life, then this method designed just for you. The problem with data recovery is solved literally in a matter of minutes.
All you need is to go to the official website of your device, download proprietary program for data management, for example, HTC Sync or Samsung Kies, connect your smartphone via USB to your PC and copy all the data you need to your PC.

Method two (simple)
For the second method, you will need a USB OTG cable or a computer mouse with a microUSB connector. However, it is worth noting that not all devices are able to work correctly/work at all via a USB OTG cable.
What you will need:
1. USB OTG cable/mouse with microUSB connector.
2. Smartphone/tablet with a broken display.
3. A mouse and some free time.
All we need to do is connect a computer mouse to our device and then control it with the mouse, transferring data, contacts and other information using a memory card or appropriate applications, for example.
Method three (for experienced ones)
This method is suitable for all users, but to implement it, some details are required, described below.
1. Personal computer/laptop with Windows installed.
2. USB cable to connect the device to a PC.
3. Pre-installed drivers for Android.
4. USB debugging mode enabled.
5. Downloaded and installed program ADB Run.
How to display smartphone/tablet images on a PC display:
1. Launch the installed ADB Run.
2. Using the number “7”, go to the Manual Command and Unlock Bootloader item, then enter the number “9” and get to the Control Android out Windows section, then press the number “1” Go to Website Java (Download Java JDK, and install) and go to the Java website to install the Java JDK package.
3. On the Java JDK website, you need to download the latest version of Java, taking into account the bit depth operating system Windows.
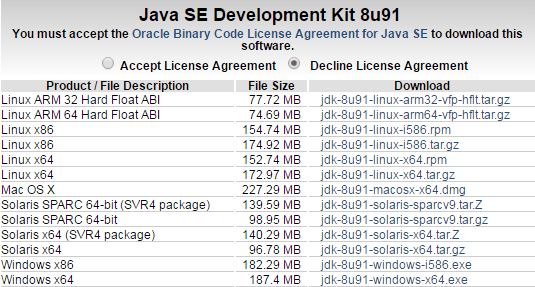
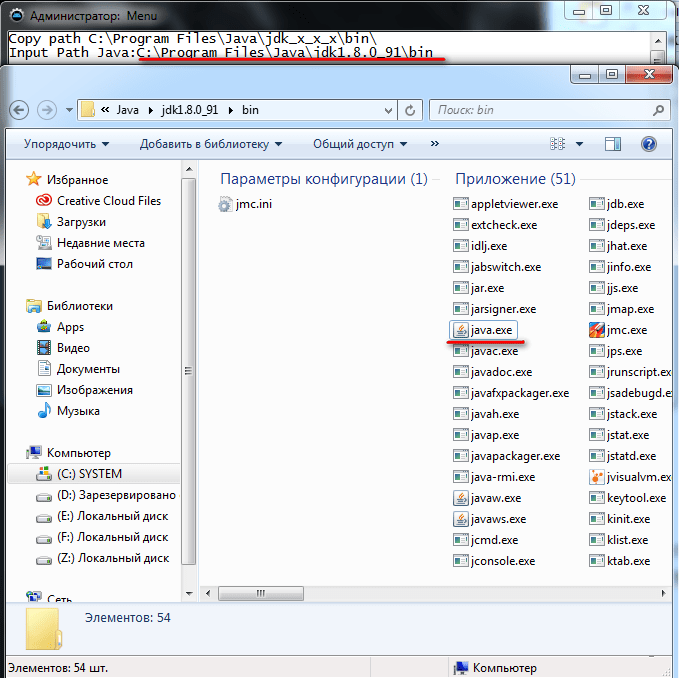
4. After you install the Java SDK, you must select Run Control Android out Windows and specify the path to the Java file, as shown in the figure below (the SDK version may differ, look carefully!).
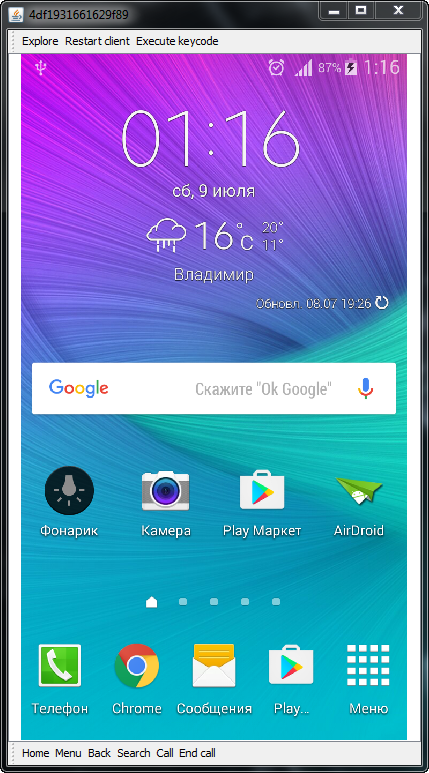
5. If all the steps are completed correctly, then you will see a window depicting the desktop of your device, and the computer mouse acts as control.
So very in simple ways within a couple of minutes you can “pull out” all the data you need from a device with a broken display.
Instructions: How to take a screenshot and record video from the Android screen using ADB Run:
Many of us know that to take screenshots on our Android device you can use the built-in methods by holding down a certain combination of buttons or use third party applications, which require Root rights to work. Today we will look at a way to take screenshots and record videos from the screen of your Android device on a computer, using only the ADB Run program; Root rights are not necessary.
What we need:
1. ADB Run program.
2. Device with USB debugging enabled.
3. USB cable and computer.
How to take a screenshot on Android using ADB Run.


3. To take a screenshot, select the first item - Take a Screenshot, after which the screenshot you just took will appear in the Adb_Run_Screenshot folder on your desktop.

How to Record Android Screen Video Using ADB Run.
1. Launch the ADB Run program and connect the device to the computer via a USB cable.
2. Go to the Screenshot/Record menu.
3. To record video from the screen of your Android device, you need to select the Record Video Android item, then specify the video recording bitrate that interests you, and enter the desired recording time in seconds. The recording process will begin, after which the newly recorded video will appear in the Adb_Run_Record folder on the desktop.
As you can see, there is nothing complicated, these actions do not take much time, and the result is pleasantly surprising.
Instructions: How to make a backup using ADB run:
There are a huge number of ways to create and restore backups on your Android device, but today we will look at a non-standard approach, namely using the ADB Run program.
What we need to create a data backup:
1. Enabled USB debugging on Android.
2. Installed ADB Run program (preferably the latest version).
3. Drivers for your device.
4. USB cable and PC/laptop.
How to do backup copy using ADB Run.
2. Select the desired item backup(data, data and applications, all together + memory card).
4. After which the following message will appear on your smartphone/tablet, where you need to select the “Back up data” option. The backup copy with the files will be placed in special folder on your computer desktop.

How to restore data from a backup using ADB Run.
1. Launch ADB Run and go to the Backup menu.
2. Select ADB Restore.
3. A window with data recovery will appear on your device, where you need to select the option “Recover data”.
At this point, creating a backup copy of your data and restoring it using the ADB Run program can be considered complete.
Instructions: How to apply a patch to a system text file using ADB Run:
Many people know that the Android operating system is the most flexible in terms of settings, customization and modding, which allows professionals and amateurs not only to create their own firmware based on the official ones, but also to create patches that, to one degree or another, affect the operation of the system/ individual components of your device.
Today we will look at an example of how you can copy the system text file using build.prop as an example from the Android OS to your computer, edit it and then create a patch that you can safely apply to your device, and, if necessary, roll back the completed actions.
What we need for work:
1. PC or laptop running Windows OS.
2. USB cable for your device (preferably branded).
3. Downloaded and installed the ADB Run program on your computer.
4. Enabled USB debugging on Android.
5. Availability of Root rights.
6. Installed BusyBox program on Android.
The process of creating and applying a patch:
First we must connect the device to the PC via USB cable, then run the ADB Run program and go to the Manual Command and Unlock Bootloader->ADB menu. detailed instructions You can find information on how to use ADB Run at the very beginning of the program review.
Now we need to copy the build.prop file, for which we enter the following command in the program window that opens:
adb pull /system/build.prop %USERPROFILE%\Desktop
Once done, the build.prop file will be copied to your PC's desktop, from where you can open it and edit it, but don't forget to change the file name. Once the file is edited and saved, you will need to copy it back to the device, for which we will use the following command.
adb push %USERPROFILE%\Desktop\android_build.prop /sdcard/
This command allowed us to move the text file to the device's memory card, and the next step is to move it to system folder, but before you start doing this, you need to give the file write permissions. To do this, you need to enter the following commands in the system section:
adb shell
su
mount -o rw,remount,rw /system
After these steps, you can safely send the file we created to the system partition by entering the following command:
cp /storage/emulated/0/android_build.prop /system
Now we just have to create the patch itself. To do this, go to the system partition with the command:
And use the following command to create the match itself:
diff -u android_build.prop build.prop > ptch.diff
At this moment, a file named ptch.diff will be created in which our changes will be made.
The last thing to do is to apply the patch we just created, and this is done with a very simple command:
patch -R< ptch.diff
At this point, the process of creating and applying a patch to a text system file can be considered complete.
Instructions: How to remove an image from Android:
Many users who decided to start creating own firmware for Android, they don’t always understand how exactly to remove images from Android. In today's article, you can learn in as much detail as possible about which blocks you need, how to dump dumps from them, disassemble them and then restore them, if necessary. In other words, you will learn how to take dumps from such partitions as: system, data, efs, preload, cache.
What you might need to take an image on Android:
1. Installed ADB Run program.
2. Smartphone/tablet with Root rights obtained on it.
3. USB debugging enabled.
4. Installed drivers for Android, if this is your first time connecting your smartphone to your PC.
5. The PC itself and the USB cable.
How to remove an image from Android (preparation):
1. Connect your smartphone/tablet to your computer via a USB cable.
2. Launch the ADB Run program and go to the Memory and Partitions menu, we need to find out /dev/block/, in other words, the location of the blocks we need in the device’s memory. To do this, you need to go to the Memory and Partitions -> Partitions /dev/block/ section, try one of the 7 presented methods, which will allow you to find out all the blocks we need.
After we found out exactly where everything we need is located Android sections, we can begin to directly remove the image. Before performing this procedure, you must ensure that free memory There is more than enough memory on your device's memory card.
1. Turn on the ADB Run program, go to the Backup menu -> Backup and Restore dev/block (IMG) -> Backup dev/block.
2. We indicate the block we need and wait until the image is taken (at this moment it is better not to touch the device).
How to restore Android images to their original state:
1. Put your smartphone/tablet in fast mode fastboot boot(bootloader) and connect it to the computer using a USB cable.
2. The boot.img and system.img files from your device must be copied to the following path C:/adb/progbin.
3. Launch ADB Run and go to the Manual Command and Unlock Bootloader –> ADB menu.
4. Enter (copy) the following commands:
fastboot flash boot boot.img
fastboot flash system system.img
fastboot reboot
When restoring the system to its original state, it is better not to touch the device and only after completing all actions can you disconnect the USB cable from the computer.
If you have a smartphone with the Android operating system and you often experiment with it, configure something or reflash something, then most likely you are already familiar with the ADB tool or (Android Debug Bridge). This is a program for controlling a smartphone via a computer via USB, which contains many useful commands.
You can view logs, install and uninstall apps, manage your device, and perform many other useful commands. In this article you will learn how to use ADB on Linux, we will look at useful ADB commands for Android users and let's look at this utility in detail. But first, let's look at how to install the tool itself on your computer.
ADB program is included as standard Android utilities SDK. You can install this environment and get the required utility. But you don’t always want to drag an entire execution environment onto your computer. Sometimes you only need one program. It can be very easily installed separately. On Ubuntu, you can do this by running the command:
sudo apt install android-tools-adb
For Red Hat, CentOS the command will be slightly different:
sudo yum install android-tools-adb
If you need to install ADB on Windows, you will have to download the Platform Tools SDK from the official website.
Preparing your smartphone
In order for you to be able to use adb with your smartphone, you need to enable USB debugging mode. This feature is hidden in all versions of Android starting from 4.2. To become a developer, first go to "Settings" -> "About the phone" and press seven times on the item "Build number":

Then an item will appear in the main settings menu "For developers":

Here you need to check the box next to the section "Allow USB Debugging":


Now your phone is ready to work with adb. Connect it via USB to your computer and let's get started.
Useful ADB Commands
Before we can control the device, there is one more thing we need to do. The adb command requires a special service to communicate with Android and needs to be started. To do this, use the following command:
adb start-server

After completion of work, you can disable the service so that it does not consume unnecessary resources:
Now you can run adb commands for android.
Device list
First of all, let's look at the list of devices connected to our computer. To do this, use the devices command:

If several smartphones are connected to the system, then by default the actions will be applied to the first one. But you can specify the desired device name using the -s option. For example:
adb -s 0123456789ABCDEF logcat
You can also specify the name of the device to which you want to apply adb program commands using the ANDROID_SERIAL variable:
export ANDROID_SERIAL=0123456789ABCDEF
Then that's it adb commands will be applied to the device specified in this variable.
Device status
With the get-state command you can find out the state of the device:

The command will return one of the following values: device - running, bootloader - loading, offline - disabled. You can use the status-window command to constantly monitor status:
adb status-window

View logs
The most common action that mobile application developers and testers have to do when searching for errors is viewing system and application logs. To do this, use the logcat command:

The utility displays the contents of Android logs in real time, so you will immediately see all error messages. You can also write everything to a file:
adb logcat -d > ~/android.log
Using the -c option, you can clear all logs on the device:
It is not always necessary to look at the full system log; sometimes it will be enough to just see the messages of the desired program. To do this, simply specify the package name:
adb logcat com android.settings
Using the --log-level option, you can set the level of message detail, the following options are available: V, D, I, W, E, F, S. To select the output detail, specify the desired letter separated by a colon after the application name:
adb logcat com android.settings:E
Or we will display only errors for the entire system:

Transferring files to your device
If you need to quickly send a file to a device, you can use the push command to do this. Here is its syntax:
$ adb push /address/local/file/address/remote/file
For example, let's download a file from the home folder to the device:
adb push ~/file /sdcard/file

The file will be instantly transferred to the device and you can verify it. Additionally, you can use the -p option to display progress, as well as the -a option to preserve the original timestamp.
In the same way, you can download a file from your device. Pull command syntax:
$ adb push /address/remote/file/address/local/file
For example, let's copy the sent file back:
adb pull /sdcard/file ~/file1

Installing applications
WITH using adb You can directly install applications. This feature can be very convenient for developers. The install command only needs to pass the address of the apk file:
adb install ~/Momentum_apkpure.com.apk

After this, the application is installed and ready to work on your device. If you need to update the application to a newer version, then use the -r option. This is very important. Otherwise you will get an error:
adb -r install~/Momentum_apkpure.com.apk
Options -s - for installation on a USB flash drive and -d - for downgrading the program version are also available.
Uninstalling apps
Uninstalling the app is also very easy. To do this, just pass the name of its package to the uninstall command. For example, let's remove the Firefox browser:
adb uninstall org.mozilla.firefox
Backup
You can create a backup copy of your firmware and all system Android files so that it can be restored very easily and quickly later. To do this, use the backup command. Let's look at its syntax first:
$ adb backup options packages
Options indicate what data should be copied. Each option can have the prefix no, which means that this data does not need to be copied. Let's look at the main options:
- -apk- save apk files for programs, disabled by default;
- -obb- save extensions installed extensions apk files in obb format. Disabled by default;
- -shared- save application data from SD card or phone memory, disabled;
- -all- save all installed applications;
- -system- save system applications, these applications are already included in the all list.
The last parameter allows you to specify which applications should be saved. If the all option is specified, then naturally this parameter is not needed. Thus, the command to backup the system would look like this:
adb backup -apk -obb -shared -all -f backup.ab
 Using the -f option we specify the name of the archive file; it will be saved in the current folder. If you do not set it, the default name will be backup.ab. You will need to confirm the creation of a copy on your phone; you can enter a password for encryption:

To restore from a backup, use the restore command. All she needs to do is pass the file address:
adb restore android.ab
The adb utility even has commands to reboot the device. You can simply reboot your smartphone using the reboot command:
You can boot into recovery mode:
adb reboot recovery
Or to bootloader setup mode:
adb reboot bootloader
Android Console
With the shell command you can login Android console and perform the necessary actions there. Most of the Linux commands we are familiar with are available here. We examined in detail all the available commands in the article. Now let's talk about the shell command itself and give some examples. To enter the console, type:

adb shell ls /system

For example, with this command you can take a screenshot:
adb shell screencap -p /sdcard/screenshot.png
And this is how you can record your smartphone screen on video:
adb shell screenrecord /sdcard/video.mp4
Conclusions
In this article we looked at how to use the adb utility to manage Android smartphone, as well as the basic adb program commands that you can use. adb shell commands are the same commands you can run in Android terminal, so there is no point in disassembling them again. I hope you found the information in this article helpful.
About the author
Founder and site administrator, I am passionate about open source software and the Linux operating system. I currently use Ubuntu as my main OS. In addition to Linux, I am interested in everything related to information technology and modern science.
Android Debug Bridge (ADB) is a console application that allows you to manage a wide range of functions of mobile devices running on the basis of the operating system Android systems. The main purpose of ADB is to perform debugging operations with Android devices.
Android Debug Bridge is a program that works on the principle of " client-server" The first launch of ADB with any commands is necessarily accompanied by the creation of a server in the form of a system service called a “daemon”. This service will continuously “listen” on port 5037 waiting for a command to arrive.
Since the application is a console application, all functions are performed by entering commands with a specific syntax in command line Windows (cmd).

The functionality of the tool in question is available on most Android devices. The only exception may be a device with the possibility of such manipulations blocked by the manufacturer, but these are special cases.
For regular user Using Android Debug Bridge commands, in most cases, becomes a necessity when restoring and/or flashing an Android device.
Example of use. View connected devices
The entire functionality of the program is revealed after entering a certain command. As an example, consider a command that allows you to view connected devices and check the readiness of the device to receive commands/files. To do this, use the following command:
adb devicesThe system response to entering this command has two options. If the device is not connected or not recognized (drivers are not installed, the device is in a mode that does not support operation via ADB, and other reasons), the user receives the response “ device attached"(1). In the second option, having a connected and ready for further work device, it is displayed in the console serial number (2).

Variety of possibilities
The list of features provided to the user by the Android Debug Bridge tool is quite wide. To access use full list commands on the device will need to be present superuser rights (root rights) and only after receiving them can we talk about unlocking the potential of ADB as a tool for debugging Android devices.
Separately, it is worth noting the presence in Android Debug Bridge of a peculiar help system. More precisely, this is a list of commands with a description of the syntax, output as a response to the command:
adb help
This solution very often helps many users remember a forgotten command to call a particular function or its correct spelling
Advantages
- A free tool that allows you to manipulate the Android software, available to users of most devices.
Flaws
- Lack of Russian version;
- Console application that requires knowledge of command syntax.
A.D.B. Download for free
Android Debug Bridge is an integral part of the toolkit designed for Android developers ( Android SDK). Android Tools The SDKs, in turn, are included in the Android Studio components kit. Downloading the Android SDK for your own purposes is available to all users absolutely free. To do this, you just need to visit the download page on the official Google website.
The Adb program is designed to work with the Android operating system. ADB is often used when changing operating system files and restoring a working state after unsuccessful actions.
ADB (Android Debug Bridge) - which means Debug Bridge for Android, the translation of this term itself already makes it possible to understand that adb is link between the Android device and the computer, allowing you to work with Android OS files directly from the computer. The adb program is part of another program called the Android SDK.
How to install ADB program
1 First of all, you need to download the Android SDK program. To work in the Windows 7 operating system, we recommend downloading the program from zip archive, in order to avoid problems with subsequent installation.
2 Unpack the archive with the program, it is best to do this to the root of the disk C:\
3 Now install the application SDK Platform Tools
4
In the folder with installed program Android SDK open the folder android-sdk-windows, you need to run the application in it SDK Manager, (in this case, you must have an active connection to the Internet). After launching it, the following window should appear. 
5 On the left side of the window you need to check two boxes Android SDK Platform-tools And Android SDK Tools, remove all other checkboxes. We agree to the terms of use and click Accept and then Install. After this, the two marked applications will be downloaded and installed on the computer. This completes the installation of the program A.D.B. finished and you can start working with android devices. Don't forget to install drivers for each device.
In order not to specify the path to the folder with the program each time, you need to edit the file path. At the moment the path to the program looks like this: C:\android-sdk-windows\platform-tools\adb .
To change the path parameters, do the following:
On the label " My computer
"Right-click and select the option " Properties", in the window that opens, go to the section " Advanced System Settings
". Next, click the button “ Environment Settings
" and in the window with the caption " System Variables
"find the parameter " path" and click on the button " Change
«. 
In the window that opens, look at the line “ Variable value
", at the end of this line we put a semicolon (if there is none) and write the following: ;c:\android-sdk-windows\tools;c:\android-sdk-windows\platform-tools;
Please note that the path must be specified exactly to the folder in which you installed the Android SDK program; in our case, this is exactly the path. 
In all Android devices, regardless of whether you have a smartphone or a tablet, USB debugging mode can be found in this path: Menu -> Settings.
Go to: Menu -> Settings -> Development ->
Go to: Menu -> Settings -> For Developers ->

Go to: Menu -> Settings -> Applications -> Development ->

Go to: Menu -> Settings -> More -> Developer Options -> USB Debugging - check the box next to this item.

Go to: Menu -> Settings -> System -> About smartphone (Tablet) -> Look for the “Build number” item and click on it approximately 7-10 times, then go back to Settings -> For Developers ->


android4all.ru
How to enable USB Debugging on Android
There are many ways to obtain superuser rights (ROOT rights), but most of them require enabling USB debugging mode. You can find out what USB Debugging mode is and how to enable it in this article.
So, the first question is: what is USB Debugging mode required for?
USB debugging is used to allow the user to use the service for debugging applications and devices on the Android operating system (in other words, checking the operation of applications and the system as a whole, possible failures and much more), which is called ADB.
The second question is more interesting: how to enable USB debugging?
In all Android devices, regardless of whether you have a smartphone or a tablet, USB debugging mode can be found in this path: Menu -> Settings.
But, despite the fact that USB debugging mode is in the settings, the options for the location of this option are on various devices may vary, so it is worth describing 5 possible options USB debugging mode locations.
How to enable USB debugging: option #1.
Go to: Menu -> Settings -> Development -> USB Debugging – check the box next to this item.
How to enable USB debugging: option No. 2.
Go to: Menu -> Settings -> For Developers -> USB Debugging - check the box next to this item.
How to enable USB debugging: option No. 3.
Go to: Menu -> Settings -> Applications -> Development -> USB Debugging ( this option V to a greater extent relevant for devices running Android OS 2.2 -3.0).
How to enable USB debugging: option No. 4.
Go to: Menu -> Settings -> More -> Developer Options -> USB Debugging - check the box next to this item.
How to enable USB debugging: option No. 5.
Given option will do for devices running Android 4.2 and higher.
Go to: Menu -> Settings -> System -> About smartphone (Tablet) -> Look for the “Build number” item and click on it approximately 7-10 times, then go back to Settings -> For Developers -> And check the box next to USB Debugging.
Further, read only by those users who have devices running Android 4.2 and higher.
After you enable USB debugging mode and connect your device to your computer or laptop for the first time and enter any of the commands, or start getting ROOT rights, you should see a window asking you to trust this computer, which is currently your device is connected. This message will appear every time you connect your device to a new computer or laptop. You should check the box next to “Always allow debugging from this computer” and click on the “Yes” button. After this, you can obtain ROOT rights and perform other actions that require you to enable USB debugging mode.
What to do if you have enabled USB Debugging, but the device is still not detected?!
The first thing you need to pay attention to is the presence of installed drivers on the connected computer or try to update (reinstall) them. Also, the most common mistake made by users is that the device is in a locked state at the time of connection, so it is worth unlocking it. Attention!!! For correct operation USB ports version 2.0 should be used; USB 3.0 ports are not recommended for such operations.
If you did everything correctly, but you were still unable to establish a connection with the computer, then you should try changing the method of connecting to the computer. To do this, you need to: connect the device using a USB cable to the computer, and then on your smartphone or tablet, in the retractable curtain, click on “USB Connection” and select PTP mode in the window that appears.
If you do not have a USB cable at hand, but you can connect using Wi-Fi, then the following instructions will be useful for you.
So, the first thing you have to do in order to activate the connection of your device via Wi-Fi networks– this is to get the IP address and port of the device (ROOT rights are required for this operation), this can be done using the ADB Wireless program, which can be downloaded from Google Play absolutely free.
After launching the ADB Wireless application, you need to click on the red button, which will later turn red, and wait until the connection occurs. At the bottom, information will be displayed in the form of adb connect (your IP address).
After completing all the manipulations, the connection to Android can be considered successful, which allows us to use adb commands in the future.
android4all.ru
How to enable debugging mode on Android via USB: step-by-step instructions

USB debugging mode is a special feature of Android devices, mainly needed by developers. With its help, you can check the functionality of the application and test it in different situations. But debug mode is also useful for users. Let's consider why it can be useful, how to turn it on and off on Android devices.
Why do you need USB debugging mode on Android OS?
Debug mode allows users to:
- Test the application being developed.
- Get root access to your smartphone or tablet.
- Copy and move files from your Android device to your computer.
- Install a third party downloaded onto your computer (not from Play Market) application for Android.
- Install different versions firmware for the device.
- Restore a broken device.
- Create a backup copy of files and applications.
In addition, in debug mode you can access system processes and also analyze changes in behavior RAM, processor and other components.
How to enable USB debugging mode on your device
The “Enable USB Debugging” option is located in the “Developer Menu” (or “Developer Options”), which is hidden from users in Android versions above 4.2. But, again, some manufacturers decide to open access to the menu, others decide to hide it. For example, on smartphones Meizu company The developer menu is always open and is located in the “Special Features” section, but on Samsung devices access to the menu is closed. It all depends not only on the company, but also on specific model devices.
So, if access to the developer menu is blocked on your device, do the following: in the device settings, open the “About device” tab and click on the “Build number” item until a notification appears that you have been assigned developer status and you can use special menu.
Now go to this menu. Depending on the model, the menu entry may be located in different sections of the settings menu. Either in the device settings there may immediately be a section “For Developers” (“Developer Options”, “Developer Menu”), or it may be a subsection of the items “Accessibility”, “Other”, “More”, “ Additional settings».
When you enter the developer menu, check the box next to “Enable USB debugging” (or “USB debugging mode”). Usually this item comes first.
Where is the mode located in different versions of Android (photo gallery)
The developer menu is located in the “More” section. In Android 2.2–3.0, the “USB Debugging” item is located in the “Applications” section. In Android 4.2 and higher, the developer menu is moved to the “Settings” sectionVideo instruction: how to enable USB debugging mode on Android
How to enable USB debugging mode if this cannot be done from the device
There are ways to enable debugging mode even if this cannot be done on the device itself due to, for example, a broken screen, a broken touchscreen, or problems with the device as a whole.
The main condition: your device must already have a third-party Recovery installed - CWM or TWRP. This is necessary to be able to gain full root access to the operating system.

After the reboot, you can work with your smartphone or tablet using QtADB, MyPhoneExplorer, ADB and other similar programs. That is, using USB debugging mode.
What to do if nothing works
To work with USB debugging, special ADB drivers are used (Android Debug Bridge, literally “bridge for Android debugging"), which can be downloaded from the Google website, official page located at: https://developer.android.com/studio/index.html. Let's figure out what to do if ADB does not detect the device, why it is impossible to use USB debugging mode.
Make sure your mobile device is detected by your computer. To do this:
- Check the USB cable for damage. Pay special attention to strong bends and sections of the cable near the plugs, where connecting wires often break. Try using a different cable to connect. If the problem really is due to physical defects, replace the cable.
- Try plugging the plug into a different USB port on your computer. It is advisable to use the ports on the back side system unit, since the rear ports are located directly on the motherboard. The front USB ports are not always connected correctly, which is what causes the problem.
- Try connecting your Android device to another computer. Sometimes it happens that a particular PC incorrectly recognizes a smartphone or tablet and does not read the necessary data from it. If the device is recognized correctly on another computer, take your PC for repair and explain the problem, since the causes of problems may be different.
- Try disconnecting all USB devices from your computer. Some of them may prevent your smartphone or tablet from connecting normally to your PC.
Make sure you are using the official firmware from the device manufacturer. If you have installed third-party firmware on your smartphone or tablet (such as CyanogenMod or similar), then USB debugging may not work correctly.
Make sure you have installed the correct ADB drivers. There are different versions of drivers for different devices. All of them are distributed according to smartphone and tablet models on the official website. There is also universal ADB drivers, but it's best to only use them if your device doesn't have a separate driver, as generic drivers may cause connection issues that can only be resolved by contacting Google Support.
For developers software It’s better to use the system rather than separate ADB drivers Android Studio, which can also be downloaded from the official website: developer.android.com. In Android Studio, driver configuration occurs automatically; in addition, there is an Android emulator for the computer, so USB debugging may not be necessary.
How to turn off USB debugging
To disable USB debugging mode on Android devices, open the Developer Menu and uncheck the Use USB Debugging option.
USB debugging mode - extremely useful tool not only for software developers, but also for ordinary users Android operating system. With its help you can install and reinstall firmware on your mobile devices, move files from a smartphone or tablet to a computer, download to Android third party applications. The ability to use USB debugging mode is also useful in cases where the device has stopped working correctly, as it allows you to delve into system processes, which will help you find problems and malfunctions. In addition, USB debugging will help you gain root access to the device, which will significantly expand the capabilities of the operating system.
skesov.ru
How to enable usb debugging on an Android tablet or phone. What is USB Debugging used for?

In many receiving instructions root rights and modifying firmware, you must enable USB debugging. What USB Debugging is and why it is needed and how to enable it can be found in this article.
What is USB Debugging used for?
USB debugging is used to use the service for debugging applications and devices on the Android OS (check how the application and the system as a whole work and what failures have occurred) called ADB.
How to enable USB debugging?
Absolutely in all Android devices, regardless of whether it is a smartphone or a tablet, USB debugging is located in Menu -> Settings
Possible location options
Despite the fact that USB debugging is in the settings, the location options in the menu may be different and there may be several options for how to find it! Let's consider 6 possible options.
Option #1:
Menu -> Settings -> Development ->
Option #2:
Menu -> Settings -> For Developers -> USB Debugging - check the box

Option #3:
Menu -> Settings -> Applications -> Development -> USB Debugging (Android 2.2 - 3.0)

Option #4:
Menu -> Settings -> More -> Developer Options -> USB Debugging - check the box

Option No. 5 for Android 4.2 and higher.