What should you do before reinstalling Windows?! How to save important information on your computer
Many blog readers often ask me: “Where and how to store information correctly?”
I will not bend my fingers, throw around technical terms and list numerous ways to store information.
I'm just sharing with you my 20 years of experience and the steps I've been taking since I almost completely destroyed the personal information on my computer many years ago. No, I saved some of the information. But, as it turned out, this was not enough.
But, first of all, I want to say a little about something else.
Why did it happen that I didn’t save all the information I needed? My first mistake was that I named the folders in which I saved data “from the flashlight”. For example, my folders had the following names: "1", "11111", "123", "ytsuken", "qwerty", "qqq" etc. As I reasoned. Now I’ll quickly create a folder with some name and quickly copy the photos there. And then... And then you get distracted by something else or just at the moment laziness. And you keep putting it off until later. And so from month to month, from year to year.
It is clear that after a few years in such a mess necessary information almost impossible to find. Even if the information is saved in this form, it may take several hours to find the desired photo, say.
Well, if the information was stored only on the computer, then when does “Later” occur in the form of failure hard drive, then... Okay, let's not talk about sad things. The main thing is just not to wait for “Later”.
Well, my second mistake follows from the first. It is impossible in a few years to figure out what is in these folders and why I created them in the first place.
And since in some folders the necessary information was located “deeply” (several subfolders), when viewing the folders I simply did not notice the photos I needed. And, during the next copying, I did not copy them to external media.
Don't create too many "root" folders. 3-5 no more (solely at your discretion). For home computer that's quite enough.
For example, "Personal folder", "Friends", "Working", "Other". IN "Personal folder", for example, subfolders "Photos", "Studies" etc. In a subfolder "Photos", for example, subfolders "Sea holidays - June 2012", “Outing with Friends – August 2012” etc.
With this approach, firstly, it will be very easy to find required document or a photograph. Well, secondly, to save all the necessary information, just copy it to “ third party media» only 4 folders (In our example this is "Personal folder", "Friends","Working", "Other").
Well, now it’s much better to save information, or more correctly, make copies of your “root” folders.
I'll take my computer as an example. You can look at the “disk control panels” of my computer in the lesson “”.
There is an opinion that if the disk "C:" is system, it is best to save the information on disk "D:".
And, although I already described these reasons in the lesson about the hard drive, I do not share this opinion.
"Save information" And "Store information" These are, in my opinion, completely different concepts.
By default, all programs are configured so that if the operating system is installed on the disk "C:", then the information is saved to disk "C:".
For example, if we create Microsoft document Word, then by default the document will be saved in the folder "My documents", which is always located at:
For Windows users XP
![]()
For Windows 7 users
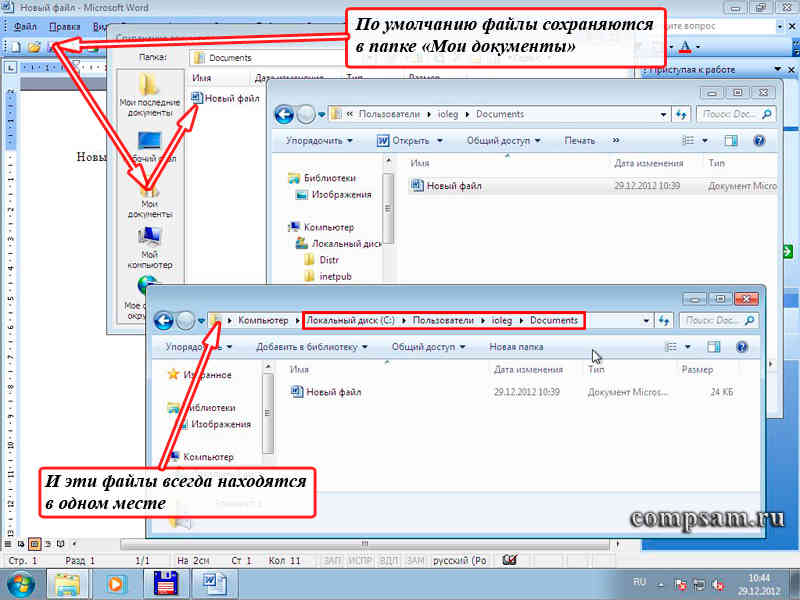
This applies to almost all programs. And it's convenient. Everything is always in its place. And you can always promptly get to the information you need by clicking on the button "Start", and then the shortcut "My documents" in Windows XP or "Documents" in Windows 7.
Although, to be honest, in any program you can configure the path where to save . I rarely do this. If for some reason I need to save the file to another folder, then instead of the menu item "Save" select a menu item "Save as..."
Another question is that storing this information on the system disk is quite risky.
Now, what are the steps? preferably to ensure that our information is not lost under any circumstances?
First
If there are additional non-system drives (in our example, the logical drive "D:"), then sort your information into thematic folders, as I described above.
It can be done copying(I always do this) information from the disk "C:" to disk "D:" to the appropriate folders. At the same time, you have copies. Those. the same information will be on the disk "C:" on disk "D:", well, maybe only in different folders.
Or by moving (I never do that). In this case, the information from the disk "C:" is removed and space is freed up, which is sometimes simply necessary.
This procedure can be performed immediately after saving the document, after a week, once a month, once every six months or a year. But this must be done.
Well, you already know how to copy, cut and paste, having briefly looked at the lesson “”. True, it says about the text. But these combinations also apply to files and folders.
Second
In parallel (or if you have only one disk "C:"), at the same intervals (I do this once every six months), it is advisable to write down all the information you need on CD/DVD disk (or disks).
In this case, a third copy of important information appears. And the likelihood that we can lose something is reduced to almost zero. I do this on DVD-R discs. Luckily they are cheap. They stand on their shelf and don’t ask to eat.
Third
Of course, a more modern, but slightly more expensive option is flash drives or, simply put, “flash drives”. The amount of information that can be recorded on it is many times greater than the volume of DVD discs.
True, as practice shows, a flash drive is good for temporary storage of information, but not long-term. Although if you follow all the operating recommendations, then you can probably use it as a data storage. Although I doubt it a little.
Fourth
All this is enough if you only have photographs and documents. What about music, films and distributions of various programs?
When the amount of total information I had exceeded 20 GB, I spared no expense and bought myself 2 external drive, which can be connected to a computer via a USB port.
One of them is a lightweight mobile phone using flash technology with a capacity of 500 GB. And the second regular hard disk in a 1 TB container. The first one is convenient to carry with you. Well, the second one is for reliability (fortunately there are no operating systems No).
Fifth
But the last one is probably the most interesting. This is the storage of data on services on the Internet that use cloud technologies.
These services appeared not so long ago, but I use them to the fullest. There are already quite a few such services, but I chose three for myself.
The deep meaning of these services is as follows. Some companies provide free disk space for data storage, limited to several gigabytes. If a larger volume is needed, then you need to pay for it.
But, as a rule, what companies provide for free is quite enough.
First one of the services that I use is (dropbox). The truth is given for free 2GB, but it’s enough for my work. ![]()
At work I work under the operating room Linux system, and at home under Windows. There are no problems, complete convenience.
An example is the lessons and articles that you see on this blog.
I usually write a lesson or article over several days. For example, I start writing at work at the end of the working day. The working day ends. I turn off the computer without copying anything.
I come home and turn on mine home laptop and immediately continue to work on the article. All information is automatically synchronized via the cloud to my home and work computers. You just need to turn on the power and wait for the computer to boot.
I will not describe how to make such a data storage for myself. My colleague Fedor has already done this.
Second The service I use is from Yandex.
And it’s not even necessary to have it on Yandex account email. But if it is, then simply use this service by submitting an application.

The application procedure is quite simple. Free allocated 8 GB disk space. I mainly store music and photos on this drive.
Well third service from Google. However, you must have an account on google.com.
But I don’t see any problems with this at all. The procedure for creating an account is very simple and straightforward. I don’t remember how much disk space Google gives immediately after creating an account (in my opinion, about 5 GB).
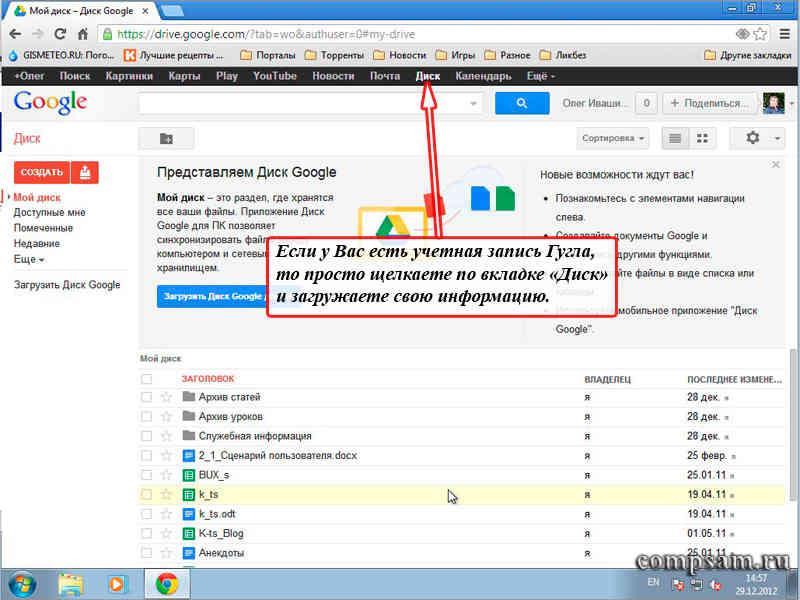
Another thing is interesting. Every day this space increases a little. Today I have more disk space 10GB.
And finally, I want to tell you my personal opinion about these services.
Since I myself am a system administrator (more precisely, the head of a department system administrators and database administrators), then I have an idea how secure such storages are. So I just trust them.
But... As Ilf and Petrov said through the mouth of Ostap Bender: “Only an insurance policy can provide a 100% guarantee.”
Therefore, it is better to insure yourself and store information on various media and services.
 In conclusion, I want to congratulate all readers of my blog on the upcoming New Year and wish you happiness, health and long life!
Instructions
If you are using the oldest and most famous Internet browser Explorer, to save a web document to your hard drive, select “File” in the main menu, then “Save As”. In the “File Type” window, expand the list of file types that this browser supports. If you select “Complete web page (*.htm, *.html)”, your hard drive will be saved, created with using HTML. If the page contained images, they will be saved in a separate folder.
The next item in this list is “Web archive, one file (*.mht)”. In this case, the entire page is transferred to the hard drive, along with images and scripts, in the form of one compact file. When you open a .mht document on your hard drive, you will see exactly the same as she looked on the Internet, where you first met.
Selecting "Web page, html only (*.htm, *.html) means that HTML text and possibly some images are saved to the hard drive.
And finally, the item “Text file (*.txt) will save information to the hard drive in the form text document in .txt format.
Opera browser offers the following formats for saving information to your hard drive:
- HTML file
- HTML file with images
- Web archive (single file)
- Text file
These formats are similar to those used by Internet Explorer.
If you want to save an image to your hard drive, right-click on it. IN context menu select “Save image as...”, then indicate the location on your where it will be stored graphic file.
To save to your hard drive information from another drive, double-click on the “My Computer” icon, then on the logical drive, open the folder in which you are going to place the file. On the right top corner Click on the two icon to bring the folder into the window. Open the media ( optical disk, flash drive, etc.) that contains information, and also minimize it. Right-click the file icon and, without releasing it, drag it to the desired folder. Release and select “Copy” or “Move” from the context menu.
Video on the topic
Please note
Keep in mind that only IE and Opera can save and open *.mht archives. To open a web archive using a browser Mozilla Firefox, you need to add the UnMHT plugin to it.
Sources:
- website Firefox add-ons
- save information on disks
You purchased new hard disk and installed it on your computer. Now we need to prepare it for work. Decide how many parts to divide into disk new space, how much to allocate for the system, and how much for data storage.
You will need
- Rights as an administrator or a member of the Administrators group.
Instructions
After discovering a new one disk and install drivers for it, you will need to initialize it. Only after this will it be possible to create and format one or more partitions on it. To do this, you need to open the “Management” console.
To do this, click “Start” -> “Settings” -> “Control Panel” -> “Administrative Tools” -> “Computer Management.” Or right-click on the “My” icon on the desktop or in the “Start” menu and select in the menu that opens, the “Management” line;
In the left part of the “Storage” window that opens, select “Manage disk ami."
Management Console disk ami" can also be launched by entering diskmgmt.msc in the "Run..." field of the "Start" menu.

The Initialization and Conversion Wizard should now start. disk ov". Click “Next”, “Next”, after “The Initialization and Conversion Wizard has completed successfully” appears, click “Finish”.

If everything went well, then in the “Management” window disk ami" (“Computer Management” -> “Storage Devices” -> “Manage disk ami") a new one will appear disk marked "Not distributed". Right-click on it and select “Create partition...” in the context menu. The “Partition Creation Wizard” will launch, click “Next”.

In the next window, select the type of partition to be created – Primary or Logical (Main partition is selected by default), “Next”.
On one physical disk You can create several sections, but no more than four main ones. IN additional section you can create one or more logical disk ov. The primary differs from the secondary partition in that the primary partition can be used to run the operating system, while the logical partition cannot. The partition on which the operating system files are located is marked as active. Only one section can be active.

Select the size of the partition to be created (by default, the maximum possible size is set). If you're going to build on this disk If there are several sections, then you need to think in advance about how much space you want to allocate for each section you create and enter it in this window.

Set formatting parameters (type file system(NTFS by default), cluster size (I recommend leaving it as “Default”), volume label, whether to apply quick formatting and files and folders) when completing the selection, click the “Next” button.

Before the Partition Wizard completes, a window will be displayed containing a summary of the parameters we have selected. If everything matches your choice, click “Done”.

Once formatting is complete, the “Not distributed” label will change to “Good.” Now you can create more sections or start working with the already created ones.

Please note
At installing hard drive, follow safety precautions.
If you are not sure about the settings you are changing, then either leave them at default or contact a specialist.
Saving tables in the Excel office application included in Microsoft package Office, reports general rules saving documents in the operating system Microsoft Windows and will not require the user to understand the hidden secrets of computer resources.

You will need
- - Microsoft Excel
Instructions
Run office application Excel included in the package Microsoft Office and select the table to be saved.
Specify the path to the desired location for the saved tables in the “Folder” drop-down list and click the “Save” button.
Return to the File menu to complete the procedure for opening an email. tables OpenDocument format and use the “Open” button.
Specify the "OpenDocument Table" item in the "File Type" directory and click the "Open" button to confirm the execution of the command.
Double click the mouse to implement alternative method open the selected file and return to the "File" menu top panel window tools Excel applications to perform the save operation required tables V OpenDocument format.
Enter the desired document name in the appropriate field and click the “Save” button to apply the selected changes.
Video on the topic
How to save Excel spreadsheet in 2019
Ways to save information to a computer
With the advent of the Internet, users download and copy information from sites, saving data directly to their computer. A device that provides data storage on personal computer, – hard drive. On your computer, you can freely move, copy, cut and delete your data between local drives. Depending on the operating system settings, the number of partitions is local disks, there can be a lot, the main thing is that there is enough memory. Most often, there are two partitions: drive C contains the installed operating system, and drive D is used to store various user data.
In order to save a file to your device, you need to select one or more files, then click the right mouse button. In the menu, select the items: “Copy” or “Cut”, open the source to which the information will be saved, and select “Paste” with the right mouse button. A key combination is also possible: Ctrl+C – copy, Ctrl+V – paste.
If you need to copy text from the Internet, to do this you need to select a fragment of text on the site. Right-click on the selected text and select “Copy” from the context menu. You can also use keyboard shortcuts. The selected text will go to the clipboard, where when you open the text Word editor paste the copied information using the Ctrl+V key combination. The picture you like is saved in the same way - to do this, select “Save picture as” in the context menu, then save the picture to the selected local disk on the computer. You can also select the “Copy image” section, in which case the information will be saved in a buffer and can be transferred to a text editor.
How to secure your information
In order for the saved file to be in complete safety and has not been confirmed to be infected with viruses, it is recommended that all information downloaded from the Internet or other sources be saved to drive D.
Clean your computer from unnecessary files using programs: CCleaner or Freespacer. You should definitely install a proven antivirus, for example: Avast, Dr. Web, Nod32.
You need to take care of the stored information. The most important files transfer to additional devices, use only a proven antivirus, beware suspicious files.
Video on the topic
Reinstallation (updating) of Windows is performed on top of the installed operating system without formatting system partition. This saves your files and settings, as well as installed programs and their parameters.
As a rule, this method is recommended in cases where all other options for solving the problem have been exhausted, although in modern Windows this is quite acceptable solution from a technical point of view. Often, it leads to the goal much faster than dancing with a tambourine.
Windows 10 owners automatically and quietly go through this process every time a new build is released, i.e. once every six months (insiders - much more often).
Windows Recovery Tools Comparison Chart
Due to the variety of means Windows recovery, I have prepared a comparison table. In it you will find brief description recovery methods and mechanisms of their work, as well as links to detailed articles about each of the means.
Reinstallation process
The process is identical for Windows 7, Windows 8.1 and Windows 10. You will need installation disk(download) and product key (Windows 7 and 8.1 only, as you can skip entering the key in Windows 10).
To reinstall the operating system using this method, you must log in to it. Upgrading 32-bit Windows to 64-bit is basically impossible.
Step 1 - Start reinstallation
Insert the installation disc and run setup.exe, and then in the window that opens, click the button Install.
Step 2 - install updates
Windows will prompt you to download latest updates— It’s logical to install an updated system. Of course, an Internet connection is required.

If you choose to download the updates, the download progress will be displayed in the next window.
Step 3 - Select Installation Type
Once the updates are downloaded, the system will reboot and the installation process will begin. Having accepted license agreement, you can select its type.

- Update- this is an installation on top existing system. At the same time are saved your settings and data, as well as installed programs. All system parameters(for example, service configuration) are reset - brought to standard, as when new installation Windows.
- Full installation- This clean install with formatting the system partition, or installation on another hard section disk. At the same time are lost all your data and programs.
The upgrade uses Data Transfer Tool.

It saves:
- all your files and folders
- programs and their settings
- user accounts and settings
- Internet settings
- email settings
- contacts and messages
All files are saved to the same partition where the operating system is installed. During the reinstallation, a series of folders are created, in one of which Easy Transfer places these files. The figure below shows how user profiles are migrated.

Then all this data is restored to installed system, and temporary folders are deleted. But before you see the desktop, you will need to go through standard process custom settings, called OOBE (Out of Box Experience) - create an account, set language settings etc.
Once the update is complete you will have clean Windows, in which, however, your files, user preferences, programs and their parameters are saved. After making sure normal operation, you can
Reinstall Windows without losing data
This article will talk about preparing for a complete reinstallation of the Windows XP or Windows 7 operating system, about reinstalling the OS with hard formatting disk. It is the reinstallation of Windows with the destruction of the old operating system, formatting the hard drive, the correct reinstallation, which allows you to bring the computer to its original state, the state that the computer had when it was purchased and the operating system was first installed. An important point such an OS reinstallation becomes preservation of all useful information from computer and the work is rewritten Windows installations without data loss.
A complete reinstallation of Windows may be necessary if the operating system is damaged and your computer or laptop refuses to boot. Reinstalling the operating system is necessary if the computer slows down, programs run slowly, or the computer often freezes. All these symptoms can be caused by viruses, severe fragmentation of files on the hard drive, incorrectly installed or malfunctioning programs, errors in system registry operating system. It must be said that the symptoms listed above may not disappear when you reinstall Windows, since they may well be caused by other malfunctions in the computer. But, as a rule, reinstalling the OS helps cure them. If after reinstalling the operating system and completely formatting the hard drive, the symptoms do not disappear, then the computer malfunction lies in its hardware, and in order to fix it, you will have to diagnose the computer components and most likely replace the faulty part.
So, before reinstalling the operating system, it is necessary, as a rule, to save valuable information from the C drive to another medium that will not be formatted when Windows is reinstalled. It must be said that formatting a hard drive completely destroys the information on it, so it is imperative to save data from drive “C” to any other storage medium. It should also be noted that by default the operating system is usually installed on the “C” drive, but this does not always happen. But, be that as it may, valuable data must be saved with system disk, the disk that will be subject to full formatting, the disk where the new operating system will be installed. Reinstalling the Windows operating system without losing data, This correct installation OS, which should be carried out by any emergency computer service.
It’s good if you have two on your computer hard drives or one, but split into two logical drive, then the necessary information can be saved to a second disk, which will not be formatted during the Windows installation. If there is no such disk in your computer, then the data can be written to a DVD/CD disk or removable hard disk. If there is not much data, then it is quite possible to get by USB flash coy. All these manipulations with data on the computer are possible if the operating system boots, but what to do if Windows does not boot at all?
If your the operating system does not boot or the computer freezes at boot time, then you can try booting Windows in safe mode. In safe mode, some drivers and support programs For Windows operation are not loaded and therefore it is quite possible that the computer will be able to boot. To login securely Windows mode XP, when passing the BIOS test, press the “F8” key several times and press it periodically until the “Menu” window appears additional options Windows boot" In this menu you can select the section to boot Windows in safe mode - “Safe Mode”. After loading Windows XP, copy the necessary data. For Windows 7, proceed in the same way.


Choice safe mode Windows 7 downloads
If such a scheme does not work, then you can remove the hard drive from the system unit and connect it to another computer, and then copy it necessary information. This option is suitable if you know how to remove a hard drive and you have a work computer where this drive can be connected. If this is not possible or you don’t want to bother with removing the hard drive, then there is another way to copy data.
You can always try booting your computer from a Live CD.. A Live CD is an external storage medium on which the operating system is already installed. The data storage medium can be a CD, DVD disc or even a USB flash drive. To make a Live CD or Live DVD you need to download the image boot disk and unpack it, using, say, the Nero program, onto a CD or DVD disc. The image must be unpacked onto a CD, and not just copied as a file - this is important! In the Nero program there is such an item in “Nero StartSmart” - “Burn image to disk”. Use this item to burn a Live CD image to an empty disc. After creating a boot disk, just insert it into DVD drive and set the BIOS to initial boot from DVD. On most computers, booting from DVD is set to boot from DVD in the BIOS by default.

So, the important data has been saved, now you need to check whether there are drivers for the computer being restored. Drivers are a necessary thing for the operation of computer devices. Simply put, drivers are small programs that reside permanently in the computer's memory and help more complex programs use various devices computer, for example, games use a video card or sound card, various applications engage network card. Without correctly installed drivers, your computer will not function at one hundred percent, even after complete reinstallation Windows. The drivers may be on the CD that was in the box with the computer or laptop when it was purchased. If the drivers are lost, you can always download them from the laptop manufacturer’s website or motherboard Your computer. If your computer has a built-in sound and video card, then just download the driver for the motherboard. It will contain a complete set of drivers for all built-in devices. If the video card is structurally separated from the motherboard, then you need to download a separate driver for it.
To see what components are in your system unit It is enough to disassemble it and look at the names of the manufacturing companies and the names of the components directly on them. The list of installed devices can be viewed in the “Device Manager” directly in the operating system itself Windows system. You can install a special program that will give full information about installed devices on the computer. The last two methods are only possible before reinstalling the operating system, since they already use installed drivers to determine what hardware is in the system unit. From special programs“Everest” is quite suitable; it gives a full report on the installed devices on the computer.
Finding drivers before installing Windows useful in that you will immediately find out whether they are available for the operating system you are installing, since manufacturers do not always supply drivers for all operating systems. This is especially important if you are going to install Windows 7 instead of Windows XP, which was previously installed on your computer. You may not find suitable drivers for old components and, accordingly, install Windows 7 on old computer become meaningless, since the computer will not be able to function at one hundred percent.
In this article I will talk about how to save data when reinstalling Windows. Thanks to these tips, almost immediately after installation new system you can get started without spending for a long time searching for drivers, setting up programs and other dull and ineffective tasks.
In fact, I won’t tell you anything supernatural now. You probably knew a lot of what you will read here before me, you just didn’t think of using it to speed up the Windows installation procedure.
So, let's collect all the knowledge and apply it!
Windows creates a My Documents folder by default, and sometimes users save their personal files in it - music, movies, passwords, important documents. Although it is logical to save files in this folder, it is not safe. Every system failure that requires you to reinstall Windows will deprive you of all your unique family photos, important passwords and other data.
To save data when reinstalling Windows, important files must be placed on a different drive than the one on which Windows is installed. As a rule, Windows is installed on drive C, so personal files should be stored on drive D. The My Documents, Desktop and others folders are part of drive C.
The safest place on your computer is the local drive that does NOT have Windows installed.
Browser Synchronization
After installing a new system, a lot of time is spent restoring browser data. To save data during reinstallation, you need to use browsers that support synchronization functions - that is, storing your data in the cloud, which can then be retrieved and used from there. The data includes login and passwords, history, bookmarks, etc.
Such popular browsers like FireFox, Google Chrome, Yandex browser and others fully work with synchronization, and this feature can be used to save data when reinstalling. This option can be found in Settings and requires registration.
Use program import and export
But for other programs, to save data when reinstalling, such cloud storage usually doesn't happen. However, most serious products allow you to import settings to your computer as a file. Later, after reinstalling the system, these settings can be exported back.
Before reinstalling Windows import settings files from programs. Once the system is installed, export this file. Thus, after reinstallation you will not have to configure all the programs for a long time.
Use driver packs and soft packs
After installation Windows traditional action is installing drivers. As a rule, the system itself installs drivers for most devices that are built into it. However, a small part of the equipment may be left without a driver, for example, cameras, video cards, printers (by the way, if you use a printer, you will be interested in buying cartridges).
Users usually obtain drivers from the developer’s website or from the disk that came with the device. After this, the driver is installed manually for a long and tedious time. In fact, this is all a long time ago, just like manual installation programs.
You can use driver packs, which are divided into two types: the first bulky ones contain all the drivers locally; the second are minimalistic - they scan devices and download drivers from the Internet. In addition, you can simply deploy the backup later. You can also use softpacks - these are sets of programs. You just need to check the boxes necessary software and start installation. Everything will happen automatically. For example, you can try softpack from here - http://softpacket.ru.
Use portable programs
Portable programs or portables are software that does not require installation. Many programs have a portable version. To use this version of the software, you just need to unpack its files and run the executable file.