A program for drawing floor plans. The best simple drawing programs on your computer
Many users may need to draw online. This can be any sketch, diagram, plan or technical illustration that needs to be created on a PC using the appropriate tools. At the same time, the computer may not have the necessary programs for this, which will prompt the user to search online for resources that can help in creating required by the user project. In this material I will tell you how to make a drawing online, and what services will help us with this.
Let's move on to the immediate description network services online. I note that these services for creating drawings are quite compressed compared to professional programs functionality, which, however, may be sufficient to solve many basic problems.
GLIFFY online editor
Given visual editor GLIFFY has quite a wide range of tools for creating drawings and schematic images, including many templates and diagrams for architectural designs, flowcharts, network diagrams and other relevant purposes.
To work with this editor, go to cameralabs.org, log in if necessary (authorization via social network). After this, you will have access to the editing screen where you can create your drawing.
 Working screen of the GLIFFY editor
 Tabs are located on the left various templates(you can expand the tab by clicking on it), on top there is a toolbar, and on the right there will be a direct field for creating a drawing.

To save your work, you will need to click on “File” - “Save” (or “Export”) at the top.
Draw.io service
The English-language service draw.io will help you create a drawing online by drawing various graphs, diagrams and charts.
To work with this service, go to the draw.io website. The resource will ask where to save the works you created (select “Device” to save to your hard drive).
Click on “Create New Diagram”, select its name, as well as the corresponding template to create on the left.
 Click on "Create New Diagram" to create a new drawing
 Select a blank starting diagram (Blanc Diagramm) or any of the existing diagrams (charts), Engineering diagrams (Engineering), flowcharts (layout), maps (maps) and other types of templates
Once you have selected a template, click on “Create”.
 The left and central part of the editing screen of the “draw.io” service
 To save the created drawing, click on “File” - “Save as”.
Service drawisland.com
The drawisland.com service is a simple English-language service for drawing on the Internet. After switching to it, you will be greeted with a screen for creating a drawing with a rather limited set of tools. On the left there is a toolbar, on the top you can select the size of the drawing and rotate it 90 or 180 degrees, and on the right you can select the diameter of the drawing tool, as well as switch between layers.
 Working window"drawisland.com"
 To save the drawing you created to disk, click on the “Save” button on the left.
Service knin.com.ua
This service is designed to create a technical plan for a construction project, which can later be saved to your PC. Like most similar services, this service has a set of built-in graphic templates that make the process of creating a technical floor plan practical and convenient, allowing you to easily draw a drawing online.
- To get started with this service, go to knin.com.ua.
- Specify the dimensions of the room at the top right, and then click on the “Create” button.
- If you need to add another room, then specify its dimensions again and click on “Create”.
- After all the necessary premises have been created, click on “Continue”.
- After this, various graphic objects will become available to you on the right - windows, walls, interior items, and so on, which you can place on your object.
- Next, once the site plan is created, you can save it to disk by clicking on the “Save” button below.
 Working window of the service “knin.com.ua”
 Service sketch.io
"Sketch.io" is another simple English-language resource for constructing simple drawings, creating graphic sketches and sketches. The functionality of the service is quite simple, and is suitable primarily for beginners in creating drawings.
- To work with the service, go to sketch.io.
- On the right is a toolbar with which you can perform all necessary operations.
- After the drawing is created, click on the “Export” button (floppy disk on top), then on “Save” - “Download”.

Drawing programs
Also when describing online services to create a sketch of the project, you cannot ignore a number of popular programs created specifically for such purposes. However, most of them are paid, since the functionality of free programs may not be enough to solve professional problems.
- Autodesk AutoCAD is one of the most known systems computer-aided design (CAD), designed to create various types of drawings, diagrams, graphs. Allows you to create 2D and 3D drawings at a highly professional level, has rich functionality, copes well with rendering 3D objects, and can work with a 3D printer. Supports working with drawings in DVG, DWF, DXF formats;
- "Askon Compass" is a whole complex software solutions for drawing and diagramming, which are quite popular in the Russian Federation. These solutions support many formats of electronic drawings, have a large database of attached libraries, and are quite simple and easy to use;
- "nanoCAD" is a free program for beginners, which includes the necessary set of basic tools for designing and creating drawings. The program is aimed at creating mainly 2D drawings, supports working with DWG and DXF drawings, the advantage of the program is the fast output of objects, working with DirectX and so on.
Conclusion
In this material, I reviewed several popular services that allow you to implement online drawing. They all have quite different functionality, generally inferior to their professional desktop competitors (for example, Autodesk AutoCAD). If you are just trying your hand at drawing, then I recommend using both the online services I have listed and the mentioned free program “nanoCAD” - the tools described are perfect for gaining basic skills in creating the drawings you need.
In the era computer technology No one has been drawing with pencils on drawing boards for a long time. Now high quality drawing created using a special set of programs and printed on a printer.
Moreover, such software can be used by everyone, from a beginner who wants to learn drawing skills to a professional working in this field.
3 Best programs for drawing on a computer in Russian with free versions
Users have access to a range of automated systems, which perform design functions based on information technology. We have selected three of the most worthy programs for review:- AutoCAD (Autodesk);
- Compass-3D (ASCON);
- NanoCAD (Nanosoft).
AutoCAD
is the most popular and in-demand software that is used by professionals, amateurs and even beginners alike. Constant developer support, annual version updates, new tools and extensive functionality- this is the hidden reason for such popularity and fame.
Functional Features
A computer drawing program allows the user to create a two-dimensional or three-dimensional project. At the same time, the program is distinguished by high-quality visualization of three-dimensional models, which only full-fledged editors of such images are equipped with.
2D modeling implemented in the Autodesk product makes it possible to create unique drawings. Projects in AutoCAD based on information technology, really differ in quality.
The program can work with three formats:
- DWG is a binary file format (editable) that stores 2D and 3D design data/metadata.
- DXF- open format, allowing you to exchange graphic information between CAD.
- DWF is an open format from Autodesk that allows you to print, review, and view drawings.
Autodesk CAD has extensive functionality that is worth a lot of money. Professional users can easily part with them because the software is truly worth its price. And amateur draftsmen prefer to use a less functional version of the program or a free one presented for informational purposes.
Pros:
- An extensive toolkit and abundance of functionality is a paradise for professional draftsmen and those who are seriously interested in this activity.
- Ability to download Excel spreadsheets.
- Ability to interact with cloud storage.
- Supports multiple operating systems.
- Interaction with three-dimensional printers.
- Ability to work with layouts.
- It is possible to use the free version of the drawing program.
- You will have to pay dearly to use the fully functional version of the software.
- Stated by the developers system requirements incredibly high.
Any industry that requires drawing uses CAD. And most often it is software from Autodesk that is chosen. Using AuotCAD, drawings for equipment and interior drawings are created, architectural projects, and the program is also used for teaching schoolchildren and students.
Askon KOMPAS
, a domestic development of the ASCON company, is a unique electronic drawing board that provides the draftsman with ample opportunities for design based on computing technologies. This is a whole set of unique programs that allows you to create high-quality, original projects.Interesting information! Distinctive feature, know-how, domestic CAD is the computing core. Any drawing developed in Compass will fully comply with state design quality standards.

Using this unique software you can draw a part, mechanism, structure.
Functional Features:
CAD supports common drawing formats created behind an electronic drawing board and closely interacts with design bureaus where other software is used.
The basis of the finished project is a three-dimensional model, and its documentation exactly corresponds to state design standards. And their updates are strictly monitored by a special audit service.
Advantages and disadvantages:
CAD is especially in demand among Russian users: amateurs and professionals.
Main advantages:
- In Russian.
- Quick to learn and easy to use.
- Actively being developed and improved.
- Many libraries can be linked.
- Extensive set of tools.
- Focus on domestic users.
- It's expensive.
- The program is resource intensive.
CAD KOMPAS is preferred by professionals; there are also less functional version, which is used for educational purposes. The software is widely used in domestic enterprises. With this unique electronic drawing board you can create any drawing and design documentation.
nanoCAD
- domestic basic system auto design, which is the most accessible and easy to use. This electronic drawing board can be used by beginning draftsmen to develop design skills. Although CAD is similar to the product from Autodesk, the development of the mathematical and software core was carried out by the domestic company Nanosoft.
Functional Features:
The program is constantly being improved, acquiring new functionality with each version. The orientation of this CAD is the creation of two-dimensional projects, and support for common formats allows you to work with them in other software.
Advantages and disadvantages:
CAD from Nanosoft is young and promising, and it also helps that the software is aimed at a wide range of users.
Pros:
- Russian language;
- Relatively low cost of the full-featured version.
- Supports domestic design standards.
- Open interface programming (the ability to create your own software based on it).
- A free version of the drawing program is offered.
- Smaller set of tools compared to other software.
- Limitations in working with the Lisp language dialect.
- Doesn't read binary file formats well.
Using nanoCAD, professional design documentation and drawings are created that meet domestic standards. And the free version is perfect for untrained users and novice draftsmen.
Having familiarized yourself with the presented programs for reading in Russian with free versions, You can choose the one most suitable for yourself or take a closer look by following the links posted to the official websites of the developers.
A free drafting program reminiscent of early versions of AutoCAD. Designed for quick creation simple flat drawings.
IntelliCAD- an international DWG-compatible platform for many AutoCAD-like CAD systems.It's no secret that the leader in platforms for designing on at the moment is the "great and terrible" AutoCAD. Although in lately it is strongly squeezed by cheaper competing CAD systems based on IntelliCAD. Almost all of them are not free and can cost as much as a couple of decent computers.
A simple engineer may not need all these 3D bells and whistles for a hundred thousand rubles, when he just needs to draw a simple part or, for example, a bookshelf. Then programs like this come on stage A9CAD. And this is what we will now look at in more detail.
A9CAD Features
- creation of 2D drawings in popular DWG and DXF formats;
- working with layers;
- works correctly in Wine from Linux;
- Only English text is supported, unfortunately;
- export of the finished project to EMF.
Installing the program
Installing A9CAD does not contain any special surprises. It is in English, but a school course is enough to work with it. Launch the downloaded installer and in the first window of the Installation Wizard, click the “Next” button.
In the second window, set the switch to the “I accept the terms in the license agreement” position, confirming that we agree with the license and want to install the program. Click "Next" again.
In the next windows we leave everything as is. Again “Next”, “Next” and in the last one: “Install”. The direct installation of the program will begin, after which the final window will appear, in which we click “Finish”.
We launch from the Desktop or from the Start panel.
A9CAD interface
When you first launch the drawing program window will look like this.

As you can see, unlike serious CAD systems, there are not so many tools, but for simple drawings they are quite enough.
Let's first set up the A9CAD interface:
1. The black background of the working field can be made white in the menu "File" - "General Settings" - "Background Color" - "White".
Pixel- minimum point on the screen.2. In the same window you can set in pixels:
- cursor crosshair length (Cross Size);
- the size of the handles by which the figures are “grabbed” (Grip Size);
- the area of the “capture” zone when selecting figures in the form of a square around the crosshair (Pick Size).

3. All panels can be dragged by grabbing the special areas at the very top (for vertical ones) or on the left (for horizontal ones). This can be useful if the program is installed on a netbook and some panel does not fit vertically. Then you can drag it up or down. Or even send him on a “free voyage”.
4. Unneeded panels can be hidden, shown or edited using context menu that appears when you right-click on any of the panels.

The most convenient way to navigate around the working area of a drawing is to use the mouse roller. By rotating it towards ourselves, we move the picture away, and by rotating it away from us, we bring it closer to the point where the mouse cursor is located. You can more accurately set the desired view using the navigation tools on Standard panel tools.
Drawing in A9CAD
There is a certain drawing technique here, slightly different from the technique of drawing in raster graphic editors. The difference is that all actions are performed with single clicks of the left or right mouse button. There is no such trick as holding down the button.
For example, let's draw a polyline:
Polyline- a complex figure consisting of one or more segments and arcs.Console - command line at the bottom of the program window.
- We decide whether we need to draw lines at right angles, and also whether a grid and drawing step will be useful (for greater accuracy).
- Select the Draw polyline tool from the drawing panel. In most cases, it is better to draw with polylines rather than simple segments. The PolyLine start point prompt will appear in the console.
- Click the left mouse button once in a suitable place on the work field. A “rubber” line will stretch behind the crosshairs. In the console, the inscription will change to PolyLine second point.
- Click again left button mouse to fix the second end of the segment. We will have one fixed line and a second rubber line.
- Now you can continue drawing the polyline by pressing the left mouse button or interrupt it by pressing the right button.

You can control tools not only with the mouse, but also with the keyboard. For example, you can specify the next point of a polyline relative to the previous one using numbers separated by commas (X,Y).
The remaining figures are drawn in the same way, a tool is selected, then according to an individual algorithm:
- Draw point - simply indicate where to insert the point.
- Draw line - indicate the beginning and end of the segment.
- Rectangle (Draw rectangle) - two opposite angles are indicated.
- Arc (Draw arc) - the center of the circle of which the arc will be a part is specified, then the radius, the initial and final direction (counterclockwise).
- Draw circle - set the center and radius of the circle.
- Ellipse (Draw ellipse) - indicate the center, one of the two points closest to the center, then one of the two points farthest from the center.
- Polyline (Draw polyline) - the first and subsequent points are indicated.
- Text (Draw text) - the first point is indicated, then the angle is specified by the second point and then text is entered from the keyboard into the console (unfortunately, only the Latin alphabet is supported and only capital letters), which appears on the screen after pressing the Enter key.
- Draw image - in the window that opens, select a picture on the computer, indicate the position of its lower left corner on the working field, and the second point sets its scale.

As you can see, the main problem of A9CAD has been discovered here, which does not allow it to be used to create full-fledged drawings - the program “doesn’t support the Cyrillic alphabet at all.” However, there are many tasks where you can do without explanatory notes. For example, if you need to explain to a measurer what the future furniture you want to order should look like.
It is precisely in such tasks that the last 6 tools in the drawing panel, designed for creating dimensions, will come in handy:
- Align dimension - specify two arbitrary points between which the distance will be calculated.
- Vertical dimension - the distance along the Y axis between two arbitrary points.
- Horizontal dimension - the distance along the X axis between any two points.
- Angular dimension - angle in degrees. You need to specify the center and two directions between which the angle will be calculated.
- Diameter dimension - the diameter of a circle or arc. It is enough to indicate the desired figure.
- Radial dimension - the radius of a circle or arc. Indicate the desired figure.

Editing a drawing
Drawing from scratch and without errors is of course good, but not realistic. It doesn't happen that everything works out the first time. Therefore, there are tools for editing the created shapes, and now we will look at them.
The editing panel is divided into two parts: the tools themselves and buttons for turning on/off object snaps.
Snaps are a very convenient thing because they allow you to precisely “snap” the mouse crosshair to different points existing figures.
For example, if we need to draw a line from the intersection of a circle with a rectangle, then we turn on Snap to intersect, select the Polyline tool and move the cursor crosshair to this intersection. A yellow prompt appears, indicating that the anchor point is captured.

Now, if you press the left mouse button, the beginning of the polyline will be exactly at the intersection of existing shapes. Other bindings work the same way:
Perpendicular on a plane - when one line is at right angles to another.- by endpoint (Snap to Endpoint);
- by midpoint (Snap to Midpoint);
- at any nearest point on the contour (Snap to Nearest);
- Snap to Perpendicular;
- in the center (Snap to Center);
- by insertion point (Snap to Insert);
- by intersection (Snap to intersect);
- and the last button in the panel (with the image of a magnet) is to reset all bindings (Clear OSnaps).
If everything is clear with the bindings, then let's look at what editing tools we have:
- Select is the same as simply clicking on a shape with the mouse crosshair.
- Reset selection (Deselect).
- Erase.
- Move.
- Copy.
- Scale - resizing.
- Rotate.
- Explode - dividing a complex figure into primitives, for example, a square is divided into 4 segments.
- Trim - removing part of a shape that extends beyond the border of another shape (for example, an auxiliary line).
- Extend - extending a line until it intersects with a specified part of another figure.
- Rounding (Fillet).
- Offset - creating the semblance of a figure at a given distance from it.
- Break - dividing a figure into two parts at a specified point.
- Mirror - creating a mirror copy of a figure.
- Join - joining two figures (for example, two polylines) into one.

Thus, with the help of all these tools, you can build quite complex drawings, put dimensions on them and send them for printing.
Working with layers
We haven't covered another important thing - working with layers. Layers allow you to display and edit created shapes in separate "packages".
For example, we decided to draw a plan of our room (to plan the rearrangement of furniture), where the walls will be black, the windows and doors will be blue, and the furniture will be orange. Then it’s most logical to draw each type of object in its own layer and give it a layer color (BYLAYER). To do this, go to the layers panel (Layers button) and create two more layers (for example, OKNO and MEBEL), in addition to the existing one with the name “0”.

We immediately assign the desired color to the new layers and then, either during the drawing process or after, we indicate to each figure its layer. This allows you to later, in one fell swoop:
- change the color, type and thickness of lines for all objects in one layer;
- hide this layer so that it is not visible;
- lock the layer so that the shapes in it cannot be accidentally “edited”.

Saving a project
When working with any serious program (and A9CAD is no exception), it is important not to forget to periodically save your project, because when random failure You can lose hours and even days of your work.
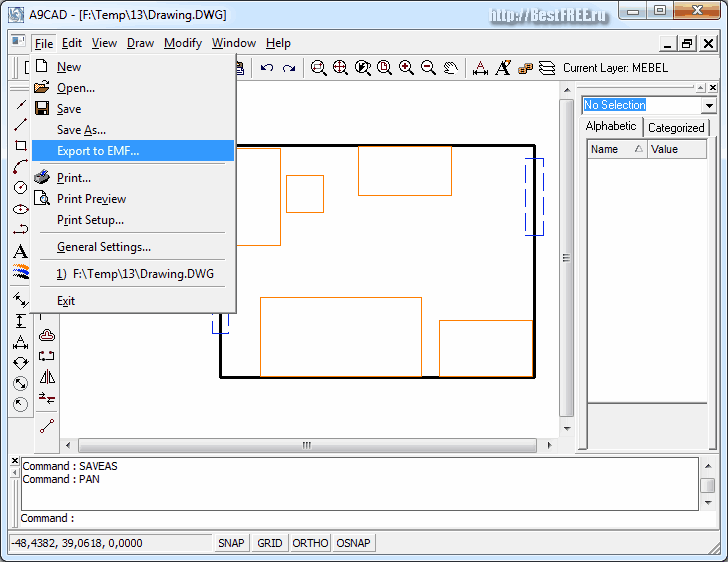
You can also save the project as a drawing in EMF format. The format is not very popular, but is easily recognized by “regular” using Windows. To convert to it, use the “File” - “Export to EMF” menu and give the new drawing a name other than Drawing (otherwise it will not be saved).
Conclusions
A9CAD is indeed not a full-fledged CAD program, and does not pretend to be that title. Drawing in this program is convenient only in cases where you need to create a simple drawing without Cyrillic characters. This could be some small household task, like sketching a future cabinet.
But on the other hand, installing A9CAD is much easier and faster than professional CAD systems, at least the same free nanoCAD.
P.S. Permission is granted to freely copy and quote this article, provided that an open active link to the source is indicated and the authorship of Ruslan Tertyshny is preserved.
P.P.S. Carrying furniture around a room in A9CAD is not the most exciting activity. For this there is special program, allowing you to see how the future arrangement will look in 3D:
Training video on working in A9CAD
subscribe to new video lessons!
P.P.P.S. By the way, not always for good result requires high-quality expensive graphics. Sometimes all you need is a good idea, like in this strategy flash game.
In the 21st century, people have practically stopped making drawings by hand. You can make a mistake in them, make a serious mistake due to inattention, and it is impossible to scale such drawings. That is why digital CAD solutions are increasingly being used for work and education. They guarantee the quality of graphic images, their scalability and safety.
Free drawing programs
KOMPAS-3D- an excellent product that is suitable for all types of drawing. It allows you to create parts for different areas of human activity. This is a fairly simple program, which, nevertheless, is suitable for solving the most complex problems.
Russian users appreciate it for its convenient and localized interface, support for ESKD and GOST standards. This is very important, because compliance technical requirements- the main condition set before any drawing program. Also, this program has a very nice hint system that can tell you about technical capabilities and ways to work with KOMPAS-3D.
Of course, such a product cannot be completely free, and this program is distributed under a closed, paid license. However there is special version For home use. It has a number of limitations in the choice of formats, but otherwise it is fully functional software.
Paid programs (demo versions)
A very expensive but very powerful product that is used by professionals all over the world. AutoCAD is the benchmark for other computer drawing programs, and for good reason! Autodesk always creates truly high-quality applications that quickly become industry leaders.
You can make absolutely any drawing in it, from the simplest detail, to a complex mechanism. Thanks to the unique tools that this program has, drawing becomes easy and fast. This allows engineers not to waste time on banal formalism and drawing each line.
Of course, AutoCAD also has a very significant drawback - it does not work with Russian system ESKD. Instead, users are offered only the international one. For some businesses, this is a major deterrent to purchasing this program.
AutoCAD has trial version, which can be downloaded for free. 
Astra Furniture Designer- a program whose essence is easy to understand from the name. It is often used in furniture production and allows you to evaluate appearance future model before creating it from physical materials. The use of this software, which, by the way, is distributed in Russian, helps businesses save money. Indeed, thanks to Astra, it is possible to analyze all the weak points of the design before starting production.
The program interface is very simple, and even those engineers and architects who have not previously worked with CAD systems can handle it. Also, it is worth noting the set of tools typical for drawing. They fully correspond to real analogues.
It is interesting that the program has added fasteners used in assembling furniture. Angles, spacers and other simple designs can be selected from a special library. Also, you can add new details there. 
designed specifically for ateliers and private tailors. In it you can create cuttings of any level, from the simplest skirts to voluminous dresses. Thanks to this program, you can save a lot of fabric, thread and time, because the appearance of future clothes can be assessed before production begins. This is very important in small businesses where additional expenses are unacceptable.
There are free programs with similar functionality, but they are much inferior to Astra Cutting. For example, they do not have unique tools for virtual work with fabric, there is no panoramic view, which allows you to speed up the process of creating cuttings.
Despite the fact that this program is paid, you can evaluate its characteristics in the free demo version. It is not limited in capabilities, but is valid only for a short period of time. 
If you have any questions, ask in the comments, we will definitely help.
Drawing programs will help you create your projects as efficiently as possible and absolutely free. Architects and designers will be able to find solutions for designing houses and interiors, electronic circuits and engines, and much more. The software in this section will provide semi-automatic execution of projects and related documentation.
Diagram Designer - creating flowcharts and diagrams
Simple vector editor to create diagrams, graphs, flowcharts and slide shows (presentations). The program already includes ready-made templates, which can be edited, build a block diagram, also can check spelling and build graphs for mathematical equations.
nanoCAD – basic CAD platform
Contains everything necessary tools basic design. Output documentation in DWG format. Software nanoCAD 2 is distributed absolutely free of charge and can be used for commercial purposes by both individual users and design teams.
DraftSight – free professional CAD
Free professional 2D CAD for developing documentation in dwg and dxf formats. Allows you to work both with 3D models in dwg/dxf format and perform a number of design and technological tasks that do not require the use of 3D modeling: create, edit, view, print files, etc.
T-FLEX CAD – CAD for students
CAD with the function of parametric solid 3D modeling and with a full set of tools for preparing design documentation in accordance with ESKD standards. The educational version allows students to study and understand the work and purpose of the program, use it for educational purposes, on the path to becoming an engineer.
Dia – creating flowcharts and diagrams
Cross-platform application for creating flowcharts and diagrams. In the program you can quite easily and quickly create objects of any complexity and for various purposes and applications: flowcharts of program algorithms, tree diagrams, static UML structures, network diagrams and more.
Mini CAD Viewer – free viewing of AutoCAD files
Mini CAD Viewer supports DWG and DXF formats, and drawing files can be saved as graphic files. The program allows you to move, zoom in and out. It has a "thumbnail" view that allows users to quickly search through folders.