Working with a hard drive in Russian. Choosing a utility for working with a hard drive
Programs for hard drives in Russian are collected in this section. All programs can be downloaded for free with activation keys.
Hard Disk Sentinel - software, which is designed for monitoring and hard testing disk. The main purpose of this program is diagnostics, search and elimination various problems on disk. Users have the opportunity to view reports on the current state of hard disk, its condition, temperature and other characteristics. Russian Hard version Disk Sentinel allows you to use functionality programs without restrictions. On our website, Internet users can download Hard Disk Sentinel activation keys absolutely free of charge. After…
Many users often encounter the problem of a so-called “braking” computer. Not everyone is able to diagnose problems on their own, and every time they spend money on service centers, to put it mildly, it’s expensive. To avoid advanced cases, sometimes it’s enough just to optimize your computer. You can optimize your computer absolutely safely at home using a simple and convenient program Advanced System Care. One of the advantages is that the basic version of this program is free. License key will allow...
PC users constantly experience problems with their hard drive. Over a certain period, the system response to a file request becomes greater, which subsequently leads to slow work OS. To fix this situation It is necessary to defragment the disk. IObit Smart Defrag is an easy-to-use program that is designed to defragment your disk. This application perfectly prevents slowdowns, freezes, and operating system crashes. After users install the program, it will start working in...
PC users know that the defragmentation process is important for regular hard drives because it reduces unnecessary movements and increases data read speed. Developers from different companies come up with effective tools to sort and defragment files on disk. Auslogics Disk Defrag is useful program, which improves speed characteristics and also increases stability Windows works. Given software product superior to most existing analogues, thanks to its speed and quality of defragmentation. Download AusLogics Disk for free...
AOMEI Partition Assistant is a powerful program that is designed to full control partitions on the hard drive. Available to users following functions: hide, format, copy, align, create, activate, erase. The program has several built-in wizards. They allow you to increase the size of partitions, transfer the OS to new disk, copy disks, create bootable disks and much more. Users of this application can divide sections into several parts, combine them into one, and so on. Download AOMEI Partition Assistant for free…
HDClone is a functional utility that is needed to copy information from one disk (meaning hard disk) to another. On this page you can download this program for free in a couple of clicks. Download HDClone 8.0.8 for free at Russian Free+ Basic Edition Download free HDClone Professional Edition 9.0.3 ISO Password for all archives: 1progs Application: copies information sector by sector (thus we get copy of hard disk exactly); is creating...
TestDisk - functional program from the author Christophe Grenier, who is multifunctional tool for resuscitation of parts of the hard drive. The addition is another Photorec application, which revives lost or damaged information HDD departments and works with cameras digital type. Program: assumes option complete removal and file duplication; resuscitates data after virus attacks; interacts with file types very different; enriched with MBR rewrite function. Download TestDisk 7.1 Russian version for free Password to all archives:…
DMDE is a fairly functional utility that helps edit and restore information on disks. Based on the fact that the application uses many algorithms in its work, it is possible to restore the structure of files and even directories in cases that are very complex. On this page you can download this program for free in the Russian version in just a couple of clicks. Utility: helps to achieve good results even in those cases where other similar programs did not help; has many different...
Creating, deleting and formatting partitions computer disks- this is only part of the possibilities hard drive management applications. Today, they make it possible to securely perform operations that previously required data deletion or other mind-boggling combinations.
Many tasks implemented through the partition manager can, in theory, be performed using the built-in Windows tool for disk management. However, it is not as intuitive as the programs discussed here.
A good disk management application consists of several modules. They are used to create, delete and format partitions. Apart from these functions, they also have functions for copying and moving partitions, creating images and backups.
Additional modules support system migration, merging and splitting partitions. Supported various schemes partitions, dynamic disks, RAID configurations, various systems files and boot records.
Attention! Always when you work with sections of hard disk, you need to carefully plan everything, execute backup data, make sure you select the correct one hard drive or partition, before pressing Enter.
Attention! All operations carried out on partitions are fraught with risks. The editors recommend extreme caution and are not responsible for possible loss of data or other damage incurred by readers.
EaseUS Partition Master Disk Management
One of the most popular programs for managing hard drive partitions in Windows. Ensures the allocation of new partitions without data loss.
Benefits of EaseUS Partition Master
- Easy conversion of partition type, primary to logical and vice versa
- Recovers deleted or non-existent partitions
- Supported hard drive capacity up to 8 TB
Flaws
- Inability to transfer data from HDD to SSD in the free version
License: freeware
Price: free
AOMEI Partition Assistant Disk Management
Also popular. Creates, divides, connects, copies hard drive partitions, changing their size, while saving files. System transfer is possible.
Benefits of AOMEI Partition Assistant
- Convenient wizards for every operation
- Supports all the most popular file systems
- Displays accurate information about supported media
- Allows you to create a bootable CD with the application
License: freeware
Price: free
Disk Management in GParted
A tool for managing computer hard drive partitions. Distributed as an ISO file. Install it on a flash drive or burn it to a CD and start your computer from it.

Benefits of GParted
- Does not require installation and does not take up disk space
- Attractive free offer for companies
- Wide range of partition management capabilities for almost any file system
Flaws
- Mastery takes time
- Only available via Live CD
License: freeware
Price: free
MiniTool Partition Wizard
Performs all operations with hard disk partitions and also hides it. Copying the contents of the disk and changing the file system.
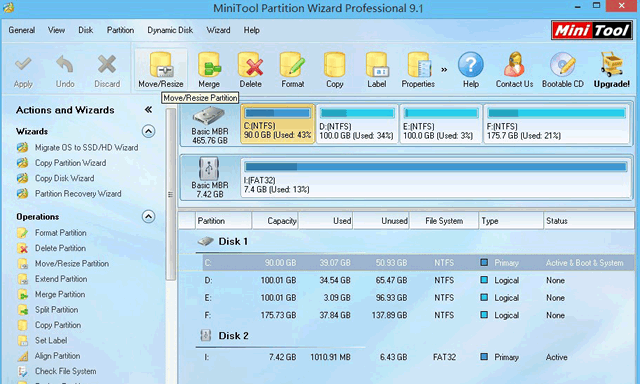
Advantages of MiniTool Partition Wizard
- Lots of tools, including disk cleaning and checking
- Convenient visual wizard for each operation
- Allows you to convert NTFS to FAT32 without formatting, change the disk type from MBR to GPT
License: freeware
Price: free
Active@ Partition Manager
Performs operations on disk partitions. Formats the flash drive in FAT32 and NTFS. Fixes MBR disks. Converts MBR to GPT and vice versa.
Benefits of Active@ Partition Manager
- Disk Imaging Tool
- Convenient wizard for creating and changing partitions
- Built-in boot sector editor, allows you to manually make changes
- Shows S.M.A.R.T data. for hard drives
Flaws
- English only
License: freeware
Price: free
This article talks about how to create, change or delete hard drive partitions using Windows 7.
To work with hard drive partitions in Windows 7, there is a tool called “Disk Management”: Control Panel → System and Security → Administrative Tools → Computer Management → Disk Management OR “Start” → in the search bar enter: diskmgmt.msc and press Enter.
1. Creating a section
Right-click on a free space not occupied by other partitions the right hard disk → Create a simple volume... The “Simple Volume Creation Wizard” window will open, click the “Next” button. Then specify the size of the partition to be created, assign a drive letter, select the required file system and formatting options, once again make sure that you did everything correctly and click “Finish”
2. Compressing a Partition
Right-click on the desired section → Shrink Volume... A message window will appear asking for space for compression, wait until the end of the survey. Then in the window that appears, in the line “size of compressed space”, indicate the amount of free space and click “Compress”
3. Section expansion
Extend Volume... The “Volume Expansion Wizard” window will appear, click the “Next” button. Then select the required free space from the list, click “Add”, then specify the amount of free space allocated to the partition, click the “Next” button, check the information and click “Finish”
4. Deleting a partition
Right-click on the desired section → Delete volume...Before continuing the operation, copy everything necessary files and folders to another disk, because Once a volume is deleted, all data on it will be lost.
5. Changing the drive letter
Right-click on the desired section → Change drive letter or drive path... Click on the Change button, select the desired drive letter and click OK. Next, we will look in detail at ways to expand disks without harming the information stored on them.
In order to divide the hard drive into partitions, you need to go to the "Start" menu → right-click on "Computer" and click on "Manage".

In the window that appears, go to the "Disk Management" section.

Select the hard drive and partition that needs to be divided and right-click on it.

In the drop-down menu you need to select "Shrink volume" and then select the size to which you want to reduce existing section. The space freed up after compression will be the new hard drive partition.

To create a new partition, you need to right-click on the free space and select “create volume”. Then specify the size of the new partition and wait for the operation to complete. Sooner or later, any computer user faces such a problem as lack of free space on the system partition of the hard drive. This is where the question arises: How to expand drive C?
First we need to go to the "Computer Management" tab (see above).
When this tab opens, you will see in the window all the media that are currently connected to the computer. Each hard drive can be divided into several logical ones. The very first one will be "Disk 0". The space will be displayed on the right, system reserved, and logical partitions (C, D, E, F, etc.). If you have only one drive C and it is full, then you can try “Shrink volume” (see above). If you have several logical partitions, then move on.
The principle of disk division.
The principle of action is this: we must expand drive C at the expense of the neighboring logical partition. This could be drive D, E, and so on. In the same way, you can increase not only section C, but also others, if you have such a need. So, delete the adjacent disk, for example, D. Right-click on it and select the “Delete volume” option. Click OK. Immediately after this this volume should appear in black. The message “Volume is not allocated” should appear on it. Now we can add the space we need to drive C. To do this, right-click on partition C and select “Extend volume”. Click "Next" and select the size you want to add.Can be used maximum size, as will be suggested by default, or choose at your discretion. Click "Next" and then "Finish". If nothing pops up additional windows, then the operation was successful. You have learned how to expand a disk using Windows 7. The main thing to remember is that the system partition can only be expanded if there is a free space. Otherwise, nothing will work.
Possible difficulties.
What other difficulties could there be? Let's say we have five volumes. We want to configure them in such a way that part of the space is added to drive C, and the other to drive D. When deleting one of the partitions, the “Delete Volume” function may not be active, and the “Extend Volume” function may not be available on volume C.The whole point is that the section style can be used MBR*. This is an outdated style. In this case, two adjacent volumes can be connected by a green frame. This means that with style MBR partition You cannot create more than four volumes.
Windows 8 provides the same tools for increasing space. Therefore, this method is also applicable on this operating system.
Partitioning a hard drive in the operating room Windows system 7 very simple thing. You can see this for yourself if you partition and create a new partition according to the described algorithm.
*MBR (Master Boot Record) main boot record in PC - table in the first sector boot disk, which stores data about the physical and logical organization of the disk. If this record is corrupted, loading the OS becomes impossible.
That's all. Thank you for reading the article. I hope it was useful to you.
While working with personal computer It may be necessary to change, add or remove partitions hard drive. If at the initial Windows installation 7, while the creation of sections takes place interactively and is intuitive, making changes to the created sections requires a certain skill. Due to the lack of any experience in these matters, the user may perform the necessary steps incorrectly, which will subsequently lead to complete loss data or even failure of the hard drive. The Disk Management utility will help facilitate the process of creating and changing disk partitions.
Disk Management utility and its functions
The Disk Management utility is a tool for performing various operations with hard drives and their sections.
With its help you can:
- create, delete, merge volumes on a disk;
- compress volumes;
- format volumes;
- assign letters for volumes;
- add volumes without rebooting;
- manage local and remote disks online.
Opening Disk Management
There are several ways to launch the program.
Via the Start menu
- Click on the “Start” menu and right-click on “Computer”. Select "Management".
Right-click on “Computer” and select “Manage”
- In the “Computer Management” window that opens, click on “Disk Management”.
Select "Disk Management"
- The Disk Management window will open.
Disk Management window
Via command line

Via "Control Panel"
- Click on the “Start” menu and select “Control Panel”.
Click “Control Panel”
- IN search bar Enter “administration” and click on the “Administration” section that appears.
Click on the “Administration” section
- Select “Computer Management” from the list.
Select "Computer Management"
- In the “Computer Management” window that opens, click on “Disk Management”.
Click on “Disk Management”
Why doesn't Disk Management open?
There are situations when the Disk Management console does not open or opens but the console window is empty and the warning message “Failed to connect to the Manager service” appears. logical drives».
The reasons that caused this problem to appear may be different. To eliminate their influence on the disk management process, you must perform the following steps:
- Carry out antivirus scan. Launch antivirus program It is recommended to do it from an optical disk or from a protected flash drive. After checking, open the “Quarantine” of the antivirus. If the dmdskmgr.dll library is in Quarantine, then return it to its place.
- Run the command Rundll32 setupapi, InstallHinfSection DefaultInstall 132 %windir%\inf\dmreg.inf through the Start menu and the Run window.
- Go to “Control Panel” - “Administration” - “Services” and make sure that “Logical Disk Manager” and “Logical Disk Manager Administrative Service” are running. If they are stopped, then enable them.
- Enter the Basic Input/Output System (BIOS) menu. To do this, when turning on the computer, press Del, F2 or Esc (the choice of key depends on the computer manufacturer). If the launch panel does not contain information about the connected HDD, then check the connecting cables at the points of connection to the drive.
How to create a logical drive
The very first hard drives, first created by IBM in 1973, contained 30 cylinders, each of which was divided into 30 tracks. By analogy with automatic rifles using the .30–30 Winchester cartridge, such discs were called “Winchesters”. Over time, in colloquial speech the word “Winchester” was transformed into “screw”.
Most hard drives are sold already prepared for installing Windows, i.e. the main partition has already been created on them. The remaining operations are carried out during the system installation process. Installation is carried out from a bootable optical disk or USB device. At one of the installation stages, a window will appear asking you to select a space to install the system.
If the hard drive was not prepared for immediate installation of the system before going on sale, then all operations will have to be done by the user. This requires a bootable optical disk or USB stick.
Before installation, configure in the BIOS ( basic system I/O) boot from DVD or USB drive:

When forming a partition on a hard drive, everything is used free space, A additional sections are created after Windows installations 7.
If possible, it is better to take advantage loading Windows PE, in which are built Acronis programs Disk Director or Partition Magic. These utilities are designed to manage partitions hard drive.
Windows Preinstallation Environment (Windows PE) is used to prepare your computer for Windows installation. It is a built-in component of other system installation and recovery tools and is not intended to be used as a primary operating system.
If you don't have a bootable disk like Windows PE, you can:

The created logical drives must be formatted using the format.com utility. Now you can proceed to installing Windows 7.
Hard drive logical drive management
You can manage hard drive partitions using context menu each of them. They provide a set of commands necessary for work.
Compressing a Partition
Compression command logical drive is set in the context menu.

Creating a section
A new partition is created in a free area of the hard drive that is not yet part of a formatted volume. At the bottom of the Disk Management console, this space is highlighted in bright green, and in the legend line it is indicated as “Free”.
- Once the partition has been compressed, right-click on the unallocated space and select “Create simple volume” from the context menu.
Right-click on the unallocated space and select “Create simple volume” from the context menu
- The “Creation Wizard” will start simple volume».
After launching the “Create a Simple Volume Wizard”, click “Next”
- Specify the size of the new volume.
Specify the size of the new volume
- Assign a letter (letter) to the disk.
Assign a letter to the disk
- We decide on the file system, cluster size and volume label.
- We format the partition.
We format the partition
- In the last window, click on the “Finish” button and create a new logical drive.
Click on the “Finish” button

After reformatting, the volume is ready for use.
Changing the section letter

Merging sections
When there is a need to reduce the number of logical drives, two are merged into one joint logical drive. Before the merger necessary information from the logical drive being deleted is copied to another drive or removable media.
To merge one drive with another:
- Select the volume that we want to attach and call the context menu. Click on “Delete Volume”.

Often the standard tools offered by the system are not enough to work with the hard drive. And therefore we have to resort to more effective solutions, allowing you to get detailed information about HDD and its partitions. The solutions discussed in this article will allow you to familiarize yourself with the operations applied to the drive and its volumes.
Thanks to its tools, AOMEI Partition Assistant is one of the best programs in its own way. Wide functionality will allow you to effectively configure hard disk volumes. In addition, the program makes it possible to check a specific section for errors. One of interesting features– this is transferring the OS with all installed software to another hard drive or SSD.

Writing an image file to a USB device is also supported. The interface is endowed with a pleasant graphical shell. Despite the large number useful functions, the program is available for free use, which makes it even more in demand. At the same time, it is possible to download the Russian version.
MiniTool Partition Wizard
This software has powerful functionality that allows you to merge, split, copy partitions, and a number of other functions. MiniTool Partition Wizard is completely free and available for non-commercial use only. The program provides the ability to change the disk label, and when creating a partition, the cluster size.
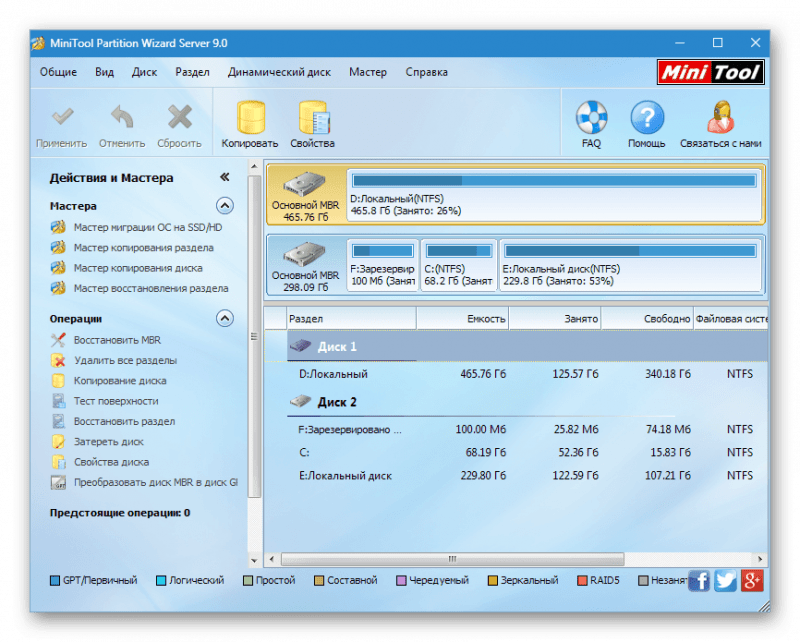
The surface test operation allows you to detect bad sectors on the HDD. The ability to convert is limited to only two formats: FAT and NTFS. All tools for working with disk volumes are located very in a convenient way, so even inexperienced user won't get confused.
EaseUS Partition Master
A program that opens up many possibilities when working with a hard drive. Among the main ones: disk cloning and importing the OS from HDD to SSD or vice versa. Partition Master allows you to copy an entire partition - this function is suitable if you need to create a backup copy of one partition to another.

At the program user-friendly interface, in which all operations are located in the left block - this allows you to quickly find the desired function. The peculiarity of EaseUS Partition Master is that it can be used to hide a specific volume by deleting a letter on it. Creating a bootable OS is another interesting and useful tool.
Eassos PartitionGuru
Convenience of working with Eassos PartitionGuru is achieved primarily due to its simple design. All instruments are located on top panel. A distinctive feature is the ability to build a virtual RAID array. To do this, the user just needs to connect drives to the PC, from which the program itself will construct a RAID.

The existing sector editor allows you to search for the required sectors, and the right block of the panel displays hexadecimal values. Unfortunately, the software is supplied in an English trial version.
Macrorit Disk Partition Expert
A pleasant interface displays functionality, which is divided into sections. The program allows you to scan your PC for bad sectors, and you can configure what is being checked disk space. Conversion of NTFS and FAT formats is available.

Macrorit Disk Partition Expert is free to use, but only in the English version. The software is suitable for people who need to conduct quick setup hard drive, but for more efficient work It is recommended to use analogues.
WonderShare Disk Manager
A program for performing various operations with a hard drive, allowing high-quality data recovery. Compared to other similar software, Macrorit Disk Partition Expert allows you to deeply scan partitions for lost information.

You can trim and merge hard disk volumes without losing files stored on it. Other tools will allow you to hide the partition if necessary or convert the file system.
Acronis Disk Director
Acronis Disk Director is one of the most powerful programs with a set of functions and operations for managing hard disk partitions and more. Thanks to the capabilities of this software from Acronis, users can recover lost or deleted data. Among other things, it is possible to defragment the volume and also check it for file system errors.

The use of mirror technology allows you to save backup copy section selected by the user. Acronis Disk Director offers the use of a disk editor, which makes it possible to find a lost cluster, taking into account the fact that the execution environment for this operation displays hexadecimal values. The program can be safely used to carry out the most efficient work with the HDD.
Partition Magic
A program that allows you to perform basic operations with a hard drive. The interface is very similar to standard application Windows Explorer. At the same time, among the instruments located in graphical shell, easy to find what you need. The advantageous feature of Partition Magic is that it allows you to select multiple active partitions, each of which has its own separate OS.
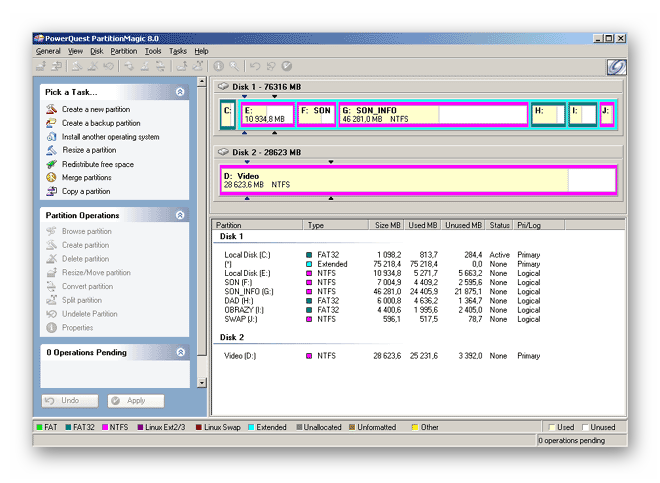
You can also use conversion services file systems, two of them are supported: NTFS and FAT. You can resize the volume and merge partitions without losing data.
Paragon Partition Manager
Paragon Partition Manager pleases users with an interesting set of functions and purposes for their use. One of them is connecting the image virtual disk. Among them, image files are supported, VMware and other virtual machines.

A noteworthy feature is that it allows you to convert HFS+ file system formats to NTFS and vice versa. Other operations are basic for partitions: trimming and expanding. Large quantity The settings provided by the program will allow you to customize all the functionality to your liking.
Reviewed software solutions have unique potential, each in its own way. The powerful tools of the developed software make it possible to save disk space and extend performance of hard disk. A function HDD checks error detection allows you to prevent critical errors in the operation of the drive.