Changing the appearance of icons in Windows. Changing the shortcut icon in Windows
Modern users prefer to stand out from the crowd - on social networks and in private. For example, many people try to customize the operating system so that it looks unique. GUI in Windows can be easily adjusted, which allows you to cope with the task without much difficulty. Very often, users change standard desktop icons to new and original ones. This technique allows you to give the OS a new “look”. How to change folder icon? We will try to understand this issue further. Let's look at the most common ways to solve the problem. In fact, everything is much simpler than it seems. And even a novice PC user will be able to quickly master the instructions provided.
Label size
Thinking about this, a person is sometimes interested in adjusting the size of labels. This technique allows you to shrink or enlarge folders and files externally. The actual “weight” of the documents remains unchanged.
How to change Windows folder icon? To adjust the file size, you can:
- Right-click on a free area of the desktop and move the cursor to the “View” line. Select the appropriate label size. For example, "Small icons".
- Go to the "Personalization" section on your computer and change the screen resolution. After saving the changes, all elements of the OS will be changed.
It is better to use the first method. It only affects the graphics of desktop shortcuts and does not affect screen resolution in any way operating system.
Standard change
How to change folder icon? Increasingly, users are not interested in the size of the label, but in its appearance. If desired, users can assign the document unique look. For example, using standard Windows icons.

To change the visual appearance of a document on the desktop, you will need to perform the following steps:
- Select the shortcut for the document whose appearance you want to change.
- Press RMB.
- Click on the "Properties" line.
- Open the "Settings" tab.
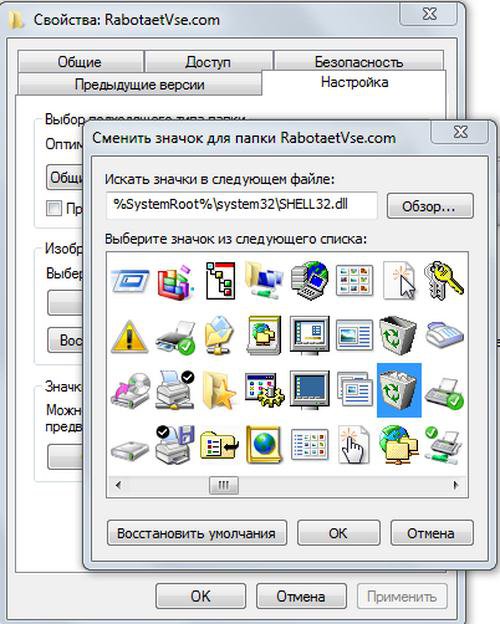
- Click on the "Change icon" button in the "Folder icons" section.
- Select the picture you want to see as an icon.
- Click on "Ok".
After saving the changes, the user will see the changed file or folder icon. Fast, simple and very convenient!
From the picture
How to change folder icon? The following technique does not occur too often. It involves changing the file's shortcut to graphic document on PC.
In this case, it is proposed to act as follows:
- Repeat the first 4 steps from the previous tutorial.
- Click on "Change picture".
- Specify the graphic file you want to insert into the shortcut.
- Confirm the operation.
In this case, the folder icon itself will remain unchanged. But the graphic document displayed on it as a “sheet in a folder” will be corrected.

Loading new data
How to change folder icon in Windows 7 and more? There is another way to handle this task. The thing is that users are able to download unique icons and shortcuts to their hard drive. They give the system a unique look.
To add a unique icon Windows document, you will need:
- Find a set of shortcuts for your operating system on the Internet.
- Download the corresponding archive to your computer.
- Repeat 5 steps from the second tutorial.
- Click on the "Browse" button and find the pre-packed archive of shortcuts. We are talking about files that were previously downloaded to the hard drive.
- Select the appropriate icon and click on the "Ok" button.
That's all. This scenario is not much different from the first manual. In the first case, you are asked to select a file image from standard shortcuts. In the second - from unique ones.
OS Styles
Windows today can be either purchased or found in the public domain. There is another option for changing the style of the operating system desktop shortcuts. What are we talking about?

About changing the OS style. How to change folder icon in Windows 10 or any other OS version? You can change the theme installed on your computer. Often the desktop icons change along with it.
Instructions for bringing your idea to life will look something like this:
- Open "Personalization" on your computer.
- Select the "Themes" section.
- Click on "Find Topics Online".
- Select the appropriate OS design and click on “Download and Install”. You can prepare a Windows theme in advance and apply it. Then in the “Personalization” section just click on “Save Theme”.
You can look at the result. If the selected Windows theme includes changes to shortcuts, they will be noticeable right away. It is advisable to manually change the desktop icon pictures if this was not done automatically.
Programs to help
When thinking about how to change a folder icon, some users decide to use specialized applications. With their help, you can quickly download and install shortcuts for files with a unique look. The majority of utilities are free and publicly available.
Usually this technique is used, guided by the following instructions:
- Install specialized program to create and edit shortcuts.
- Launch the appropriate application.
- Create or find the desired icons in the archive.
- Click on the button responsible for loading shortcuts.
In some cases, pictures of files and folders change automatically. Sometimes you have to adjust them manually using a second instruction.

If there is a desire to change the folder icon, users are advised to pay attention to the programs:
- "IrfanView".
- Avelcon 2.
- IconPackager.
- Restorator.
The first two applications allow users to independently create icons for the operating system.

Met in social network, she was like an angel among a nondescript world. With each new message, we became closer to each other and then came the final accompaniment “I invited her to a restaurant.” Our real acquaintance It turned out to be much worse, the girl turned out to be not a beautiful fairy, we are absolutely not suitable for each other.
Why does this happen? A person in love cannot assess the situation realistically! He flutters around, does not notice the bad things of his companion, but like any “rose-colored glasses,” these too become unusable.

Inconsistency, that's the theme! Do you agree sir? When we see a folder on the desktop, we may not understand that what is inside this box or shortcut is not capable of reflecting the entire inner perfection of a program, game or movie.
The desired may not be deceptive; if we take the whole situation into our own hands, then we will learn to transform the folder, make it the one, the only one...
Changing the shortcut icon
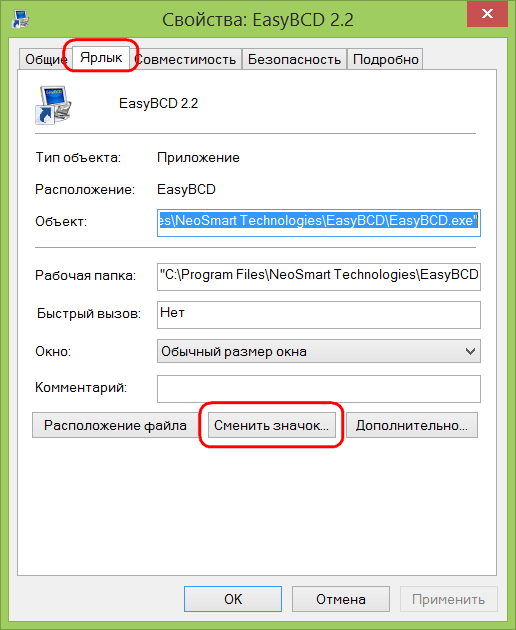
For example, here is a shortcut Google Chrome Let's take it as a basis and find out how to change the icon in Windows 7? We use the right mouse button (RMB) on the shortcut and click “properties”. 
Now in the properties we need to select the “shortcut” section and click “change icon”.

Select the icon that suits you and click “OK”. We confirm actions if necessary.

As we can see, the icon has changed! It's done! Rejoice, motherfucker! 
Changing the folder icon
If you want to change the folder, then again, right-click on it and click properties
Go to the “settings” section and click “change icon”. 
All you have to do is select the picture you like and click “OK”. 
Replacing system icons
Please note that it is not possible to change system shortcuts in the same way, for example, “My Computer”, “Trash”.
What to do? Find the “Start” button on the desktop and go to “Control Panel”. 
In the control panel we need to select “Appearance and Personalization”.

Just like when changing the theme, we need to go to the “personalization” tab. 
Now in the left border we should note “change desktop icons”.
Select the shortcut you plan to change and click “change icon”. 
Select the preferred icon and click “ok”.

Don’t forget to confirm, click “OK” again 
How to add your own icons?
1) Standard icons are not inviting, attractive and they seem ordinary, but you want something trendy! Download from the site http://www.iconarchive.com/tag/ico-files - a lot of interesting icons, choose the one you like!

2) Have you chosen? Click “Download ICO” - the download begins, quickly and without any telephone numbers and other fucking things. The ico format is what we need, because with other image formats it was not possible to put our own icon.

3) By default, all downloaded images and other files will be sent to a specific folder - depending on the browser.
Therefore, you need to find our downloaded image in “ico” format and move it to a visible place, for example, on the desktop or create a folder.
4) Now, for example, we will start changing the folder icon: RMB (right mouse button) – properties – settings – change icon and click browse

5) Find our downloaded icon, which I asked you to move to a prominent place and click “OK”. Be sure to set the format to “ico” to find it.

6) Click “OK” again and now the folder should change its appearance. If everything worked, but the icon has not changed, right-click on the desktop and click “Update”.
Thus, you can replace even system shortcuts with your image.

Complete replacement of icons for Windows
Want to change all icons? Exists great way! Complete replacement not only system icons, but also files of various formats, for example, all zip files will change the appearance.
1. Download and use
Install the multifunctional http://www.stardock.com/products/iconpackager/ – click “Get it Now”.

2. All opportunities are issued immediately, but for 30 days.

3. To download, you must provide an e-mail
Enter email address, a download link will be sent to your inbox.
We open our virtual mail and in the “Inbox” folder we find a letter from Stardock Corporation. Click on the picture and it will take us to the site to download the file.

5. Let's start the jump
Now you can finally download this software perfection.
6. Preparing for installation
The download has started, if it hasn’t started, click on the link, and we are also given instructions:
Open the downloaded exe file;
We confirm our actions;
Let's follow further instructions.

Loaded? Open it and start installation. We agree and click “Next”.

8. Shelter for use
We select a location to install the program: specify the folder or leave it as default (don’t touch it). The program weighs 143mb - I would say the norm. Click “Next”.

9. Launch
The installation has started, all you have to do is wait.. After completion, leave the checkbox and click “Finish”.

Working with Icon Packager
Let's go to the program. Click “Continue” and move on.

Replacing icons with your own or standard ones
In the “Icons Cursors” section, we can literally replace every icon. We move along the bottom tab and left-click twice on the icon that we plan to change. You can again download from the Internet or use standard icons.

For the changes to take effect, be sure to click “Apply changes”.

With Icon Packager, you can change system shortcuts, standard folders and files of various formats (mpeg, gif, zip and so on). I say again, this is a treasure for a complete and large-scale replacement of the visual background. Even the cursors can actually be changed.
Yes, it turned out to be an unusual article – rich! You can also view others
zavlekyxa.ru
Changing the folder icon on Windows 7 and 8
For quick visual search or decoration appearance folders (directories) have custom icons. The recommendations will show you how to change the folder icon in Windows 7, 8 to your own.
There are enough ways to change the icon of a specific directory or all, involving windows tools, third party programs. Create new folder or select an existing one and follow the steps below.
How to change the appearance of a folder
To change the folder icon in Windows 7, 8 you will need to do a few things simple actions. In Explorer, select a directory and right-click on it. In the menu, click “properties”.

In the properties window, go to the “settings” tab. In the third area, click the "change icon" button.

In the dialog box, select a standard icon from the list (located in the SHELL32.dll file) or click “browse”, specify the path to your image (ico) and click “open”. To practice, download the archive with icons here.
Recommended to use graphic files with a resolution of 256 by 256 pixels so that the icon sizes on the desktop or in Explorer are displayed correctly. If you decide to return the default folder view, click the “restore defaults” button. Once you've made your final selections and completed the steps, click OK.

In the properties window look at preview. Next, click “apply” and OK.

As a result, it is created in the folder configuration file desktop.ini, which contains the parameters and path to the image. To see it, you need to display hidden folders and windows 7 files.
You can manually create or edit the file instead of using dialog boxes. Create text document(txt), name it desktop and change the extension to (ini). Open it and copy these lines:
[.ShellClassInfo]IconFile=full path to the icon (ico)
Save the changes to change the folder icon in Windows 7, 8. The lines in the existing desktop.ini may differ, you just have to enter the path to the picture.
It is not always possible to change the folder icon to your own image, for example, this is not applicable for windows directory. You also cannot change the icon inside the library, first right-click on the folder and select “folder location” from the menu. Then follow the recommendations above.
How to change the icons of all folders
Using this method, you can change all folder icons in Windows 7 at once by setting a custom image. You will need administrative access. This will change the icons for all PC accounts. More icons change when changed Windows themes, if it supports such features.
1. In the search bar of the start menu, write regedit and click enter.
2. When the UAC window appears, click “yes”. These messages are annoying, so I suggest you read how to disable User Account Control in Windows 7.
3. In the left pane of the registry, find the Explorer section (the picture shows the full path). Right-click Explorer, point to "New" and select "Partition". Give the Shell Icons a name and press enter. If this section exists, skip this paragraph and go to step 4.

4. Select the created, existing Shell Icons. In the right pane, right-click, hover over “new” and select “string parameter”. Write it type 3 and press enter.

5. Right-click on parameter “3”, click “edit”. In the value area, write the path to ico file, for example, C:\iconca\papka.ico and click OK. The recommended image size (ico) is 256x256 pixels.
6. Pay attention to Windows bit depth 7, if you have a 32-bit system, go straight to step 7. If you have a 64-bit version of Windows 7 installed, then go to the section shown in the picture below and follow steps 3 to 5.

7. To change the folder icon on Windows 7, restart your PC.
If you want to return regular folder icons, then visit the Shell Icons subsection and remove type 3 by right-clicking on it. Select “delete” from the menu, then click “yes.” For the 64-bit edition, do these steps in two places. Restart your computer.

Programs for changing folder icons
There are paid and free utilities for changing the folder icon. Let's consider free products. I would like to emphasize that programs do not bring more benefit than using regular funds. Such applications include IconTo (we’ll look at it in more detail), FolderIco. To change a folder icon or group of folders, do this:
1. Download IconTo here and install.
2. Launch the program, click “specify folder/file” and select installation for one folder, for several or for a specific file type.

4. Select one icon from the standard ones, in the “favorites”, “software” tabs, or click “specify an icon” to select your picture. Then click “install icon” and enjoy the result.

That's all, I explained how to change the folder icon in Windows 7, 8. Feel free to use the capabilities of the operating system itself. The programs do not give the desired result. If the theme goes beyond icons, find out how to change the Start menu icon in Windows 7 to improve the appearance of the OS.
nastrojcomp.ru
How to replace icons in Windows 7 using standard and software methods?
Good day.
Many users want their operating system to be unique. This is primarily due to convenience. In addition, some also hope to be different from others in some way, because in general, different computers The same versions of Windows are installed. IN latest builds Users have the ability to set the background, change the overall color of the panel and windows. In addition, it is possible to choose the appropriate sound scheme. But it does not provide the ability to install new icons. In this article I will tell you how to replace icons in Windows 7. And I will try to cover everything possible options.
About formats (to contents)
Windows 10 and previous versions provide various scenarios for installing non-built-in icons. But they must have the extension *.ico. At the same time, many developers offer images in *.png format. What to do in this case? It's simple - you need to do the conversion.
To do this, you can try changing the format in various graphic editors.
But it’s worth saying right away that this won’t always work.
The most in an efficient way is the use of small simple applications that allow you to achieve literally just a few clicks desired results. One of the most compact, convenient and fastest is Aveiconifier2.
Conversion(to contents)
This process is simple - anyone can figure it out. Download the above program and install it. After launch, a small window opens. Transfer the corresponding image to the “PNG” field. As a result, an image will appear in the “ICO” section. We just drag it to the place we need.

If you right-click in the last field, you can select the appropriate size. In the case when you need to translate several elements at once, simply select them all and do the same.
Replacing icons (to contents)
Microsoft's OS provides many options for replacing standard icons. So, the simplest is the manual procedure. To do this, we make several movements:

Despite the fact that this tool is built into the system, changing even a dozen shortcuts will be problematic. In addition, not everyone knows how to replace system icons, because using the above features you can put new pictures on only a few links.
Program (to contents)
If you want to replace several icons that belong to the same group with new ones at once, you should use the IconPhile application.
It is worth noting that this tool even allows you to install other icons on file formats.

Easy to use. Launch it and immediately select in which section you want to install other images. After that, call the context menu and click “Change Icons”. A explorer will appear in which we select the path to the desired images.
Many computer users want, but do not know, how to replace the Start icon. After all, this element is almost always shown on the display. And many people are already tired of his usual appearance.

All this can be done using the program. However, I have already talked about this in the article Topics for windows launcher 7.
Cart(to contents)
This element, like the previous one, is systemic. But in latest versions Microsoft operating systems developers have provided the ability not only to change the view, but also to hide it from the desktop. The same cannot be said about Windows XP. So, how to replace the trash icon standard methods?

You need to go to “Personalization” and select the appropriate item. However, I also mentioned this earlier.
Often, users want to get a completely updated design of the OS, each element of which is stylized to match a certain direction, be it a movie, a musical group or something similar. So, installing a theme for Windows 10 with replacing icons will allow the user to get almost new system. You can find out more in this article.

At the same time, if someone has heard about the method using “imageres.dll”, it is worth saying right away that the idea is not the best. After all, this system file, which contains icons, sounds, background and other elements. If changed incorrectly, the operating system may completely fail.
Well, I hope I was able to answer all the questions regarding this topic.
windwix.ru
Changing the appearance of icons in Windows
If you are tired of the standard icon design in Windows 10 and 7, you can change it. Who needs monotonous folders that are no different from each other? After all, they can choose individual icons. For books - a volume in a beautiful binding, for documents - a stack of papers with a paper clip, for music - sheet music, for games - a joystick. If you do the same with shortcuts and system directories, you get a unique design theme. Find out how to change icons in Windows 7 and other versions. You can decide for yourself how your desktop elements will look.

What images are suitable for icons?
There are several requirements for the image. It should be:
- Square.
- In .ICO format.
- Suitable size (16x16, 32x32, 48x48 or 256x256).
The image can be corrected and reduced in the built-in graphic windows editor- Paint. It is available in all versions of the system: 7, 8, and 10.
- Find it in the Start menu - Programs - Accessories.
- Click File - Open (blue button at the top left).

Window Paint programs
- Specify the path to the drawing.
- When it opens, click on the “Resize” button.
- If the picture is not initially square, uncheck the “Maintain proportions” checkbox. This may cause the image to become very distorted. Therefore, it is better to select icons in advance that have equal sides. Or trim the edges of the original design (if you only need the functional part of the composition).
- Set the appropriate size in pixels. 256x256 is the maximum possible. It is designed for large monitors.
- Save the resulting image as a .PNG (File - Save As).
Now you need to change the file format if it was not originally in .ICO. This is standard resolution windows icon all versions (XP, Vista, 7, 8, 10). For quick conversion, a simple utility “AveIconifier2” is suitable.
- Find it on the Internet and download it.
- Launch it.

- Drag and drop your original image into the box that says “PNG”. Bring it directly from File Explorer.
- A picture will appear next to it. It will already be in.ICO. Drag it out of the converter just like you would a PNG file.
You can also use the IcoFX program to change the extension.
Here's how to change folder icons in Windows 10. The method is relevant for other versions of Win.
- Right-click on the directory. It's better not to touch system data. Select your own directory.
- “Properties” item.

Click on Properties
- "Settings" tab.
- "Change Icon" button.

Click on Change icon
- A list of images that are already available in Win will appear. You can use any of them.
- If you want to set your own icons, click on the “Browse” button.
- Specify the path to the ICO file.
Now the folder will look different.
Shortcut icons
If folders look boring, the shortcut icons are initially varied. But what if you don’t like the picture? Or does it stand out from the general style? In windows 10, 8 and 7, these pictures can also be customized.
- Right-click on the object.
- “Properties” item.
- Shortcut tab.
- "Change Icon" button.

Click Change icon
- As with folders, you can select icons from the list or use your own (click Browse and specify the path).
System catalogs
The icons for the “Computer”, “Trash”, “Users”, “Network” directories cannot be changed through “Properties”. But there is another way.
- Open Control Panel.
- Personalization menu (in the Appearance and Personalization category).
- On the left there will be a section “Changing desktop icons”.
- You can put your own icons there system folders.
- In Win 10, this menu is located in Personalization - Themes.

Icon options in Windows 10
Programs
There are utilities that change icons in automatic mode:
- Iconpackager.
- Theme Source Patcher.
- IconPhile.
On the Internet you can find resources with collections of icons. Look at the screenshots and choose what you need.
Changing the icons of all folders at once
Through the registry you can change the icons of all folders at once. For example, if you don't like the look of Win 10 and want to make directories like Windows 7.
Editing registry entries can be dangerous. It is better to limit yourself to design themes. But if you do decide to do this, create a backup copy.
- Go to Start - Run.
- In the window that opens, enter “regedit” without quotes and click OK. The Registry Editor will appear.

"regedit" command
- Click File - Export.
- Come up with a name for backup copy and indicate where to save it. If something goes wrong, you can restore them all.
Now start changing icons.
- In the registry, open the folder “HKEY_LOCAL_MACHINE”
- Go to "SOFTWARE".
- Then in Microsoft\windows\CurrentVersion\Explorer.
- Right-click on Explorer.
- Item “Create - Section”.
- Name it "Shell Icons". If such a directory is already in the list, open it.
- In the right part of the window, call the context menu and select “Create - Stock parameter”.
- Write type 3 (three).
- Right-click on the newly created parameter “3” (“Three”).
- “Change” item.
- In the “Values” section, enter the path to the icon along with the file name and extension.
- If you have a 64-bit system, open the HKEY_LOCAL_MACHINE\SOFTWARE folder again.
- But this time go to Wow6432Node\Microsoft\windows\CurrentVersion\explorer
- And repeat all the steps described above.
- Restart your computer and evaluate new look icons
To make Windows 7 more original, you can change not only the theme and design, but also the icons for standard folders, recycle bin, start and files. The easiest way is to use the capabilities of the system itself, but if you wish, you can install programs and unique icons from the Internet.
How to change the start icon on Windows 7?
For the sake of variety, sometimes you want to change the Windows start icon, because standard image It's boring every day. How to do this for seven?To change the start button, use Windows program 7 Start Button Changer. It can be downloaded for free.
The simplest option
If you have downloaded the program to your computer, all you need to do is run it. But be sure to do this as an administrator. Then all you have to do is select the icon you like, replace it and enjoy the new button.If everything worked for you, you can stop there. However, sometimes things get complicated, so it requires a little more steps and a file called explorer.exe.
Option to change the explorer.exe file
Go to system disk C. Find Windows folder, open it and find the file we need there. It will be called that way - explorer.exe.Click the mouse (with its right button) so that a list with items appears. There we select “Properties”.

Open the “Properties” item, tabs will appear there. We need "Safety". A list of users will appear in the window. Select the group called “Administrators” and click on the “Edit” button.

In the next window, in the permissions for the group you need to check the boxes vertical column“Allow” next to all items in the box. Be sure to apply the changes and agree to the new permissions.

Now we return to the “Security” tab, we need to additionally set permissions for changes. The button is called “Advanced” and changing this parameter will enable special permissions for the Administrator group.

In the tab that opens, select the line “Administrators” with one click of the mouse. Click on the function to change permissions.
If you did everything correctly, in the “Permission” column opposite the “Administrators” group you will have the rights “ Full access" IN normal mode By default, permissions are displayed at the Read and Execute level.
In the window that appears, you will need to change the permission details and to do this you need to click on the “Change” button. The next window will be called "Resolution Element". In the “Allow” column, check all the boxes. We agree with the changes.

Please note that the Owner tab should display the name of your account or the name of the Administrator.
Now we have all the rights to make changes at the system level. Launch Windows 7 Start Button Changer, first download and install it. Right-click on the icon and run as administrator.

There you need to select an item called “Change Start Button”. We will need the "Sample Orbs" folder. This special archive with a set of buttons. Choose which one you like best and click “Open”.

To cancel the changes, just click on the button called “Restore Original Explorer Backup” and the start icon will return to its original appearance.
How to change a file icon in Windows 7?
For those who want to change personalization computer to suit you and make the file icons different, this step by step instructions- the most accurate.Having completed all the steps, you can now always change the icons at your discretion. Moreover, you won’t need third party applications or additional programs, as in the case of replacing the start icon, here you can get by standard means sevens.
The icons themselves can be downloaded from the Internet or even ordered from a designer if you want something truly unique.


Don't forget after changes made save the data by clicking “Apply” and “Ok”.
How to change folder icons in Windows 7
Changing a folder's icon will allow you to make it unique by making it stand out from the crowd. The steps are quite simple, so even if you are a beginner, you can easily figure out the procedure.
If for some reason you don’t like the result, then you can return everything by opening the same path: Properties - Settings - Change icon. On last tab There is a “Restore defaults” function. By clicking on it, you will restore the icons that are present in the system by default.
Installing icons using IconPackager
There is another way to change folder icons to any others. To do this, you can use the convenient IconPackager utility.
If your collection does not contain icons for certain types of files or programs, the icons for these objects will remain the same - without changes.
It happens that you need to return the icons back. In this case, in the same program, click on “Windows Default Icons By: Microsoft” at the bottom of the screen from the available icons and apply the rule by clicking on “Apply icon package”.
Other programs for changing icons
To install icons, the tools suggested above are not always enough. For example, you liked an icon, but it is presented only in the PNG extension, while installing new icons requires the ICO extension. In this case, two programs will be useful:- AveIcon 2 is a small program that can convert icon files from PNG and ICO.
- IrfanView is a utility that comes in handy if you need to convert an entire collection of icons at once.
How to change the trash icon in Windows 7?
Changing the trash icon requires other steps. You won't be able to access it through Properties.
Video on replacing standard icons in the seven
Watch the visual video instructions on how to change standard icons to your own:Thus, if you want to change the icons of folders, files and other objects in Windows 7, you can use the capabilities of the operating system itself. It is enough to download pictograms from the Internet as individual icons or as a whole collection. Installing icons will only take a few minutes, even if you use third-party programs.
Microsoft, even if it wanted to radically transform Windows icons, presenting them to users, say, in some flashy style with a red or purple color scheme, it will never do this. The reason is the narrow scope of the concept. The design concept of any product provides for its recognition by the masses, and its external transformation should not go beyond certain limits.
That is why from version to Windows versions we can observe some visual transformation of the icons, but these changes can hardly be called dramatic. From XP To Vista, from Vista To "Seven", from "Sevens" To "Eight" we will see almost the same design of Windows icons with a predominance of yellow shades. Even in new version Windows 10, where the icons are most different from those found in all other versions of the operating system, they only acquired a flatter outline and a changed drawing. But they still remained in yellow color scheme and with the same individual elements of the pictures.
Fortunately, in Windows system Changing a boring picture is the work of the users themselves. Below we will look at how to change Windows icons.
What are icon files?
Windows icon files have the extension ".ico" and are a small picture, usually no more 48x48 pixels. The most common icon image sizes are 16x16, 32x32 And 48x48 pixels. There may be larger sizes - for example, 64x64 or 128x128 pixels, but these, in most cases, are third-party icons, specially created to replace the standard ones. In older versions of the system, large icon sizes may not be displayed correctly, so among program installation files we rarely see icon files with large sizes pictures. In addition to files with the extension ".ico", other types of files can be used as icons in Windows - for example, startup files ".exe" or library files ".dll". However, they don't look particularly good when the labels are enlarged.
Specially created icons professional designers, can contain multiple images of different sizes.
When you zoom out the shortcuts, the pictures of such icons will not lose sharpness, and when you zoom in, they will not lose detail. If there are several images in the icon, the computer automatically selects right size for display, and such shortcuts always look attractive - be it a system explorer, be it a startup Metro screen with tiles, be it the dock or launcher inside a third-party file manager.
Where can I get icons for Windows?
If not to replace the launch shortcuts of some programs with icons of completely different ones, in order to bring chaos into the work of the victims of such pranks, but for a harmless change Windows design Naturally, there must be third-party icons on the computer.

Their collections can be downloaded on the Internet by entering key query type "Download icons" or "Icons Pack download" . Archive file with a collection of icons, you need to unpack it and place it somewhere in a secluded place. It is advisable not to move or rename folders with icons in the future, because then the placement path configured for shortcuts will be lost, and everything will need to be configured again.
You can create icons yourself from your own images. Any of the graphic editors (even with the same standard Paint) the desired picture can be cropped and reduced in size, for example, to 48x48 pixels. Then save in format BMP. After this extension ".bmp" V Windows Explorer or third party file manager renamed to ".ico" . And that’s it – the icon is ready.
Almost any image format can be converted to ICO using software or online converters. To create icons, there are special small programs like minimalistic graphic editor- For example, Easy Picture2Icon, M-Icon Editor, IconUtils, ArtIcons and others.
How to change a folder icon
For each individual folder in Windows, you can customize its own unique icon. To do this, you need to select this very folder and use context menu open its properties.

In the folder properties window, click the button change icon .

We will see a selection of icons existing in the system, but they are not what we need, and they are already boring. Click the browse button, select the folder with the saved icons in Explorer and open the file you like.

Returning to the properties window, click the button "Apply". And we can see how the folder has changed.

How to change the shortcut icon
As for a folder, for each individual program launch shortcut, regular service, saved web page, or other object, you can assign a different icon. Call up the context menu on the shortcut and click .

In the tab, click the button change icon.

Click "OK" in the icon change window.

Returning to the shortcut properties window, click at the bottom "Apply" and confirm the decision in the window asking for administrator rights. After which we can observe this shortcut with an already changed icon.

How to change desktop icons
You can configure your own icons for some desktop elements - computer contents, user profile, network, recycle bin, etc. - in the section personalization. On empty space desktop, call the context menu and select, in fact, the item.


For each element separately, click the button.

Then, by clicking the browse button, select the icon in Explorer.

After applying the changes, the selected desktop element will be transformed.

Windows does not provide the ability to change icons for separate files. Documents, video-, audio recordings, drawings and other files will have the appearance of an application, which plays them by default. However, you can give a unique look to individual frequently launched files by creating shortcuts for them on the desktop and customizing the icons of these shortcuts in the manner described above.

How to change the file type icon
Windows does not provide for setting up custom icons for individual file types. But this is possible with the help of free third party program Default Programs Editor. It is designed to edit the Windows context menu and change file association settings.
After starting the program, click , then - "Icon".


In the next window, click .

Then press another review button (already system) to indicate the path to the desired icon.

Confirm your choice.

Save the icon for the selected file type by pressing the button "Save Icon".

We can see what has changed: While other file types will display their application icons, the file type you just configured will have its own icon.

Automatic icon change using patches
Above we looked at ways to manually configure icons for individual elements. But standard Windows icons can be automatically replaced with others - created in the same collection style. Thematic icons, introduced into Windows using patches, replace standard icons for folders, devices and drives, network elements, desktop, control panel and other system objects. Applying a patch to change system icons - where easier way refresh the appearance of the system rather than manual setting folder icons and shortcuts, however, this is far from the safest action.
In the implementation of patches for changing icons, themes, cursors, the use of system tweaks and similar operations with interference in Windows settings can sometimes end unsuccessfully - due to slight braking of the conductor during further work to blue screen death. Therefore, when downloading patches for changing icons on the Internet, it is advisable to read user reviews - either thanking the site owner for posting such excellent programs, or cursing him for distributing system killers.
Well, what about without basic safety rules? Before any transformation operations using patches, you must create restore point or backup.
Patches for using third-party icons can be found in the form universal utilities, which can work with multiple icon packs.

And the icon packs themselves, working in conjunction with such a patch, are selected separately to suit everyone’s taste and color.
Another type of patch - individual collections, implemented into the system using its own installer.

Windows patching is carried out during the installation process of such programs.

And without any extra fuss, we get a ready-made result – a modified icon design.
Desktop shortcuts are used to quick launch installed applications. Usually the image is set by default, but the user can independently change the appearance of the icons: icon, size, remove the arrow, and more.
Shortcuts on the desktop: what they are and why they are needed
Shortcuts provide quick access to files. If you delete the shortcut, then to launch the utility you will have to search for the location of the file, and this will take more time.
It is worth saying that the shortcut is not the program itself, it simply indicates the path to it. And if you delete the icon, the utility will remain in the system.
How to change shortcut icons
If you are not satisfied with the standard shortcut icons, you can change them.
How to reduce or increase the size of a shortcut
The same icon size will look different at different screen resolutions. There are two ways to change the scale.
The first is through the desktop settings:
With this method, the icons may automatically align to the grid and will have to be sorted again.
The second way is to pinch Ctrl key and roll the mouse wheel up or down, the icons will increase or decrease accordingly.
How to remove the arrow from a shortcut
By default, each shortcut is marked with a small arrow to make it clear to the user that it is a shortcut. But not everyone likes this appearance of the icons. Quick solutions The operating system developers did not provide for this problem, and it can be fixed by making changes to the registry or using a special program.
More simple and in a safe way is software solution. The most popular utility is Aero Tweak. It has a simple interface, does not require installation and, in addition to changing the type of shortcuts, has several more useful functions.
 Aero Tweak can customize other display options besides arrows on shortcuts
Open the program and go to “Windows Explorer”, check the box next to “Do not show arrows on shortcuts”. They will disappear after you restart your computer.
If it is not possible to download the utility, then you can solve the problem through the register:

It is important to do everything exactly according to the instructions and rename the file “IsShortcut”. The registry is responsible for the operation of the entire system, and if there is an error, the computer may not function correctly.
Video: how to remove the arrow from a shortcut using Aero Tweak
How to change the appearance of shortcuts
You can completely change the appearance of the shortcut:

You can download individual packages on the Internet, where the choice is much wider. To see the downloaded icons in the window, you need to click “Browse” and specify the path to the package.
How to change system icons
System shortcuts are a little more complicated to change:

System icons may change along with the desktop theme.
How to remove shields from labels
If all shortcuts are marked with arrows, then the shields indicate that the program can make changes to the system and works with administrator rights. If you remove the shield, the computer will consider the utility being launched to be a simple application. For computer security inexperienced users It is recommended not to expose the computer to danger and leave the shields in place.
If you still want to remove the shields, then to do this you need:

The shields will disappear. To return them back, we do the same steps, only we return the slider to the middle.
How to remove and hide shortcuts
If you need to hide shortcuts for a while, then:

All icons will disappear from the screen. It is worth noting that all files that were on the desktop will be hidden: documents, folders, images. To return everything to its place, you need to check the box “Show desktop shortcuts”.
To delete, select an icon (or several) and press Delete. Or simply drag the files to the trash.
How to recover deleted shortcuts
If you accidentally deleted a shortcut yourself, you can easily restore it by going to the trash. Or you can create a new one:

If shortcuts disappear without your participation, then the reason may be as follows. The system maintenance tool checks your computer every week (unless this function is disabled) and if there are more than four damaged shortcuts, it deletes them.
A shortcut that does not lead anywhere is considered damaged. For example, after deleting a program, its icon remains. But the system may consider the label of a removable storage device damaged if it is not connected or is in an inaccessible place at the time of scanning.
What you can do:
- move all shortcuts to a separate folder, the service tool checks only the desktop;
- disable the service tool.
The second method may affect the operation of the system, so it is preferable to simply move the shortcuts to a separate folder.
If you still want to disable the service tool, you can do this as follows:

If the icons still keep disappearing, then the problem is most likely a virus. Put good protection and scan your computer.
Editing the appearance of shortcuts is a matter of personal taste and, in general, does not pose any danger to the operation of the system. But if you download additional software for settings, then download it only from a trusted source and be sure to check for viruses.