BIOS open bootable USB flash drive. How to set the BIOS to boot from a disk or USB flash drive
Friends, in this article we will find this very boot menu for laptops Acer, Sony, Samsung, MSI, Toshiba, HP, ASUS, Packard Bell and load the above devices from my Corsair Voyager flash drive, on which the operating system is located Windows system 7. Don't forget if you want to install on a new one Windows laptop 7 or Windows XP, then connect the USB flash drive to USB port 2.0 (black), if you connect the flash drive to the USB 3.0 port ( blue), then the installation of the system will end in error, since Windows installer 7 no USB drivers 3.0.

We will also analyze the BIOS of these devices in detail. Let's look at how to change the boot priority on these laptops, in case you and I are unable to enter the boot menu. There is no need to be afraid of the BIOS; if you configure something in it incorrectly, you can always reset the settings to default.
Very important note: This note will be useful to you if you have new laptop any manufacturer (2013, 2014 with UEFI BIOS). If you have such a laptop and you are reading these lines, then you want. To do this, of course, the laptop needs to be booted from .
Almost all laptops currently sold have a UEFI BIOS; such a laptop cannot simply be loaded from a flash drive, since the UEFI BIOS has a special protection - a protocol secure boot "Secure Boot"based on special certified keys (available only in Windows 8). The Secure Boot protocol will not allow your laptop to boot from any boot disk or flash drives other than installation Windows disk 8. In order to boot your laptop from a flash drive, the Secure Boot protocol needs to be disabled in the BIOS of your laptop; this is done very simply, read our article or.
Let's return to this article. I think the information will be useful to many owners of laptops and netbooks. This article will also help if you want to boot from a disk and don't know how to do it.
Let's start with Acer laptop, first of all, we connect our Corsair Voyager flash drive to the laptop, then press F12 when loading,

Then you need to select our flash drive in the boot menu that appears and click

If you are unable to enter the boot menu of your Acer laptop using the F12 key during boot, then the Boot Menu option is disabled in the BIOS and needs to be enabled.
When loading, press F2, the initial Information tab, go to the Main tab, see the F12 Boot Menu parameter, set it to Enabled,

Next, press F10 to save the settings, reboot, press F12 when loading and our boot menu appears, select our flash drive in it and press Enter, booting from the flash drive occurs.
If the boot menu of the Acer laptop still does not appear, then go to the BIOS again (when loading F2), Boot tab. We select our flash drive and put it in the first position using the F6 key, then press F10 to save the settings, reboot and boot from the flash drive.


When loading the laptop, press F12 and get into the boot menu, select our flash drive here, if you connected a flash drive to the laptop, its name will be here. Press Enter and if your flash drive is bootable, it will boot from the flash drive.

If for some reason you cannot boot your laptop from a flash drive using the boot menu, then you can enter the BIOS and change the boot device priority there. We often press F2 when booting a Toshiba laptop and get into the BIOS of this laptop. The initial Main tab, go to the Boot tab (responsible for loading the laptop) and see our Corsair Voyager flash drive in sixth position. We select it using the keyboard and press F6, thus moving our flash drive to the first position, then press F10 to save the settings we changed, the reboot occurs and the laptop boots from the flash drive.
Friends, if you have a new samsung laptop, for example, 2012-2013, then read this article "", for all others, this instruction is also suitable.
When loading, press Esc or F10, get into the boot menu and select our flash drive. If the boot menu does not appear, then go to the BIOS, press F2 or DEL when loading. In the BIOS Boot tab, select the first option Boot Device Priority
And we enter it, here we select our flash drive and using the F6 key we put it in the first position. Next, press F10 to save the settings and reboot, reboot, then boot from our flash drive.


and we get to the boot menu. The first device is now the disk drive, if your flash drive is connected to the laptop, then its name will also be present here, select our flash drive here and press Enter or F10, a reboot occurs and further loading from the flash drive.

If you cannot enter the boot menu of an HP laptop, then go to the BIOS, press ESC when loading, then F-10, get into the BIOS,
Go to the System Configuration tab, then Boot Options, press Enter


As you can see, the first device is set to hard drive laptop Notebook Hard Drive. If your flash drive is connected to a laptop, then its name will be here, select our flash drive and use the F6 key to move it to the first position. Next, we save the settings we changed, press F10 to save the settings, the reboot occurs and the laptop boots from the flash drive.


If the boot menu is not available, press the DEL key during boot and enter the BIOS, then go to the Boot tab, select our flash drive and, without releasing Shift, press +, thereby moving our flash drive to the first position. Press F10 to save the settings, the settings are saved and the laptop boots from the flash drive.


Then go to the Boot tab and select the Fast Boot option ( fast loading) to Disabled,


Once again we enter the BIOS and go to the Boot tab, set the Launch CSM (advanced boot) option to Enabled,

We go down to the Boot Option Priorities and Boot Option #1 option and enter it by pressing Enter, in the menu that appears, using the arrows on the keyboard, select the name of our flash drive and press Enter. Here we also put our Corsair Voyager flash drive in first place.


We press F10 to save the settings, reboot and our Asus laptop boots from the flash drive.
Also you can use boot menu Asus laptop, to do this, in the initial phase of booting the laptop, frequently press the key Esc, you will be taken to the boot menu, using the arrows on the keyboard, select your bootable USB flash drive and press Enter.

How to boot from a flash drive Packard laptop Bell

Press the button when loading F12 and we get into the boot menu of the laptop, there we simply select our flash drive and boot the laptop from the flash drive.
If F12 does not work when loading, then click F2, less often F6 and get into the BIOS Laptop UEFI,

here we go to the tab Boot.
If before turning on the laptop you connected a flash drive to it, then it may not decide immediately in this menu.
Set the Boot Mode option to Legacy BIOS.
And the option Secure Boot set to position Disabled.
Now the flash drive should determine. Place the flash drive in the first position, save the settings and reboot. If the bootable flash drive is made according to our articles, then the download will be successful.
If you download ISO image With Windows distribution and even write it down correctly DVD disc or creating a bootable USB flash drive using the same UltraISO is almost no problem for anyone. Then with the second stages, installation itself operating system Many people have difficulties transferring from a disk or flash drive to a PC.
I know of three ways to start installing Windows.
1) the simplest and most unreliable is to open the image with Windows already running using virtual drive and start the installation, but there are many factors that can interfere and give an error at some stage of such an installation.
2) Insert the flash drive we created into USB connector or a DVD with Windows into your drive, no matter what version, Windows 7, Windows 10, even Win95. This works for everyone. Then, when you turn on the PC, call BOOT menu, this is a list with the media from which we need to boot, select the media we need and press ENTER. You can read more about how to install Windows via the BOOT menu here.
3) It differs from method 2 only in that we indicate what we want to boot from not through the boot menu, but in the BIOS of our device.
In this article we will talk in detail about how to install Windows from a flash drive via BIOS or Windows boot 7 from a BIOS flash drive.
Booting Windows 7 from a BIOS flash drive
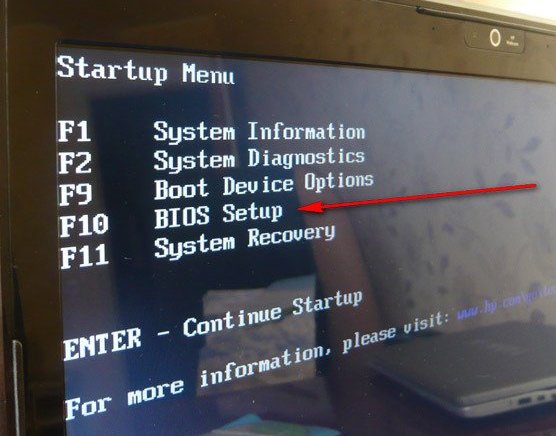
Installing Windows from a flash drive via BIOS starts with calling BIOS menu or also called Setup, this is most often done with the Delete button immediately after turning on the laptop or computer, press continuously until you see blue screen with some text, but sometimes it happens that you need to press another button, this is F2 or F10 or Esc. You can try all the options until you see it desired result, or you can read it in the welcome window mother firmware text like “Press DEL to run Setup” it tells us that in order to get into the BIOS you need to press DEL.
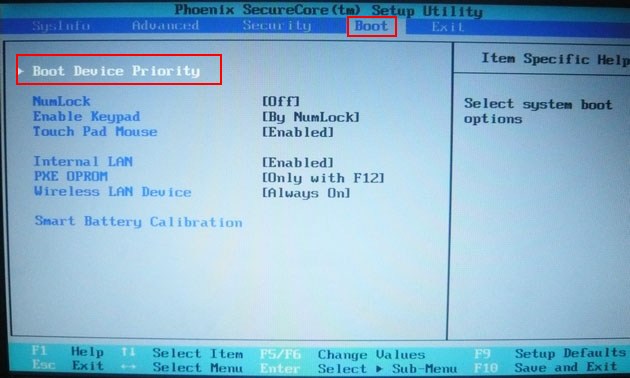
And so, after we got into the BIOS SETUP UTILITY, we look for the Boot tab and use the arrows to go there. We need the Boot device Priority line

The logic here is simple: the higher the device is in the list, the higher the priority in the download queue. That is, the top one in the list is loaded first, and so on in turn until the system boots.

And so, using the arrows, select the first drive in the list and press ENTER, we see a list of all possible devices from which the computer can boot.

If we want to choose to load the BIOS via a flash drive, then select the USB interface, this is Removable Dev or something with the text “USB” included, or if the flash drive is already inserted, then the name of the flash drive manufacturer will be written. If you need to select a DVD drive, then as a rule this line begins with the words CDROM: or DVDROM: or it can also be written by the manufacturer of the DVD drive.
If you have made your choice, then press ENTER and in the same way select the second device in turn, the second on the list should be your hard drive on which Windows will be installed. If the BIOS does not see the flash drive, then try inserting the flash drive into another USB connector and do everything all over again.
In order for all changes to be saved in the BIOS Setup, before leaving, you need to go to the Exit tab and select the Exit & Save Changes line and press ENTER.

After this we can Windows bios install via USB flash drive or dvd drive. Not everyone has a bios with a blue screen anymore. In 2017, you can increasingly see a new generation BIOS, it is more graphically thought out, there are pictures of icons for a clear association, if you are not good at English, so as not to make a mistake. But essentially all the settings are the same.
Attention!- after our changes to the BIOS, now the computer will always boot first from a flash drive, then from hard drive, therefore it is important when Windows installation after the first stage of installation, when the laptop or PC reboots, YOU NEED HAVE TIME TO PULL THE FLASH DRIVE FROM USB connector, or remove the disc from DVD-Roma. Otherwise, the first installation stage will be repeated endlessly.
Now we know how to configure the BIOS to install windows from a flash drive. And having with you a bootable USB flash drive with WINDOWS way 7 or 10, we can install or reinstall the OS on any device without any problems.
Repeatedly, users need to boot their PC from third party media. So, for example, in the case reinstalling Windows, you need to set the boot from a flash drive in the BIOS. The same need may arise if you need to roll back the system to a restore point.
In order to boot from a system flash drive, you need to prepare the drive itself. The drive should be selected based on the capacity of the operating system. So, Windows 7 OS weighs 2.5 GB, and version 8 weighs 4 GB. Naturally, it’s worth buying a larger drive. If you already have an old flash drive on hand, then you need to format it. Simply deleting data will not solve the problem. The flash drive may contain viruses and system errors. Then you won’t be able to record the OS image.
How to format a flash drive? We connect the device to the PC, open “My Computer”. Right-click on the icon and select “Format”.
Specifying parameters file system(if you select any of the options, the flash drive will be compatible with Windows OS, but the maximum file size will be limited):
- 1. FAT32. It will not be possible to write files larger than 4 GB onto such a drive. 2. exFAT. On such a drive you can store files of any size. 3. NTFS. Many devices will not see the drive.
IN " Volume Label» indicate the name of the drive. Select the item “ Quick cleaning " and click " Begin" Next, you need to download the licensed OS image from the Microsoft website. Before downloading you must enter serial key and select the system language.

To boot a PC from a USB flash drive, you need to create system image. Let's look at how to do this using the USB/DVD Download Tool.
- Download and launch the application. In the first step, you need to specify the path to the OS image.

- Next, select the drive.

- And press the "" button.

After copying the image, you can begin installation and change the BIOS settings.
How to run a flash drive through BIOS - step-by-step instructions
Most often, to boot from a flash drive, you do not need to change the BIOS settings. Just call up the boot menu when you turn on the computer and select the flash drive.
The problem for most users is getting into the BIOS system. Regardless of how the version is installed, to boot from a flash drive you must:
- Insert the drive into the USB connector of the computer. It is advisable to use the port located on the motherboard, i.e. from the back of the block. Check. Is the USB controller turned on? Start the PC by holding down certain keys. A prompt will be displayed on the screen when the system starts. For example, in the screenshot below you need to hold DEL to open the BIOS.

- Go to the downloads section and select a USB flash drive in the list of devices. Save the changes.
You can only use the arrow buttons to navigate through menu items, and to confirm your selection - Enter.
Running from a flash drive in Award Bios
Here's what the Award Bios loading screen looks like:

Go to the "" section. We go down to the point “ USB Controller" Click " Enter" In the new window select “ Enable" In a similar way we change “ USB Controller 2.0».

Click " Esc» to exit to the main menu. Go to the "" section. We go down to the point “ Hard Disk Boot Priority" The screen below shows that loading is carried out from the hard drive.

How can I set the BIOS to boot from a flash drive? Go to the line with the name of the flash drive (Patriot Memory) and drag it to the very top using the " + " Exit the menu by pressing " Esc».

In the line "" click " Enter" In the drop-down menu, select “” (or “ USB-FDD"). The second device must be " Hard Disk».

In order for booting from the flash drive to take place after a restart, you need to save the changes. To do this, click " Esc" and in the message "" select " Y».

Installing boot from flash drive in AMI Bios

We check the USB controller on the “ tab Advanced» – «».

Opposite "" and " USB 2.0 Controller"should be" Enabled».

Enter" From the list select " Enabled" Exit the menu by pressing " Esc».
How to set boot from a flash drive in BIOS? On the " Boot" instead of "" you need to select "".

To do this, stand on the line and click “ Enter" and in the window that appears, select our flash drive.

We exit the section through “ Esc" Go to the "" section. Here the first device should be a flash drive.

Close the BIOS and save the changes.

How to boot from a flash drive in Phoenix-Award Bios

Checking the operation of the controller is carried out on the “” tab. Against " USB Controller" And " USB 2.0 Controller"should be" Enabled».

To change the parameter values, go to the line and click “ Enter" From the list select " Enabled" Exit the menu by pressing " Esc».
How to enable boot from a flash drive in BIOS? On the " Advanced"opposite "" set "".

Exit the OS, saving the changes.

After restarting, the PC will boot from the USB flash drive.
How to boot Windows from a flash drive to EFI (UEFI) Bios
On laptops with UEFI, you won't be able to quickly change settings. To run a flash drive through BIOS, you must disable this Secure Boot protocol. It blocks the system from booting from any third-party drive. Next you will need to enable " compatibility mode for other operating systems" It is called differently: " CSM Boot», « UEFI», « Legacy BIOS», « CSM OS"To get into the BIOS you need to press the keys immediately after turning on: Fn+F2.
Immediately after launch, use the arrows to go to “ Security" Paragraph " Secure Boot" set to " Disabled».
Reinstalling the operating system from a flash card is practiced in connection with the abandonment of optical drives. Enough large number devices, ranging from netbooks to budget models system units, does not include a DVD-ROM as part of the assembly.
Besides, external drives used for a number of specific, but not often performed tasks:
- Resetting or changing the administrator password in the Windows operating system.
- Loading a mini operating system (to clean your computer from viruses or registry errors).
- Installation/reinstallation of the system.
- Launching specific utilities (for testing hardware, working with a hard drive).
You can boot from a flash drive in the following ways:

This menu becomes available during the POST procedure, when starting/restarting the computer. Login methods differ for different models motherboards. The main methods and key combinations are shown in the table.
Some manufacturers, such as Lenovo, create a special button to enter the BIOS, or bootloader. It is usually located next to the device's power button.

After entering the bootloader, you must select the primary device. In the figure, this device is a Kingston flash card.

Important! Depending on the bootloader menu, it may change and acquire new features, such as: mouse control, loading via network card, etc. You should be guided by the name of your flash drive.
Changing boot order in UEFI
UEFI (from English Unified Extensible Firmware Interface, unified extensible firmware interface) is the successor to BIOS. Essentially, this is the same non-volatile memory firmware, adapted for modern operating systems. Given software most often has GUI user. UEFI is focused on regular user, unfamiliar with the working methods of programmers and system administrators. Logging into UEFI is the same as entering BIOS.
Step 1. Launch the UEFI interface.
Step 2. Select the device that should have the highest boot priority and make it the primary startup device.

Important! Most common boot orderUEFI is changed by dragging the mouse, that is, you need to hover the pointer over the icon (or line) corresponding to the flash card, and, while holding down left button mouse, move to the far left (or top - depending on the firmware version and manufacturer motherboard computer) position.

The basic I/O system in Russia is represented by three developers:

To enter, the “F2” or “Delete” keys are usually used, however, by analogy with the “Boot” menu, there may be other options - “Esc”, or a special button.
Important! Launch methods basic system I/O are displayed on the screen while the computer boots. Refer to the “Setup” or “Settings” markings.

Changing AMI BIOS boot priority
Step 1. Enter BIOS.
Important! The flash card must be inserted intoUSB connector before starting the computer, otherwise the BIOS will not be able to recognize it, since the functionPlug&Play (insert and play) is not provided in it.

Step 2. Using the “right” and “left” keys, switch to the “Boot” menu (from English - download).

Step 3. Go to the “Hard Disk Drives” submenu (from English - drives hard drives). Highlight the first line (“1st Drive”) and press Enter. In the window that opens, using the “up” and “down” buttons, highlight the line corresponding to your flash card and press “Enter”.


Step 4. Return to the “Boot” tab and enter the “Boot Device Priority” submenu (from English - boot device priority). As in the previous step, you should specify the flash card as the device with the highest priority.


Step 5. To save changes to non-volatile memory, use the “F10” key and confirm saving the changes.

Changing AWARD/Phoenix BIOS boot priority
Step 1. Enter BIOS.

Step 2. Using the “up” and “down” keys, switch to the menu “ Advanced BIOS Features" (from English - advanced BIOS settings). In the “First Boot Device” line, select the flash card you need, similar to the AMI BIOS method.

Note! Depending on the firmware version, either the name of the flash card or simply its symbol(USB-HDD or USB-Flash).

Step 3. To write changes to non-volatile memory, use the “F10” key (or select the “Save & Exit Setup” line on the first BIOS screen) and confirm saving the changes made.

Conclusion
The article discussed several options for booting a computer from a flash drive. These methods can be used for a whole range of tasks - from installing an operating system to working with already installed system, or individual hardware parts. After completing the work, do not forget to set the normal (default) priority boot devices to avoid problems turning on your computer.
Video - How to boot a computer from a flash drive
How to boot from a flash drive old computer, which has in the settings BIOS option no boot from USB devices? Today everyone is modern computer devices this possibility is provided, because that’s why they are modern, but if not in the users’ homes, then at least in budgetary institutions There are still old PC builds that can only boot from CD/DVDs, floppy disks or over a network. It is designed to cope with such restrictions free program Plop Boot Manager. This is a bootloader with its own menu, which, in particular, provides the ability to boot from USB drives.
The program can be installed in boot entry MBR of the hard drive, with the selection menu bootable media will appear every time you boot your computer. Another way to use Plop Boot Manager is to write its disk image to a disc and use it only in cases where it becomes necessary to boot from a flash drive. Once recorded, such a disc will serve as a bridge connecting the computer and USB devices for their interaction. Boot from a flash drive - be it installation disk operating system, be it a rescue or anti-virus Live-Disk, it will be possible by selecting it among the options for loading the Plop Boot Manager environment. Whereas the latter will appear on the screen after setting the computer to boot from a CD/DVD.
To create a CD/DVD with boot menu Plop Boot Manager we need to download its distribution to write to a blank disc. Go to the official website of the program and download the archive from latest version Plop Boot Manager.

Unpack the archive.

Of the files in the archive, we only need the image ISO disk. In our case, the remaining contents of the archive with the Plop Boot Manager installation files in the boot record of the hard disk are not needed.

The next step is to write the disk image to a disc. For these purposes, a mass is provided various software, you can also use regular means Windows.

A standard CD/DVD burning tool will require a minimum of effort.

We boot the computer from the burned disc, setting the priority in the BIOS to boot from the drive.

An important point: the flash drive must be inserted into the USB port before the Plop Boot Manager menu loads.
The Plop Boot Manager menu is primitive and minimalistic. Navigation in the bootloader environment is carried out using the navigation keys "" "↓", and selecting a boot option is done using the Enter key.
Among possible actions we'll see:
- Setup– bootloader settings;
- About– information about the version of Plop Boot Manager;
- Shutdown– turning off the computer;
- HDA Partition No.— loading from one or another disk partition;
- USB– loading from a flash drive is actually what we need.

Did this article help you?