How to log into the d link dir 300 modem. Setting up a network connection and logging into the router control panel. How to set up a connection
The D-Link DIR-300 router has a point on board Wi-Fi access 802.11n and allows you to organize a wireless network at home, through which mobile gadgets can access the Internet and access each other’s files. Correct setting router not only helps to avoid hacking home network“craftsmen”, but also allows you to significantly increase the Wi-Fi speed and increase the coverage area of the D-Link DIR-300.
After connecting the D-Link DIR-300 router to the provider’s network, you can configure Wi-Fi, set a password and distribute the Internet to wireless devices. The access point can be configured in three ways:
- Using the Setup Wizard wireless network»;
- Manual setting of parameters;
- Automatically, via WPS protocol.
Quick setup
The DIR-300 provides configuration using the “Wizard”. This method requires minimal effort and allows you to set up a Wi-Fi network in seconds without diving into technical details.
To establish a connection, you need to log into the router’s web interface and select the “Wireless Network Setup Wizard” section. Depending on the firmware, the “Master” may be located in different places interface, but all options and menu items in different versions The software have the same name. Procedure for the “Master”:
Set the network mode to “Access Point”.


Enter the access point name - the name of the Wi-Fi network, which will be displayed on all connected devices. For security reasons, it is not recommended to leave the default name “DIR-300”.

Select the “Secure Network” item and create a password that the router will request from connected devices.


After completing these simple steps and applying the changes, the Wi-Fi setup using the “Wizard” will be completed and the D-Link DIR-300 will be completely ready for use.
Manual setting
Unlike quick setup, manual configuration allows you to take into account the features of the connected devices and neighboring networks, which allows you to improve throughput and reception quality.
Basic manual setting Wi-Fi networks for home use on DIR-300 it is performed in 2 stages:
- Setting basic network parameters;
- Configure security settings.
Basic settings
The main wireless network parameters are located in the router control panel on the “Wi-Fi – Basic Settings” tab. To go to this item in the “dark gray” interface, you will need to switch to advanced mode.


Description of functions:
- The “Enable Wireless Connection” option controls the access point’s power. In order for devices to use a WiFi connection, the checkbox must be checked.
- Disabling Wi-Fi network broadcasting without deactivating the radio module may be necessary when using the DIR-300 in client mode. If you remove this checkbox from standard mode, That wireless communication between the router and all devices will be interrupted.
- The MBSSID and BSSID parameters are configured when the router is used to simultaneously serve several wireless networks. At home, such a scenario is unlikely, and if there is only one network, these parameters cannot be changed.
- If you check the “Hide access point” checkbox, the WiFi network name will no longer be displayed both on other people’s devices and on trusted ones. In this case, the router will not stop broadcasting. To establish a new client connection, you will need to enter SSID name manually. This function implemented in D-Link DIR-300 to ensure security.
- Channel selection can be entrusted to the router firmware, leaving the value “auto”, but automatic setting is not always adequate, which often leads to a drop in the wireless speed of the router. To select manually correct channel, it is necessary to evaluate the performance of neighboring Wi-Fi networks. In the “light” air interface of the D-Link DIR-300, when selected, a histogram appears showing the channel load.

The less loaded the channel, the higher throughput, and therefore wireless speed transfers. To study the situation in more detail, you can use one of free programs, for example, WiFi-Analyzer.

Security Settings
Professional hackers are hunting for corporate secrets and are unlikely to be interested in hacking anyone's home point access. But there are amateurs who can “harmlessly” pick up a password in order to use the “free” Internet or connect to the webcam of someone else’s computer. Therefore neglect elementary rules security is still not worth it.
Wireless network security settings are located in the router control panel on the “WiFi – Security Settings” tab. To go to this item in the “dark gray” interface, you will need to switch to advanced mode.


Description of functions:
- A network authentication method that excludes the objective possibility of hacking - WPA2. In corporate Wi-Fi networks, access is used through a RADIUS server, and for a home network, a preset PSK password key is suitable. Thus, maximum protection will provide WPA2-PSK mode.
- The encryption key is the same password that must be entered on the WiFi device in order to connect to the D-Link DIR-300. Complex password and correct setting - the most important conditions network security. The password cannot be set to simple numeric or dictionary combinations, or your date of birth. Good password contains more than 8 characters: numbers, special characters and letters, case sensitive. Regardless of the complexity, finding the key is only a matter of time, so it is recommended to change the password to a new one every month.
- AES – data encryption technology. Provides key cryptographic strength without reducing speed wireless transmission, therefore well suited for use in the 802.11n standard. The update period should be left at its default value of 3600 seconds.
- Pre-authentication through adjacent access points is only used in complex networks with multiple routers.
After completing these steps and applying the changes, setup Wi-Fi protection will be completed and the D-Link D-300 will be ready for safe operation.
Connecting using WPS
The WPS protocol was developed to simplify Wi-Fi network setup. For the user, the essence of the technology is that the router is paired with any WPS-compatible TV, smartphone or tablet without having to enter a password: when you press a button on the router, the devices exchange a digital access code and connect automatically.

Depending on the hardware revision of the router, the button may be located on the side or back of the case.

Brief instructions for connecting to D-Link DIR-300 via WPS using an Android device as an example:

Select the “WPS Button” option.

Press the WPS button on the DIR-300 case.

After a few seconds, a successful connection message will appear.


Thus, in just 4 simple steps you can connect any WPS to the router compatible device and you will not need to enter any password.
Despite the convenience this method pairing, the WPS protocol has the lowest security: when exchanging identification packets between devices, it is used digital code, which can easily be picked up by spyware.
Additional features
- The MAC filter in the D-Link DIR-300 is an auxiliary means of protecting against unauthorized Wi-Fi connections. Allows you to configure both black and whitelists MAC addresses.

- “List of WiFi clients” displays up-to-date information about connected devices. The function allows you to forcefully disconnect any user from your home network.

- The “WPS” tab provides access to simplified device pairing options.
- On the " Additional settings"you need to pay attention to 2 important parameters: "TX power" and "Channel width".

Transmitter power is expressed as a percentage. The higher it is, the wider the Wi-Fi network coverage area.
The channel width can be selected automatically - 20/40, or adjusted manually. The wider the channel, the greater the throughput, i.e. speed.
The 40 MHz channel gives a noticeable increase in speed, but is less resistant to interference from neighboring networks than 20 MHz. In addition, as you approach the edge of the coverage area, the throughput of the 40 MHz channel is greatly reduced. To improve reception, you will need to configure the D-Link DIR-300 transmitter to maximum power, but then the router will begin to emit too much radio waves, which will “clog” weak waves from the antennas mobile gadgets. This will significantly reduce wireless transmission speeds on devices operating in close proximity to the router. Thus, it is possible to select the optimal values of power and channel width only by measuring the speed and coverage directly at the installation site of the DIR-300.
- The values of the remaining parameters on the “Advanced Settings” tab are not recommended for users who do not have special knowledge.
- WMM – WiFi-Multimedia technology optimizes wireless traffic for multimedia applications. To improve speed performance while watching online videos or calling on Skype, the option must be enabled. It is not recommended to change parameter values.
- In “Client” mode, DIR-300 can connect to another router to organize complex infrastructure in large homes or offices, as well as when connected to a provider’s Wi-Fi network.
Found a typo? Select the text and press Ctrl + Enter
Setting up the DIR-300 NRU router is not working, please help with advice. Bought this model router. The store reassured me, they said that it is the easiest to install and almost all Russian Internet providers work with it, and all of them have instructions for installing it on their official websites. Of course, there were no instructions for this model on our provider’s website, and I also realized that router DIR-300 there are some different revisions b1-b5 (it turned out I had NRU b5). And each Internet provider configures the router differently, or so it seemed to me. As for the manual book that came with the router, it contains a description of connecting the DIR-300NRU b5 to the XP operating system. I want to connect it first to system unit with the Windows 7 operating system, and then connect my daughter’s laptop to the created virtual network, but it also has Windows 7 installed. I tried to figure it out myself and you know, all these IPoE and PPPoE, PPTP gave me a headache. So I have a question for you: can I still connect two of our computers to the router or immediately call a specialist like you. And also, explain in Russian what is the difference between WAN and VPN? Vladimir. Samara.
For a long time now, my friends have been asking me to buy and set up a router for them. We go to the store, buy it and set it up step by step, and you watch everything that happens, everything will be clear even to a beginner. You can connect any router, it all depends on your persistence and, of course, patience. Setting up the DIR-300 NRU Router not complicated, this router is extremely popular due to its inexpensive price of 1000-1100 rubles and good reliability and works with operating systems Windows systems XP, Windows Vista, Windows 7. On the official websites of Russian providers, there are instructions for installing it, but as I noticed outdated revisions b1, b2, b3, the web settings interface is black and brown.
- In 2011, D-Link updated the web interface, now the router settings windows (including the new model DIR-300NRU b5 are pale green, and the background is white, naturally the settings have changed a little. For providers, everything remains in place. This confuses many users who have recently purchased a router. IN at the moment according to my observations, the most often purchased model is the D-Link DIR-300 NRU b5, which has Wi-Fi support at speeds of up to 150 Mbit, uses an updated settings interface, built-in firewall and compatibility with standards without wired communication 802.11b and 802.11g. I advise you to know exactly what you are buying and check everything in the store.
Attention! Setting up the D-Link DIR-300 NRU router (HW revisions: b1, b2, b3) is slightly different from setting up the DIR-300NRU b5 router, but the essence is basically the same, now you’ll see everything for yourself.

Now about the settings. Before getting onto the Internet itself (global computer network) from our home, you and I first go to our Internet provider or provider in a virtual private network, (for example Beeline). There are few real providers in Russia, there are many sub-providers, in simple language intermediaries. But how to configure the router depends on how these providers organize their network.
How do all providers (providing Internet services) differ and how does this affect the router settings?
Nowadays, one half of the providers use the modern network protocol DHCP or IPoE, where IP and DNS addresses are distributed automatically (I must say very convenient for an Internet provider), and to access the Internet they use an outdated tunnel protocol or a new second-level tunneling protocol L2TP (combining PPTP and L2F).
The other half of the providers work using the outdated PPPoE protocol, associated mainly with xDSL technology (for example Rostelecom), that is, they use DSL modems, in the router settings we again select Type PPPoE connections(information at the end of the article) and set it up a little differently than in the first case. Of course, sometimes there are other features, so before you buy a router, this is my advice to you. Call your provider and find out all the information you need to configure the router, ask about which range of router models to choose from, so as not to have to worry later with settings, firmware and, as you said, specialists like me. Now, let's take a closer look at the setup, in my opinion very good router from D-Link, DIR-300NRU b5. In general, I set it up many times this router in seven and in, but unfortunately I didn’t look at the accompanying manual, but it turns out that in fact, as our reader said, nothing is written there about Windows 7, but there is information about XP. Don't worry, our router works fine on both operating systems.

Let's start with the fact that you need to find out what network protocols your Internet provider uses - PPPoE or L2TP, you can find out by looking at the contract with it or you need to call the support service of your provider and just ask, this is the best way, by the way. Let's start with the most common and easiest to configure network protocol today, DHCP. You also need to find out how your provider issues IP addresses; in the case of the DHCP protocol, this happens automatically; you can verify this by looking at the Local Connection Properties of your network adapter.
Windows XP
Start - Control Panel - Network Connections - Connection via local network- Properties - Internet Protocol (TCP/IP) -Properties - Obtain an IP address automatically And Get DNS address-servers automatically.

Windows 7
Start - type View network connections-Local Area Connection - Properties - Internet Protocol Version 4 (TCP/IPv4) and Properties - Obtain an IP address automatically and Obtain a DNS server address automatically.


If you have the Use the following IP address checked in the Internet Protocol Properties and the addresses are registered, the same addresses must be specified in your agreement with your provider, then your Internet provider works using the PPTP or PPPoE protocol. Let's look at setting up a router with these protocols at the end. But before connecting a router with these protocols, you also need to set the Obtain IP automatically and Obtain DNS server address automatically parameters in the Internet connection properties.
Let's move on to the router settings. If something goes wrong, you can always reset the router to factory settings by pressing the Reset button.
We will connect the one carried out by your provider local cable Internet to the WAN port on the router, as we see it says internet, and the router and your desktop computer let's connect with each other network cable(in our case blue) via LAN port No. 1.

Users to whom the Internet is supplied using ADSL technology need to connect the DSL modem and router with a network cable, then connect the router with a network cable to the system unit.
The DIR-300 router has only 4-LAN ports, to which you and I can connect up to 4 personal computers, where there is no Wi-Fi.

Turn on the router, open any browser: Chrome, Opera, Mozilla, Internet Explorer and enter in address bar 192.168.0.1 and press Enter.


And here we are in the initial window of the DIR-300 router. First of all, experienced users download the latest firmware version from the official website ( software) for the router and install it, currently installed on our router latest version firmware, so there is no need to download or flash anything. And my advice to you, even when the firmware comes out, first try to configure the router as it is, without flashing it, it’s easy for a beginner to make a mistake, and then you can restore the router only at a service center.


Name - Beeline
Connection type - L2TP
Will connect automatically- Put a tick
Service name - tp.internet.beeline.ru
PPP Username - our Beeline login starts with 089...
Password - Your internet password
Encryption - Typically No encryption
The device configuration has been changed- Save so that after restarting the computer, the changes you made to the router settings will be saved.

Next, click Connections again, select the Beeline we just created, Connection type l2tp and assign it Default Gateway(check this item). Click Save.

Click on the button Status - Network Statistics. In the WAN field, you and I see information that our router has successfully received the necessary data from the provider and we have Internet.

Now we connect the laptop to our router via Wi-Fi.

Click in the router settings Wi-Fi button. General settings. We leave everything as default.


PSK encryption key: We come up with an encryption key, preferably 10-digit, consisting of letters and numbers in random order, it’s more reliable
WPA encryption – AES or TKIP+AES, then your network will be accessible to almost everyone existing devices Wi-Fi.
WPA key renewal period leave it as default.
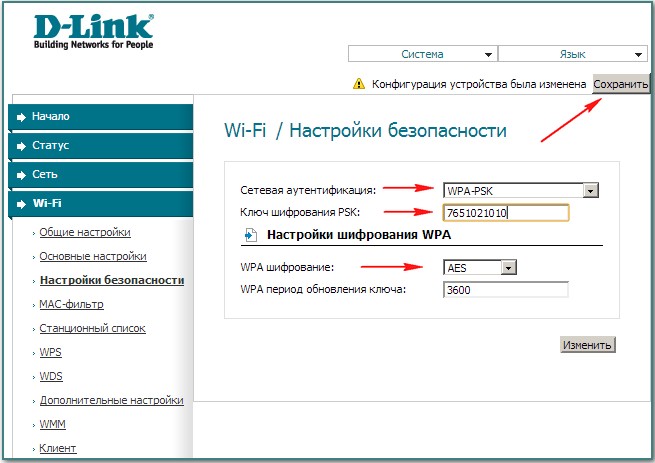
Sometimes it happens that the router settings are lost when its power is turned off, so be sure to top corner page, expand the "System" menu and click on " Save and Reload". Now the changed settings of your router will be saved in its non-volatile memory.
Control Panel\Network and Internet\ Network Control Center and shared access \Wireless Network Management,

Double click on the network DIR-300 NRU 
Properties of the DIR-300 NRU wireless network. Connection tab, you should have a check mark on the item Connect automatically if the network is within range.

In the DIR-300 NRU wireless network properties window, Security tab, check the security settings – Security type,Encryption type, Network Security Key, everything should match the router settings.

Here are friends and all the settings of our router in network protocol DHCP.
As for setting up our router in PPPoE mode, you will need to go to the router settings Network -> Connections and select PPPoE connection type, then enter the username and password, as well as confirm the password. Detailed instructions are available on the D-Link website itself - http://dlink.ru/ru/products/5/728.html

router D LINK DIR 300, WAN and LAN connectors. WAN - Internet input, LAN - local network
Many users are scared by the need to configure the d link dir 300 router on their own. However, there is essentially nothing wrong with this. It is impossible to break it without significant effort, and if you make any mistakes in the setup, you can always start from scratch. What is important is only care and patience, which will be required if you are doing this for the first time and have not previously entered the router settings.
The first difficulty that users encounter is the need to abstract from understanding physical device as such and its virtual, more precisely, software settings. Therefore, first we will consider the design of router D, which may differ slightly depending on the year of manufacture.
Important!When choosing a place to connect and install the router, make sure that there is a power outlet in close proximity to it, as well as the provider cable, which is inserted into the port with a connectorWAN located next to a group of four LAN ports that are similar in appearance.
First, the device is connected to a household power supply, then to the provider’s network, and only then using a patch cord (the cord that comes with the kit) to a computer or laptop, if the dir router will be configured with their help. Either end of this cord is inserted into any of the four LAN ports, and the other end into the network connector of the laptop or the connector on the computer’s network card. If for configuration it will be used wireless device – home tablet or a smartphone, then you won’t need it at all.

patch cord is a patch cord, cable
Advice! If the standard 1.5 meter patch cord is not suitable for comfortable work with a computer, it can be replaced with another one purchased separately at a computer electronics store or at the radio market.
The remaining three ports for the local LAN connection can be used for other wired connections after setup. For example, you can connect:
- Multimedia receiver for TV;
- Second PC for forming a home network;
- External drive for cloud storage.
On this physical connection router ends and wifi setup router d link dir 300 can begin.
Windows users
On next stage, when the link is physically connected, the system will automatically download necessary drivers and will detect it without unnecessary manipulation on the part of the user. However, when working with OS Windows versions 7–10 it is necessary to optimize the system parameters for correct operation.
This will require launching Control Panel, which is accessible from the Start menu. In the list of categories, you should find “Network and Internet”, and after launching it, select “Network Center”. In the dialog, you will need to find the item called “Change adapter settings” and select context menu for it the “Properties” element.
In the next window, you must select the “TCP/IPv4” element and also select “Properties” for it. This will allow you to select the DNS server and IP addresses for it automatically.
Main work
The next step in setting up the router will require launching any browser, for example, Chrome or Moilla Firefox, and in the input line where the name of the site is usually entered you need to enter email address indicated on the sticker attached to reverse side router dir 300.

browser address bar, paste 192.168.0.1 or 192.168.1.1.
Most often these are numbers 192.168.0.1 and 192.168.1.1. In addition to them, a login (admin) and a corresponding password (admin) are often indicated, which are in this case standard. They should be entered when prompted on the page and press “Enter”. Next, the interface with a list of customizable parameters will be automatically loaded.

enter your login and password

choose a language
To do this, select the following items in the list one by one:
- System.
- Administrator password.
On this tab, enter a name (you can leave “admin”) and New Password, after which the “Save” button is pressed.
At the next stage, go to another section, selecting one by one:
- Net.
- Compound.

Go to advanced settings
Now you need to dig into the contract received from the provider and find out in it the type of connection that is used. Most often this is IPoE or PPPoE, although other options are possible. The required one should be selected from the list and, if using a MAC address, enter it in the appropriate field. You will also need to check the following boxes:
- Obtain a DNS address automatically.
- Obtain an IP address automatically.
Create and configure a wireless connection
To set up a Wi-Fi connection, you will need to select the following items sequentially:
- Wi-Fi.
- Basic settings.
First, you need to check the “Enable wireless connection” checkbox. IN open tab You should enter the new network name in the “SSID” cell and select a region from the drop-down list to obtain national standards. For the settings to be saved, you need to click the “Change” element.
Next, it is recommended to immediately install or change standard password. It is necessary to strangers could not access your network resources and devices connected to them. To do this, go to the “Security Settings” item. The list of its parameters includes the “Network Authentication” field, which should be assigned the “WPA2-PSK” type. As a result, the list of parameters will change and in the “PSK encryption key” field you will need to enter the created password, and for the WPA field corresponding to the encryption, you should select the TKIP type.”
When finished, click the “Change” button for the adjustments to take effect.
This completes the main configuration of the d link dir 300 router and to correctly complete and save the parameters, select the “System” item located at the top right, and in the open dialog click the “Save and Reboot” button.
Reset settings to original state
If you can’t enter the settings, most likely someone previously configured the device and changed the protection settings. In this case, as in many others, for example, if a new, malfunctioning firmware was installed, resetting the settings will help. It is also called a rollback, which is easy to do without going into the device settings.
For this purpose, the design of the model provides physical button"Reset". To avoid unexpected failures, it should be pressed and held for 15 seconds.
Pay attention!Excessive force when pressing a key« Reset" will not give the desired result. On the contrary, it can cause physical breakdown, since the button is soldered directly to the board.
After the manipulation is carried out, all data about user settings, including passwords and network addresses, will be destroyed. Therefore, in order to avoid the painful selection of values for all parameters, it is advisable to save the configuration in a settings file on the computer.
Additional parameters and options
It is worth noting that, in addition to its main functions, it has several operating modes. This is the access point for wi-fi distribution, bridge and client. At the same time, the model has a considerable number of auxiliary options. For example, you can use it to configure the reception of IP TV channels, and, if necessary, limit access to specific list network resources, which is especially important when working in an office.
The design features of the model make it easy to understand how correctly the device works. The front panel is equipped with LEDs indicating operation:
- power supply;
- Internet connections;
- local wired connections;
- wireless connections.
For example, a green light indicates readiness for work, and a yellow light indicates possible problems. In this case, green blinking indicates data transmission on the corresponding channel. But the physical WPS button also has a blue blinking mode, which indicates an attempt to establish a connection.
There are a lot of similar features and you can learn more about them from the instructions included in the package. If problems arise, you can also contact hotline provider.
As a result
Now you know that anyone can install routers and it is not at all necessary to call a specialized specialist to set it up. You can do this yourself, and after a short practice you will be able to master more complex options available in new firmware, which can be downloaded from the official website if you have an Internet connection.
Today there are hundreds of different routers on the market that allow you to organize your own Wi-Fi network Houses. The D-Link company occupies one of the leading places in the list of manufacturers of this kind of devices. It produces a lot of different routers, among which the D LINK DIR 300 model occupies a special place. It combines optimal price and functionality, for which it has received recognition among users. D LINK DIR 300 routers are often purchased for offices, homes, cottages and various other premises where high-quality Wi-Fi signal. In this article we will look at how to configure the D LINK DIR 300 router.
How to connect the D LINK DIR 300 router
Before proceeding directly to setting up the router, you need to connect it. To do this you will need to do the following:

How to configure the D LINK DIR 300 router
After connecting the router, you can proceed to configure it. First you need to create a wireless network:

At this point, you can consider the local network setup stage complete; now you should go directly to setting up the D LINK DIR 300 router. Any router can be configured via a browser. Follow these steps:

That's all, the setup of the D LINK DIR 300 router is complete. After these steps, the Internet should start working. But most likely you want to configure wireless internet, you will need to follow a few more steps below.
How to set up a Wi-Fi access point in the D LINK DIR 300 router
If you have correctly configured the Internet itself according to the instructions described above, you now need to activate the Wi-Fi access point. This is required to be able to connect to the router from any devices via a wireless connection. This is done as follows:

How to connect via Wi-Fi to a D LINK DIR 300 router
The last step is very simple - connect to the router via Wi-Fi. The connection method is no different from connecting to any other wireless point access. If your computer has Wi-Fi adapter, just turn on the wireless network connection, after which a corresponding icon will appear in the lower right corner, indicating that it is possible to connect to the Internet via Wi-Fi. Click on this icon and select the D LINK DIR 300 access point, identifying it by the name you specified as part of the setup.
Enter the password you specified earlier and connect to the network.

Please note: IfWi-The Fi adapter on your computer is “external”, connected viaUSB, the connection process may vary slightly. Most likely, the connection will occur after installing specialized drivers through the appropriate utility.
Hi all. Still, it’s interesting to watch the development modern Internet, I remember not so long ago there were ordinary Dial UP modems connected to the COM port, but now with fiber optics, and especially ADSL you won’t surprise anyone
Of course, with changing technologies, the nuances of setting up equipment are changing, but I can say with confidence that setup has become much easier, and the Internet has become more accessible. Therefore, today I want to walk you through an example of setting up a D-Link DIR 300 router (and in general tell you what and how, all routers themselves are configured according to the same principle, only the admin interface changes)
First we need to figure out what we're dealing with. In my case in front of me D-Link router DIR 300 and now we will take a step-by-step look at what the process of setting it up looks like. At the bottom of the router (no matter what: be it D-Link or Netgear) always present general information, namely: its IP address and login / password to access the settings. (I have circled them in a red frame in the photo below)

Now we need to figure out how our connection to the Internet is organized. It is important to understand here that the router itself is not the source of the Internet - its task is only to divide accessible internet for the number of computers and other devices we need. No, don’t think that I think you’re stupid, they just really tried to prove to me that WI-FI is the Internet! I couldn’t convince the person, and I didn’t—I think you understand—Wi-Fi is just a method of data transfer that has been so conveniently attached to the delivery of the Internet from the source to the end consumer.
Historically, the D-Link Dir300 router has become very popular and a bunch of instructions have been written on it, but I want to tell you everything in more detail with typical examples. In my practice, there were 2 options for setting it up: this ADSL modem + router Dir 300 and directly fiber optic cable + router.
So how to configure the DIR 300 router? First, let's decide what and how to connect where. You have 2 types of ports on your device: WAN and LAN, don’t confuse them... to simplify the explanation completely, WAN is where the Internet comes in, and LAN is where it goes. The scheme is like this, router "takes away" Internet and shares it between all network participants, in our case connected via wi-fi or LAN cable (by default all computers in LAN networks and Wi-Fi are open for interaction with themselves), in this case we have such a modest home network.
Setting up a network adapter
If you have never set up your network, you can skip this step- by default in Windows it is set as we need, but in general it would not be superfluous to make sure, at the same time I will explain how IP addresses are issued
Go to “Network and Sharing Center” in the “Control Panel”, click “Change adapter settings”

Select ours from the list local connection over a local network, in my case the Ethernet interface, yours may be called differently, but the meaning does not change.

Select “Properties”, this is where we will configure the network

Uncheck “Internet Protocol Version 6” and go to the properties “Internet Protocol Version 4”

By default, DHCP is enabled on the router, which means that our computer will receive an IP address automatically when connecting to the router, so in the settings we safely select “Obtain an IP address automatically” and “Obtain an address DNS servers automatically"

Unfortunately, for reasons unknown to me, auto-assignment of IP addresses may not work during the first setup. (this happens very rarely, but I’d better describe what to do in this case). To make it clear how, the gateway is the IP address of our router, and the IP address differs from the gateway only in the last digit (choose any from 2 to 255), the subnet mask is always the same 255.255.255.0 (she will register herself). At this stage, the network setup is complete, let’s move on to the settings of the router itself.
Unlike the good old dialup modems, all settings are stored directly in the device itself, so we should go to it to register the configuration we need. Although if you work according to the Modem + Router scheme, provided that the modem automatically distributes IP addresses, then everything should work right out of the box, i.e. Connected and the Internet is automatically distributed. But still, I recommend that you check all the settings and adjust them to suit our needs.
Quite often they come bundled with routers installation disks, however, with their help I was never able to set up the Internet correctly, so I don’t recommend using them, it’s better to do it yourself (at least you will know what and how you have it configured), and you won’t get it necessary control over your network...
In order to get into our router to configure it, you need to write its IP address in the browser address bar (the one on the stickers on the bottom of the device) and enter the login and password specified there.

Before us is the web interface of our DIR300 router, this is where we will configure our Internet with you. To get to the appropriate settings, go to “Advanced settings”

In the network section, select WAN (the same WAN where the Internet comes)

As you can see I already have several configurations, i.e. my router is configured and working, if you have something there, but nothing works - feel free to delete everything from there, now we will create new configuration Internet connection. To do this, click “Add”

Now select the connection type. If you have authorization by login and password, then we need PPPoE, select the “Internet” port and come up with a name for the connection (For our convenience, otherwise you don’t have to worry about it and leave it as is), scroll below...

...enter the username and password twice (from the subscriber’s registration card), at this stage the setup of the Internet connection is completed.

There are cases when some providers simply require you to register your IP addresses (and just if we ourselves connect the configured modem to the WAN port), then in this case you should use a static IP - its configuration principle is the same as in a local network, only our custom router now plays the role of a computer. I would like to draw your attention to the MAC parameter and the arrows next to it. If everything happens automatically, then for some providers the binding is triggered by a unique MAC address at your network equipment… What does it mean? This means that on the provider’s side the Internet will be distributed provided that on the client’s side there is equipment with the same MAC address, i.e. Even if you take two identical routers and configure them identically, only one of them will work; to get the other to work, you will need to call technical support to remove the binding.
Why arrows? They allow you to copy your MAC address network card and the router will work with this MAC address. This is necessary in order to make our lives easier, I’ll explain why. You are successfully using the Internet and suddenly you decide to buy a router (and it has its own MAC address), you configure it, but there is no Internet, because the provider is bound to the MAC address of your network card. Click the copy MAC address button and voila - the router has the same address and everything starts working great!

This is what the IP address settings look like - the same as with the network on a computer. This completes setting up your Internet connection!

How to set up a DIR 300 router (Wi-Fi)
Set up Wi-Fi on the router D-link Dir 300 is much simpler than the Internet, but again I’ll try to tell you everything in detail, on the tab with Wi-Fi settings present general settings- there is only a checkbox “whether Wi-Fi works or not”, so we are not interested there, we will go to Basic settings

The SSID is the name of your network and will appear in searches. I would like to dwell in detail on the Channels. Quite often, some phones do not see wi-fi on channels above 9, so if possible, try to use the range from 1 to 9, that seems to be all, go to the security settings

Here we should select the encryption type and password, I think there will be no difficulties here... Now let's move on to the interesting part - setting up virtual servers.

How to forward a port to Dir 300?
When I was new to networks, I had a huge problem with port forwarding - well, I didn’t understand how and why. With time and experience, an understanding of all this has come and I can tell you everything in simple language, understandable to a mere mortal. The vast majority don't need to know this, but if you decide to set up your home game server With access via the Internet, then you will definitely have to figure it out. The fact is that if you set everything up on your computer correctly, then when you try to access your computer from the Internet, you will not be able to reach it, because the request will come to the router and stop there. In order for the request to go to the computer we need, we need to configure a port forwarding rule. If there are absolutely no hassles, then there is DMZ - just enter the IP address of your COMPUTER there! and rest assured that absolutely all requests from the Internet will go to your computer (however this is critical from a security point of view)

Let's go to the Virtual Servers section and see several rules: one for the OpenTTD toy, and the second for the Remote Desktop Service, let's add a new one...

Settings virtual server looks quite simple, and there are templates for some popular games and programs, but we will do everything ourselves. The name again is for your convenience; we select the interface that you specified when setting up your Internet connection. External port (Start) - the port that needs to be forwarded to the computer, and the internal one is usually the same... also do not forget to write down the Internal IP - this is the IP address of your computer. That's all!…


- yes, very simple, I hope that my article completely answered your question. I understand that it is impossible to reveal all aspects and nuances within one article, so if you have any difficulties, write in the comments, I will try to help, see you next time!