Is it possible to install Linux on an Android tablet? Installing Ubuntu Touch on your phone
Most Android users know that this platform is based on operating system Linux, but despite this, many of its programs are not available. That is why a great solution is to install a Linux shell called Ubuntu on the tablet. It runs through the Emulator and runs in parallel with Android, providing a wide selection of applications that usually do not load on devices with this operating system.
Both operating systems can run in parallel
We'll look at how to install it yourself without help. special applications, using only an emulator and VNC Viewer.
Installing Ubuntu on the tablet
What parameters are required for this shell? We need root rights free memory in a volume of 2.5–3.5 GB. A minimum clock frequency of 1 GHz is required and support for the Ext2 file system is required. As tools that facilitate installation, we need several programs, including an emulator - it will be useful for further launching the software.
What are root rights and how to get them? They represent administrator rights. In this case, the presence of such rights will allow you to change system parameters tablet, so install Ubuntu without them for Android it won't work.
You can obtain these rights through various applications, a large number of which you will find in Play Market. Download one of them, activate administrator rights and then proceed to directly install Ubuntu on your tablet.
To do this you need to do the following:
- Login to system settings your tablet and in the “For Developers” section, enable USB debugging mode. If you do not have this function, go to the “About Device” menu and find the line with the build number - quickly click on it 5 times in a row, after which a message will appear that you have become a developer and should appear in the list;

- Create a folder in the card memory called Ubuntu;
- Download the script to launch Linux and one of the assemblies software- there are only two of them. The first is minimal, contains only individual, most popular applications and is half a gigabyte in size, after installation it takes up 2.5 GB on the memory card free space. The second is a complete assembly, it has an extensive set of programs, and accordingly, it has original size 1.5 GB and after unpacking it will take 3.5 GB of memory;
- Next you should download two programs: Terminal Emulator for Android and VNC Viewer;
- Open the Emulator application and run the following commands in it:
- cd /sdcard/ubuntu;
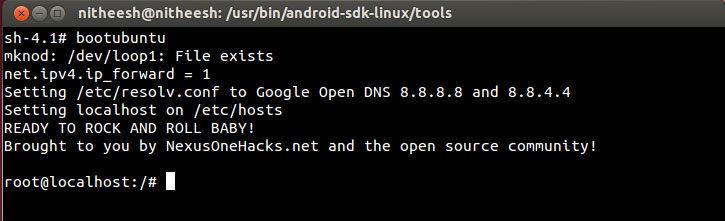
- sh ubuntu.sh.

Note. Before entering commands, the emulator will ask you to do so upon initial startup, and, of course, you need to agree to this action.
- Next, you need to provide your screen resolution details and desktop environment type in the same Emulator application.
- After a few minutes correct installation you will see a message with the text root@localhost:/# - this means that Linux shell was successfully launched in the emulator.
A user may have many reasons why he needs Linux on Android. You could, for example, use it to power a LAMP server that runs web applications and serves web pages. If the user is network administrator, he can install his favorite Linux tools and turn his smartphone into a portable network solution to troubleshoot or test functionality.
Initially with Play Store Google downloads the complete Linux Installer application. In addition, you need to go to the Linux Project website on Android and download the open source version of the Android application. First you need to go to the “Settings” menu, select “Security” and switch to the “ Unknown sources" to enable installation of applications other than Play Store.
The application requires root Android device. The exact procedure required to start depends on the device models. The installer requires BusyBox to boot Linux, which will be implemented and installed the first time you run it. In addition to the application created by the Linux project on Android, you will also need a VNC viewer to use the graphical desktop. The project proposes to use popular app Android VNC Viewer.
Additionally, you will need another application to access the built-in command Android line. The project offers to use the application Android Terminal Emulator. Next, launch the Complete Linux Installer application. Click on the project icon in the top left corner of the screen to open the navigation menu, which contains several items. The first two are the most important:
- An installation guide that will guide the user through the steps required to set up and install the various supported Linux distributions.
- The Launch item is an integrated launcher that can be used to boot Linux onto a smartphone into a configured distribution.
Other items will lead to various information and tips that will help in setting up the system. The distribution setup process consists of several steps, which require:
- Launch the Complete Linux Installer application.
- Open the navigation menu and click on the “Install Guide” element.
- A list of distributions that can be run on the device will appear.

You can run Linux on an Unrooted Android device thanks to the GNURoot app. Despite its name, it does not require a built-in phone. The main difference between Complete Linux Installer and GNURoot is that the latter gives access to the interface command line Linux distribution. To run Linux on Android via GNURoot, you need to take it from the store Google Play, and also download a companion application for your specific Linux distribution. The application is used for popular distributions such as Debian, Gentoo and Fedora.
These applications are close to 100 MB in size, unlike the GNURoot application which is only a few kilobytes. Once they are installed, launch GNURoot and use the drop-down menu at the top of the page to select the distribution you want to download. Then click the Create New Rootfs button to install the distribution. The process will take some time depending on the device resources. When this is done, you need to click the Launch Rootfs button, which will open a terminal and register the user in the Linux distribution on the Android (phone). If you check the “Run as fake root” checkbox before starting the distribution, you will be logged in with superuser privileges.
Instructions for choosing Ubuntu
First you need to click on the selected option to further instructions eg Ubuntu. After which the detailed instructions, divided into four pages. The first page of the application displays the basic requirements for the device to be able to run a Linux distribution on a smartphone. Most important step- make sure debugging support is enabled. To do this, you need to open the sections “Settings”, “Applications”, “Development” in sequence and make sure that the parameter “ USB Debugging» switched.
Links to download images for the selected distribution will appear on the seond page. Next, click on the “Upload image” button, a window opens with three additional buttons to upload one of three supported image types: large, small, or core.

Then you should install the Linux OS distribution of your choice, and also select the download size compressed image, which will be displayed on the SD card after it is removed. The next sequence of steps is as follows:
- Make sure your Android device is using ARM processor v7, since most distributions only support this ARM architecture.
- Click on the image: this action will bring up another popup with buttons that either download the image from the Sourceforge mirror or download via torrent.
- If the user selects the torrent option, the application will download a torrent file, which will then need to be passed to the torrent client to download the actual image for the selected Linux OS distribution.
- You can download the image to your computer and then transfer it to the SD card on your Android device. In this case, it is safe to skip the instructions on this page.
- You can unzip the downloaded file either on your computer or on the device itself. For the latter you will need a universal file manager, such as paid application Root Explorer or free application ES File Explorer.
- If the user moves images to their device manually, it is better to place them inside a folder. For example, if images are loaded for Ubuntu distribution, it would be more correct to unpack it in the Ubuntu folder on the SD card.
- Once loaded, the user will be taken to a terminal window that will list instructions on how to connect to this running installation"Linux" on "Android" (smartphone) using the VNC viewer.
- You must provide the password displayed on the page, as it will be needed to connect to the VNC server running inside the distribution.

In order to launch the application responsible for loading distributions, you need to open navigation menu by clicking on the application icon or clicking on the launcher item. The drop-down menu on the page is then used to select the distribution. If the user receives a message that an image does not exist for the selected distribution, this means that the application cannot find and retrieve image files for the distribution. This occurs if the downloaded file was not extracted or it was saved in a non-standard location.
In this case, you need to specify manually IMG file distribution when running Linux on Android. To do this you will need:
- Click the “Settings” button on the right top corner Start screen, which displays a drop-down menu.
- Click the “Add” option to open the page and create an entry for the distribution.
- Enter the name of the distribution in the space provided and tap the three-dot field to navigate to the file system on your Android device and point to the IMG file for the distribution.
- Click “Save Changes”.
This custom entry from the distribution will now appear in the drop-down menu on the launch page. When an entry is selected, the application will show a button to launch the distribution.
Procedure for installing Linux on an Android tablet:
- Click on the button to download the distribution. This will launch the terminal application and give it superuser permission.
- Press the Enter key on the virtual keyboard to load the distribution. Since this is the first time the user has launched the distribution, they will be prompted for a default password. This is the password for account default user, not the password required to log into the VNC session.
- The program will then specify whether the distribution needs to run a VNC server to view the graphical desktop and SSH server, or to remote access to the distribution via secure connection.
- It is recommended to run them to take advantage of all the benefits of running a Linux distribution on an Android device.
- You will then be prompted to enter the VNC session screen resolution. Although you can set it to any size, for better review Usually the product is installed at the same resolution as on the device.
- Please note that when calling virtual keyboard it will hide part of the desktop. This is all that is required for the configuration.
- The application will then prompt you to save the default settings and allow you to download the distribution.

When the distribution is loaded, the user will see a note with the appropriate settings to connect via VNC to that distribution, and then the standard Linux root prompt will be displayed. You can use this shell to interact with the distribution, as with any desktop application. For security purposes, first of all, the user must install New Password to use root.
Security system installation procedure:
- Login and enter a new password for root user. If you want to start the SSH server when you boot the distribution, you can connect to it from any computer on the network by entering the Ifconfig command inside the terminal on your Android device.
- Dial the device's IP address, for example, 192.168.2.101.
- To connect to the device, you should launch a terminal on another computer and enter: ssh [email protected].
- The system will require the password for the ubuntu user, which was set when the distribution was first loaded.
- To view the graphical desktop running on top of a Linux distribution on an Android device, you need to press the home button and minimize the terminal application.
- Launch a VNC application, for example, androidVNC to install Linux on Android.

VNC has various settings to connect to the distribution running on the device. You need to enter localhost in the field that asks for the IP address of the VNC server and 5900 as the port. In addition to this, you will also need a password to authenticate with the VNC server, which depends on the distribution. For Ubuntu images, the password is ubuntu. For Arch Linux this is archlinux, for Linux Debian this is debian and so on. The password is listed on the distribution wiki page on the LinuxOnAndroid project website.
If the user is using androidVNC, the application prompts to change the color format to 24-bit color (4bpp). Next, click the “Connect” button to start the VNC session after all the information has been entered. The VNC client will connect to the device, and the graphical desktop that is running in the distribution used will immediately be displayed.
Application developers advise androidVNC users to change the input mode to the touchpad. To do this, click on the menu button inside the VNC session. This will bring up a variety of options. You need to click the "Input Mode" option and then select the "Touchpad" radio button from the list of supported input modes. Now you can interact with and manage your desktop just like you would on a PC.

IN Android application VNC single click means left click. Double tap simulates a right mouse click. The application will display three buttons: two for zooming in and out and one for displaying the virtual keyboard. You can use the package manager to install new applications. The distribution will be able to install applications that have been ported to the ARM architecture, which is true for any popular application.
You can use the steps above to download, configure, and use any of the supported distributions on your device. The application also offers some other options for further customizing distributions and user interface. First, change the distribution settings when you first log into it. To do this, select the distribution that you want to configure from the drop-down list in the “Launch” section.
In addition to the "Start Linux" button, click "Setup Linux" to open the settings page. There are checkboxes here to enable or disable running SSH and VNC servers. And it is also possible to change the VNC screen resolution by changing the values provided on this page. The page presents several interesting options, including the Create 1GB SWAP File checkbox. With their help, the application will create a swap file for the distribution.
Page file for the system
Before enabling this option, you need to make sure that there is enough free space on your SD card. The app can also mount folders from the Android file system to running Linux.
Order of operations:
- Click the Configure Mounts button to launch the mount editor.
- Click "Options" in the top right corner and then select the "Add Mount" option.
- A page will appear where you will need to specify the location Android folders, which needs to be divided manually, for example, storage/sdcard0/Downloads, and then the installation path, for example, home/ubuntu/Downloads.
- You can add as many folders as you need.
- Click the “Save Changes” button, then exit the mount editor.
Transferring folders to a new image
Depending on how the distribution is used, sooner or later the user may exhaust all free space. In this case, he will have to free up space by creating a larger image and copying all the files and folders from the existing one to the new one. The procedure begins by launching the terminal and creating an empty image of the required size. For example, to create a 4GB image called ubuntuNEW.img you need to issue the command:
dd if = /dev/zero of = ubuntuNEW.img bs = 1M count = 0 seek = 4096.
Then you need to format this new image and create file system via the command:
mke2fs -F ubuntuNEW.img.
Then they copy the image file that needs to be received from the device to the computer, For example, with the name ubuntuOLD.img. Next, create two folders on the desktop (ubuntuNEW and ubuntuOLD) to mount these images using the commands:
- sudo mount -o loop ubuntuOLD.img ubuntuOLD;
- sudo mount -o loop ubuntuNEW.img ubuntuNEW.
They will mount the images into the appropriate folders. Once this is done, copy all the files from the old image to the new image using the command:
sudo cp -rp ubuntuOLD / * ubuntuNEW.
First you need to make sure that files and folders are copied along with access rights. The process is usually completed by turning off the image using the entries:
- sudo umount ubuntuOLD;
- sudo umount ubuntuNEW.
You can now transfer the ubuntuNEW.img file to your phone, delete the existing image, and ensure that the distro entry on the startup screen points to the new image. Enable use of the distribution's CLI package manager tools using GNURoot.
Installing Linux on Android without root rights

Installing any Linux distribution on an Android phone usually requires ARM-supported distribution and root permissions. Since rooting your phone voids the warranty and opens backdoors to potential attacks, you need to adopt a method to run Linux on Android without rooting. With GNURoot, the user doesn't have to do these tricks and skip root permissions.
This method is not like installing full version PC for Linux on Android phones because they install the Linux subsystem, which includes many tools. You can use apt-get, SSH, or even turn your Android phone into a LAMP server to run web apps.
Installing Linux on an Android phone using this version will require you to first install GNURoot from the Play Store. Then the application installs a fake root. To do this, simply open the Play Store, find GN, URoot and install these products. Select the Linux distribution's helper application.
By default, GNURoot offers different ARM-based Linux distributions: Linux Debian Wheezy, Fedora, Aboriginal (a lightweight version of BusyBox) and Gentoo. Select any of them and click "Create new Rootfs" to download necessary files. This process may take some time, so you need to wait a few minutes, after which you should select your Linux distribution and launch it.
After the download is complete, select this distribution from the second option in the drop-down list. After checking the "Run as fake Rootfs" box, apt-get and other root commands are obtained. Click "Run Rootfs" to install and use Linux on Android phone. After installation, the user is ready to use Linux on an Android phone. Now you can install any package from the distribution using the appropriate package manager using apt-get for Wheezy or yum for Fedora.
To create additional windows terminal press the “+” button. To access menu options for various settings, you can click on the icon on the right and other options. In the four major Linux distributions available in the GNURoot application, you will have to work using the command line. To run programs that require windows, you will need GUI.
At the first stage, this can be implemented using the GNURoot WheezyX distribution, which runs a VNC server. To view the graphical interface, you need to download VNC Viewer from the Play Store. The first time the WheezyX distribution is launched in a terminal window, launch the VNC viewer application and enter "localhost: 1" as the address and default "password". To do this, a virtual desktop is launched for the xterm terminal window for Wheezy. You can now navigate Linux on Android using your mouse pointer and keyboard icon.
Is very popular, especially among system administrators and software developers. Huge number various devices works under his control. Unfortunately, mobile devices, such as a tablet, with native Linux support are practically non-existent. On at the moment Only one model has been released, running on Ubuntu. But buying it may not be so easy, since it is not available in every country.
If desired, you can install it on Linux tablet, replacing Android.
Naturally, many may wonder whether it is possible to install Linux on a tablet that originally runs Android instead of this OS. Officially, both Android and Linux have the same kernel, but, unfortunately, Linux will not work fully on an Android tablet. Developments are underway in this direction, and many programmers are actively working to solve the problem, but the reality today is that you need to be sophisticated to run a Linux distribution on an Android tablet.
In this material we will provide an overview and step by step actions, how to install a Linux distribution on your tablet. We will tell you what conditions need to be met, how to prepare your device, and also tell you about the features of the procedure.

What you will need:
- Android tablet.
- SD card with a capacity of 3.5 GB or more.
- root access
- a complete backup of all data for one hundred percent certainty of a safe outcome. You move large files and perform a lot of operations, so this is a must.
IMPORTANT. DISCLAIMER. Despite the fact that this process does not cause any damage, the site editors are not responsible if something happens to your Android device during the installation or launch of Ubuntu.
Make sure you have superuser rights. On almost every device you can do this by checking if you have the Superuser app. If you don't have root rights, you can get them. To do this, find out the instructions specific to your device.

BusyBox libraries will help you interact with the Android system. You can download the installer from the Play Store (or Android Market), by going here (https://play.google.com/store/apps/details?id=stericson.busybox) and downloading it. Go to the BusyBox Installation tab and click the Install button. Once the utility is installed, you can move on to the next step by installing a terminal emulator.
Step 2: Install the terminal emulator and check that it works correctly.
The most popular terminal emulator for Android is on this page (https://play.google.com/store/apps/details?id=jackpal.androidterm) in the Play Market. By following the link, download it, install it on your tablet and run it.
After it opens working window application, enter the word "su". The utility will ask you to provide root access, and you must give it because the utility runs system scripts that we will later use to run Ubuntu.

To check if the BusyBox terminal and libraries are working correctly, enter the command “busybox arping –help”. If the terminal gives you a text with a lot of options, such as -f -q -b, everything works. If not, check if your phone is rooted, if BusyBox was installed correctly, and if the terminal has permissions. If everything is in order, you can continue.
If you have completed all the necessary steps in steps 1 and 2, there is no need to worry. The next few steps are very simple. Start by connecting your phone to your computer. You must enable the USB drive, which will allow you to open your SD card on the computer (most of you will know this when you have moved music and other files from your computer to Android).
Next, you need to create a folder called “Ubuntu” on the SD card. Then you should download this one (https://sourceforge.net/projects/linuxonandroid/files/Ubuntu/10.10/ubuntuV5-image.zip/download) and this one (https://sourceforge.net/projects/linuxonandroid/files/Ubuntu /10.10/ubuntuV5-script.zip/download) files. These are ZIP files that contain 2 important things: the launch script and the file Ubuntu system. If you open the first ZIP archive, you will find the IMG file, and if you unzip the second file, you will find the SH file.

Unzip both archives and move the files to the “Ubuntu” folder. You should now have two files in the folder. Most of the necessary processes have been completed.
Step 4: Start Ubuntu System
Go back to your terminal application and type "su" again, then write "cd/mnt/sdcard". To make sure everything works, try typing "ls" and see if you can recognize your folders (you should be able to find the Ubuntu folder too).
To start your Ubuntu, type "cd /ubuntu" followed by "sh ubuntu.sh". This will cause many processes to run that will try to install your system. Next, the utility will ask you to select a screen resolution. Enter it in width x height format, for example 1280 x 720. For more better performance To prevent the tablet from slowing down, choose a lower resolution. Now everything is done.
The Ubuntu system is working, but we cannot see it. To see the GUI, you need to use the VNC protocol client. We can download any of them from the Play Store.

Good day, dear site users! I recently tried to install Linux on my Android device. As a guinea pig, I used a smartphone called Explay Tornado. I needed a computer with an Internet connection, USB cable, the smartphone itself. Before installing a new system on your smartphone, you need to make sure that your device has a Micro SD card installed and Root Rights. If you have not received Root rights then you need to get them! I used a computer program called Kingo Android ROOT. There are many other programs to obtain.
IN Google market you need to download the following programs: Complete Linux Installer; Terminal Emulator for Android; VNCViewer
First of all, we will work with the application or program Complete Linux Installer. Once again we don't change Android system on Linux, we make one system work on another. When we first launch the application, the program prompts us to install additional components For further work, naturally we agree with them and begin the installation. Installation will take good internet no more than one minute. As shown in the figure, the application prompts you to install boot scripts, you are required to click on the OK button.
- Next, the application will require you full access to the system, for this you and I received Root rights. The next step is to allow the application to access the system functions of your smartphone or tablet.
- Then we move on to the next step, namely the system installation guide. The program automatically starts checking your device for all the main factors for installing a new environment and will give you the results of the versions that you can install on your tablet or phone. In my case, the program selected these versions of the program.
- As shown in the screenshot above, we are listed with options that our device can definitely reproduce. But as practice has shown, they work, but with crashes. Crashes may be due to the fact that my device is too weak, I don’t know exactly how it will work for you. And so let’s look at the example of installing Ubuntu 13.10.
- Click on the button labeled Ubuntu 13.10 and move on to the next point, which we will discuss in detail with you.
The program offers to download to a system image and there are 3 versions of them, large, small, and standard, how do they differ? First of all, they differ in the size (weight) of the files and, therefore, in functionality. Since everyone knows that my device does not have enough memory, I need to install a larger memory card and choose the system that takes up less space on the flash card. Click on download image and select the file you need. The sizes are very large, so I suggest downloading via torrent from a smartphone. Hurray, by the time we set it up for download, we can fulfill the remaining requirements of the program.
Without leaving the program, click download Terminal Emulator for Android; and VNCViewer the program will immediately take you to Google Play to the necessary pages with applications that need to be downloaded and installed. Have you downloaded everything and installed it? Now, while the system image is loading, we download ES-Explorer and after downloading, open it and go to the memory card. Through Explorer we create a folder with the name our system, which means that we create a folder with the name " Ubuntu"After downloading the image, we need to unpack the archive into new folder (Ubuntu).
- After you unpack the file into a new folder, you should have two files in it. One of them has the extension .img. This file will start our system. We return to the very beginning and click the system selection and click the change button additional menu. In this menu we indicate the full path to the image itself, which will look something like the screenshot.
- It seems like everything is with the settings. But when starting, you need to open the terminal and do not touch anything, the application itself should automatically background select the necessary data, but to execute text commands you will need to confirm the completion of your actions through Root access. Here, naturally, we allow the application to continue working.
- After this, your new system will start, and your smartphone can work like new, while all the features will be available to you new system, as in the terminal so a complete graphical environment. This is the first method Linux installations Ubuntu seems to be finished.
That’s probably all, if you have any questions, ask them in the comments under the material below, I will be happy to help in solving any problems that arise to the best of my ability and understanding of the situation.
Running Linux on Android is possible! And you don’t need a device with root rights for this: all the necessary software is available in the official Google Play store. In just 10–15 minutes you can get an operating system that differs from Android in advanced functionality.
Note: if you follow our instructions, Linux OS will be running in a virtual environment. Android will still be running in the background. To call such a system complete would be incorrect. Nevertheless, it copes well with a list of standard tasks.
Close everything before installation Not required applications and clean RAM Android device.
1. From the Google Play Store, install GNURoot Debian and XServer XSDL.
2. Before you start installing Linux, make sure that your device is connected to a stable Wi-Fi networks. Launch GNURoot. The required environment packages will begin downloading.
Installation takes from 30 seconds to several minutes depending on the speed of your Internet connection. Ignore the tickers until the following message appears:
root@localhost:/#
For those familiar with the concept of “”, don’t let this line scare you: the application will not cause any harm to the device, since it works in a “sandbox”.
3. Enter the following command:
apt-get update
Wait until the packages are downloaded. This will be indicated by the line Reading package lists…Done.
4. Now enter another line:
apt-get upgrade
To the question “Do you want to continue?” enter English letter Y and press Enter. The installation of packages will begin.

This time the installation procedure will take a little longer. Wait patiently for the installation to complete until the coveted line appears:
root@localhost:/#
The Debian Linux environment is installed, and now you can proceed to deploy the graphical shell.
5. Installation of all Linux distribution packages is performed with the following command:
apt-get install lxde
There is also an option to install the system kernel using the line:
apt-get install lxde-core
Confirm the installation by re-entering Y and pressing Enter. The package download process will begin.
During installation, make sure that all files have successfully downloaded, and that when unpacking, your device does not run out of free space. Otherwise, the system startup will fail.
6. To complete the installation of the operating system, you must download three additional utilities:
- XTerm - to access the terminal from the Linux graphical shell;
- Synaptic Package Manager - for managing apt packages and downloading applications;
- Pulseaudio - for installing sound drivers.
All three utilities are installed using one GNURoot terminal command:
apt-get install xterm synaptic pulseaudio
About 260 MB of data will be downloaded to the device.
7. Now minimize the GNURoot application and open the previously installed XServer XSDL. Agree to download additional fonts. After the installation is complete, tap on the screen several times (the application will ask you to select the resolution and font size - it all depends on your preferences) until you see a splash screen with a blue background and white text.

Re-launch GNURoot and enter the following two commands one after the other:
export DISPLAY=:0 PULSE_SERVER=tcp:127.0.0.1:4712
startlxde &
The sequence for further restarting the system (when you want to open Linux again) looks like this: run XServer XSDL and wait for the blue screen, open GNURoot and enter the two commands above, return to XServer XSDL.
If the terminal complains about an invalid command, return to step 5 of these instructions and try installing a bare kernel. Check the memory status of your Android device.
8. Now open XServer XSDL, wait a few seconds, and you'll have Linux ready to go.

To install applications, in the lower left corner, open the Start menu and select Run. Type Synaptic and press Enter.

In the window that opens, use the search and install the necessary applications. It could be Firefox browser, GIMP image editor, office suite Libre and other Linux compatible programs.


Of course, this option for installing Linux cannot be called full launch operating system on Android. Virtual Linux has several limitations, but when used wireless mice and keyboard (possibly connected using an OTG adapter and a USB hub), you can turn your smartphone or tablet into a laptop with the functionality of an adult OS.
