Review of virtual machines from different developers
How to install it yourself software product Oracle Virtualbox, with which we will create a virtual machine, read in.
In order to create a virtual machine, for example, Windows XP, you need (the instructions are described for Virtulbox version 5.0.2 installed on Windows 8.1 x64):
1. Launch (Start -> Programs -> Oracle VM Virtualbox)
2. Press the button Create
Fig.1 - Oracle Virtualbox - create
3. In the next window, set the name virtual machine, its type and version:
 Rice. 2
 Press the button Next
4. Set the required volume RAM For normal functioning virtual machine:
 Fig.3 - Oracle Virtualbox - creation - determining the amount of RAM
 Press the button Next
4. In the next window, select Create new virtual hard disk:
 Fig.4 - Oracle Virtualbox - creating a new virtual hard disk
 Press the button Create
5. Select type hard drive:
 Fig.5 - Oracle Virtualbox - choosing the type of virtual hard disk
 Click the button Next
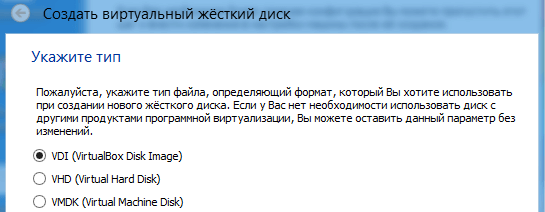
6. Specify the format for storing data on the virtual hard disk:
 Fig.6 - Oracle Virtualbox - choosing the format for storing data on a virtual hard disk
 Click the button Next
7. Provide name and size virtual hard disk:
 Fig.7 - Oracle Virtualbox - setting the name and size of the new virtual hard disk
 Press the button Create
8. On the left side of the window Oracle VM VirtualBox Manager an image will appear Windows systems XP:
 Fig.8 - Oracle Virtualbox - manager
 Now you need to configure the virtual machine to be able to install Windows XP on it.
9. The first thing you need to do is indicate the source from which the operating system will be installed. To do this, select the desired one from the list of virtual machines (in this Windows case XP see Fig.8) and press the button Tune
10. Select in the panel on the left Carriers and in the attributes we indicate the device (disk) from which the operating system will be installed. IN in this case we will install Windows XP from CD (‘D:’)
 Fig.9 - Virtualbox - media setup - selecting OS installation source
 Creating your first virtual machine
Click the " Create" V top corner VirtualBox.
A wizard window will appear to guide you through setting up your new virtual machine (VM).
On the following pages, the wizard will ask you for the minimum information required to create a virtual machine, including:
- Name virtual machine, which will later be shown in the list of virtual machines in the VirtualBox Manager window, and it will be used for the VM files on disk. While any name can be used, keep in mind that once you've created a few virtual machines, you'll appreciate it if you gave your virtual machines fairly descriptive names; "My Virtual Machine" would be less useful than "Windows XP SP2 with OpenOffice".
- In the section " Type operating system » Select the operating system you want to install later. Supported operating systems are grouped; if you want to install something very unusual that is not listed, select " Other" Depending on your selection, VirtualBox will enable or disable certain virtual machine settings that your guest operating system may require. This is especially important for 64-bit guest OSes. Therefore, it is recommended to always set the type to the correct value.
On next page select the memory (RAM) that VirtualBox should allocate each time the virtual machine starts. The amount of memory specified here will be taken from your host computer and provided to the guest operating system.

Remember: Select this option carefully! The memory you give to the virtual machine will not be available to the OS on your physical computer while the virtual machine is running, so don't specify more than you have free. For example, if your host computer has 8 GB of RAM and you enter 4000 MB as the amount of RAM for a particular virtual machine, while that virtual machine is running, you will only have 4000 MB left for all other software on your host. If you are running two virtual machines at the same time, more will be allocated for the second virtual machine. more memory(which may not even start if this memory is not available). On the other hand, you should specify as much as your guest OS (and your applications) require for proper operation.
A Windows XP guest will require a minimum of several hundred MB of RAM to run properly, and Windows Vista It will even refuse to install if less than 512 MB is available to it. Of course, if you want to run graphics-intensive applications in your virtual machine, you may need even more RAM.
For modern versions of Windows (both host and guest OS), it is advisable to have at least 4 GB of RAM for comfortable operation. For Linux with a graphical interface, it is advisable to have 2 GB for comfortable work. For Linux with a command line interface, 100 MB is enough for the OS itself + memory for running applications.
Don't leave your host (the operating system on a physical computer) with less memory than it needs to run, otherwise it will begin to heavily use the page file, which will lead to significant slowdown of both the host and the virtual machines.
As with other settings, you can change this setting later after you have created the virtual machine.
Then you have to specify virtual hard drive for your virtual machine.
There are many, including potentially complicated ways, by which VirtualBox can provide hard drive space for a virtual machine, but the most common way is to use large file image on your "real" hard drive, whose contents VirtualBox presents to your virtual machine as if it were its hard drive. This file is all hard disk, so you can even copy it to another host and use it with another VirtualBox installation.
The wizard will show you the following window:

To create a new empty virtual hard disk, click the " Create».
You can select an existing disk image file - if you have already used virtual disks before, you will see them in the drop-down list, or you can click on the folder image and select a random location where the virtual disk is located.
If this is your first time using VirtualBox, you will need to create a new disk image. Hence, click the button Create».
This will bring up another window - " Create a virtual hard disk" which will help you create a new disk image in the new virtual machine folder.

The Master tells us:
“Please specify the file type that determines the format you want to use when creating a new hard drive. If you do not need to use the disk with other software virtualization products, you can leave this parameter no changes.
- VDI (VirtualBox Disk Image)
- VHD (Virtual Hard Disk)
- VMDK (Virtual Machine Disk)"
VirtualBox supports two types of image files:
- Dynamically the distributed file will only grow when the guest OS actually stores data on its virtual hard disk. Therefore, it will initially be small on the host hard drive and only later, as it fills with data, will it grow to the specified size.
- File fixed size will immediately take up the specified space, even if only part of the virtual space on the hard drive is actually used. This option, taking much more space, a fixed-size file, has less overhead (the need to perform operations associated with growing the container) and is therefore slightly faster than a dynamically allocated file.

To prevent overflow physical disk, VirtualBox limits the size of the image file. However, it should be large enough to contain data for your operating system and the applications you want to install - for a Windows or Linux guest OS, you'll probably need several tens of gigabytes for any serious use. The image file size limit can be changed later.

Starting a virtual machine
To start a virtual machine, you have several options:
- double click on the virtual machine in Manager
- select its entry in the list in the Manager window and click the button at the top “ Launch»
- for virtual machines created with using VirtualBox 4.0 or later, go to the " VirtualBox VMs" in your system user's home directory, find the subdirectory of the machine you want to run and double-click the machine settings file (the file with the extension .vbox)
- if you have created a desktop shortcut for the virtual machine, you can run double click from desktop
This will open a new window and the virtual machine you selected will boot. Everything that is usually visible on the monitor virtual system, is displayed in Preview in VirtualBox Manager.

In general, you can use the virtual machine just as if you were using real computer. However, there are a few points worth mentioning.
Starting a new virtual machine for the first time
When the virtual machine is launched for the first time, another wizard will appear - “Startup Wizard” - you can select installation media. Because the virtual machine is created empty, it will behave exactly like a real computer without an operating system installed: it will do nothing and display an error message that no bootable operating system was found.

For this reason, the wizard helps you select an environment to install the operating system.
- If you have physical media The CD or DVD from which you want to install the guest operating system (for example, in the case of an installation CD or Windows DVD), place the media in your host's CD or DVD drive.
Then, from the Installation Media Wizard drop-down list, select " Host drive" with the correct drive letter (or, in the case of a Linux file, a device file). This will allow your virtual machine to access the media file on your main drive and you can continue with the installation. - If you downloaded the installation media from the Internet as a file ISO image(most likely in case Linux distribution), you would typically burn this file to a blank CD or DVD and continue as just described. With VirtualBox you can skip this step and connect directly ISO file. VirtualBox will then present this file to the virtual machine as a CD or DVD-ROM, much like it does with a virtual hard disk image.
In this case, the wizard's drop-down list contains a list of installation media that have previously been used with VirtualBox.
If your media is not listed (especially if you are using VirtualBox for the first time), select the small folder icon next to the drop-down list to open the standard dialog box file manager, with which you can select an image file on your host disks.
In both cases, after choosing in the wizard, you will be able to install your operating system.
Capturing and releasing the keyboard and mouse
Starting with version 3.2, VirtualBox provides a virtual USB tablet device for new virtual machines through which mouse events are communicated to the guest operating system. As a result, if you are using a modern guest operating system that can handle such devices, mouse support may work out of the box without mouse capture, as described below.
Otherwise, if only the standard PS/2 mouse and keyboard devices are visible in the virtual machine, then since the operating system in the virtual machine does not “know” that it is not running on a real computer, it expects exclusive control of your keyboard and mouse. This is not true, however, because if you are not using the virtual machine in full screen mode, your virtual machine needs to share a keyboard and mouse with other applications and possibly with other virtual machines on your host.
As a result, first after installing the guest operating system and before installing the Guest Additions (we'll explain this in a minute), only one of the two - your virtual machine or the rest of your computer - can "own" the keyboard and mouse. You will see a second mouse pointer that will always be limited to the VM window. Typically you activate a virtual machine by clicking inside it.
To return ownership of the keyboard and mouse to your host operating system, VirtualBox reserves for you special key on the keyboard: " host key" The default is right CTRL button on the keyboard. You can change this default value in the VirtualBox Global Settings. In any case, the current setting for the host key is always displayed in the lower right corner of your VM window in case you forget it:
![]()
In detail, this all means the following:
- Your keyboard belongs to the VM if the VM window on your computer's desktop has the keyboard focus (if there are many windows open in the guest OS, it belongs to the window that has the focus). This means that if you want to make keyboard input into a virtual machine, first click on the title bar of your VM's window.
To release the keyboard from the virtual machine, press the " Host" (as described above, this is usually the right CTRL).
Note that while the virtual machine owns the keyboard, some key combinations (for example, Alt-Tab) will no longer be visible to the host, but will instead go to the guest OS. After you press the host key to re-enable the keyboard on the host, all keystrokes will go to the host again. For technical reasons, the VM will not be able to receive all keyboard inputs, even if it currently owns the keyboard. Examples of such combinations are Ctrl-Alt-Del on Windows hosts or single keys captured by other applications on X11 hosts.
- Your mouse belongs to the VM only after you click in the VM window. The mouse cursor will disappear and your mouse will control the guest pointer instead of the normal mouse pointer.
Note that mouse ownership is independent of keyboard ownership: even after you've clicked on the title to be able to type into the VM window, your mouse is not yet necessarily owned by the VM.
To release the mouse from ownership of the virtual machine, also press the " Host».
Because this behavior can be inconvenient, VirtualBox provides a set of tools and device drivers for guests called " VirtualBox Guest Additions”, which make the virtual machine keyboard and mouse experience smoother. Most importantly, Guest Additions gets rid of the second, "guest" mouse pointer and will make your host mouse pointer the mouse pointer in the guest OS.
Entering special characters
Operating systems initiate certain procedures from certain key combinations. Some of these key combinations may be difficult to communicate to the guest OS, since there are three candidates who receives keyboard input: the host operating system, VirtualBox, or the guest operating system. Which of these three gets the keystrokes depends on a number of factors, including the combination itself.
Host operating systems reserve certain key combinations for themselves. For example, it is not possible to enter the combination Ctrl+Alt+Delete, if you want to reboot the guest operating system on your virtual machine, since this key combination is usually hardwired into the host OS (both Windows and Linux catch it) and pressing this key combination will reboot your host.
Additionally, on Linux and Solaris hosts that use the X Window System, the keyboard shortcut Ctrl+Alt+Backspace usually resets the X server (to reload the entire GUI). Since the X server intercepts this combination, clicking it will usually restart the graphical user interface your host (and kills everything running programs, including running VirtualBox).
Third, on Linux hosts that support virtual terminals, the combination Ctrl+Alt+Fx(Where Fx is one of function keys from F1 to F12) usually allows you to switch between virtual terminals. As in the case Ctrl+Alt+Delete, these combinations are intercepted by the host operating system and therefore always switch terminals on the host.
If you instead want to send these key combinations to the guest operating system in the virtual machine, you will need to use one of the following methods:
- Use the items in the virtual machine window menu " Enter» → « Keyboard" There you will find " Send Ctrl+Alt+Delete" And " Ctrl+Alt+Backspace"; however, the latter will only affect Linux or Solaris guest OSes.
- Click special combinations keys with key Khosta(usually the right key CTRL), which VirtualBox will then pass to the virtual machine:
- Button Host+Del to send Ctrl+Alt+Del(to reboot the guest);
- Button Host+Backspace to send Ctrl+Alt+Backspace(to restart GUI Linux or Solaris user);
- Button Host+F1(or other function keys) to simulate Ctrl+Alt+F1(or other function keys, i.e. for switching between virtual terminals in a Linux guest).
For some other key combinations such as Alt-Tab(to switch between open windows), VirtualBox allows you to configure: During focus on a virtual machine, whether these combinations will affect the host or the guest. This is a global setting for all virtual machines and can be found in the " File» → « Settings» → « Enter» → « Automatic keyboard capture».
Changing removable media
While the virtual machine is running, you can change removable media in the " Devices» virtual machine windows.
The settings are the same as for the virtual machine in the " Settings" of the main VirtualBox window, but because this dialog is disabled when the virtual machine is in " running" or " saved" condition, this additional menu makes it possible to work with removable media virtual machine at any time.
Therefore, in the menu " Devices» VirtualBox allows you to attach a host disk to a guest, or select a floppy disk, or DVD image using the Disk Image Manager, as described in the "" section.
Resizing your car window
You can resize the virtual machine window when it starts. In this case, one of three things will happen:
- If you have enabled scaling mode, the virtual machine screen will be scaled to fit the window. This can be useful if you have a lot of machines running and want to take a look at one of them while it's running background. Alternatively, this may be useful for making the window larger if the virtual machine's output screen is very small, for example because it is running an older operating system.
To enable zoom mode, click Host key+C or select " Screen scaling mode" in the menu " View" in the VM window. To exit zoom mode, press again Host key+C.
The aspect ratio of the guest's screen is maintained when the window is resized. To ignore aspect ratio, click Shift during resizing operation.
- If you have Guest Additions installed and they support automatic change size, Guest Additions will automatically adjust the screen resolution of the guest operating system. For example, if you are running a Windows guest with a resolution of 1024x768 pixels, and then resize the VM window to make it larger by 100 pixels, Guest Additions will change the resolution Windows screen up to 1124x768.
- Otherwise, if the window more screen virtual machine, the screen will be centered. If it is smaller, scroll bars will be added to the car window.
Saving machine state
When you press the " Close" of your virtual machine window (in the top right corner of the window, just like you close any other window on your system), VirtualBox asks you if you want to " Save machine state", "" or " Disable machine" (you can also use a keyboard shortcut for this action: press the " Host" together with " Q».)

The difference between these three parameters is critical. They mean:
- « Save machine state" With this option, VirtualBox “freezes” the virtual machine, saving its entire state on the local disk.
When you start the virtual machine again, you will find that the virtual machine continues from where it left off. All your programs will still be open and your computer will resume functioning. Thus, saving the state of a virtual machine is similar to pausing a laptop computer (for example, by closing its lid).
- « Send a shutdown signal" This will send an ACPI shutdown signal to the virtual machine, which will have the same effect as if you pressed the power button on the real computer. If the virtual machine is running a fairly modern operating system, this should trigger the proper mechanism to stop the virtual machine running.
- « Disable machine": With this option, VirtualBox also stops working with the virtual machine, but does not save its state.
Warning: This is equivalent to pulling the power plug on a real computer without shutting it down properly. If you start the machine again after turning it on, your operating system will have to reboot completely and may begin a lengthy check of its (virtual) system disks. Those. This should generally not be done as it may result in data loss or inconsistent guest disk state.
This shutdown option should be used in exceptional cases, it can be used to shut down a frozen virtual machine, or if you have Snapshots that you want to revert to and do not want to save new data written after the Snapshot was taken.
A similar function as the option “ Send a shutdown signal» executes in the menu « Car» option « Shut down", it has the same effect and everything said above applies to it.
A virtual machine is a program that allows you to work in an isolated operating system, without the risk of changing your main operating system in any way. This is a kind of “sandbox” in which you can do whatever you want.
For example, you have Windows 7 installed, but you need to run an application that only works on Windows XP. Installing two operating systems is not economical, since you need to buy another expensive license, clog up your hard drive, and in general it’s not the best idea. But you can run a virtual machine with Windows XP and work with it without any problems the necessary software. Some even try to break one like that physical computer several virtual ones, but it looks a little stupid; there are other, more adequate technologies.
What is a virtual machine for?
Let's list:
- Run other operating systems without installing them on your computer
- Testing programs that may contain viruses
- Testing viruses that you can embed into programs
- To emulate something. For example, other hardware devices (development of Java applications for phones)
- Testing and acquiring skills in creating/using a local network
I have listed the main tasks for which virtual machines can be used. You can adapt them to suit your needs, all you need is an idea and a little thought, and, of course, you need to know how to create a virtual machine.
Virtual machines for Windows
To create a sandbox on your computer/server, you can use one of the five most popular virtual machines: VirtualBox, QEMU, Parallels Desktop Microsoft Virtual PC and VMware Workstation. We will focus on VirtualBox, since it is not inferior to its competitors in performance and speed, and in some cases even surpasses them.
VirtualBox is a virtual environment that can emulate different operating systems and applications. It installs without problems on Windows, Linux or Mac OS. It was developed on January 15, 2007, changed developers 3 times, and is now being developed by Oracle. Distinctive feature – given environment can work with several operating systems simultaneously.
So, for example, you can run Windows and Linux on your Mac, or run Windows Server 2008 on Linux server. If you need to run Linux on your Windows computer, and so on, all together with your existing applications.
Installing a VirtualBox virtual machine
First, you need a Windows distribution. IN in this example I'm using XP, so I downloaded Windows XP Professional SP3 from latest updates. Download VirtualBox for Windows from the official website. Both 32 and 64-bit operating systems are supported. During installation, you will be asked to install drivers; in all dialog boxes, select “Install”.
We launch, the program window looks like this:
Click Create and select Windows XP.

We set the RAM to suit your needs. I only needed to run one application, so I chose 256 megabytes. Click "Next".

We create a virtual disk on which files for our virtual OS will be stored. Type – VDI (VisualBox Disk Image). Dynamic hard drive 10 GB.


So our virtual operating system has been created.
To install the OS from an image, we need to go to Settings/Media and do it as shown in the screenshot below:

Choose Windows image XP we downloaded:

In the same settings you can do shared folder, in which we will store files for work. In the settings, go to the Shared Folders section, click on the Add icon:

Now everything is ready to launch, exit the settings and double click click on the name of our created virtual machine and launch it. Once launched, the download will begin automatically.

Note: When the machine starts up, it may not see the shared folder and you will need to install an add-on. This can be done by selecting top menu Install/install guest OS additions:

Now you know how to install a virtual machine, and you can put this knowledge into practice. Good luck with your virtualizations, dear readers.
Learning to use VirtualBox is beneficial for everyone. Thanks to this service, you get virtual computers that you can run on your devices without having to buy new hardware. At its core, it's free. software for virtualization.
VirtualBox was created to solve many problems. Thanks to this functionality, you get the opportunity to create virtual computers out of thin air. They don't take up any space on your desk, but they work just like a real PC. They can be created and deleted with a few clicks.
What is VirtualBox? It is a free, open source, cross-platform application for creating, managing and running virtual machines (VMs) - computers whose hardware components are emulated by the host computer, or device, on which the program is running. VirtualBox can run on Windows, Mac OS X, Linux and Solaris.
Why is this necessary?
Using virtual machines can be extremely useful for a number of reasons. For example, you can run it to try software that you think might be dangerous, or you can try a different operating system without changing the way your computer is configured.
You can also use it for security purposes. For example, you can create a virtual machine just for online banking to make sure you don't become a victim spyware or Trojans obtaining your data.
How to install VirtualBox?
The easiest way to get the latest version of VirtualBox is to download it from the download page of the official website. There you can find suitable version for your platform or? If you use Linux, you can study the list of instructions for the various distributions of this OS.
For each version of Linux, you are given the option to download the "i386" or "amd64" option, 32-bit and 64-bit versions, respectively.
How to install VirtualBox? The process is similar to installing any other program on your platform, so you shouldn't have any problems. If you have any difficulties, you can always read the installation guide on the service's website.

Using VirtualBox
How to use VirtualBox? When you launch the application for the first time, you will be greeted by the VirtualBox Manager. Here you can create virtual machines, enable or disable them and configure access to the virtual hardware available to them, as well as make network settings.
Creating a virtual machine
In order to produce in VirtualBox setup network and get started, you will need to create a virtual machine. This is done as follows.
The first step to creating any virtual machine is to click the "Create" button in the top left corner of the VirtualBox Manager window - this is a big blue star, which is very difficult to miss.
This will launch the New Virtual Machine Wizard, which will walk us through the steps required to get it up and running.
Enter the name of the virtual computer. This name is completely up to you, but there are some nuances.
VirtualBox will try to figure out what OS you plan to run in the virtual machine based on what name you enter. If the name mentions "XP", it is assumed that you will be installing Windows XP and configuring it accordingly. However, you can come up with random name. You will then have the option to manually select your OS type from the drop-down lists below. When you do this, click Continue to move on to the next step. This example looks at Windows for VirtualBox. Below are instructions for installing this OS as a guest OS and then setting up a network connection.

Selecting RAM
To install the guest OS after launch VirtualBox, you will be asked to select the amount of RAM you want to place in the virtual machine. The more volume you give it, the better app will work, but keep in mind that the memory allocated to the virtual machine cannot be used by the host OS (i.e. the machine on which VirtualBox is installed).
So how much RAM should you allocate to a VM? This depends on a number of factors. If you plan to only use the virtual machine while it's running, you can afford to give it more RAM because you won't be asking the host system to multitask. If, on the other hand, you will be using it while running many other functions on the host OS, you should better calculate this value. good general rule is to allocate half of your computer's RAM. So, if your PC has 4GB RAM, give 2GB to the VM, leaving the host with the rest. If you select this value with a blunder, you will encounter the fact that VirtualBox does not start.
Storage space
The next step is to create a “virtual hard disk” (VHD). This creates a file on your HDD that can be used by VirtualBox to act as a separate hard drive. This allows you to install the operating system without worrying about your existing data being affected.
Make sure Boot Hard Disk and "Create" are selected. new hard disk", then click "Continue". This will launch "Create new master virtual disk" Click Continue again to complete the action.

You'll then be asked whether you want to create a "dynamically expanding" or fixed-size disk. Each has its own advantages. The great thing about a dynamic disk is that it only takes up as much space as the data it contains. It is also much faster to create than a fixed one of any significant size.
However, you need to keep an eye on this because his flexibility can also be his negative trait. So you create a dynamic disk and assign 50 GB to it and then put about 20 GB of data on it. Its file will appear as holding only 20 GB of hard drive space, according to your host OS. Therefore, you can take this place with other data and not notice it.
The point is that if you start a virtual machine and try to add more data to the dynamic disk, you will have problems - the virtual disk says it still has 30 GB, but in fact it may no longer have it.
This is also the advantage of a fixed-size disk. Sure, it's inconvenient when you're trying to figure out how much space you'll need, but then you won't have to worry about it anymore.
This example shows dynamic disks, but fixed ones will work just as well. Make sure Dynamically Expanding Storage is selected, then click Continue again. Next, you will be asked to select a name, location, and size for the new VHD. For most uses, you won't need to change the name or location, but you can do so by clicking on the folder icon next to the text field.

The size you should specify depends on how much material you plan to use. If you just want to use it to run a few programs, the suggested size of 10 GB should be sufficient. Make sure the settings are correct, then click Continue and Finish.
At this point, you just need to check everything and make sure that all the settings are set as you expect. Then you just need to click "Finish" and the virtual machine will be created so you can install Windows.
Booting a Guest OS in VirtualBox
How to continue using the service? Now it's time to run the virtual machine for the first time. Make sure the new virtual PC you just created is selected in the VirtualBox Manager window, then click the Start button at the top of the window. When the service starts, you will be greeted with a First Run Wizard window that will help you prepare to install Windows XP. Click Continue. It will then ask you whether you want to use a CD or an image on your hard drive (usually an .iso file) as your installation media. Once you've selected your option, click Continue, then Finish.
If you were unable to open the virtual VirtualBox machine After the above settings, you probably have allocated space for RAM or HDD incorrectly. If rebooting does not solve the problem, repeat the previous steps again.
Since there is nothing installed on the virtual hard disk, the program will automatically load Windows installations. It will take some time to download all the necessary OS files, but eventually you will see a screen showing a list of existing sections and unallocated space on your computer.
After this you should configure XP, so press Enter. You will be asked how you want to format the drive. You need to select the option “Format partition using file system NTFS (Quick)". Make sure you select the "Fast" option or you will be waiting for a very long time!
Windows Setup will then format the VHD and then begin copying files to the drive. Your participation in this process is not required. Once the files are copied, Windows Setup will automatically restart your computer to move on to the next step.
When the PC reboots, it will try to boot from the CD using the "Press any key to boot from CD..." window. Ignore it! If you do this, you will repeat the previous step again for no reason.
You can prevent this system issue by right-clicking the CD icon at the bottom of the virtual machine window and clicking "Remove disk from virtual disk." Once this window closes, you will see the familiar screen Windows boot XP before it switches to the second stage of installation.
Once the “Windows XP Setup Wizard” is displayed, click “Next” to begin it. You'll first be asked to set your regional and language settings, which basically involve clicking "Customize..." (to select your country) and then "Details" if you need to change your keyboard layout.
Once everything is selected, click Next again. After this, you will need to enter your computer name and administrator password. It's better to choose a name that has some meaning instead of a random string of automatically generated characters. How complex you want to make the administrator password depends on how important the security of the virtual machine is.
After clicking Next, you will see the date and time settings, which you do not need to change. When you click this button again, the window will disappear for a while, Windows will apply all the settings and continue with the installation. You can now use Guest Additions in VirtualBox.
After a minute or two another window will appear, this time for network settings. It is more convenient to choose the first option (a network that does not have a domain). This requires entering the workgroup name - Rward by default, and all default values. However, you may need to select "Direct3D Support" when asked to identify components.
How to work with the network?
Networking in VirtualBox is extremely powerful, but setting it up can be a little tricky. To understand this, you need to consider various ways VirtualBox network settings with a few pointers to what configurations should be used and when.
Oracle VM VirtualBox 5.1 allows you to configure up to 8 virtual network adapters(controllers network interface) for each guest virtual device(although there are only 4 in the GUI).

Main modes:
- Broadcast network addresses(NAT).
- Bridge networks.
- Internal network.
- The network is for hosting only.
- NAT with port forwarding.
Oracle VirtualBox offers them as based on the guest OS type you specify when creating the virtual machine, and you rarely need to modify them. But choosing a network mode depends on how you want to use the device (client or server) and whether you want other computers on your network to see it. So, you should look at each VirtualBox network configuration mode in a little more detail.
Network Address Translation (NAT)
This is the default mode for new virtual machines and works fine in most situations where the guest OS is a "client" type (i.e. most network connections are outgoing). Here's how it works.
When the guest OS boots, it typically uses DHCP to obtain an IP address. Oracle VirtualBox will send this DHCP request and inform the operating system of the assigned IP address and gateway address for routing outgoing connections. In this mode, each virtual machine is assigned the same IP address (10.0.2.15) because each one considers itself to be on its own isolated network. And when they send their traffic through the gateway (10.0.2.2), VirtualBox rewrites the packets so that they appear as if they came from the host, and not from the "guest" (running inside the host).
This means that the guest OS will work even if the host moves from network to network (such as a laptop moving between locations), from wireless to wired connections.
However, how does another computer initiate a connection with it? For example, you need to connect to a web server running on a guest computer. This is not possible (usually) using NAT mode because there is no route to the guest OS. So for running virtual machine servers you need a different network mode and a different VirtualBox network setup.
NAT connection (network characteristics):
- Guest OSs are on their own private network.
- VirtualBox acts as a DHCP server.
- VirtualBox's NAT mechanism translates addresses.
- Destination servers display traffic originating from the VirtualBox host.
- No configuration is required for the host or guest OS.
- Works great when the "guests" are clients but not servers.
Bridged networks
Bridged Networking is used in cases where you want your virtual machine to be a full member of the network, that is, equal to your host device. In this mode, the virtual network adapter is "connected" to the physical one on your host.
This is because each virtual machine has access to physical network just like your host. It can access any service on the network - external DHCP services, name lookup services and routing data, and so on.
The downside to this mode is that if you run a lot of virtual machines, you can quickly run out of IP addresses or your network administrator will be overwhelmed with requests for them. Second, if your host has multiple physical network adapters (such as wireless and wired), you must reconfigure the bridge if it reconnects on the network.
What if you want to run servers in a virtual machine, but don't want to involve a network administrator? Maybe one of the following two modes will work for you, or maybe you need a combination additional parameters, for example NAT vNIC + 1 Host-only vNIC.

Bridged network characteristics:
- VirtualBox bridges are for the host network;
- good for any guest OS (both client and server);
- use IP addresses;
- may include guest configuration;
- Best suited for production environments.
Internal network
When you configure one or more virtual machines to run on an internal network, VirtualBox ensures that all traffic on that network remains within the host and is only accessible to the device on that virtual network.
The internal network is a completely isolated system. It is good for testing. In it, using a virtual machine, you can create complex internal networks that provide their own services (for example, Active Directory, DHCP, etc.). Note that even the host is not an element.
This mode allows the virtual machine to run even if the host is not connected to the network (for example, on a plane). However, with this type of connection and network setup, VirtualBox does not provide such “convenient” services as DHCP, so your device must be statically configured or provide the DHCP/Name service.
Installation of several internal networks is allowed. You can configure virtual machines to allow multiple network adapters to reside in internal and other network modes, and thereby provide routes if necessary. But all this looks complicated and inaccessible to a non-specialist.
What if you want the internal network to accept the VirtualBox host while providing IP addresses to the guest OS? To do this, you may need to configure a host-only network.
Internal network characteristics:
- guest operating systems can see other “guests” on the same internal network;
- the host cannot see the internal configuration;
- network configuration required;
- even if the host is not a party to the connection, the internal network can be used in conjunction with a bridged connection;
- well suited for multi-user networks.
Hosting only network
Works almost the same as an Internal Networking connection, where you specify which network the guest server is on. All virtual machines located on this network will see each other and the host. However, others external devices cannot see "guests" on this network, hence the name "host only".
It is very similar to an internal network, but the host can now provide DHCP services. To set up such a connection, go to VirtualBox Manager and select the default settings.
Network characteristics:
- VirtualBox creates a private internal network for the guest OS and the host sees the new NIC software.
- VirtualBox provides a DHCP server.
- Guest operating systems cannot access the external network.
NAT with port forwarding
Now you can imagine that you have learned enough modes to handle every case, but there are exceptions. What if your development environment is on a laptop, for example, and you have one or more virtual machines that need other computers to connect to? And you are constantly forced to use different client networks.
In this scenario NAT will not work because external machines must be connected as a bridge. It's possible good option, but you may need IP addresses. Additionally, software may not always be able to cope with changing networks.
If you use an internal network, you may find that your virtual machines need to be visible on the network. What to do in such cases?
Configure the virtual machine to use a NAT network, add port forwarding rules, and external computers connect to "host". The port number and connection will be forwarded by VirtualBox to the guest OS number.
For example, if your virtual machine runs a web server on port 80, you can configure the above rules. It provides a mobile demo system that does not need re-tuning every time you connect your laptop to a different LAN/Network.
Ultimately VirtualBox has a very powerful set options, allowing you to customize almost any configuration you might need. To choose the option you need, read the VirtualBox instructions on the official website.
VirtualBox free program, allowing you to run an operating system inside another, through virtualization. For example, by installing this program on Windows 10, you can run others in it Windows versions, Linux, Android and others. It works like this:
The program reserves part of your PC's resources (Processor, RAM, video memory, OS storage space) for operating the operating system.
Installing VirtualBox
First you need where you can find latest versions programs for different OS. I'll download the Windows version.
There are no difficulties in installation, everything is as in regular programs. It is not recommended to change the installed components.


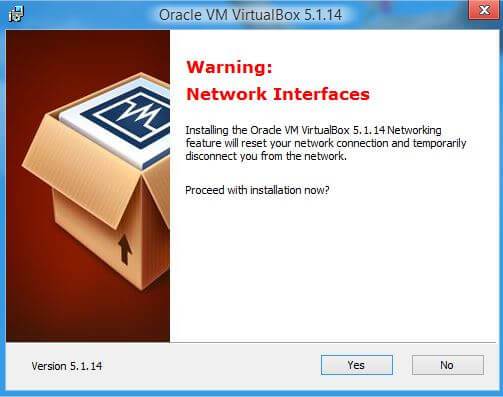
If you wish, you can uncheck some of the checkboxes, but I recommend leaving the second and fourth ones. Next, you will receive a warning that network connection the Internet will be interrupted to install the virtual driver, we agree. Click “Yes”.
Then click “Install”.

The installation process will begin, where you will be presented with offers to install the driver; for all such offers, click “Install”.


This completes the VirtualBox installation process. Click “Finish”.
Creating a virtual machine on VirtualBox
There should be no difficulties in creating a virtual machine. Launch the program and click the “Create” button.

In the next window you will need to specify the name and type of OS you will install.
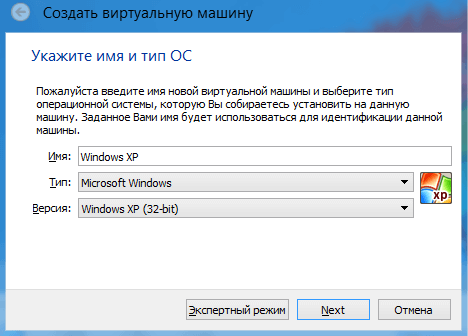
Next, we determine the size of RAM allocated to the virtual machine. For Windows XP I will allocate 512MB of RAM. It all depends on the amount of memory you have installed. If there is enough, then much more can be allocated.

In the next window you are asked to select the location and size where the OS will be installed. Since this is the first time we are setting up a virtual machine, we need to select “Create a new virtual hard disk”. Click “Create”.

In the next window you need to select the disk type, fixed or dynamic. It depends on your preferences, I will choose fixed.

Select how many GB of memory you want to allocate for installing the OS and its programs. I'll allocate 5GB. And also the place where the created disk will be stored, choose where there is free memory. Click “Create”.

The process of creating a virtual disk will begin.

This completes the creation, and you will see that you will have a virtual machine with the name that you gave it earlier, for me it is Windows XP.

Addition:
If you click on the “Customize” button, you will see sections in which you can configure the machine’s properties in more detail.

For example, how many cores do you want to give and their load limit. And in the “Display” section you can increase the amount of video memory for the video card.
Installing the operating system on VirtualBox
To start the installation, click on the green button (arrow) “Run”. A window will appear asking you to select the path to the installation disk image.

Specify the path to the pre-downloaded OS image.

Click “Open”. After this, click “Continue”. It will go as usual for everyone, normal installation OS. You will also need to create one or more local disks. When the installation is complete you will need to remove it. installation image. To do this, click on the “Devices” tab,
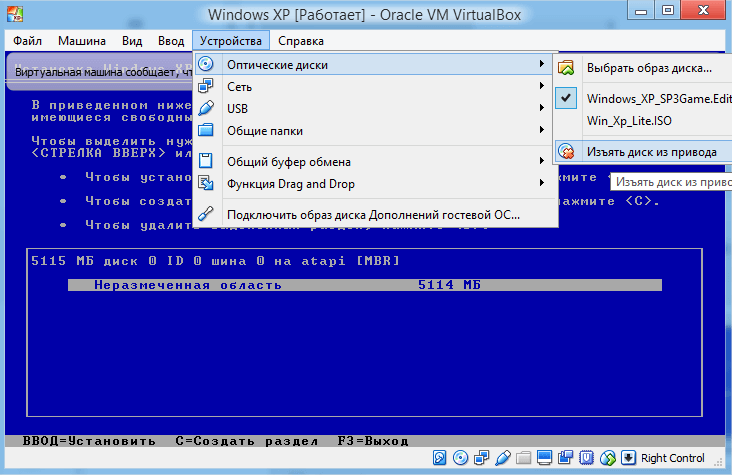
select the sub-item “ Optical discs" and click there "Remove disk from drive" and reboot the newly created OS. That's all for now, good luck.