Hidden settings of Android 6. Secrets of Android (Android): All hidden features and functions
Most of us feel insecure when we have to get acquainted with a new operating system. And despite the fact that Android today can be found on the vast majority of electronic devices, there are still many users who are not familiar with it.
Users never use many system features
If you are one of these people, we will provide you with the most important information on how to understand the system, introduce you to it. In general, here is a kind of instruction called “Android for Dummies”, which contains all the current tips on working with the platform.
Turn on the device, log into your account and establish a connection to the Internet
Following the instructions, we turn on our smartphone or tablet, after which the system desktop will appear in front of you, or, if the device is turned on for the first time, the wizard will start initial setup. For example, on a smartphone the wizard suggests doing the following:


What is the system interface?
After setting up your smartphone or device, even if you did not go through the wizard, you will see the desktop of your gadget.

What is he? You will be offered the following symbols and icons:


It is worth noting that on tablets with Android, the bottom line opens quick menu, where you can turn on Wi-Fi, find out about battery charge, etc. important information- to open it, simply make an upward movement in the clock area. In smartphones running this system, to open the notification menu, you need to swipe your finger across the entire screen from top to bottom.

We've looked at what the desktop looks like, now let's move on to the main Android menu.
It is made in the form of a general list with icons and program names, or in the form of several desktops with the same lists of applications - there is nothing difficult in viewing them. In the general menu you will find all the elements of your device; there are also settings for your smartphone or tablet.
Using the Internet on Android
If you have already established an Internet connection, it's time to learn how to use the browser. If Wi-Fi is turned off, you can activate it in the mentioned notification menu or through the settings that you will find in the menu. After you open the section, activate Wi-Fi work, then the device will automatically search for networks. The only thing left to do is select a network from the list, enter a password if necessary and click “Connect”.
How to access the Internet on Android?
To do this, follow these instructions:
- Select the browser installed on your smartphone or tablet and open it.
- Then you can use the browser in the same way as on a computer - you will have a line for entering an address, the ability to add tabs, and additional icons hide menus for adding bookmarks, viewing page history, etc.

In general, there is nothing difficult about working with a browser on a tablet or smartphone - if you don't know some functions or icons, just try them.
We missed only one point - to enter the site address, you need a keyboard.
How to use the keyboard?
The keyboard will automatically open whenever you click on the line where you enter this or that text or message. Therefore, launching it is a simple matter, and if you need to remove the input tool, just click “Back”.
Here's what you need to know about using the keyboard:

How to add other languages to the keyboard?
This is done in the settings, where there is a menu dedicated to input means - in it you can add languages, turn on or off dictionaries, and perform other keyboard settings.

On tablets, input means settings are available on the bottom line, next to the clock - the corresponding symbol in the form of dots appears every time you turn on the keyboard, so you don’t even have to go into the menu and search for the desired section in the settings.
How to use Google Play Market?
This service is an application where you will find thousands of various programs for your Android device. As a rule, Play Market is by default in the menu of your tablet or smartphone; to use it you need account Google - If you haven't signed in before, you will do so the first time you launch the store.
So, how to use this miracle? Everything is very simple - choose the application you like or find it through the search bar, click “Install”, and then the equipment will handle everything on its own.

If you need to delete a program or transfer it to a memory card, the latter is necessary when there is little space on the device itself, and you can do this in the settings. A separate section contains all the applications installed on your gadget.
File manager and how to watch movies and listen to music on Android
To view multimedia files there is separate application called Gallery or Media Storage, which you will find in the main menu. There is nothing complicated in using it; photos and videos located in the device’s memory or on the card are distributed into the created folders.
If you need audio files, books and a general list of files on the device, there is a file manager, which on the Android system is called Explorer.

By the way, when viewing photos, you can immediately install them on your desktop, or as a contact image from phone book. In general, customizing the background, widgets and other aesthetic components is a large and separate topic.
How to set a ringtone?
If you use an Android smartphone, you probably want to hear your favorite ringtone. This is done through the settings - go to the Sound menu, click on the Ringtone line, where you can select required file. As you can see, in this menu you can completely edit your call settings. You can also set the melody you like in the player while listening to music - you will find the corresponding function in the menu.

Thanks to this brief instructions on Android you learned minimum set the most important sections and system settings that will allow you to start using your smartphone or tablet confidently. The main thing is don’t be afraid to try and find out what you haven’t seen before. In general, using this platform will probably be simple and understandable for you, because everything in it is thought out logically and consistently.
If the search giant Google was quite delayed with the launch of Lollipop for Nexus, Android 6.0 Marshmallow began to fly away on time. Already, some smartphones and tablets are receiving the coveted updates and introducing users to a number of useful changes, one part of which is aimed at internal changes to the system, and the other at external ones. We will now talk about all the significant innovations discovered in “Zefirka”.
Without lengthy introductions and lyrics about the main accents of the “six,” let’s get straight to the point. The first thing users will see after installing Marshmallow is a new system boot animation demonstrating the formation of the word Android.
Lock screen
Next we go to the lock screen, which will surprise you with a new font, which is also used in the case of several widgets for the desktop. He fits perfectly into the overall visual style system and does not look like something from a completely different opera.


One icon has also changed quick launch: on the left there is now a microphone instead of the “Dialer” Google Now for voice requests, but the Camera remains on the right. In Lollipop they were activated by swiping right or left, but here you need to swipe from the corner of each icon, which is less convenient.


If the search engine on the left does not suit you, there is an opportunity to return the usual “Dialer”, to do this you need to go to application settings, select default applications, go to “Assistant and voice input" and change the Assistant value to "no". However, it is worth understanding that choosing “Dialer” completely disables Google Now.


Among the new functions, it is also worth noting the ability to leave some kind of arbitrary inscription, which is set in the Security settings item. It may well serve as a reminder or warning.
Application menu and widgets
All installed applications are now displayed in a vertical list, sorted alphabetically. You can quickly find the game or program you need through the search bar at the top or, for example, by holding down the scroll slider - pull it down, and it will show all the letters involved. The 4 most frequently used apps are also displayed at the top of the list.


By the way, this type of menu became available to some Nexus users back on Lollipop; all they had to do was update the Google application. This also applies to widgets, also sorted in alphabetical order. Some new elements have appeared among them, for example, audio search on Google Play- analogue of Shazam. Just bring it to your desktop and click to listen and determine the composition.
Curtain and volume
An activator has finally appeared in the standard quick launch icon curtain silent mode « Do not disturb", which can be turned on certain time or indefinitely, until shutdown. At the same time, a profile of complete silence or with exceptions for alarms and important reminders/notifications/calls is available.


(left - Android 5.1, right - Android 6.0)
The set of quick launch icons can be customized using System UI Tuner, which we wrote about in. The same function, by the way, allows you to select the icons displayed in the status bar and enable a display of the battery charge level in percentage. The last option is not particularly clear.


"Dialer"
The application for making calls has changed slightly in appearance, but its main change is the option to send an SMS message, which is displayed when dialing a number. Its appearance seems quite logical and natural.


Now on Tap
This feature is one of the main functional innovations of Android 6.0. It is a system of contextual automatic search information based on screen content. That is, in essence, predicts possible search queries by some elements displayed in at the moment on the display.


Kinopoisk Twitter and Now on Tap results
For example, when listening to a musical composition in the Now on Tap player, it will offer you to buy it on Google Music, show information on the artist or album, send you to the artist’s official website, or show latest news. Similarly, with text data in letters or tweets about some films, flights, holiday events, and so on - almost everything that may additionally interest the user is taken into account.


watching the actors of the film "Pan" and going to the Radiohead YouTube channel
Launch of Now on Tap carried out by long pressing the “Home” button However, for now, owners of devices with Android 6.0 will have to change the system interface to English to demonstrate the capabilities of the function - Russian is simply not supported yet. Let's hope it doesn't last long.
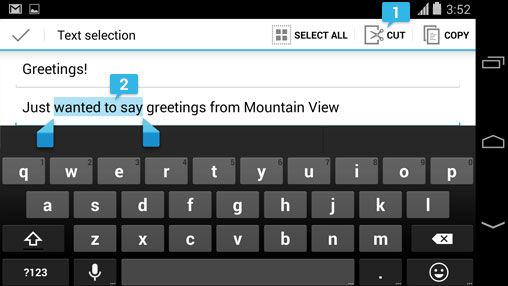
Working with text
Also worthy of attention is the so-called smart text selection, which significantly simplifies copying, sharing, translation or web search for selected words - all these actions are immediately displayed in context menu when highlighting words or entire applications.


(left - Android 5.1, right - Android 6.0)
Settings: Applications
In the settings item “Applications” appeared ability to set access rights specific applications to SMS messages, calendar, contacts, camera, microphone and so on. To enable or disable it, just move the switch to the desired position.


A link graph immediately appeared in the settings, demonstrating applications that open certain links from a browser, Twitter, mail, or, for example, a simple SMS message. Available to choose from automatic start or request confirmation.


Here you can also set default applications, allow or deny access to certain tools. system settings or get acquainted with those tools that do not save the device’s battery power. By default it is only Google Services Play.
Settings: Storage and USB Drives/Memory
This settings item, as before, demonstrates what and how much memory is occupied. The design of the section has changed slightly, but the essence is the same - the total size of images, videos, audio, applications and other things is calculated.


New in the settings is the “Memory” column, which includes data on RAM usage. The average amount of RAM used for a specific period of time (3, 6, 12 hours or 1 day), the available memory size and the number of active applications are displayed.
Settings: Battery
The design of the battery usage section has changed slightly, and the data on the gluttony of a particular application has become more detailed. Plus, the previously mentioned charge saving point, which displays apps and tools that go into standby mode under certain conditions to reduce power consumption.


Settings: Backup and reset
The data backup option that appears here will allow you to store it on Google servers content from applications, access point passwords and other settings. This whole thing works only partially so far, since much depends on the program developers themselves, who must ensure the functioning of such a backup.


The option to reset everything immediately became available network settings, this applies to mobile networks, Bluetooth, and Wi-Fi.
Wallpapers and animation
In Android 6.0 Marshmallow, many animation effects have changed, including when opening/closing applications, minimizing windows, various swipes, displaying curtains and much more. And, of course, we can’t help but highlight the set of new wallpapers in the Material Design style.


Easter egg
The role of an Easter egg, launched by the same taps according to the system version in the settings, was a mini-game a la Flappy Bird. You will have to control a small red android, and the obstacles will be marshmallows on sticks. By the way, this arcade game turned out to be not much simpler than the original from the Vietnamese developer.


Overall, Android 6.0, tested on the Nexus 5, leaves a pleasant impression. The system began to work a little faster, and the animation seemed smoother. Pre-installed applications less - the same Google settings added to the list general settings, which looks quite logical even from a search point of view.
Regarding autonomy, there are also positive changes - the total operating time in mixed mode of use has increased by 15 percent - a trifle, but nice. In standby mode, charge savings are significantly better only when communications are turned off - overnight, for example, the battery drains by only 1-2 percent. If Wi-Fi and mobile transmission leave data active, charge losses increase significantly - the work of the vaunted energy saving technology is practically not felt.

In addition to autonomy, the Camera application, which simply remained the same, did not live up to expectations in Marshmallow, although it was assumed that with the system update it would also be updated. However, this may be a matter of time, because for Nexus 5X and 6P latest version already available.
Operating room today Android system is gaining more and more popularity, but not everyone knows that there are some Android secrets. This refers to those functions that the average user does not know about; they are not described in the instructions and are extremely difficult to find even on the Internet.
In fact, it is impossible to study absolutely all the capabilities of this operating system, so much remains beyond the attention of the user community. And some interesting features are not known even to the developers themselves, because they were created on their own, as a result of some other actions. In general, today we will look at the most popular, necessary and interesting functions of the Android operating system.
Increasing battery life
Many people know that to increase battery life you need to turn off everything possible functions, programs and services. This really works, but practice shows that there is another very interesting method saving energy. It is connected to WiFi. It is known that connecting to the Internet requires a lot of energy.
But if you put WiFi in sleep mode, you will need much less of it. The working principle of this method is unclear. In theory, everything should be the other way around - if WiFi goes into sleep mode, then less battery power will be consumed. But in practice everything is different and by some miracle it is the sleep mode that consumes many times more battery power.
It is interesting that on some sites they write exactly the opposite. So on the Internet you can find information that you need to turn on sleep mode and then less energy will be consumed. But in Android 6.0 and above, the sleep menu clearly states that enabling sleep mode will result in increased power consumption. In the case of the above sites, most likely there were unscrupulous authors.
To enable sleep mode, you must do the following:
- Log in to WiFi. That is, just hold down the corresponding icon in the menu that appears when you swipe from above. You can also go to settings and open the “WiFi” item there.
- Next, you need to click on “Options” in the upper right corner of the open window.

- After this, a menu will appear in which you should select “WiFi in sleep mode.”

- In the window that appears, check the box next to “Never”.

Actually, the window shown in Figure 3 shows that turning on sleep mode will lead to an increase in energy consumption.
Important: This instruction shown for Android 6.0.1. In older versions you need to go to settings, then “ Wireless connections...", "WiFi", then find additional features and already there select the “WiFi in sleep mode” item and in exactly the same way check the “Never” option.
There are a number of other tips that, as practice shows, help to significantly save battery power. They look like this:
- Just turn off WiFi. To do this, swipe from top to bottom and click on the WiFi icon in the drop-down menu. After this, it will become inactive, like other shortcuts in this menu.
- Turn off your mobile network too. If it is 3G, then even if the user is not on the Internet at the moment and is not downloading anything, energy is still consumed to search for the signal source. In principle, the same situation applies to WiFi. For this purpose in top menu There is also a corresponding shortcut.
- Turn off GPS (in the top menu this item may be called “Geodata”). The fact is that the device tries to connect with satellites to determine its location, and this requires a lot of energy.
- Turn off the accelerometer, that is, auto-rotate the screen. There is also an item for this in the menu above. The fact is that this is a full-fledged sensor that constantly needs energy to do its job. If you can adapt to the fact that the screen will not rotate when you rotate the entire device, feel free to disable auto-rotate. For some, this option, by the way, is even more suitable.
- If your device is not medium IPS screen, A good AMOLED or even a SuperAMOLED display, put not bright wallpaper, preferably in dark colors. Then the screen will need less energy to display the splash screen. You can even put a different theme for guarantee.
- If you are in an area where the signal is very weak, switch to airplane mode or even switch to power saving mode, in which the smartphone becomes an old Nokia 3310, only with large display. The point is that the search GSM networks it also requires a lot of energy, and if the signal is weak, the device will work even more “hard” to ensure an acceptable level of reception. From time to time you can go to full mode and send everyone messages that everything is fine with you.
Advanced Volume Up Menu
In general, Android has more than one hidden menu, but really few users know about advanced sound settings. In fact, this operating system allows you to separately set the volume level for calls, for media files, that is, movies, music, etc., for notifications and for system sounds. In Figure 4 you can see what the extended volume control menu looks like in one of the latest versions OS.

And to get to it, you need to go to settings, select “Sound and vibration” and click on “Volume” in the menu that opens.
Forced reboot
There are situations when your smartphone or tablet needs to be rebooted urgently. This happens when the device freezes and all the buttons simply stop working. This may be to blame incorrect operation systems (in common parlance, glitches) or viruses. Anyway there are some hidden possibilities in forced mode, send the device to reboot.
They differ depending on the model, but in total there are two options:
- You must simultaneously press the power button and the volume down button and hold them together for 10 seconds.
- In some cases, you need to press the Volume Up button and the Home button together with the Power button. After this, you also need to hold these buttons for 10 seconds.
The power button is the one that turns on your phone or tablet. In most cases it is located on the top or side. For example, in phones Samsung it can always be found on the side. On the other side there are volume up and down buttons.

The above combinations are relevant for most modern devices on the Android platform. It very rarely happens that on phones and tablets for forced reboot other combinations are intended. In any case, there are not many buttons on the body and through trial and error you can find the desired combination.
Quickly launch Google with voice typing
Few people know that from any menu you can launch the Google search engine with one click of a button. This is done by long pressing the Home button. On most modern smartphones it is the only one on the front side of the case, so it is simply impossible to confuse it. In this search engine, the “OK Google” service immediately works, that is, voice dialing search queries. The search window is shown in Figure 6.

You can take a screenshot without additional programs
Interesting “tricks” of the Android OS are related to how to take a screenshot. Typically, this requires downloading additional programs, like Screenshot Easy. In fact, the operating system itself allows you to take screenshots. For this there is also special combinations buttons that are on the case. Depending on the device model, different combinations may work. But one of the ones listed below will definitely work on your phone or tablet.
- You need to press the power button and volume down button at the same time. Only in this case you don’t need to hold them for 10 seconds. If it doesn’t work and the screenshot is not saved, then your device has another combination for this.
- Long press the Home button.
- Long press the recent programs button. This method only works on devices with Android version less than 3.2.
- Pressing the Home button and the Power button at the same time.
These combinations work, in most cases, after a short press. Sometimes you will need to hold them. But you should never hold the above keys for 10 seconds. We are talking about this because in some cases the user may accidentally discover the hidden combination of forced reboots discussed above and, accordingly, send the device to reboot.
It is also worth saying that in some cases, button combinations for taking a screenshot are indicated in the instructions for the device. But this happens very rarely, so you just have to try different combinations of buttons.
Interestingly, in some versions of Android firmware you can display the “Screenshot” shortcut in the main menu. After that, you just need to click on it to take a screenshot. We are talking about firmware such as AOKP, SlimROM and GyanogenMod.
Special codes
Now let's move on to real hacking and what is inaccessible ordinary user. In fact, Android has hidden features that are revealed only after entering a special code. There is a whole set of such codes that cannot be found out in any instructions or posts. To dial them, you just need to go into your phone, press the keypad and enter the desired code as if it were some kind of regular number phone.
Here is this set of special codes:
- *#06# - display the IMEI number, that is, unique identification number Your device, by which it can be found if lost or stolen;
- *#*#4636#*#* - open full information about the device (if in the settings you can see only the most basic things, then this window will display all system information, data about memory, built-in programs, battery and much more);
- *#*#34971539#*#* - open full information about the camera installed on your phone or tablet, including information about the firmware version, as well as firmware updates;
- *#*#8351#*#* - launching a program that begins recording what the microphone perceives during the last 20 phone calls (this is not a recording of telephone conversations, but only a recording of your own voice) and writes all this into the phone’s memory along with a list of dialed numbers;
- *#*#7780#*#* - reset all settings related to the phone itself, Google account, various applications and the applications themselves are deleted (this code does not delete data from memory cards and system applications, but it captures everything else);
- *2767*3855# - full reset everything that can be reset (after executing this code, there will be absolutely no information on the device, no files, nothing at all);
- *#*#7594#*#* - changing the operating mode of the device's on and off button (you can make sure that when you press it, a menu with a choice of one of three options does not appear, but the device immediately turns off, goes into airplane mode, or switches to silent mode).
It is very important to think a lot before running one of these codes. All the features of Android devices described above cannot be rolled back. The only way to get everything back is to simply turn off the phone or tablet while performing a given task by removing the battery from it.
After this you will need to restore the system. To do this you need to use special programs, which are available in abundance on the Internet.
Disabling standard applications
Few people know that all pre-installed services from Google and other programs that are initially on the device can be turned off. The fact is that it is impossible to remove them, but sometimes you want to turn off some notifications or get rid of a program that is not working properly. So, to disable any standard application, you need to do the following:
- Go to settings and select “Applications” there.

- Open "Application Manager" there.

- Now you need to click on some system application. For example, let's choose Google Drive or simply "Disk". Click on it and get to the menu where there are two buttons - “Stop” and “Turn off”. Click on the second one and turn off this program.

For other programs, this menu will have a “Delete” button. But such a hidden menu is only available for system applications. By the way, it is much more convenient to remove programs through additional programs like Clean Master and similar ones. But, as we said above, it does not work with system applications, like all other similar utilities.
Developer Menu
There are a number of features that are only available in the developer menu. These features include creating an error report, setting a backup password, viewing all running services, enabling and disabling USB debugging, setting a log buffer, and many other interesting features.
There you can even set the buffer size for the system event log, display a detailed log of WiFi connections with SSID and RSSI networks, select the USB configuration and enable OpenGL tracing! In general, a very powerful toolkit. And to access it, you need to go to settings, click “About device”, go to “Software information” and click on the build number 7 times.

After this, the “Developer Options” item will appear in the settings menu. It will no longer be possible to remove it somehow, although in the parameters window there is a switch next to the words “Enabled”.
In the video below you can see how the above codes are clearly used.
In four years, Android has transformed from a small but ambitious project into perhaps the most complex and feature-packed mobile OS of our time. Android supports a huge number of technologies and functions, many of which are hidden from the user or hidden in places you wouldn't even think to look at. This article is a collection of tips and tricks that can be applied to any Android device without the need to root it.
01. DISABLE THE AUTOMATIC CREATION OF ICONS ON THE DESKTOP
I think I’m not the only one who is annoyed by the way the market behaves when installing an application. For some reason he thinks that for any more or less software or the next game I definitely need an icon on the desktop, and he successfully creates it. And I have to delete it. And then another one. And so every time.
Fortunately, this behavior is easy to disable - just open the Google Play settings (in the left panel) and uncheck the “Add icons” checkbox. There you can also disable the forced password request every 30 minutes when purchasing applications, as well as the hated auto-update of applications.
02. DISABLE GOOGLE SEARCH AND OTHER USELESS SOFTWARE
The standard firmware of Android smartphones includes a huge amount of useless software, ranging from a bunch Google applications(do you know that Google requires manufacturing companies to include almost all the software it develops in the firmware of their devices?) and ending with all sorts of junk from the smartphone manufacturer. All of this (or at least most) can be disabled.
Go to “Settings → Applications → All”, tap on the desired software and click “Disable” (of course, you will be warned how “dangerous” this is). By the way, when you disable Google search, Google Now will disappear, as well as the search bar from the desktop (after a reboot), in its place there will be an empty area.
03. RESET TO SAFE MODE
Few people know, but Android, like many other operating systems, has a so-called Safe mode. This is a mode in which the operating system boots with third-party applications disabled. Not very skillfully written malware (one that is not registered in system partition) in this case falls off, like any software that interferes normal operation systems. Safe mode can be used to bypass screen blockers, applications that cause the smartphone to freeze, or, alternatively, to identify who is actually eating up the battery - the next firmware or software update.
The mode is turned on quite simply, but not at all in an obvious way: by holding down the power button and then holding your finger on the “Power off” item. After rebooting, the culprit of the problem can be removed through “Settings → Applications”.
04. GET RID OF INSTRUCTIVE NOTIFICATIONS
“The construction of the castle is finished!” - how did you get these notifications? Everyone who is not too lazy is trying to notify me about all possible and impossible events: “Vasya Dzhubga replied to you on Twitter,” “You have 100,500 new messages,” “You won surgery to enlarge your right leg.” You swipe away one notification, and three new ones appear in its place.
How to get rid of all this slag: hold your finger on the notification for a long time and uncheck the “Stop” button. This is the recipe for KitKat. In Lollipop, everything is a little different, but the essence is the same: hold down, then the i button, and in the window that opens, check the “Block” box. There you can also force the notification to be a priority so that it is always at the very top.
05. DON'T FORGET ABOUT THE SERVICE MENU
Another not at all obvious function is service menu. It can be opened by dialing *#*#4636#*#*. Basically there are different technical information like IMEI number, signal strength, current location or network type. But there is also a very useful function for some situations to force the smartphone to switch to desired type networks (2G, 3G, LTE).
In conditions bad level The device tends to reset its 3G/LTE signal to 2G in order to save battery power and ensure subscriber availability. This behavior can be disabled. Open the service menu and in the “Set up preferred network type” item, select WCDMA only or LTE only. In the same way, you can switch your smartphone to 2G - GSM only. It will help if you need to save battery power and the Internet is rarely used. By the way, you can also disable the radio module there altogether (until the next reboot, of course). 
Smartphones based on Chinese MTK chips have their own and much more sophisticated service menu. His number is *#*#3646633#*#*. There is various system information and a huge number of tests, among which you can find several useful settings, such as adjusting the call volume or, for example, changing GPS/AGPS settings. The menu itself is terribly illogical and contains so much varied information that I don’t even dare to describe it, but will simply send the reader to three letters - XDA.
06. USE A STANDARD BROWSER
I don't know why users don't like Android's built-in browser so much. In my opinion, he is wonderful. Lightweight, fast, powered by the Chromium engine, can synchronize with a Google account (that is, it immediately includes all bookmarks and passwords from Chrome), but most importantly, it has a very convenient and almost ingenious navigation method. This is the so-called radial menu, which can be activated in the settings (only in Android 4.0–4.4).
07. MANAGE YOUR CONTACTS FROM YOUR COMPUTER
Google has web services not only for remotely installing software, blocking and searching for a smartphone, but also for managing contacts. All people's contacts ever saved and synchronized when connecting a new smartphone can always be found on the page google.com/contacts. They can be viewed, edited, added and deleted. Moreover, oddly enough, it is essentially part of Gmail.
08. MONITOR YOUR PROCESSOR LOAD
Android has a built-in feature that displays the current CPU load and currently active processes on top of the screen. In theory, it is intended for application and firmware developers and is hidden from ordinary users, but no one is stopping us from activating it. But first you will have to reach the “For Developers” settings section, which by default does not exist at all.
Go to settings, then “About phone”, find the line “Build number” and tap on it seven times in a row. The message “You have become a developer!” should appear on the screen. This means that the “For Developers” item is now open, and we go to it. We rewind almost to the very bottom of the screen and in the “Monitoring” section we find the “Show CPU load” switch.
Turn it on and see a list in the upper right part of the screen. The first line is the so-called loadavg, which shows the number of processes that had to run or wait their turn to run in the last minute, five and ten minutes. To put it very roughly: if these values, divided by the number of processor cores, are above one, this means 100% processor load in the last minute, five or ten minutes, respectively. Below is a list of the most power-hungry processes (essentially, an analogue of the top command from Linux).

09. USE ADB TO BACKUP SOFTWARE ON YOUR COMPUTER
We have already written more than once about a wonderful tool called ADB, which can significantly simplify managing a device from a computer for a person who is familiar with the console (here we are mainly talking about Linux, of course). In addition to the ability to install software, transfer files to a smartphone, view logs and other useful things, ADB has recently made it possible to backup all smartphone settings and applications.
To use this functionality, install the universal ADB driver (goo.gl/AzZrjR), then download ADB itself (goo.gl/3P7klM), install the driver, then expand the archive with ADB, connect the smartphone to the computer with a USB cable, launch command line and execute the command
A message will appear on the smartphone screen asking you to specify the encryption password for the backup - you can safely press “Next”. The application backup process will begin, which will affect both the APK packages themselves (the -apk flag in the command) and their settings. All applications from the memory card will also be included in the backup. You can restore a backup using the following command:
$ adb restore backup . ab |
10. DISABLE BACKGROUND DATA TRANSFER IN APPLICATIONS
Working in the background, applications can actively use the Internet for a variety of purposes, from updating their content to leaking information about your location. In addition, such activity in any case leads to increased battery consumption. 
Android has the ability to selectively restrict applications from transferring data in the background, but it is located in a place where most users would hardly ever look. To prevent any application from using the Internet in the background, you need to go to settings, then “Data transfer”, scroll down the screen to the list of applications actively using the network (for some it will be a surprise that it is there at all) and tap on the desired software. At the bottom there will be an option “Limit background mode" It is worth keeping in mind that the option will disable data transfer only via mobile network, so data will continue to flow over Wi-Fi.
11. USE THE SEARCH BAR
Often, smartphone owners Android based neglect the search bar at the top of the main screen. This is really logical, given the ability to search by typing a query into address bar any mobile browser.
Meanwhile, the search bar on your desktop does much more than just redirect your request to google.com. It allows you to search contacts, applications, calendar events, bookmarks and web browser history in automatic mode. With normal use of a smartphone, it may not be so useful, but when connected external keyboard it is an indispensable tool. Just click
12. USE SMART LOCK
Smart Lock is one of those features that you don’t think about, but once you try it, you can’t live without it. This is one of the most notable new products Android Lollipop and one of the most useful functions, added to Android recently. The idea of Smart Lock is extremely simple - it disables the PIN code or other lock screen protection if there is a specific Bluetooth device or map location nearby.
By default, Smart Lock is “sort of” disabled. That is, it does not light up anywhere, but after pairing with a new Bluetooth device (of any type), it will definitely offer to add it to its white list. After this you will forget about her again. But only until you enable lock screen protection in the “Security” section of the settings. Now it will work as it should.
Sami Smart settings Lock are in the same section, and, in addition to adding new Bluetooth devices, you can specify “safe places” there, and immediately with a list of options based on Google Now “observations”. By the way, if you disable it, as described in the first tip, then this functionality will also be lost.
13. SAVE ENERGY RIGHT
Another notable innovation from Lollipop is its power saving mode. IN standard Android it migrated from the firmware of smartphone manufacturers, who previously sold it independently. Now the function is in pure Android- you use your smartphone to the fullest, and when the battery charge reaches 15%, the system suggests turning on the power saving mode, which turns off background transmission data, reduces brightness to a minimum, disables some sensors and reduces screen rendering FPS to a couple of tens of frames per second. For clarity, the status bar and on-screen buttons at the bottom of the screen turn red - so you don’t forget.
To save battery life on a smartphone with an AMOLED screen, you can set black wallpapers and use apps with black backgrounds.
The energy saving mode is customizable. Go to “Settings → Battery → menu → Power saving mode.” Here you can specify a condition automatic switching on mode (though the choice is meager: 5%, 15% or never) and, most importantly, turn on the mode right now. Very convenient if you have a long trip ahead without the possibility of recharging.
14. MONITOR TRAFFIC
Most likely, smartphone manufacturers, as usual, will shovel standard interface Android 5.0 and everything will change (hello Samsung - the biggest fan of breaking interfaces), but in the standard Lollipop curtain, or rather, in the “second curtain” with  flasks quick settings There is one highlight. The data transfer button in the center does not switch data transfer at all, but expands into an interface that allows you not only to view the current traffic consumption, but also to disable data transfer using the switch on top.
15. SHARE NOT YOUR PHONE, BUT THE APPLICATION
Especially for those who like to give their phone to other people, Lollipop has a Screen pinning feature that allows you to lock your smartphone on one application without the ability to close it or switch to another. Like many other useful features, it is completely invisible and hidden quite deep in the settings. To activate, go to “Settings → Security”, scroll almost to the very end and turn on the “Block in application” option.

Now if you click the view button running applications(“Review”), at the bottom of the thumbnail current application A pushpin will appear. Once you tap the icon, the screen will be locked on the selected app and you will need to hold the Back and Overview buttons simultaneously to go back. In this case, you will have to enter a PIN code if it is set for the lock screen.
XX. USE ACITIVITY LAUNCHER
Any graphical Android application includes one or more so-called “activities”. Each of them is an application window (screen), for example the main screen or the settings screen, maybe even a file selection window. By default, you can open directly (from the desktop) only those activities that the application developer marks as main; the rest are accessible only through the application itself and only if the developer himself allows this.
However, having the right tool at hand, you can reach any other activity of any application and even create a shortcut for it on the desktop. Activity Launcher does just that. Just install the application, select “All actions” in the menu at the top and find the software you need. All of her activities will appear on the screen, and any of them can be opened with a simple tap or placed on the desktop by holding your finger for a long time.
An example of useful “internal” activities is the Chrome bookmarks window (Chrome →Bookmark), access to the hidden AppOps mechanism in Android< 4.4.2 (Настройки → AppOps), запуск поиска в TuneIn Radio (tunein.ui.activities.TuneInSearchActivity). Очень много активностей имеет в себе ES Проводник, включая редактор, music player, image viewer and much more. Any of them can be launched directly from the desktop. In the same way, you can open any section of the settings and gain access to some OS functions that are difficult to reach. This is completely legal functionality and does not require root.
Android has a large set of hotkeys for connected keyboards. You can use Arrow, Tab, and Enter to navigate the desktop and various menus. In addition, the following key combinations are available:
Esc - “Back” button;
Win + Esc - Home button;
Ctrl + Esc - “Menu” button;
Alt + Tab - switch between applications;
Ctrl + Space - switch layout;
Ctrl + P - open settings;
Ctrl + M - manage installed applications;
Ctrl + W - change wallpaper;
Win + E - write a letter;
Win + P - music player;
Win + A - calculator;
Win + S - write SMS;
Win + L - calendar;
Win + C - contacts;
Win + B - browser;
Win + M - google maps;
Win + Space - search;To find out your MAC and IP address, go to “Settings → Wi-Fi → menu → Advanced
new functions.” MAC and IP will be at the very bottom.Lollipop has a built-in Flappy Bird style game. Go to “Settings → About phone”,
Tap on the “Android Version” item several times, then hold your finger on the “Lollipop” that appears. Let's play.Google Now supports large number Russian-language voice commands. All of them can be divided into two groups: voice search and the voice commands themselves. Voice search allows you to perform an intelligent search on Google, when the system displays a specific answer on the screen instead of a list of links, and voice commands allow you to perform certain actions, for example, send an SMS or set an alarm. The list of commands is shown in the image " Voice commands Google Now." Voice search includes more than a dozen various types questions:
Weather. What will the weather be like tomorrow morning?
Addresses. Where is the nearest pharmacy?
Flight information. When does Aeroflot flight number 2336 depart?
Time. What time is it in London?
Events. When is sunset today?
Computing. What is equal to square root from 2209?
Translation. How do you say "cucumber" in Spanish?
Sport. When does Spartak play?
Finance. What is the S&P 500 index today?
Facts. What is the height of the tallest building in the world?
Exchange rates. Convert 2600 rupees to US dollars.
Images. Show photos of the Golden Gate Bridge.
Interestingly, Google Now understands a large number of much less obvious questions in English. As an example we can give:
Should I wear a jacket today?
How much tip for 420 rubles?
Where is my package?
This, of course, is not all that could be talked about, but it will not be possible to lengthen the article, and many of the other possibilities are already known. Don't forget about these tricks, and your smartphone will become
a little more convenient. at January 26, 2017.
Few people know, but Android 6.0 Marshmallow, in addition to the developer menu, contains one more hidden settings screen- System UI Tuner. Using it, the user can slightly customize the system interface and even launch a demonstration mode.
For activation System UI Tuner just pull out the quick settings curtain and hold down the gear that opens global settings. It will begin to rotate, and after that a notification will appear congratulating you on adding a new item; you should look for it in the “System” section.


At logging into System UI Tuner A message immediately pops up warning that the options hidden in this menu are not for everyone and activating them can lead to negative consequences. These settings cannot be called extensive, because they only have four items: “Quick Settings”, “Status Bar”, “Show battery level as a percentage” and “Demonstration”.


The most useful for the user, of course, is the first one, because it allows you to rearrange and add items in the quick settings curtain. The process is extremely simple and self-explanatory, including removing options. “Status Bar” allows you to hide the display of any indicator in this line, and there are a lot of them. The name of the third item speaks for itself, and the fourth launches a special demo mode of the system. The latter is designed for app explorers who frequently take screenshots - it always keeps the time and battery level the same, and pop-up notifications are disabled.
Judging by the presence of a hidden System UI Tuner, Google engineers are thinking about giving the user the opportunity deeper customization of the bare Android interface. Apparently, they are aware of the significant lag in this area of their own shell compared to third-party ones, but this does not mean that the company will ultimately decide to take such a step.